
Akai MPC Studio Setup Guide
In this guide, we will show you how to get up and running with the Akai Professional MPC Studio for the first time. Follow the sections below to get started.
Register the MPC Studio
Before you start using the MPC Studio, you need to register the device on the Akai Professional website. By doing so, you’ll be able to access all of the bundled software, including the MPC Studio DAW, a bundle of virtual instruments, vocal and effects plug-ins, and free MPC Beat Packs. Keep your Sweetwater invoice handy, as you’ll need it during the registration process.
- Log in to your inMusic account. If you don’t have one, click Create Account, then fill out the necessary information.
- On your account home page, click REGISTER NEW PRODUCT, enter the serial number, which is located on the bottom of the unit, the back of the MPC Studio owner’s manual, and the side of the box.
- Click CHECK SERIAL, fill out the required information, then click REGISTER YOUR PRODUCT.
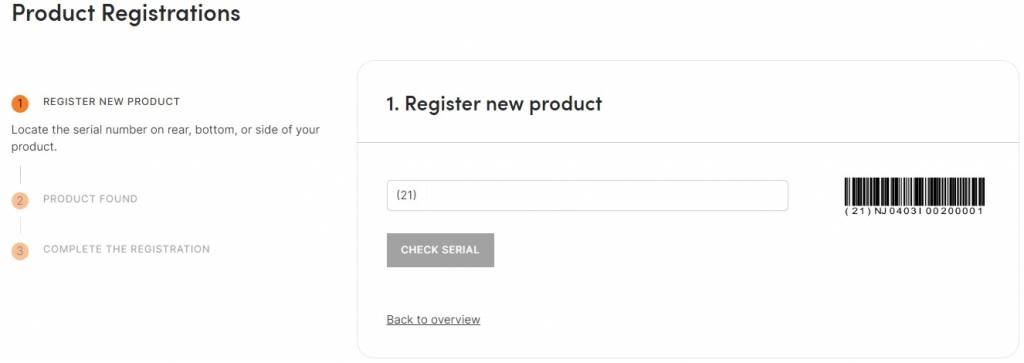
Click the image to register your MPC Studio
Download and install the software
Once you’ve registered the MPC Studio, you’ll be able to download and install the bundled software. Your software activation keys and installers are all located in the MPC Software Manager, which you can download from your Akai account page.
iLOK ACCOUNT: If you are registering any of the AIR Instrument virtual instruments, then you will need to create a free iLok account during the activation process. Check out our AIR Software Activation Instructions for more information!
- Expand the MPC Studio 2 Installer, located in the Software Downloads section of your Akai account page, and choose the installer for your OS.
- Navigate to your Downloads folder and launch the MPC Studio Software Manager.
- Follow the on-screen instructions.
- Once prompted, click I have an iLok Account. If you don’t have one yet, keep this tab open and head over to our iLok Setup Guide to learn how to create one.
- Install the driver and firmware by clicking their respective Install buttons.
- Install the MPC 2 software. When prompted, enter the activation code, which you can find when you click Get Activation Code.
Installing the additional synth content
When you first launch the MPC Studio DAW, you’ll receive a notification about your free additional synth software.
- Navigate to the top toolbar and click MPC, then click Get Synth Content. This will download the MPC Synth Content installer.
- Close MPC Studio, then run the Synth Content installer. Once complete, relaunch the MPC Studio DAW.
How to Set Up Your MPC Studio Controller & Software
Setup and connections
Now that you’ve taken care of the registration and software installation process, let’s show you how to get set up and connected! Akai Professional has made the hardware connection process straightforward. Just use the included USB cable to connect it to your computer, then use the 5-pin MIDI to TRRS adapters to connect MIDI devices.
CONNECT DIRECTLY TO YOUR COMPUTER! The MPC Studio is bus powered, which means no external power supply is necessary. However, we strongly recommend connecting the MPC directly to your computer, as USB hubs (mainly passive ones) may not have enough power for a stable USB connection.
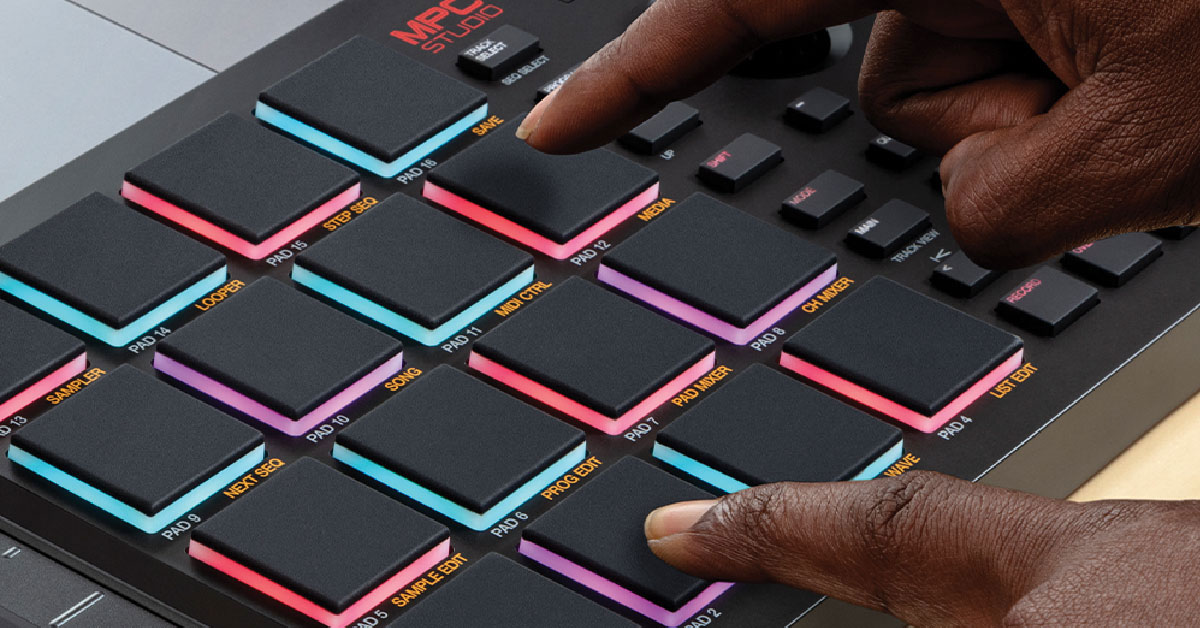
How to Navigate Your MPC Studio Controller
How to create a beat
Recording a beat is very easy using your MPC Studio in the MPC Studio DAW. Just pick the instruments you want on each track, then start recording! One great thing is that you can overdub tracks. This is particularly useful for trap beats where the hi-hats have a more complex pattern.
Load an instrument
You can load a drum kit (Program), an instrument (Preset), templates that you created on previously created songs (Project), factory Sequences, and lastly, Samples.
- Open the Media Browser to pull up any installed expansion libraries.
- Alternatively, you can press the B key on your keyboard to open the Media Browser.
- Select the expansion library of your choosing, and then load the instrument type (Program, Preset, Project, Sequence, Sample).
- Press the Browse button on your MPC Studio and use the data wheel to scroll through, preview, and select the kit/instrument/sample you want to use.
- Once you’ve found something you like, press the data wheel to load it onto a track, then press the Main button to begin playing.
- If you’d like to load an additional instrument on the same track, follow the same procedure. Once loaded, press the Program Select button and use the data wheel to switch between the instruments.
- Press the Track Select button and follow the steps above to insert an instrument on a new track.
Replacing individual samples
You can easily replace individual samples on an instrument. The process is straightforward, too!
- Click the Sample button in the MPC software, then follow steps 1–3 as outlined above to browse the samples.
- Once you find the sample you want, press the pad you wish to assign it to, then press the data wheel to load it into memory.
How to Browse the MPC Studio Sounds & Drum Samples
Record a beat
Once you have all of your instruments loaded into memory, it’s time to create a beat! One of the great things about the MPC Studio is that everything is done right on the hardware, so there isn’t a need to stop a recording to select a new track or to re-record.
- If you haven’t already, enter the main menu by pressing the Main button.
- Hold down the Tap Tempo button and use the data wheel to choose the project tempo.
- Press the Record button to arm the track, then press the Play button to begin recording.
- Arm the track and press the Play Start button to record along with a click track.
- Once the recorded sequence plays through once, Overdub will automatically be enabled. Stop recording by pressing the Overdub button or the Stop button.
- To record on the next track, use the data wheel to switch tracks, then follow the same procedure.
- If you want to erase a specific note/instrument pattern (e.g., a snare drum), then stop recording, begin playback, then press and hold both the Erase button and the pad the sample is assigned to.
How to Make a Beat on MPC Studio
Additional resources
Akai MPC Studio Academy
When you need help, Sweetwater has the answers!
Our knowledge base contains over 28,000 expertly written tech articles that will give you answers and help you get the most out of your gear. Our pro musicians and gear experts update content daily to keep you informed and on your way. Best of all, it’s totally FREE, and it’s just another reason that you get more at Sweetwater.com.


Offer applies only to single-receipt qualifying purchases. Select manufacturers may require that only the manufacturer’s products qualify towards the minimum purchase amount needed to be eligible for promotional financing. Otherwise, an invoice that meets the minimum purchase amount and contains at least one qualifying manufacturer product is eligible for promotional financing. No interest will be charged on promo purchase balance, and equal monthly payments are required on promo purchase until it is paid in full. The payments equal the amount financed divided by the number of months in the promo period, rounded up to the next whole dollar. These payments may be higher than the payments that would be required if this purchase was a non-promo purchase. During the last month(s) of the promo period the required monthly payment may be reduced due to the prior months’ rounding. Regular account terms apply to non-promo purchases. New Accounts as of 07/31/2025: Purchase APR is 34.99%. Penalty APR is 39.99%. Min Interest Charge is $2. Existing cardholders: See your credit card agreement terms. Subject to credit approval.
Offer applies only to single-receipt qualifying purchases. No interest will be charged on the promo balance if you pay it off, in full, within the promo period. If you do not, interest will be charged on the promo balance from the purchase date. The required minimum monthly payments may or may not pay off the promo balance before the end of the promo period, depending on purchase amount, promo length and payment allocation. Regular account terms apply to non-promo purchases and, after promo period ends, to the promo balance. New Accounts as of 07/31/2025: Purchase APR is 34.99%. Penalty APR is 39.99%. Min Interest Charge is $2. Existing cardholders: See your credit card agreement terms. Subject to credit approval.
The estimated required monthly payment shown which excludes taxes and delivery equals the amount financed divided by the number of months in the promo period, rounded up to the next cent. During the last month(s) of the promo period the required monthly payment may be reduced due to this rounding. These payments apply only with the financing offer shown. If you make these payments by the due date each month, you should pay off this amount financed within the promo period, if it is the only balance you are paying off. If you have other balances on your account, this payment will be added to any other minimum monthly payments.
Applies only to select items from this manufacturer. Ask your Sweetwater Sales Engineer for more details.