
Akai Fire Quickstart Guide
How to use this guide
In this guide, we will get you started with the Akai Fire. That means we’ll show you how to connect and configure it within FL Studio, explain the different modes, and create a song. Follow the sections below to get started.
Getting Started with the Fire
We’ve created this getting started guide so you can enjoy making music right away. The Fire includes a free copy of FL Studio Fruity edition, so before you dive in, visit our FL Studio activation instructions. Once downloaded and installed, we’ll begin by getting the hardware connected and configured within FL Studio. After that, we’ll show you how to create your first song.
Register the device
Before you can get the Fire, you’ll first need to register the device so you can get a free license for FL Studio Fruity Edition. Just create an account, then download, register, and install FL Studio. Follow these steps to get started.
1. Log into your Akai Pro account. If you haven’t created one, do so here.
2. Navigate to My Account at the top of your account page, then click Register My Product.
3. Fill out the registration page using the serial number located underneath the unit. Keep your Sweetwater invoice handy as it will also ask you the purchase date.
4. Click Register My Product. You will then be redirected back to your account page. Under the Included Software box, click the Redeem Now link under FL Studio Fruity Fire Edition.
5. Follow our activation instructions to register and install FL Studio.
Configure it in FL Studio
Connecting the Akai Fire is simple. Just plug the unit into an available USB port on your computer, then launch FL Studio. Since the Fire is class-compliant, no additional driver software is necessary. Follow these steps to get it connected in FL Studio.
1. Connect the Fire to an available USB port, then launch FL Studio.
2. Navigate to the Options menu and make sure Enable MIDI remote control is enabled.
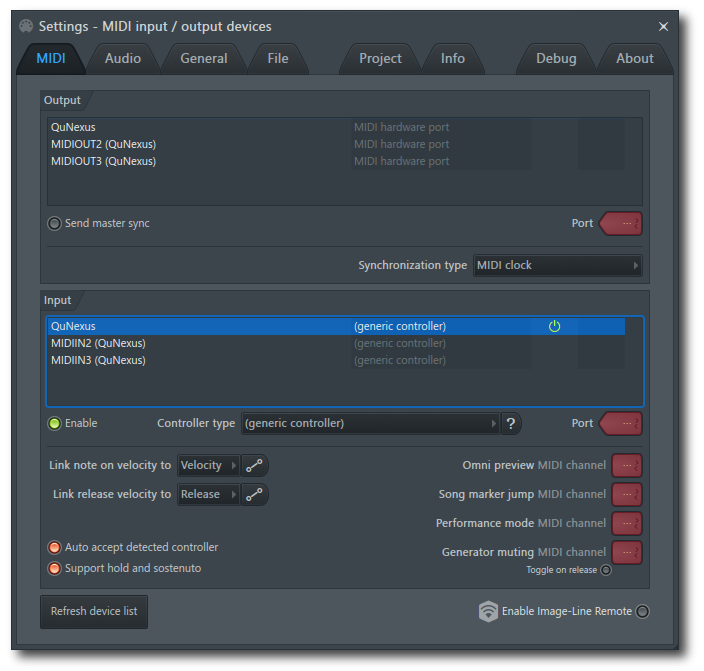
3. Go back to Options then select MIDI settings. Select the MIDI Input section, then select Fire and click Enable.
- Note: Some computers may list the Fire as USB Audio Device (generic controller).
4. Confirm that the Fire is sending MIDI signal by pressing a few buttons and looking at the MIDI activity light located on the top left part of the screen.
Are you using a different DAW?
The Fire works natively with FL Studio, but you can use it as a generic MIDI controller with a different DAW. You’ll need to enable it manually. For further information, check out our DAW quickstart guides for Pro Tools, Cubase, Ableton Live, and Reason.
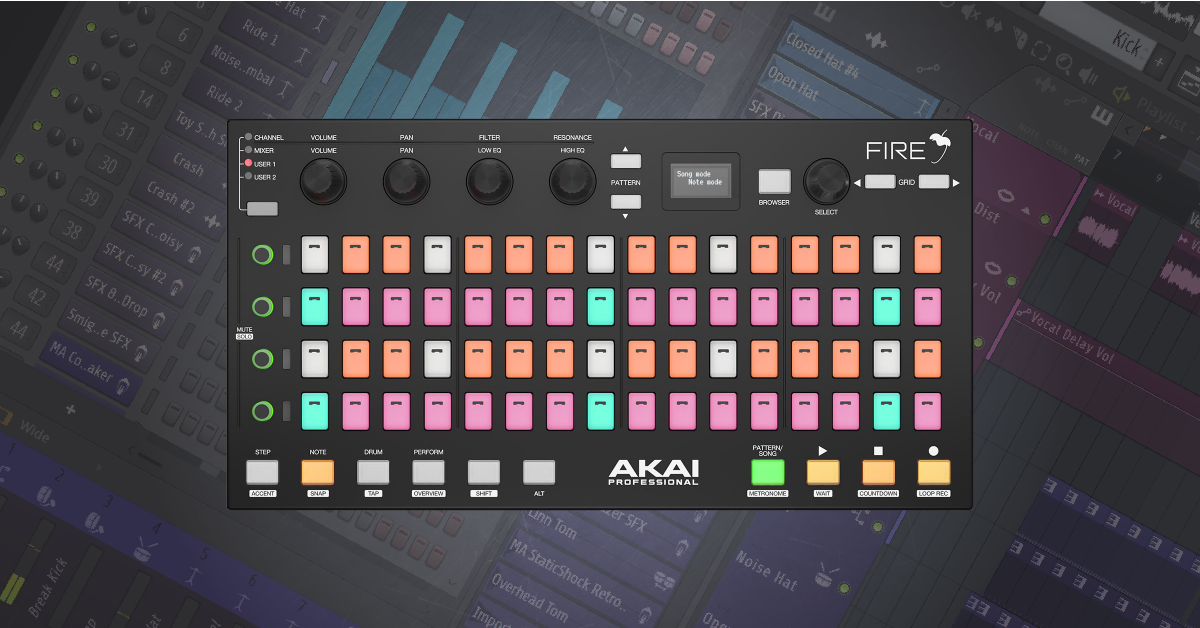
Basic controls
The Fire has many different functions which control almost every aspect within FL Studio. We’ve laid out the basic controls for you in the diagram below. For a detailed list of shortcuts, view the Fire’s ‘Cheat Sheet’.
-
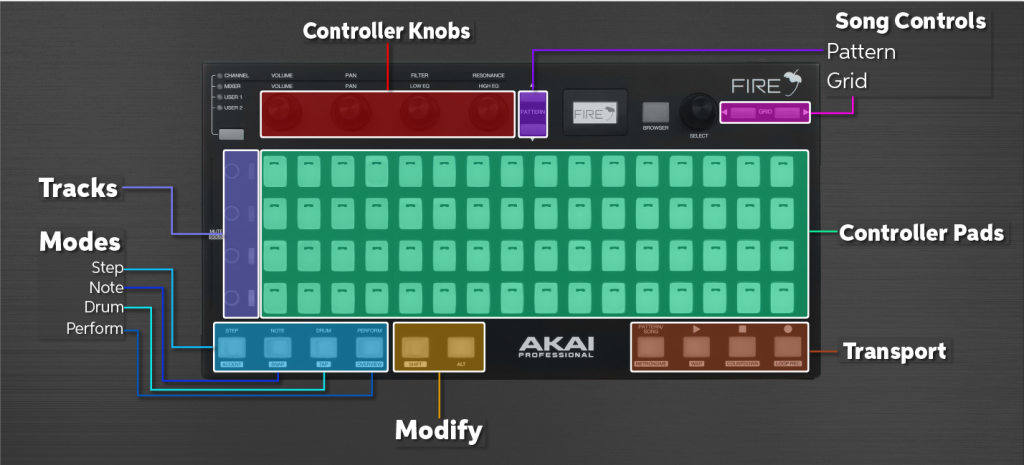
- Sections of the Fire.
CAP: Sections of the Fire
Controller Knobs
The controller knobs allow you to adjust parameters like volume, panning, and EQ sweeps. Holding Alt plus adjusting a knob will change that parameter for an individual instrument.
Song Controls
- The Pattern buttons allow you to scroll between available patterns within your song.
- The Grid buttons will let you extend or shorten the length of your track.
Modify
The Modify section includes the Shift and Alt keys. By holding one of these down while pressing a function pad, it allows you to work with the secondary mode of that pad.
Transport
The Transport section allows you to stop, play, and record your song. By holding Shift, you can access other parameters like turning the metronome on or loop record.
Modes
- Step Sequencer mirrors the Channel Rack window where you will trigger each step (beat).
- Note mode turns the controller pad into a MIDI keyboard. The Green pads indicate the octave, the white pads indicate the white keys on a keyboard, and the orange keys indicate the black keys on a keyboard.
- Drum mode is for when you use a drum sampling plug-in such as FPC.
- Performance mode is for live performance where you can play, remix, or edit songs on the fly.
Controller pads
Pressing one of the controller pads will activate or deactivate a beat (step) on the channel that’s selected.
Channel
The channel section is a group of four channels within the Channel Rack. Pressing the channel button will mute it while holding Alt then pressing a channel button will select it.
Tracks
There are three sections within the Track section; toggle between patterns with the Patterns buttons, adjust the size of the pattern’s grid using the Grid buttons, and select groups of channels with the Select knob.
Creating with the Fire
Now that you know how to get it configured and what each section of buttons and knobs do, let’s create a song.
Creating a song
When you first launch FL Studio, there will be an empty project with four channels in the Channel Rack section. Follow these steps to create a song.
1. Select a sample by holding Alt and pressing the respective channel button. Alternatively, you can hold Alt and use the Select knob to scroll through the channels.
2. Press the Step button to go into the Step Sequencer mode. This mode mirrors the channel rack window.
3. Press the controller pads which you’d like to trigger the sample on each step (beat). By default, there are 16 steps per measure. To add more, press the RIGHT grid button and fill in the steps.
4. Press Play to preview the beat.
Want to record live?
If recording a track such as a synth lead or bass, enter Note mode by pressing the Note pad. The same goes for drums, but you’ll need to enter Drum mode by pressing the Drum pad. Once selected, press the Record pad, then press the Play pad.
Loading and replacing samples
You can preview and load instruments and samples located within the Browser window of FL Studio. To navigate through this, press the Browser button and use the Select dial to scroll up and down. Follow these steps to preview and load an instrument.
1. Press the Browser pad to switch to the Browser window then use the Scroll knob to scroll up or down.
2. Press the Scroll knob to open the list of samples in the selected folder then use the scroll knob to select the sample.
3. Press the RIGHT Grid button to preview the sample.
4. Press the Scroll knob to open the sample options menu. To replace an existing sample, select Send to selected channel or focused plug-in. To create a new channel, select Open new channel.
Is the sample menu not opening?
If FL Studio isn’t the active program on your computer, you can scroll up and down, but the sample menu won’t open when pressing the Scroll knob.
Related Content
Making Beats with FPC
Mixing with Fire
Controlling and Recording Automation
Assigning and Controlling Parameters
When you need help, Sweetwater has the answers!
Our knowledge base contains over 28,000 expertly written tech articles that will give you answers and help you get the most out of your gear. Our pro musicians and gear experts update content daily to keep you informed and on your way. Best of all, it’s totally FREE, and it’s just another reason that you get more at Sweetwater.com.


Offer applies only to single-receipt qualifying purchases. Select manufacturers may require that only the manufacturer’s products qualify towards the minimum purchase amount needed to be eligible for promotional financing. Otherwise, an invoice that meets the minimum purchase amount and contains at least one qualifying manufacturer product is eligible for promotional financing. No interest will be charged on promo purchase balance, and equal monthly payments are required on promo purchase until it is paid in full. The payments equal the amount financed divided by the number of months in the promo period, rounded up to the next whole dollar. These payments may be higher than the payments that would be required if this purchase was a non-promo purchase. During the last month(s) of the promo period the required monthly payment may be reduced due to the prior months’ rounding. Regular account terms apply to non-promo purchases. New Accounts as of 07/31/2025: Purchase APR is 34.99%. Penalty APR is 39.99%. Min Interest Charge is $2. Existing cardholders: See your credit card agreement terms. Subject to credit approval.
Offer applies only to single-receipt qualifying purchases. No interest will be charged on the promo balance if you pay it off, in full, within the promo period. If you do not, interest will be charged on the promo balance from the purchase date. The required minimum monthly payments may or may not pay off the promo balance before the end of the promo period, depending on purchase amount, promo length and payment allocation. Regular account terms apply to non-promo purchases and, after promo period ends, to the promo balance. New Accounts as of 07/31/2025: Purchase APR is 34.99%. Penalty APR is 39.99%. Min Interest Charge is $2. Existing cardholders: See your credit card agreement terms. Subject to credit approval.
The estimated required monthly payment shown which excludes taxes and delivery equals the amount financed divided by the number of months in the promo period, rounded up to the next cent. During the last month(s) of the promo period the required monthly payment may be reduced due to this rounding. These payments apply only with the financing offer shown. If you make these payments by the due date each month, you should pay off this amount financed within the promo period, if it is the only balance you are paying off. If you have other balances on your account, this payment will be added to any other minimum monthly payments.
Applies only to select items from this manufacturer. Ask your Sweetwater Sales Engineer for more details.