
9 Fixes for Pro Tools -9073 Errors
Overview
Sweetwater’s Tech Support team handles thousands of calls each week which means we’ve seen our fair share of error messages. Over the years, we’ve learned tons of great solutions to common problems and in this article we’ll share our 9 best fixes for Pro Tools 9073 error messages.
There’s a lot of different things that can cause a 9073 error but it’s usually something simple like a setting in Pro Tools or a recording drive that doesn’t have enough free space. These 9 fixes will resolve all of the most common causes for Pro Tools -9073 error messages.
1. Check System Requirements
Before we dive into troubleshooting, let’s start by making sure that your computer meets or exceeds the system requirements for your version of Pro Tools. No amount of troubleshooting will fix an incompatibility so make sure the version of Pro Tools you are running is compatible with your operating system. You can check the Pro Tools computer requirements here and the Pro Tools operating system compatibility requirements here.
2. Close Applications Besides Pro Tools
Applications that are running in the background will use memory and processing power that could otherwise be used by Pro Tools. Quitting as many applications as possible will keep them from bogging down your computer –just be sure to save first. We don’t want you losing anything.
3. Adjusting Buffer and Cache Size
Buffer size is the amount of time needed for audio to be processed before it is sent to your speakers. By going to your Playback Engine and setting your buffer size effectively, you can eliminate the possibility of -9073 errors. If you are unsure of which sample size to pick, read Which Buffer Size Should I Choose in my DAW?
Cache is temporary computing storage so that data can be quickly accessed. Setting the cache size to Normal or even a little above that, will allow Pro Tools playback to be a little more responsive. Follow the instructions below to adjust the buffer and cache size in Pro Tools’ Playback Engine.
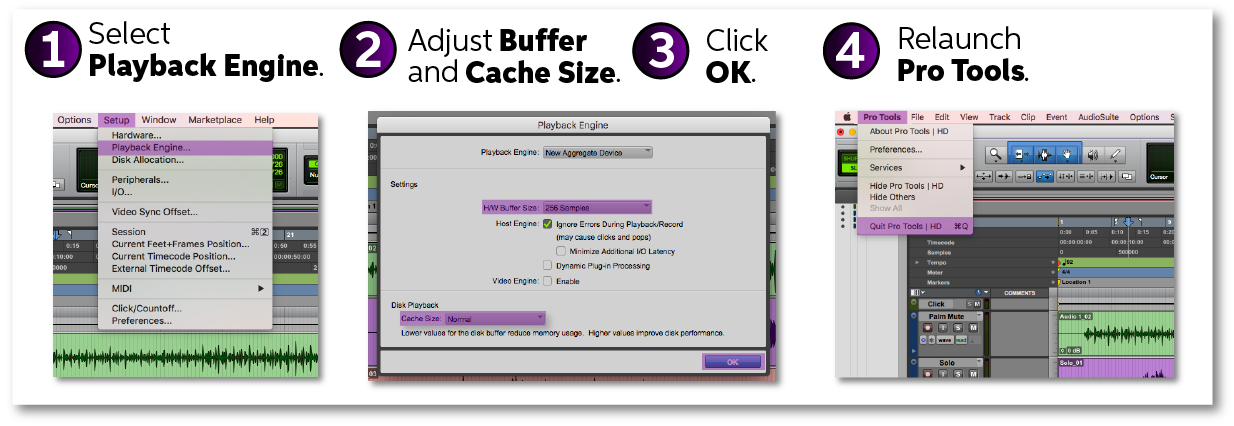
How to Adjust Buffer and Cache Size
1. Go to the Setup tab and select Playback Engine…
2. In the Playback Engine window, adjust the following:
- Under the Settings section, adjust the H/W Buffer Size.
- Under the Disk Playback section, increase the Cache Size.
3. Click OK.
4. Close and relaunch Pro Tools.
4. Types of Hard Drives and USB Hubs
The type of hard drive you use can affect the performance of Pro Tools. When working in Pro Tools, a solid state or 7,200 RPM hard drive is essential. Bus-powered hard drives (powered solely by the ports on your computer) can also be detrimental to your computer’s performance. Therefore, we recommend using powered drives (hard drives that have its own power supply).
Similarly, if your interface is connected to a USB hub, it may not provide enough power for your interface. This is especially true with hubs that do not use their own power adapter (passive hubs). Try using a USB hub with its own power supply or reconfiguring your USB connections so that the interface is connected directly to your computer.
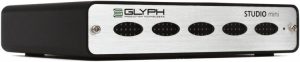
Hard drives such as the Glyph 1TB Studio Mini (pictured above) are highly recommended when working with Pro Tools.
5. Disable Time Machine (Mac only)
If you’re a Windows user, you can skip this one. Mac users, this one is for you!
Time Machine is a Mac application that automatically backs up your files. However, this app can cause problems when it comes to audio recording. If Time Machine begins a backup while you are recording, it will use resources and processing power normally allocated to Pro Tools. It’s a good idea to disable automatic Time Machine backups. We still recommend doing lots of backups but do them when it works for your schedule.
How to Disable Time Machine
1. Go to Finder.
2. Select Applications and choose System Preferences.
3. At the bottom of the window, click Time Machine.
4. Uncheck the Back Up Automatically check box.

6. Partition Your Hard Drive
Partition means to “divide something into parts.” So when referring to “partitioning a hard drive,” all it means is that you need to split the hard drive into sections. Partitioning large drives into volumes no larger than around 9 gigs in size can help prevent fragmentation.
If you do not know how to partition a hard drive, take a look at these articles by LifeWire that will walk you through how to partition a hard drive on Windows and Mac.
7. How to Disable Spotlight Indexing (Mac only)
Spotlight Indexing is Apple’s internal search engine for your computer. It is constantly indexing the documents, images, applications, etc that you use so that when you search on the Spotlight Index, it can quickly generate the most applicable results for you.
However, this has been known to cause AAE or DAE -9073 errors in Pro Tools and disabling this feature often fixes it. Follow the steps below to disable Spotlight Indexing.
How to Disable Spotlight Indexing
1. Open System Preferences.
2. Choose Spotlight.
3. Click on the Privacy pane.
4. Use the + (Add button) to add folders or disks to the list.

8. Bounce Your Beat Detective Tracks
Beat Detective is a feature on Pro Tools that allows you to clean up and solidify your drum tracks. Within the Beat Detective window, you can edit your drum tracks so they are played in time as well as the ability to add crossfades and other effects to your tracks.
However, if your session is already using a lot of processing power, running Beat Detective could push it over the edge and cause a 9073 error. To fix this, find the tracks that were edited the most with Beat Detective and bounce them to a disk. Then, replace the original regions with the bounced files. That will free your computer up to process other things like plug-ins instead of the edits. Just keep in mind that any plug-ins on your tracks will get bounced to disk too so you may want to bypass them before bouncing to disk.
Here’s a step-by-step that will show you how to bounce Beat Detective tracks:
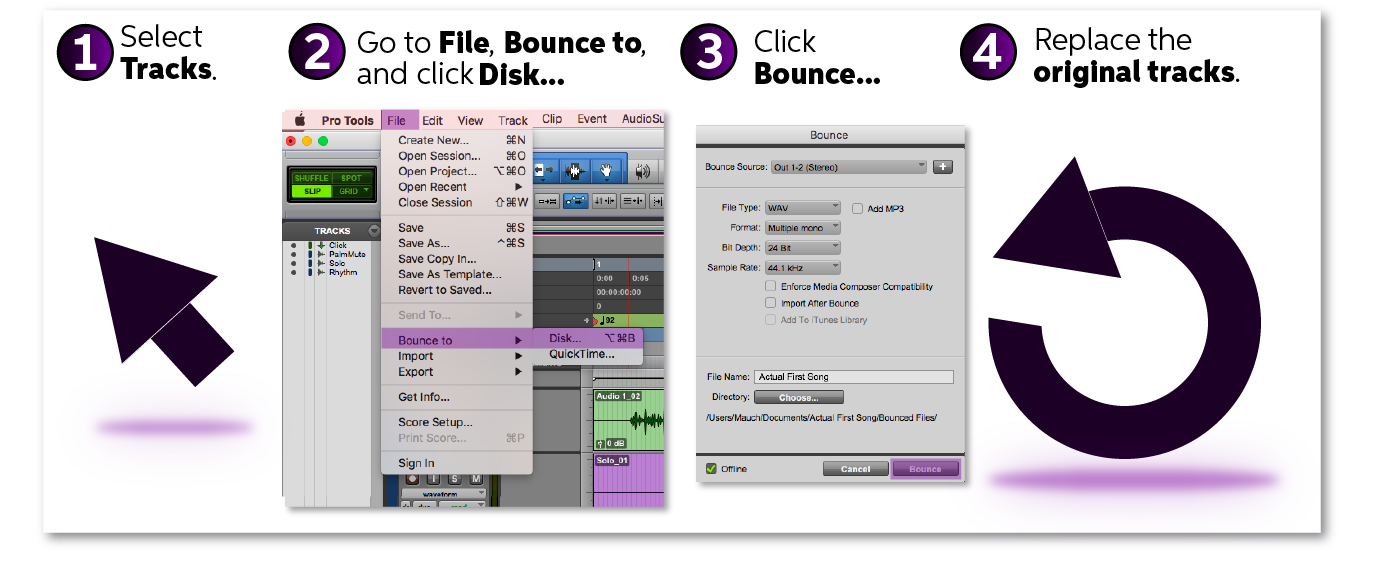
How to Bounce Beat Detective Tracks to Disk
1. Choose tracks that were heavily edited using Beat Detective.
2. Go to File, select Bounce to, and click Disk…
3. Adjust settings as necessary and click Bounce…
4. After the file has bounced, replace the original tracks with the new bounced file.
9. Limit Recording Allocation (Pro Tools 9 and earlier)
Another way to mitigate this 9073 error is to limit the recording allocation. By doing this, you are telling Pro Tools the maximum length you would ever record. This helps prevent fragmentation and allows Pro Tools to write data onto your drive slightly faster. Follow the instructions below to limit recording allocation.
How to Limit Recording Allocation
1. In Pro Tools, click the Setups tab.
2. Then, click Preferences…
3. In the Operation tab, adjust your Open Ended Record Allocation.
Note: Select the longest time you would ever run a track for. For example, if you’re recording a 45 minutes band practice, select Limit to 60 minutes.
Wrapping up…
At this point, Pro Tools should be up and running smoothly. If not, check common solutions like Trashing Pro Tools Preferences and our Pro Tools Troubleshooting Guide for more help.
Helpful Links
How to Activate & Authorize Avid’s Pro Tools 12 & 2018
How do I trash my Pro Tools preferences?
Mac Optimization Guide for macOS 10.13 High Sierra
PC Optimization Guide for Windows 10
How to Configure Pro Tools 12 & 2018 Audio & MIDI Settings
When you need help, Sweetwater has the answers!
Our knowledge base contains over 28,000 expertly written tech articles that will give you answers and help you get the most out of your gear. Our pro musicians and gear experts update content daily to keep you informed and on your way. Best of all, it’s totally FREE, and it’s just another reason that you get more at Sweetwater.com.

