
Zoom LiveTrack L6max Digital Mixer Quickstart Guide

NOTE: This guide is for the Zoom LiveTrak L6max. We also have a guide for the original Zoom LiveTrak L6.
The Zoom LiveTrak L6max is a compact, 12-channel digital mixer, a standalone 14-track audio recorder, and a 12-in/4-out USB audio interface. Easily integrated into your live performance setup, it can also be battery powered. It’s got four channels of 32-bit float A/D conversion that lets you record anything from the quietest to the loudest signals with no need to set input gain. You can access advanced functions on the LiveTrak 6max’s display screen or on the L6 Editor app on your computer. Let’s get started.
- Difference Between the Zoom LiveTrak L6 & L6max
- What Is 32-bit Float Audio Recording?
- Scan the QR Code for the Quick Tour & Owner’s Manuals
- Powering up the Mixer & Formatting a microSD Card
- Setup & Connections
- Using the Controls to Set up a Mix
- Recording on the Zoom L6max
- Using the L6max as an Audio Interface
- The Display Screen & the Zoom L6 Editor App
Difference Between the Zoom LiveTrak L6 & L6max
The Zoom LiveTrak L6max, as the name indicates, expands on the features of the LiveTrak L6. These are their differences:
The LiveTrak L6 has 10 channels with two mic preamps, provides 12 tracks of recording, and can save three scenes. The L6 doesn’t have a display screen. While it’s possible to set certain parameters with button presses, it’s designed for parameter and system settings to be configured on the Zoom L6 Editor app on your computer.
The LiveTrak L6max has 12 channels with four mic preamps and provides 14 tracks of recording. The L6max also adds overdubbing with a stereo mixdown “bounce” function. It can save four scenes. The L6max provides a sub-out in addition to the master output. The L6max has a display screen with menus for configuring most functions right on the unit, although it’s convenient to make the same settings using the Zoom L6 Editor app.
What Is 32-bit Float Audio Recording?
Channels 1–4 on the L6max can capture audio in 32-bit float resolution when you record directly to a microSD card or when you use the L6max as an audio interface to your computer with a DAW that supports 32-bit float. There’s no need to set the input gain on these four channels before recording because they have dual analog-to-digital converters configured to capture an extremely wide dynamic range.
When you edit the 32-bit float audio files in your DAW, you can adjust the gain after the fact to get the levels into the range where you can mix them with your other tracks.
Learn more in the L6max Operation Manual > L6max Overview > Realizing high audio quality while mixing.
Learn more in the Zoom support article: “32-Bit Float: Everything You Need to Know.”
Scan the QR Code for the Quick Tour & Owner’s Manuals
The L6max packs a lot of connections, controls, and functions into a desktop form factor. We’ll give you an overview, but you’ll need Zoom’s owner’s manuals for reference.
Inside the lid of the box, you’ll find a QR code. Scan it, and you’ll be directed to this page with the following links:
- Zoom L6max Quick Tour video
- Zoom L6max LiveTrak Quick Tour manual
- Zoom L6max Operation Manual PDF
- Zoom L6max Operation Manual HTML, which you can bookmark and view in your browser.
Here’s the Quick Tour video.
ZOOM L6max Quick Tour
Powering up the Mixer & Formatting a microSD Card
The L6max supports microSDHC and microSDXC memory cards. Find the list of compatible cards on the LiveTrak support page.
Always format a memory card on the L6max before use. Formatting will erase all data, so check the contents of the card on your computer and back up any data before formatting.
- Always turn off the power on the L6max before inserting or removing a microSD card.
- Open the card slot and insert the card. (To remove the card, push it further into the slot, and the spring-loaded mechanism will pop out the card.)
- Connect the provided Zoom USB power adapter to the USB-C port labeled “DC5V” on the side of the unit.
- Press the Power button on the L6max.
- Press the Menu button beneath the display screen.
- Use the back and forward buttons to select “SD Card” and press the fourth button (labeled with a check mark) to confirm.
- Under “Format,” use the buttons to select “Execute” and press the fourth button to confirm.
Setup & Connections
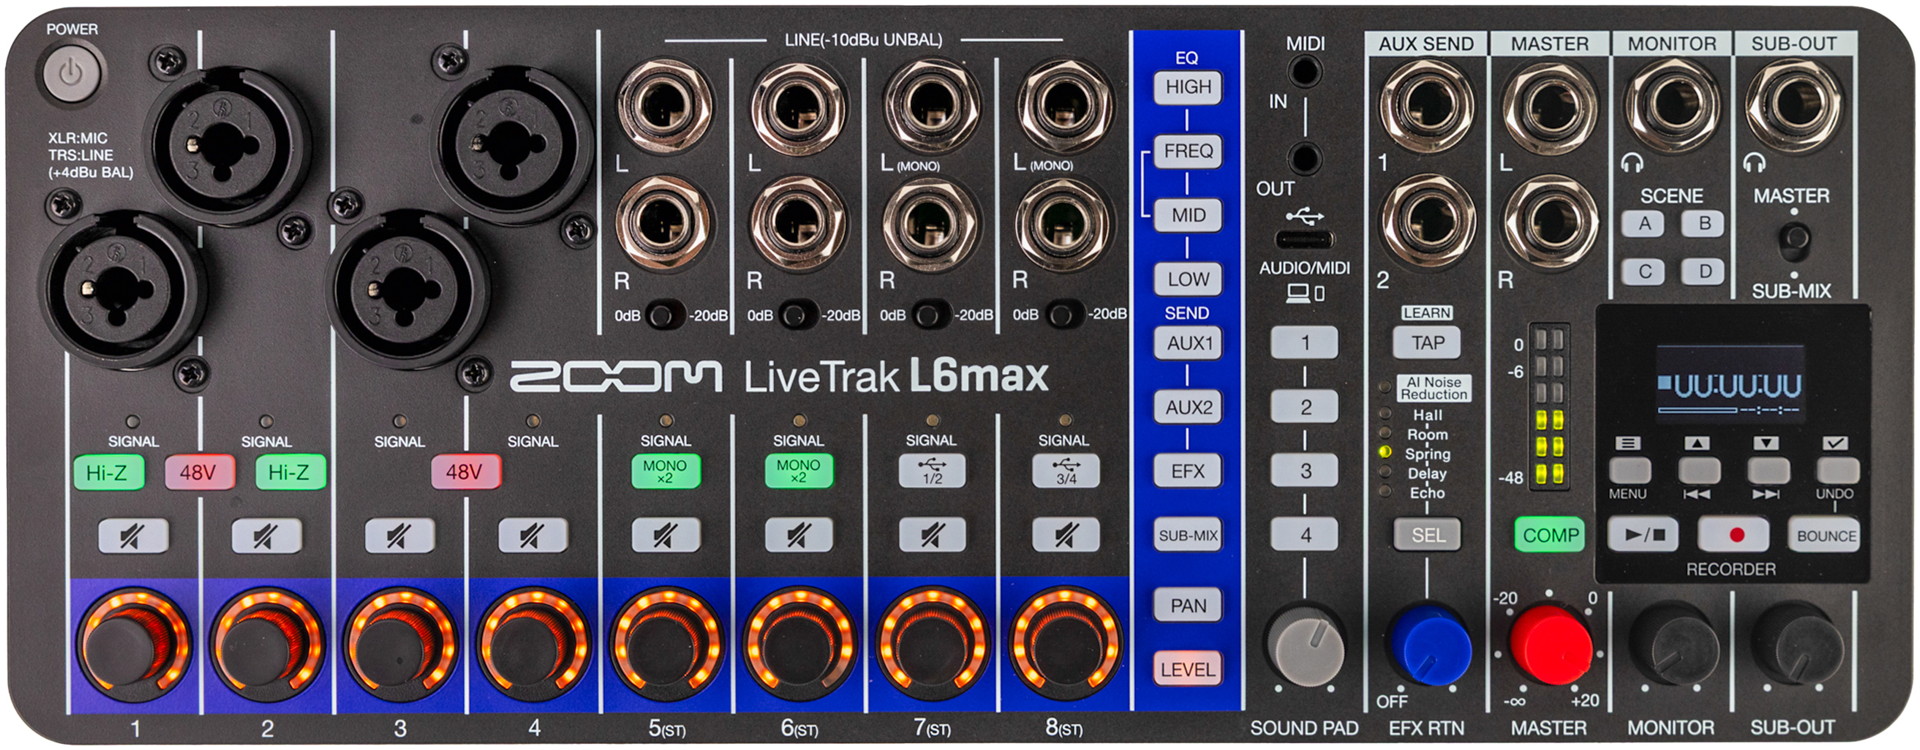
The Zoom LiveTrak L6max front panel
Make sure that the mixer is powered off and the Master, Monitor, and Sub-Out knobs are turned down all the way before you connect any cables.
Power, USB Ports & Data Connection
The L6max has two USB-C ports with different functions.
The first USB-C port is on the right side of the unit. It’s labeled “DC5V” and is only for powering the mixer, not for transmitting data. Use it with the included Zoom USB power supply.
If you connect a USB-C data cable to this port and then to your computer or mobile device, then you will discover that you can power the L6max, but your computer or device cannot detect the L6max and cannot transmit digital audio over this connection.
The second USB-C port, on the front panel, is for transmitting digital audio and computer data. Use a USB-C data cable to your Mac or Windows PC to:
- Use as a multichannel audio interface
- Control the L6 from your DAW using MIDI commands
- Connect to the L6 Editor app on your computer
- Transfer audio files between the microSD card in the L6max and your computer
You can also connect the L6max over USB to an iPhone, iPad, or Android device for use as an audio interface.
Your computer or device can also power the L6max through this second USB-C port.
See the below section “Using the L6max as an Audio Interface.”
Battery Power
You can power the L6max using four AA batteries. With the power off (and no USB cables connected), flip the unit over and lift the two tabs on the battery cover.
Using the menu settings, select whether you are using alkaline, Ni-MH, or lithium batteries so that the remaining battery charge can be displayed accurately.
Inputs & Outputs
Channel Inputs
Channels 1–4 have combi jacks for either 3-pin XLR microphone connections or 1/4-inch TRS line-level balanced connections. Only these four channels have 32-bit float recording capability.
Each pair of channels has a button to enable 48V phantom power for condenser microphones. (Don’t enable this unless your microphone requires it.)
Channels 1 and 2 have Hi-Z buttons for connecting the output from a guitar.
Channels 5–8 are stereo pairs of line-level inputs. The jacks accept 1/4-inch TS unbalanced connections. For each channel, you have an input pad switch. Set the switch to 0dB or -20dB, if the input level is in the red.
For Channels 5 and 6, you can use the Mono button to select two mono signals rather than a stereo pair.
Channels 7 and 8 can be switched to receive two stereo pairs of digital audio channels from your computer or device over USB. Press the USB buttons to enable this. Engaging the USB connection disables analog audio input for these channels.
Aux Send
Route the mixer’s output to external effects using the Aux Send jacks with 1/4-inch TRS connections.
MIDI In & Out
Control the L6max using MIDI hardware via the 1/8-inch TRS connections labeled MIDI In and Out. Use MIDI Type A adapters (sold separately) to connect gear with standard 5-pin DIN plugs.
The L6max can also act as a MIDI interface for connected devices, routing their MIDI signals over the USB data connection.
Master, Headphone & Sub-Out
Connect the Master outputs to a PA system or powered monitors with TRS connections.
Connect headphones to the Monitor output using a 1/4-inch TRS cable.
With the Sub-Out switch set to Sub-Mix, you can connect a secondary output. With the switch set to Master, you can connect a second set of headphones.
Using the Controls to Set up a Mix
Channel Strip Functions
Each channel on the mixer has these channel strip buttons:
- Equalization: High, Mid with adjustable Frequency, and Low
- Auxiliary sends: Aux1 and Aux2
- Internal effects channel: EFX
- Sub-Mix
- Stereo panorama: Pan
- Level
For each channel, the Signal light will glow green to indicate audio input and glow red if the input is overloaded.
Set the channel strip parameters for each channel using the rotary encoderknob on the channel together with the buttons on the channel strip section. The LED lights around each encoder knob show you the relative value for the currently selected parameter.
Tap the Level button on the channel strip and then turn the encoder knob on the channel corresponding to the signal you want to adjust. In turn, tap another channel strip button and adjust its value in the same fashion, working your way through the parameters on the channel as you set up your mix. Then go to the next channel, and so forth.
Learn more in the L6max Operation Manual > Mixing.
Internal Effect
AI Noise Reduction
With live inputs hooked up but no signals coming in, press the Sel button to enable AI noise reduction. The unit will analyze the noise coming into the mixer for three (3) seconds and save a profile. When you record, the entire signal on each channel will be recorded, but the signals passed to the stereo master will have noise reduction applied.
Learn more in the L6max Operation Manual > Mixing > Using AI Noise Reduction.
Reverb & Delay
One effect can be selected. Choose between Hall, Room, Spring, Delay, and Echo. You can set a tap tempo for Delay or Echo using the Tap button. You can also set the tempo via an external MIDI clock signal.
Using the menus on the display of the L6max, you can fine-tune parameters for each effect. You can also do this in the L6 Editor app on your computer.
Learn more in the L6max Operation Manual > Mixing > Using internal effects.
Master with Compressor, Monitor & Sub-Out
The Master, Monitor, and Sub-Out knobs are volume knobs, not rotary encoders; their values aren’t saved like settings on the channel strip.
The Comp button engages a stereo compressor on the master outputs. It has no parameters to adjust; it’s either on or off.
In the Mixer section of the menu on the display, the Sub-Out can be configured for either of two positions in the signal chain in three variations:
- Pre Master Fader
- Pre Master Fader + Comp
- Post Master Fader
Saving Scenes
You can save Scenes to the A, B, C, and D buttons. Press and hold one of the buttons until it lights. The current mixer settings will be saved to that Scene. When you select a Scene and adjust any parameters, that Scene button will blink. Press and hold it again to save the new settings.
Learn more in the L6max Operation Manual > Mixing > Saving settings (scenes).
Sound Pads
Use the four sound pads to trigger recorded sounds. The section has a dedicated Sound Pad volume knob.
You can record a sound to each pad directly on the L6max, or you can use the L6 Editor app on your computer to import sound files and assign them to pads.
Learn more in the L6max Operation Manual > Using sound pads.
Recording on the Zoom L6max
TIP: Use the menu on the display screen to set the clock on your L6max with the correct date and time. Each new recording will go into a folder on the memory card that’s labeled with the date and time. Learn more in the L6max Operation Manual > Making various settings > Setting the date and time.
Before you start recording, format the microSD card on the L6max.
Press the Record button to begin recording. Stop recording by pressing it again.
By default, the L6max records a separate audio file for each channel along with a stereo file that’s a mix of all channels.
To play back, press the Play/Stop button, which will light up green. The stereo file will play back. Adjust the Master knob to control the playback level.
Learn about more features, including overdubbing or “bouncing” tracks, in the L6max Operation Manual > Recording and playing audio.
Using the L6max as an Audio Interface
You can connect the L6max to your computer, tablet, or mobile device for use as a 14-input, 4-output audio interface for your DAW or for streaming.
Connect a USB-C data cable to the USB port on the front panel of the L6max, just below the MIDI jacks. Connect the other end of the cable to your device using the appropriate adapter as needed.
If you are on Windows, then you must download and install the L6max Windows driver from the LiveTrak L6max support page. Expand the .zip file, and you’ll see the installer along with installation instructions.
The L6max has a fixed sample rate of 48kHz. You can configure the interface for 32-bit float or 24-bit format. Consult the owner’s manual for your DAW regarding setting up projects for 32-bit float recording.
Learn more in the L6max Operation Manual > Using as an audio interface.
The Display Screen & the Zoom L6 Editor App
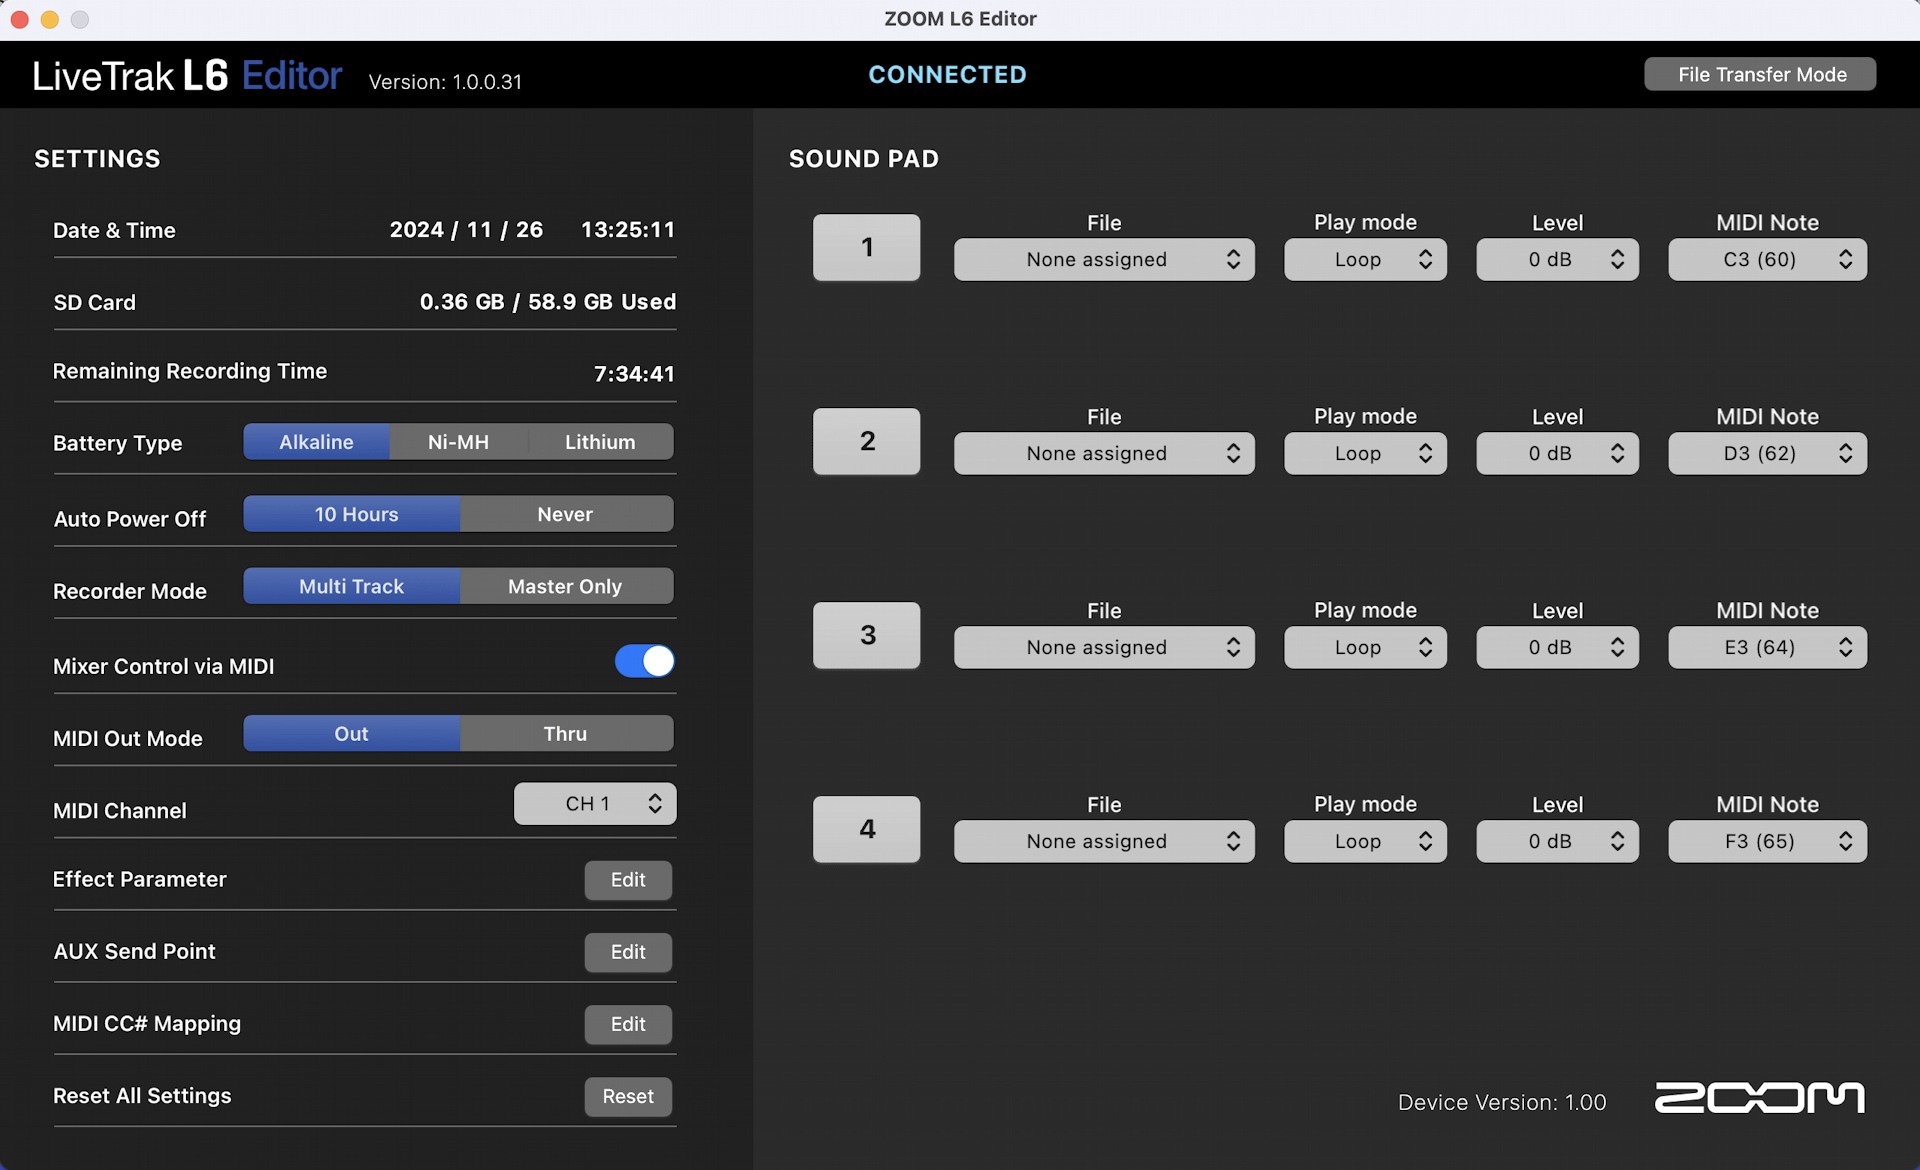
The Zoom L6 Editor app
On the L6max, you can set parameters for most features in the menus on the display screen. These include:
- Setting the time and date for automatic labeling of recorded audio files
- Making global settings for the mixer
- Assigning audio files to be played by the sound pads
- Editing effects parameters
- Configuring aux sends
You can also access the same settings by connecting the L6max to your computer through the USB-C data port and running version 2.0 or higher of the Zoom L6 Editor app. This app works with both the LiveTrak L6 and LiveTrak L6max models.
File Transfer Mode can be enabled in the L6 Editor app. In this mode, you can transfer recordings and audio files between the L6max’s microSD card and your computer.
Download and install the L6 Editor app for macOS or Windows from the LiveTrak L6max support page. If you are on Windows, then you must install the L6max driver for Windows, as well.
Before you launch the L6 Editor app, quit your DAW and any other applications that use MIDI ports so that they don’t interfere with the operation of the L6 Editor app.
Related Articles
When you need help, Sweetwater has the answers!
Our knowledge base contains over 28,000 expertly written tech articles that will give you answers and help you get the most out of your gear. Our pro musicians and gear experts update content daily to keep you informed and on your way. Best of all, it’s totally FREE, and it’s just another reason that you get more at Sweetwater.com.

