
Working with External Instruments in Cubase

In this guide, we will show you how to set up and configure external instruments in Cubase. Follow the sections below to get started.
Getting ready to record
NOTE: You must use Cubase Pro if you want to utilize external MIDI instruments in Cubase. Other Cubase versions (Artist, AI, Elements, and LE) do not have this capability.
After making the audio and MIDI connections described in the Basic Connections article, you’ll need to adjust a few settings in Cubase before you’re ready to record.
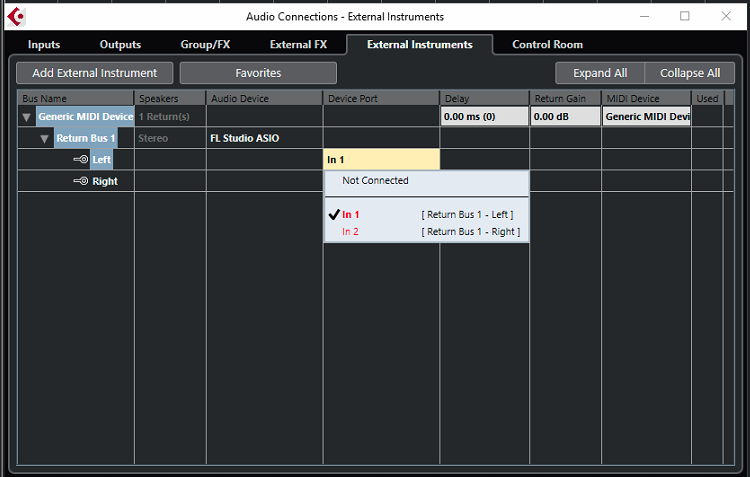
- Open the Studio menu, choose Audio Connections, then the External Instruments tab.
- Click Add External Instrument.
- In the new window that opens, give your external instrument a name (e.g., Roland TD-50 module)
- This will help you keep your project organized, especially if you plan to use more than one external MIDI instrument.
- Choose the number of Mono and Stereo returns.
- For example, if your external MIDI instrument is connected to the audio interface with a single cable, you would choose one mono return. If your external instrument is connected to the audio interface with two cables, you would select one stereo return.
- Click Associate MIDI Device and select your MIDI device. If you are using a direct USB connection from your external MIDI device to the computer, you will choose the name of your external MIDI instrument.
- If you connect the external MIDI instrument to a MIDI interface with MIDI cables, you will select the name of your MIDI interface.
- Click OK. You will now see your new external MIDI instrument listed in the bottom part of the External Instruments window.
- Click into the Device Port Column and then select the input(s) on your audio interface to which your external MIDI instrument is connected.
- For example, if you connected the audio cables from your external instrument to inputs 3 and 4 on the interface, you would choose inputs 3 and 4.
Selecting the number of sends and returns
Add the external instrument to your project
The next thing you need to do is add the external instrument to your project by creating, then naming the new instrument track.
- Open the Studio menu and choose VST Instruments. Alternatively, use the F11 hotkey to open the same window.
- Click the Add Track Instrument button located to the right of the track’s record button.
- Select the name of the external instrument you created in the previous section.
- External instruments are indicated by an X icon in the list next to their names in the Instrument pop-up menu.
- Click Add Track.

Recording
The new track added to your project will now behave exactly like any other VST instrument in Cubase. When it is armed for recording, it will respond to MIDI notes sent from your MIDI controller, and you can record MIDI into the track just like any other software synth. From this point, you have two options.
Option 1
You can leave the track as it is (MIDI data on a VST instrument track) in the project, and the MIDI will be converted to audio along with all your other tracks when the project is exported as an Audio Mixdown.
Option 2
You can freeze the track, which will convert the track to an audio track. Freezing the track is very easy.
- Open the VST Instruments window (F11).
- Locate the Freeze Icon (snowflake) next to the name of your External Instrument and click it.
- Choose Freeze Instrument Only.
- That’s all there is to it. This basic recipe can be followed to record any external MIDI instrument in Cubase.
Related Articles
When you need help, Sweetwater has the answers!
Our knowledge base contains over 28,000 expertly written tech articles that will give you answers and help you get the most out of your gear. Our pro musicians and gear experts update content daily to keep you informed and on your way. Best of all, it’s totally FREE, and it’s just another reason that you get more at Sweetwater.com.


Offer applies only to single-receipt qualifying purchases. Select manufacturers may require that only the manufacturer’s products qualify towards the minimum purchase amount needed to be eligible for promotional financing. Otherwise, an invoice that meets the minimum purchase amount and contains at least one qualifying manufacturer product is eligible for promotional financing. No interest will be charged on promo purchase balance, and equal monthly payments are required on promo purchase until it is paid in full. The payments equal the amount financed divided by the number of months in the promo period, rounded up to the next whole dollar. These payments may be higher than the payments that would be required if this purchase was a non-promo purchase. During the last month(s) of the promo period the required monthly payment may be reduced due to the prior months’ rounding. Regular account terms apply to non-promo purchases. New Accounts as of 07/31/2025: Purchase APR is 34.99%. Penalty APR is 39.99%. Min Interest Charge is $2. Existing cardholders: See your credit card agreement terms. Subject to credit approval.
Offer applies only to single-receipt qualifying purchases. No interest will be charged on the promo balance if you pay it off, in full, within the promo period. If you do not, interest will be charged on the promo balance from the purchase date. The required minimum monthly payments may or may not pay off the promo balance before the end of the promo period, depending on purchase amount, promo length and payment allocation. Regular account terms apply to non-promo purchases and, after promo period ends, to the promo balance. New Accounts as of 07/31/2025: Purchase APR is 34.99%. Penalty APR is 39.99%. Min Interest Charge is $2. Existing cardholders: See your credit card agreement terms. Subject to credit approval.
The estimated required monthly payment shown which excludes taxes and delivery equals the amount financed divided by the number of months in the promo period, rounded up to the next cent. During the last month(s) of the promo period the required monthly payment may be reduced due to this rounding. These payments apply only with the financing offer shown. If you make these payments by the due date each month, you should pay off this amount financed within the promo period, if it is the only balance you are paying off. If you have other balances on your account, this payment will be added to any other minimum monthly payments.
Applies only to select items from this manufacturer. Ask your Sweetwater Sales Engineer for more details.