
Two Notes OPUS Quickstart Guide

The Two notes OPUS is an extraordinarily flexible guitar processor with a plethora of usage scenarios. In this guide, we will help you get set up and give you an overview of the features.
- Download the App and Register Your OPUS
- Making Connections
- Controlling the OPUS
- Programming the OPUS
- OPUS Setup Scenarios
Download the App and Register Your OPUS
When you open the OPUS box, you’ll find the handy Quick-Start Guide. On page 2, you will find the QR Code with this link to download the app you need to control the OPUS.
It’s possible to use most features of the OPUS standalone without connecting it to a computer or mobile device. However, it’s much easier with the Two Notes Torpedo Remote app.
When you use the app for the first time you will be prompted to create a user account with Two notes and register your purchase, which is required to access all the OPUS’ features.
Go to the Two notes Torpedo Remote webpage. We recommend starting with the app for macOS or Windows. Later, you can download the mobile app to control the OPUS from your phone or tablet.
Install the app for macOS or Windows
Download and install the version of the app that’s appropriate for your version of macOS or Windows. Follow the instructions.
Connect your OPUS to your Mac or PC using the included USB-C cable. If your computer does not have a USB-C port, you will need a USB-C to USB-A adapter dongle, which is not included. Power up the OPUS by connecting its included power supply.
On macOS, you will be prompted to indicate that you give permission for the USB device to connect to your Mac.
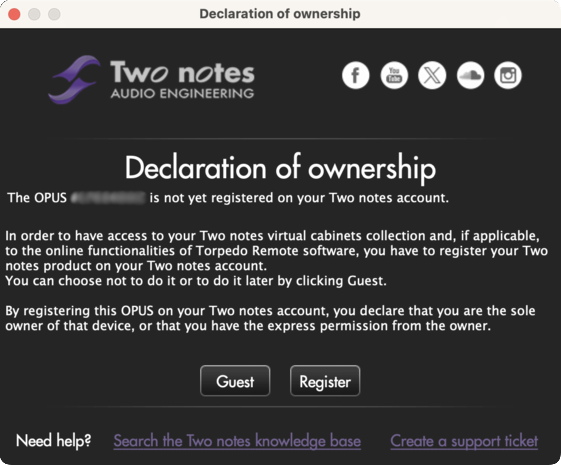
The Two Notes Remote app’s registration screen
When you first run the app with the OPUS connected, you will see a Declaration of Ownership, which detects your device’s serial number and prompts you to register your purchase. You can temporarily bypass this by clicking Guest, but don’t choose that option; it’s not productive.
Follow the prompts to create an account, log in, and register.
Upgrade the Firmware
You will want to install the newest firmware whenever Two Notes releases an upgrade. The firmware update will provide bug fixes and may also add entirely new amp and speaker models.
When you run the Torpedo Remote app, it will notify you when an upgrade is available. To upgrade, you must be logged in, with your serial number registered.
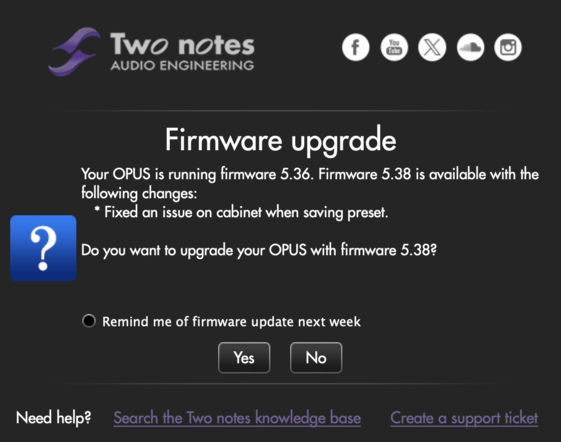
OPUS firmware upgrade prompt
If the app prompts you to upgrade the firmware, click Yes.
The app will prompt you to back up the presets and configuration of your OPUS to a file on your computer’s hard drive. If your OPUS is brand-new, you can select No. If you have already programmed some features, select Yes.
On macOS, at the beginning of the firmware update procedure, you may see a brief message asking your permission to connect a new USB device. Click Yes right away.
The app will automatically download the firmware installer, upload it to the OPUS, and perform the upgrade. Do not disconnect or turn off your OPUS or your computer while this upgrade is in progress.
If the upgrade fails, and the Torpedo Remote app quits unexpectedly, don’t worry. You can restart the app and re-install the firmware to correct the problem.
The app will indicate that the firmware update is complete.
The app will now open a new window showing the full range of features of the OPUS.
Download the Two notes Genome plug-in
Your OPUS comes with a license to use Two note’s new Genome plug-in, which provides effects and models that run natively on your Mac or Windows PC to provide signal processing within your DAW. You can also download and work with the older Two notes Torpedo Wall of Sound plug-in.
Download the User’s Manual
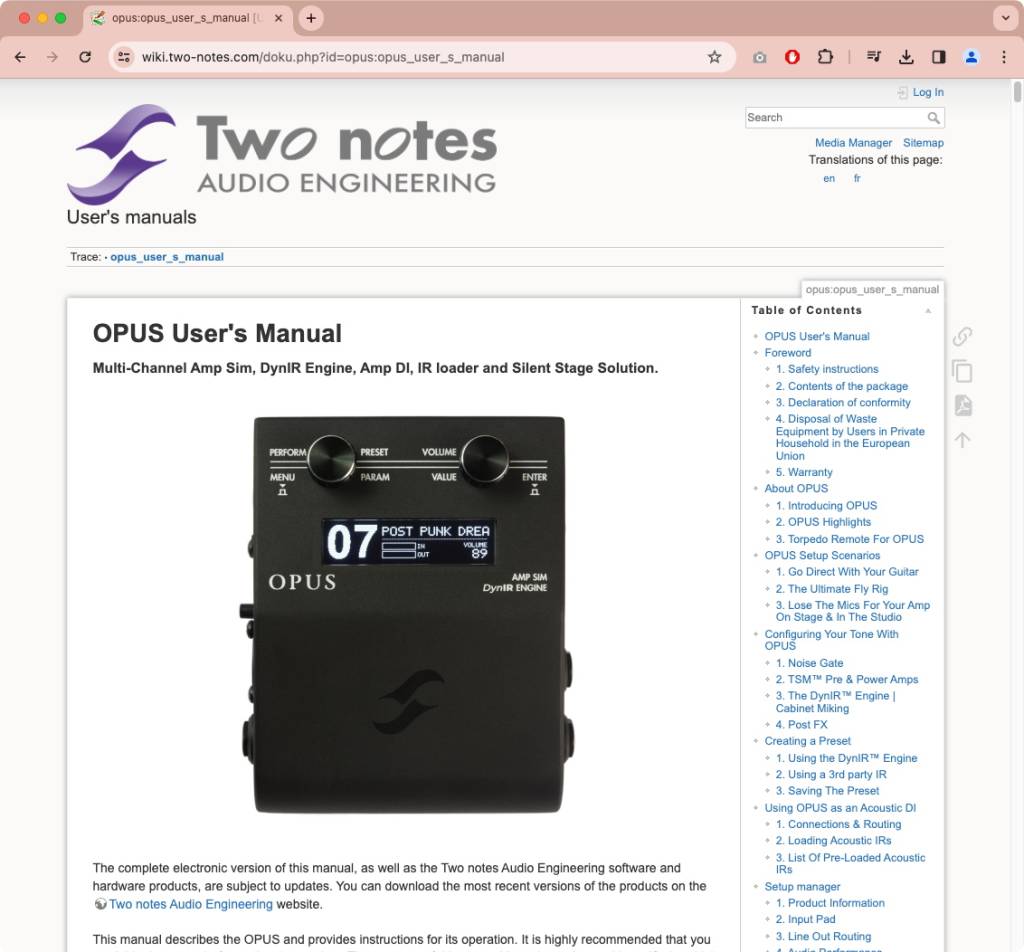
The OPUS User’s Manual online
You can access the User’s Manual online in your web browser, but you can also download a copy.
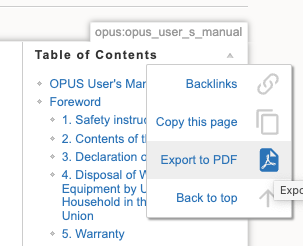
Downloading the OPUS User’s Manual
Go to the page and move your cursor over the PDF icon on the right. Select Export to PDF in the pop-up menu.
Making Connections

OPUS front panel
The two rotary encoder control knobs can be pressed in and turned to access the various menus and change parameters on the unit’s display screen. Learn more in the OPUS User’s Manual > Using OPUS Without Torpedo Remote Via the OLED Display & Rotary Encoders.

OPUS right-side connections
To connect a guitar or an output from your pedalboard, use a guitar instrument cable and set the In Level switch to Inst.
To connect the output from an amplifier, use a speaker cable, not an instrument cable, and set the In Level switch to Amp. Use another speaker cable in the To Speaker connection to connect to a suitable speaker or load box.
Warning! When an amp is connected to the Amp input, the related cabinet or a suitable load box has to be connected to the To Speaker connection using the correct speaker cables. Failure to do this will damage your amplifier.
Learn more in the OPUS User’s Manual > OPUS Setup Scenarios > 3. Lose the Mics For Your Amp On Stage & In the Studio.
- USB-C. Connect to your host computer to control the OPUS using the Torpedo Remote app.
- Power. Use the 12VDC power supply included with the OPUS.
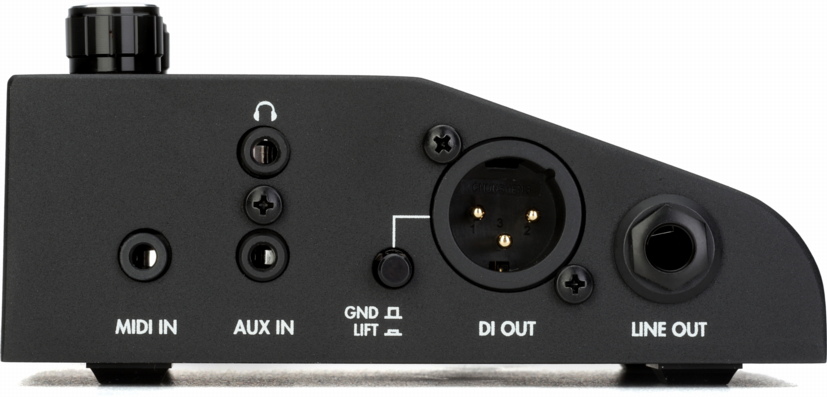
OPUS left-side connections
- Headphones. Connect headphones using a 1/8-inch TRS connector.
- MIDI IN. Use the included MIDI adapter breakout cable, which has a 5-pin DIN jack on the other end, to enable hooking up an external MIDI controller.
- Aux In. Connect a cable with a 1/8-inch jack to input external audio for private practice while you monitor with your headphones. The Aux In’s stereo input will be passed to the headphones. The OPUS processes the guitar in mono.
- DI Out. Connect a 3-pin XLR cable for balanced mono direct output to speakers, a mixer, or audio interface.
- Gnd Lift. Toggle the Ground Lift switch if you hear noise in the DI Out.
- Line Out. Connect a 1/4-inch TRS cable for balanced mono audio output to speakers, a mixer, or audio interface.

OPUS back panel
On the back of the unit, above the illuminated logo, is the microSD memory card slot. A 256MB card is included; the slot can accommodate up to a 32GB card.
Controlling the OPUS
While the OPUS is designed to fit on your pedalboard, it has no footswitches.
In live performance, if you need to switch presets or alter parameters, you can do this from the Torpedo Remote app on your phone or tablet, connected to the OPUS wirelessly via Bluetooth.
If you prefer physical footswitches or expression pedals, you can connect a MIDI foot controller (not included) to the OPUS using the included MIDI cable breakout connector, and map the functions you need to the footswitches on your controller. Learn more in the OPUS User’s Manual > Setup manager > 5. MIDI.
Programming the OPUS
As we mentioned earlier, you can control the OPUS using only its two hardware knobs and the built-in display, but it’s much easier to access all the functions on the Torpedo Remote app on your computer.
Using the OPUS hardware controls
Learn more in the OPUS User’s Manual > Using OPUS Without Torpedo Remote Via the OLED Display & Rotary Encoders.
Torpedo Remote for OPUS for Mac and Windows PC
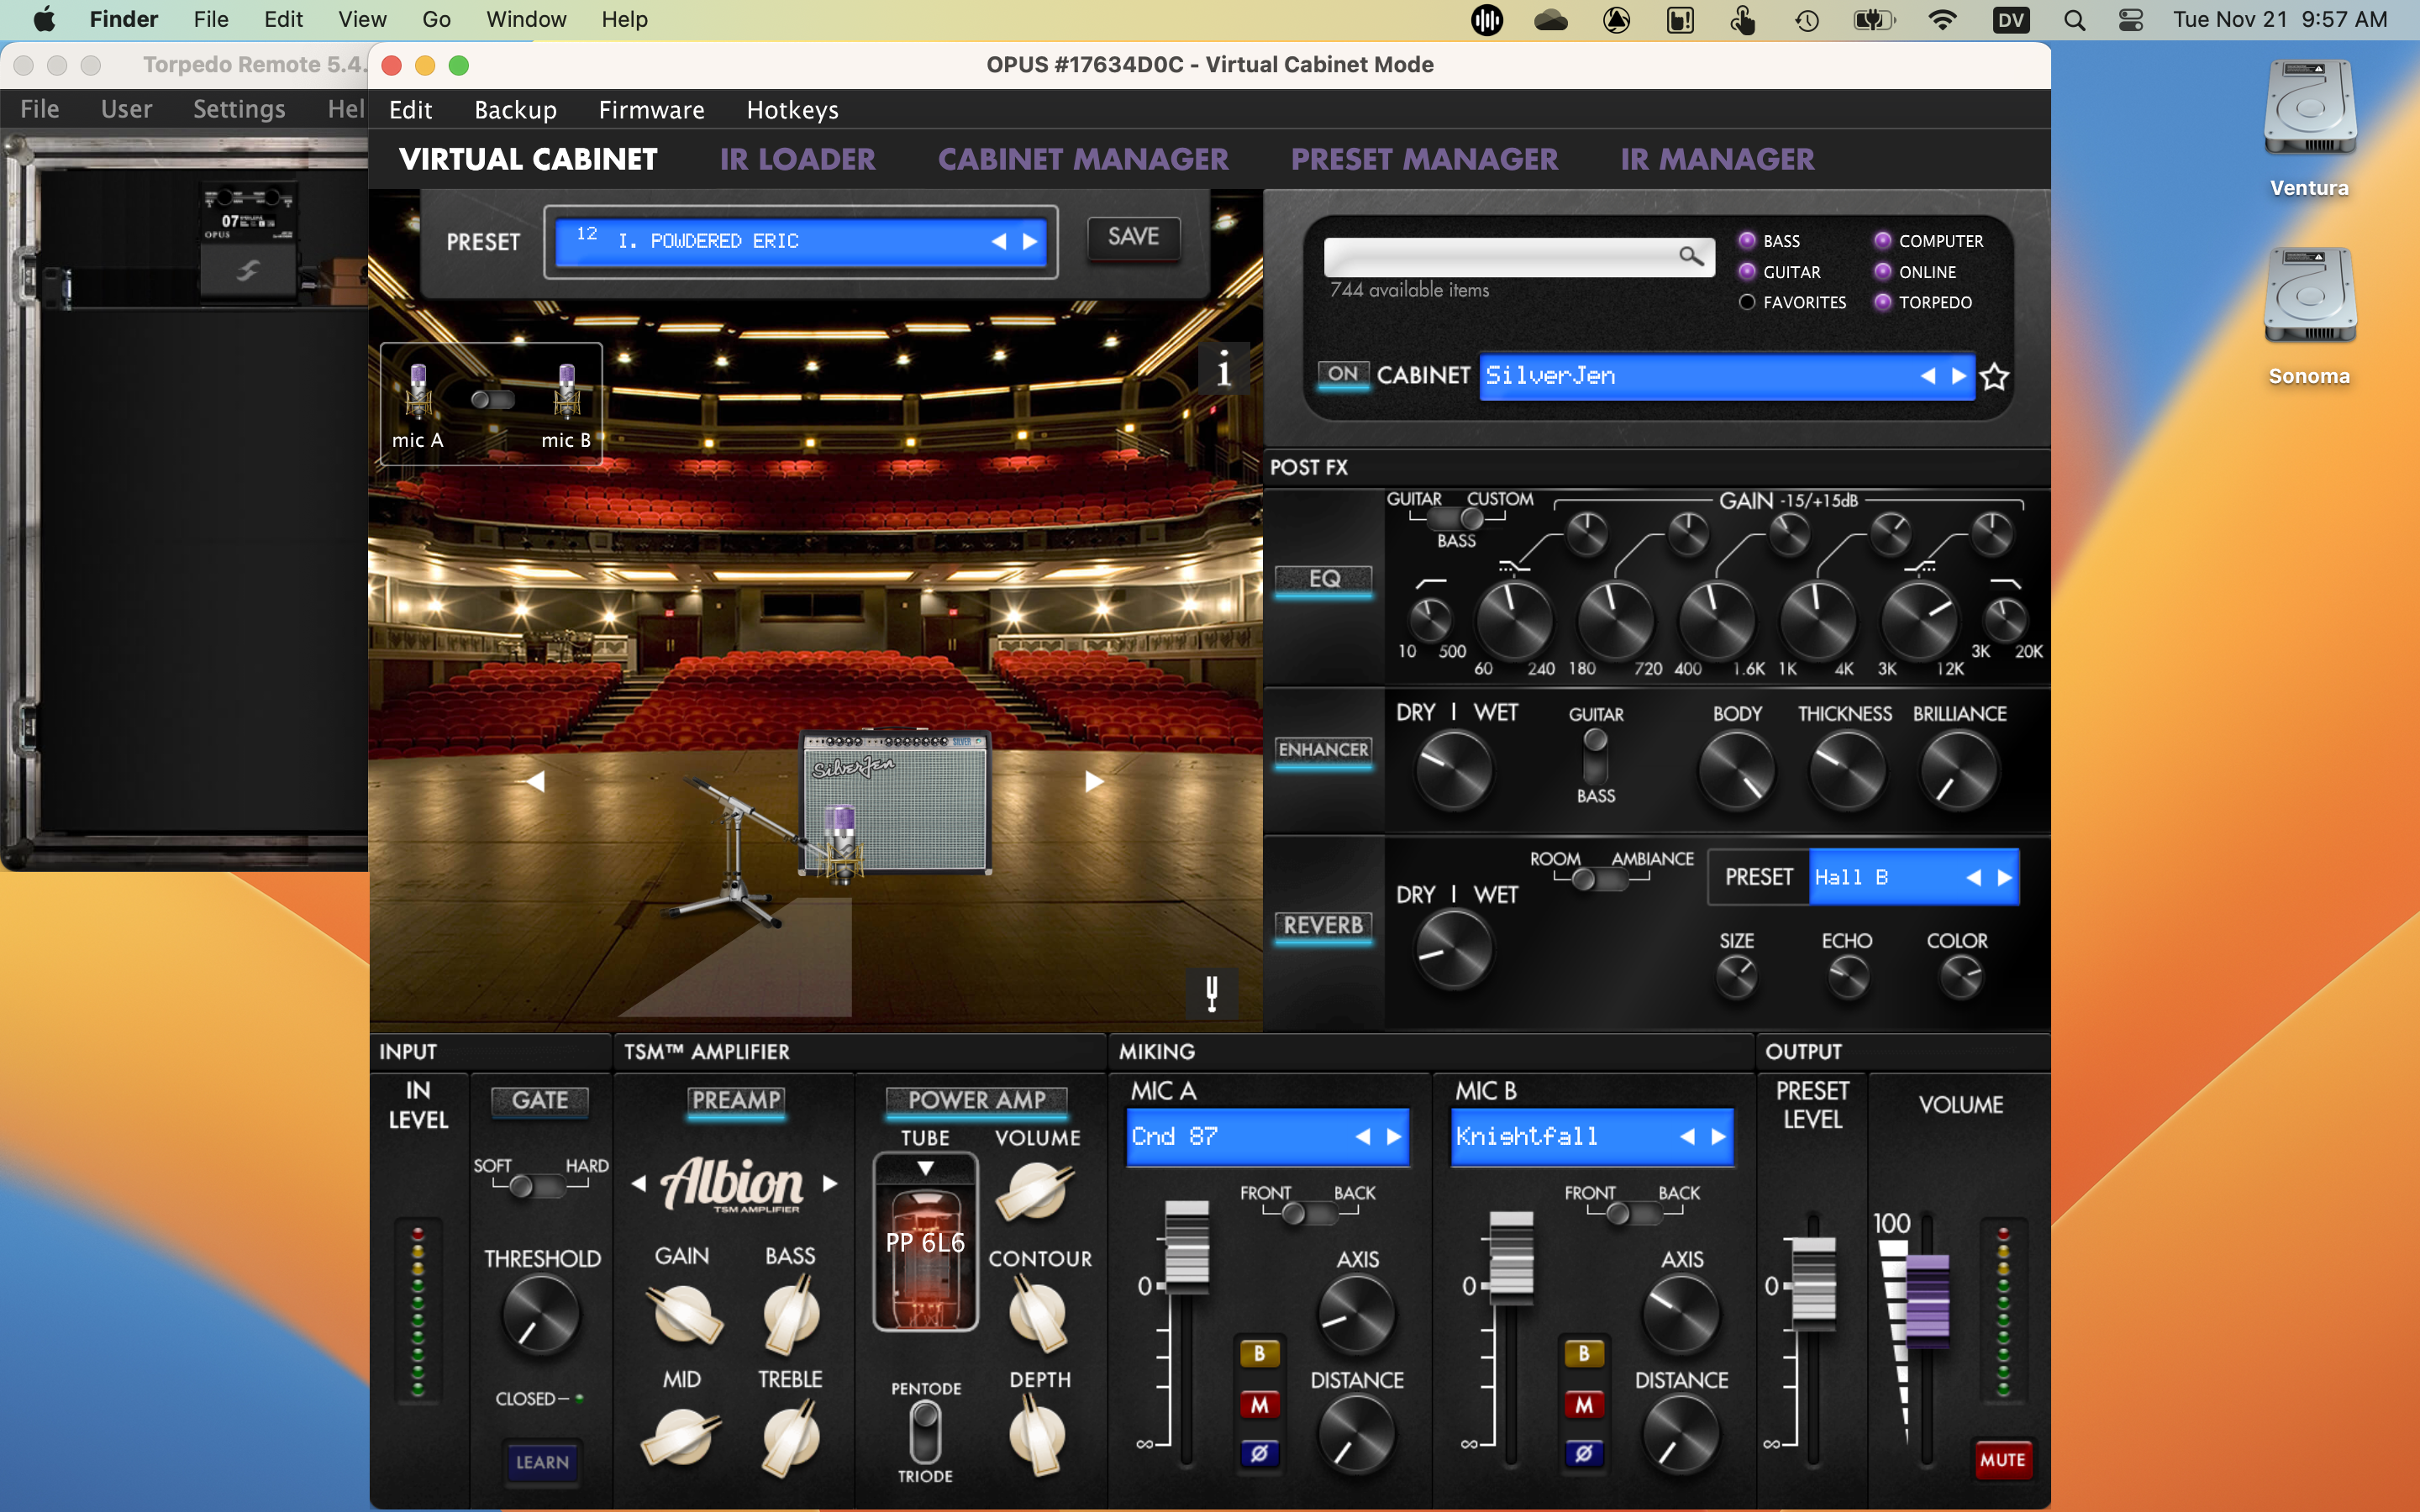
Torpedo Remote for OPUS on macOS
As you have already installed the Torpedo Remote app for your computer, set up a Two notes account, registered your unit, and upgraded the firmware, you are ready to get started with the app.
Note that the USB connection is for transmitting data to program and control OPUS; the OPUS does not send or receive audio over USB. To route the audio from the OPUS to your computer’s DAW, you need to connect the OPUS’ analog audio outputs to an audio interface.
The Mac and Windows version of the app enables creating and saving banks of presets and loading your own IRs. This version also allows connecting to the Two notes store online to purchase and download additional Two notes DynIR virtual cabinets, and to load those into the internal memory on the OPUS over USB.
Learn more in the OPUS User’s Manual > About OPUS > 3. Torpedo Remote for OPUS.
Creating Presets
TIP: Two notes uses two trademarked terms that you will see often:
- TSM, or Tube Stage Modeling, refers to the digitally-modeled preamplifiers and power amplifiers.
- DynIR refers to the dynamic impluse response modeling of guitar cabinets, speakers and microphones.
An OPUS preset can contain any or all of:
- TSM Preamp
- TSM Poweramp
- Emulated Cabinet (either the built-in DynIR from Two Notes, or a third-party static IR that you load yourself)
- Two emulated microphones with specific positions within the room (if you are using a DynIR)
- Post effects including noise gate, EQ, enhancer, and/or reverb
- A predefined Preset Level
In the Torpedo Remote app for macOS and Windows, there are two locations for presets:
- Torpedo refers to the 128 internal memory slots in the OPUS hardware.
- Computer refers to presets on your computer, which you can then transfer to the OPUS’ internal memory.
Learn more in the OPUS User’s Manual > Creating a Preset.
Torpedo Remote for OPUS for iOS, iPadOS and Android
The Torpedo Remote app for iOS, iPadOS, and Android is for live performance and does not provide all the features of the Mac and Windows app. The mobile version does not enable loading and unloading cabinets and IRs.
Note that, similarly, the Bluetooth connection is for sending data to program and control OPUS; the OPUS does not transmit or receive audio over Bluetooth.
- On your Apple device, download the iOS and iPadOS version from the Apple App Store.
- On your Android device, download the app at the Google Play Store.
Bluetooth Pairing with OPUS
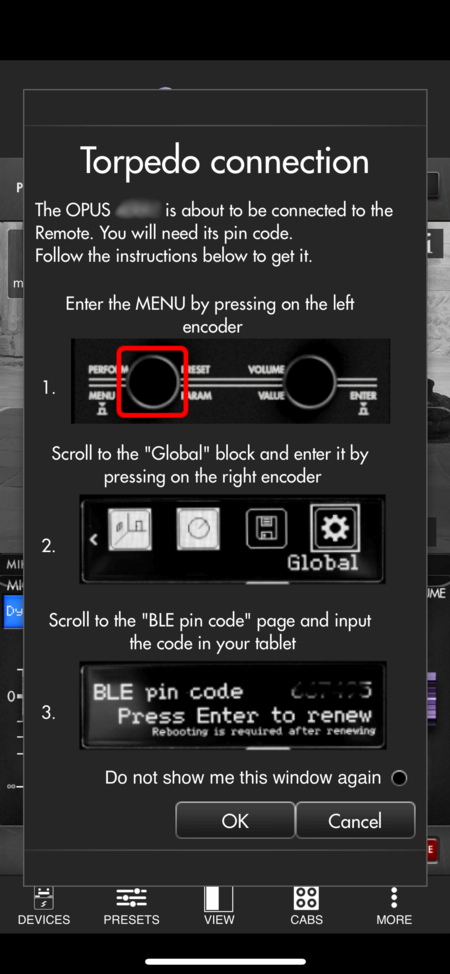
The Bluetooth pairing procedure on the Torpeo Remote mobile app
The first time you use the OPUS with the mobile app, you must pair the Bluetooth connection.
- On your device, go to your system settings and ensure Bluetooth is turned on.
- With the OPUS powered on, open the Torpedo Remote app on your device.
- Tap on Devices on the bottom bar.
- Tap on Pair a new device.
- Tap on Pair an OPUS.
- The app will prompt you that it senses the Bluetooth connection to the OPUS. You must look up the Bluetooth pairing PIN code on the OPUS and enter it into the app.
- On the OPUS, press the left encoder to enter Menu. Scroll to the Global block and press on the right encoder.
- Scroll to BLE pin code. Take note of this code.
- On the mobile app, click OK. Enter the code from the OPUS hardware.
When the connection is made, you can now control the OPUS from the mobile app.
In the Torpedo Remote mobile app, there are two locations for presets:
- Torpedo refers to the 128 internal memory slots in the OPUS hardware.
- Local refers to presets in the app on your device.

The main view in the Torpedo Remote app on iPhone
TIP: If the OPUS is connected to the Torpedo Remote app on your computer over USB-C, pairing it with the Torpedo Remote mobile app over Bluetooth will disconnect the OPUS from the USB-C connection, or vice versa. You can only have one connection active at a time.
Learn more in the OPUS User’s Manual > 3. Torpedo Remote for OPUS > 3.2 On Your Mobile Device or Tablet.
OPUS Setup Scenarios
Go Direct with Your Guitar
- Use a guitar instrument cable to connect your guitar to the Inst./Line In jack.
- Set the In Level switch to Inst.
- Check the input level VU Meter on the OPUS display. If the display indicates clipping, navigate to the pedal’s Menu using the knobs and scroll to the Global section. Click to enter, and scroll to the Input Pad page. Set it to On to reduce the input by 10dB.
- Connect the DI Out XLR output to an audio interface, mixer, or speakers, or monitor with the Headphone output.
Learn more in the OPUS User’s Manual > Using OPUS Without Torpedo Remote Via the OLED Display & Rotary Encoders.
The “Fly Rig”
- Connect the “pre” effects on your pedalboard to the input on the OPUS, using an instrument cable, and set the In Level switch to Inst.
- Check the input level VU meter on the display. If the input signal is clipping, you can set the switch to Line.
- Use the Line Out to connect to your pedalboard for the “post” effects.
- Connect the DI Out XLR output to an audio interface, mixer, or active full-range speakers.
- Alternatively, you can monitor the internal processing of the Opus using the Headphone output.
Learn more in the OPUS User’s Manual > OPUS Setup Scenarios > 2. The Ultimate Fly Rig.
Use Your Amp with the OPUS Cabinet and Microphone Modeling
As we have mentioned earlier, you can connect your guitar to your amplifier, then connect the speaker output from your amplifier to the OPUS, in order to use the OPUS’ cabinet and microphone modeling to get a DI signal or line output to go to your front of house mixer or audio interface. This negates the need to use microphones on your speaker cabinet on stage or in the studio.
You must take care to set this up correctly, and you must connect the To Speaker output to a suitable speaker cabinet or load box.
Before you attempt this, carefully read this section in the OPUS User’s Manual > OPUS Setup Scenarios > 3. Lose The Mics For Your Amp On Stage & In The Studio.
Hybrid Setup: The OPUS’ Preamp into Your Amp’s Power Amp
You can use the OPUS’ digitally-modeled preamp in place of your amp’s preamp, and then send the output from the OPUS to your amp’s power amplifier, and then to your amp’s speaker cabinet.
- Connect your guitar’s instrument cable to the OPUS’ Inst/Line In and set the In Level switch to Inst.
- In the preset you select in the Torpedo Remote app, choose your TSM preamp and disable the TSM power amp emulation.
- Use an instrument cable to connect the OPUS Line Out to your amp’s effects return jack.
Acoustic Guitar DI
You can use the OPUS with your acoustic guitar’s piezo pickup output to model the sound of a guitar miked acoustically.
On the Torpedo Remote app for Mac or Windows, you can create new presets that bypass the preamp and power amp models. Then, using the IR Loader tab, you can select from the app’s extensive library of acoustic guitar body models, rather than speaker cabinet models, which you can upload from the app to the OPUS’ memory.
Use the channel controls to program the parameters you want to save to your presets.
You can also create a mix of your wet and dry signal, and use the Line Out Routing facility to send the dry and wet signals separately to the OPUS’ two outputs, to different channels on your audio interface or mixer for further mixing.
Learn more in the OPUS User’s Manual > Using OPUS as an Acoustic DI.
Line Out Routing
Depending upon the setup scenario, you can set up the Line output for a different signal chain than the DI output. This way you can create two different mono signals to route and mix.
You can access the Line Out Routing feature on the front panel of the OPUS or using the Torpedo Remote app’s Setup menu. The four settings available are:
- No Processing: The Line output sends the dry input signal from OPUS without any processing.
- After TSM Amplifier: The Line output sends the signal after the Preamp, Power Amp, and Noise Gate (but bypasses the Cab Sim and Post FX).
- After Cab Sim: The Line output sends the signal after the DynIR cabinet emulation microphone channels (but bypasses the Post FX).
- After Post FX: The Line output sends the entire signal chain of the OPUS, meaning that the Line output and the DI output will be the same.
Learn more in the OPUS User’s Manual > Setup manager > Line Out Routing.
Learn more about each setup scenario in the OPUS User’s Manual > OPUS Setup Scenarios.
TwoNotesTV: OPUS | Feature Rundown
Related Articles
When you need help, Sweetwater has the answers!
Our knowledge base contains over 28,000 expertly written tech articles that will give you answers and help you get the most out of your gear. Our pro musicians and gear experts update content daily to keep you informed and on your way. Best of all, it’s totally FREE, and it’s just another reason that you get more at Sweetwater.com.


Offer applies only to single-receipt qualifying purchases. Select manufacturers may require that only the manufacturer’s products qualify towards the minimum purchase amount needed to be eligible for promotional financing. Otherwise, an invoice that meets the minimum purchase amount and contains at least one qualifying manufacturer product is eligible for promotional financing. No interest will be charged on promo purchase balance, and equal monthly payments are required on promo purchase until it is paid in full. The payments equal the amount financed divided by the number of months in the promo period, rounded up to the next whole dollar. These payments may be higher than the payments that would be required if this purchase was a non-promo purchase. During the last month(s) of the promo period the required monthly payment may be reduced due to the prior months’ rounding. Regular account terms apply to non-promo purchases. New Accounts as of 07/31/2025: Purchase APR is 34.99%. Penalty APR is 39.99%. Min Interest Charge is $2. Existing cardholders: See your credit card agreement terms. Subject to credit approval.
Offer applies only to single-receipt qualifying purchases. No interest will be charged on the promo balance if you pay it off, in full, within the promo period. If you do not, interest will be charged on the promo balance from the purchase date. The required minimum monthly payments may or may not pay off the promo balance before the end of the promo period, depending on purchase amount, promo length and payment allocation. Regular account terms apply to non-promo purchases and, after promo period ends, to the promo balance. New Accounts as of 07/31/2025: Purchase APR is 34.99%. Penalty APR is 39.99%. Min Interest Charge is $2. Existing cardholders: See your credit card agreement terms. Subject to credit approval.
The estimated required monthly payment shown which excludes taxes and delivery equals the amount financed divided by the number of months in the promo period, rounded up to the next cent. During the last month(s) of the promo period the required monthly payment may be reduced due to this rounding. These payments apply only with the financing offer shown. If you make these payments by the due date each month, you should pay off this amount financed within the promo period, if it is the only balance you are paying off. If you have other balances on your account, this payment will be added to any other minimum monthly payments.
Applies only to select items from this manufacturer. Ask your Sweetwater Sales Engineer for more details.