
Sheeran Looper X Quickstart Guide
The Sheeran Looper X is the ultimate looper workstation for songwriting and live performance. The Looper X features Ed Sheeran’s powerful multi-track looper workflow plus a complete toolkit of loop creation and remix functions. It’s set up for guitar, vocals, keyboards, drums, drum loops, and more. While you can start looping right away, we wrote this guide to help you dive into its rich feature set.
- Register with Sheeranloopers.com
- Update the Firmware
- Setup and Connections
- Basic Operation
- Using the Sheeran Looper X with Your Computer
- Sheeran Looper Instructional Videos
Register with Sheeranloopers.com
Go to sheeranloopers.com/support.html. Follow the instructions under “Register Your Looper” to create an account with Sheeran Loopers’ parent company, inMusic, and register your purchase.
Download the User Guide and More
Back at sheeranloopers.com/support.html, under the Looper X section, click on Learn More.
On the Looper X Support and Downloads page, scroll down and find the links to download the Quickstart Guide and Full User Guide. You’ll need them to learn all the features.
You will need to connect your Looper X to your Mac or Windows PC to upgrade the firmware, to transfer loops and audio files to and from your Looper X, and to back up your loops.
To connect your Looper X to a Mac, you don’t need a custom driver; just plug it in. If you are on a Windows PC, you need to download and install the PC Driver found on the page.
Sheeran Loopers also provides the File Converter app for macOS and Windows to give you a drag-and-drop tool to convert imported loops to the Looper + format of 16-bit 44.1kHz .WAV files.
Update the Firmware
The Looper X requires a “day one” firmware update. New firmware provides bug fixes and may add new features and capabilities to the unit. So when you take your new unit out of the box, don’t skip the firmware update. Follow these instructions, then come back here.
Setup and Connections
Inputs and Outputs

Sheeran Looper X inputs and outputs on the back panel
Make sure the power switch is off and the input- and volume knobs on the front panel are turned all the way down before you connect or disconnect your headphones or other cables.
Inputs. The four inputs are combi jacks that can accept either a balanced XLR cable or an unbalanced 1/4-inch instrument cable. Use these to connect a microphone, a guitar, or other instruments. Adjust Input Gain for each input using the knobs on the front panel, and view the incoming signal level in the Track, Mixer, and Audio Routing views on the display. You can enable 48V phantom power if your microphone requires it. Learn more in Sheeran Looper X User Guide > 5.0 Menu > 5.10 Global Settings (page 37).
Aux. Connect a 1/8-inch TRS cable for analog audio auxiliary input from a phone or a device to play a backing- or practice track. The aux input is routed directly to the outputs and does not go through the looper or any effects.
Phones. Connect headphones using a 1/4-inch TRS plug.
Outputs.
- Outputs 1 and 2 are 1/4-inch TRS connections for a stereo pair to connect to your amplifier or audio interface. If you need a mono output, use Output 1.
- Outputs 3 and 4 are balanced XLR outputs to connect to your mixer or speakers.
The Looper X provides flexible output routing for looper tracks as four separate mono outputs or stereo pairs, and for which signals get routed to the headphones. Learn more in the Sheeran Looper X User Guide > 5.11 Audio Routing (page 42).
EXPR. Connect an optional expression pedal with a 1/4-inch TRS connector. The expression pedal can be mapped to various functions.
SD. Insert an SD card for additional storage of loops and audio files.
MIDI In and Out/Thru. Connect standard 5-pin DIN MIDI cables to external MIDI equipment to control the Sheeran Looper X.
USB-B. The orange connector is for connecting your Looper X to a host computer with a USB cable, which is included.
USB-A. This port has two functions:
- Insert a USB flash drive for additional storage.
- Connect a USB cable to a MIDI controller with a class-compliant USB interface to control the Looper X, rather than using standard MIDI cables.
DC In. Connect the 19V power supply provided.
Power Switch.
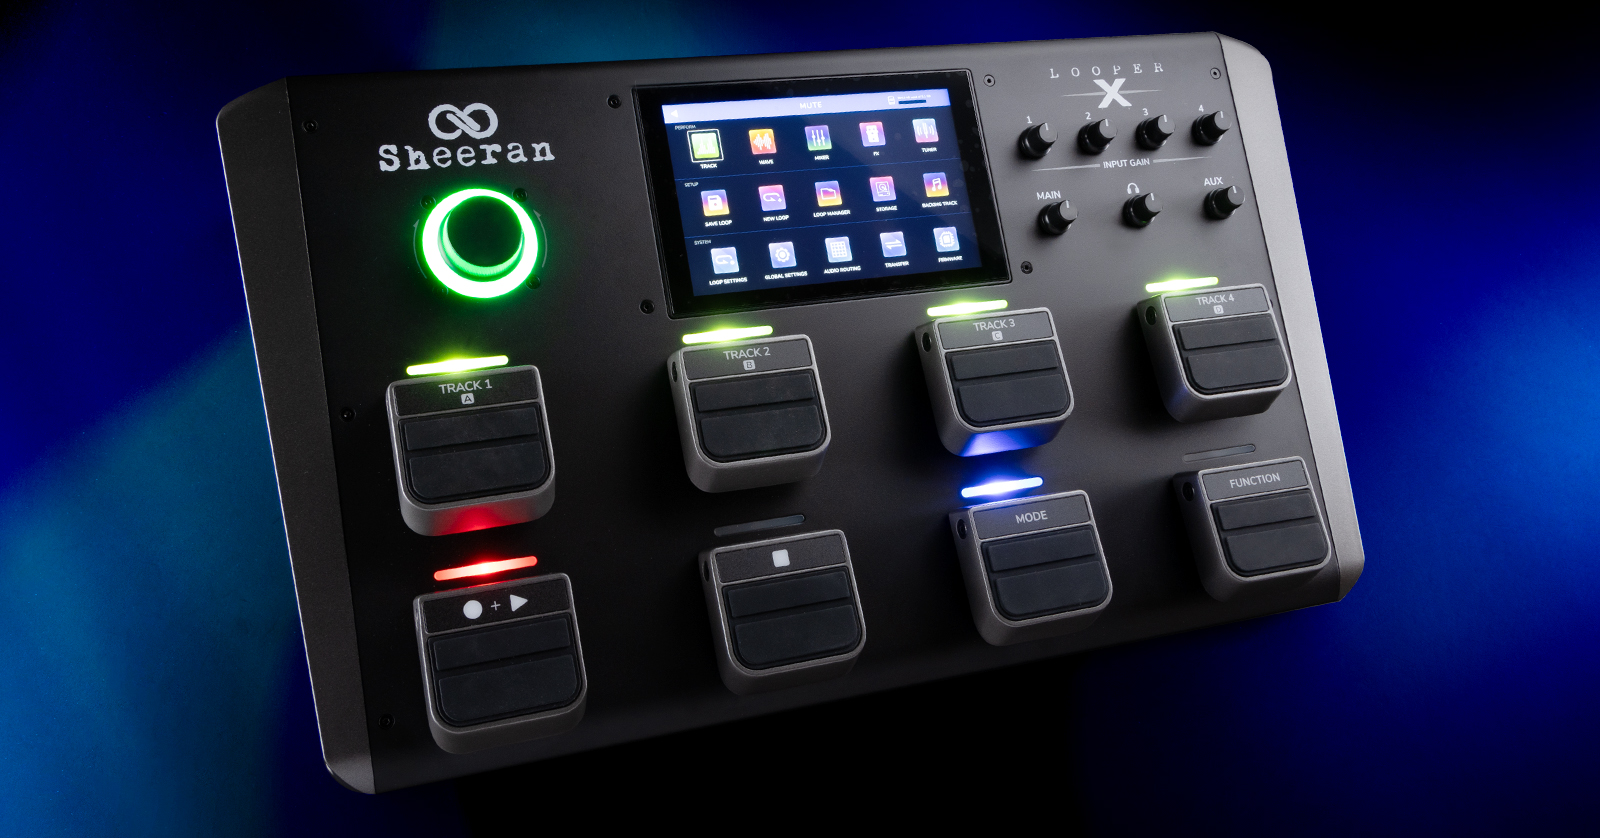
Front Panel
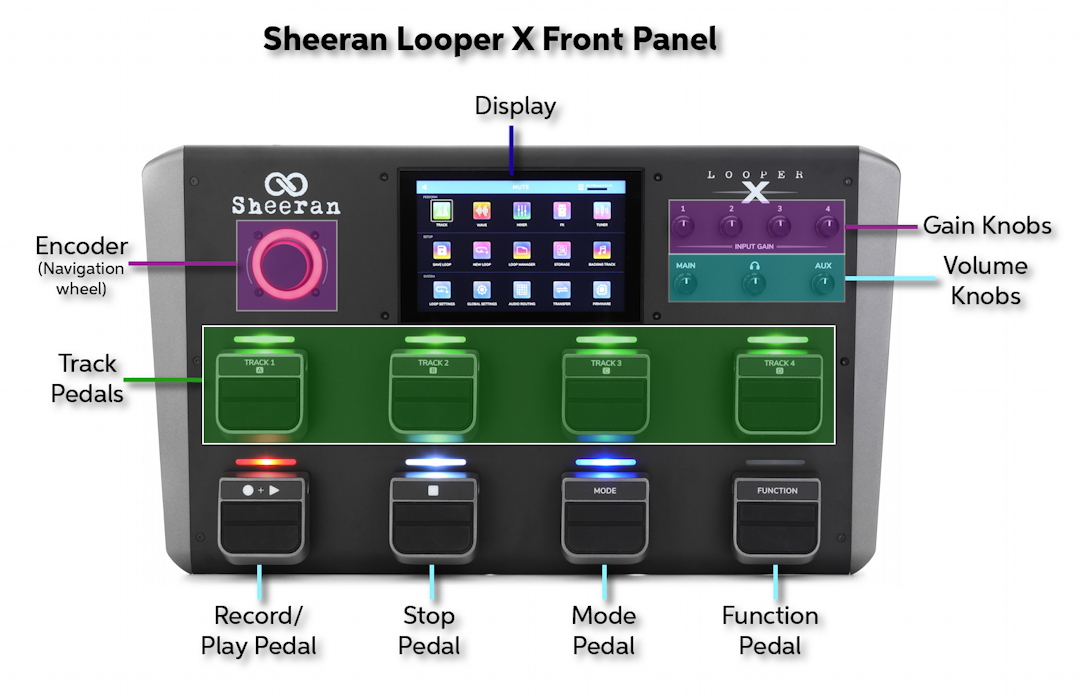
Sheeran Looper X front panel controls
Display. The multi-touch display is where you view all the controls and settings. Tap to move between different menus, and tap to select a parameter to edit. Learn more in the Sheeran Looper X User Guide > 5.0 Menu (page 19).
Encoder. Turn to scroll through menu options on the display and to change the parameter value of the selected field on the display. Push the encoder to confirm a selection. When laying down loops, the LED halo changes to indicate state: green for playback, red for recording, and orange for overdub.
Input Gain knobs. These four knobs are used to adjust the strength of the signal coming into the four inputs. Signal strength is displayed in the Track, Mixer, and Audio Routing views.
Volume knobs. These three knobs are used to adjust the level of the Main outputs, the Headphone outputs, and the Aux Input.
Each pedal has an indicator light above it that changes color according to context.
Track pedals. Press each pedal to select one of the four loop tracks or sections. Double-press a pedal to solo the track.
Record + Play pedal. Select a track with one of the four Track pedals, then press this pedal to record, overdub, and play back your loop.
- The first press starts recording, and the indicator turns red.
- The second press sets loop length and begins overdubbing, and the indicator turns orange.
- The third press stops overdubbing and begins playback, and the indicator turns green.
Stop pedal. Press to stop tracks or selections; the function depends on which of the five looper modes you have selected. Press and hold the pedal to clear all tracks.
Mode pedal. Press to enter Mute mode, then press the Track pedals to mute each track or section. Press and hold this pedal to change to a different Looper Mode or to bring up different pages of commands. Learn more in the Sheeran Looper X User Guide > 5.9.6 Customize Pedal Menu (page 36).
Function pedal. This pedal brings up different pages of functions on the unit. In each page, all the other pedals take on different functions, the names of which are shown on the display. Different pages are set up for features such as manipulating and editing loops and tracks, selecting effects, and engaging the tuner. Learn more in the Sheeran Looper X User Guide > 4.4 Operation > Functions Menu (page 15).
Basic Operation
Recording Time
The Looper X has more than seven hours of internal recording time; you can also store loops and audio files on an SD card or a USB flash drive. In use, you can record audio onto four tracks and save each set of four tracks as a loop. Each track can have up to 99 layers, and each track has no maximum duration. You can record, play, and stop tracks independently depending on the Looper Mode.
Instruments, Effects, and Signal Processing
The Sheeran Looper X has internal effects chains and presets for processing the sound of loops from different kinds of instruments and the human voice. You can independently assign chains of effects to each of the four tracks or sections in the looper, either “pre” for committing the effects to audio as you record the loop or “post” to apply effects to a dry loop after it has been recorded.
The FX Racks page contains these groups, each of which features a library of presets which are chains of multiple effects:
- Vocal
- Vocal Tuner with automatic tuning, MIDI control, and creation of vocal harmonies
- Guitar, both acoustic and electric, including amp simulations
- Lo-Fi for adding grit and grain to clean sounds
- Dub with delay and rhythmic effects for drums and bass
- Drum for processing live drums or drum loops
- Studio for global effects
- Rhythmic for effects like time slicing and stutter
- Ed’s Rack, Ed Sheeran’s custom presets for acoustic and electric guitar, bass, beatbox, keyboards, synth bass, and vocals
- Single Effects, where you can choose one virtual effect pedal at a time and create your own chain
You can of course edit the parameters of each effect in a chain individually, save your changes, and create new presets that you store in the FX Racks.
Drum Loops
The Sheeran Looper X contains a huge library of drum loops in many styles. You can select loops and apply them to Track 3 and Track 4 in the looping workflow. You can apply chains of effects from the FX Racks. Drum loops can be time-stretched to match the tempo of your project. You can also import your own drum loops from your computer and store them in the Looper X’s internal memory, to an SD card, or to a USB flash drive.
Basic Looping
Here’s how to get started in Ed’s classic workflow, Multi Mode.
Before recording, set the input volume level for each instrument or microphone source on the inputs you want to use.
- In Track or Waveform view, select a track by pressing one of the four Track pedals. The LED on the track pedal and on the Record + Play pedal will turn red to indicate the track is armed for recording.
- Press Record + Play. Play and record the first layer of your loop.
- Press Record + Play again to set the loop length and begin overdubbing. Add your first loop layer.
- Press Record + Play again to enter playback.
Continue to add overdubs by pressing Record + Play to alternate between overdubbing and playback.
Select a new track and begin this process again to create new loops, even with different instruments or your voice, on the other three tracks alongside your first track.
To stop playback of your loops, press the Stop pedal.
Learn more in the Sheeran Looper X User Guide > 4.1 Basic Looping (page 11).
Five Looper Modes
The Sheeran Looper X provides five different workflows. The mode is displayed in the bottom-right area of the touchscreen in the Track, Wave, and Mixer views.
Select one mode before you begin recording or importing loops; if you change the mode after recording, loops will be discarded.
- Multi provides four tracks of the same length. This is Ed Sheeran’s preferred mode.
- Sync provides four tracks you can set to different lengths: one primary track and three others that are multiples or divisions of the primary track.
- Song provides four independent song sections, such as intro, verse, chorus, and bridge.
- Band is a combination of Sync and Song modes. It provides one primary track plus three tracks that can be played independently.
- Free provides un-synced, independent free-form tracks. This would be useful for creating ambient soundscapes.
Learn more in the Sheeran Looper X User Guide > 4.0 Operation > 4.2 Looper Modes (page 13).
Menus and Settings
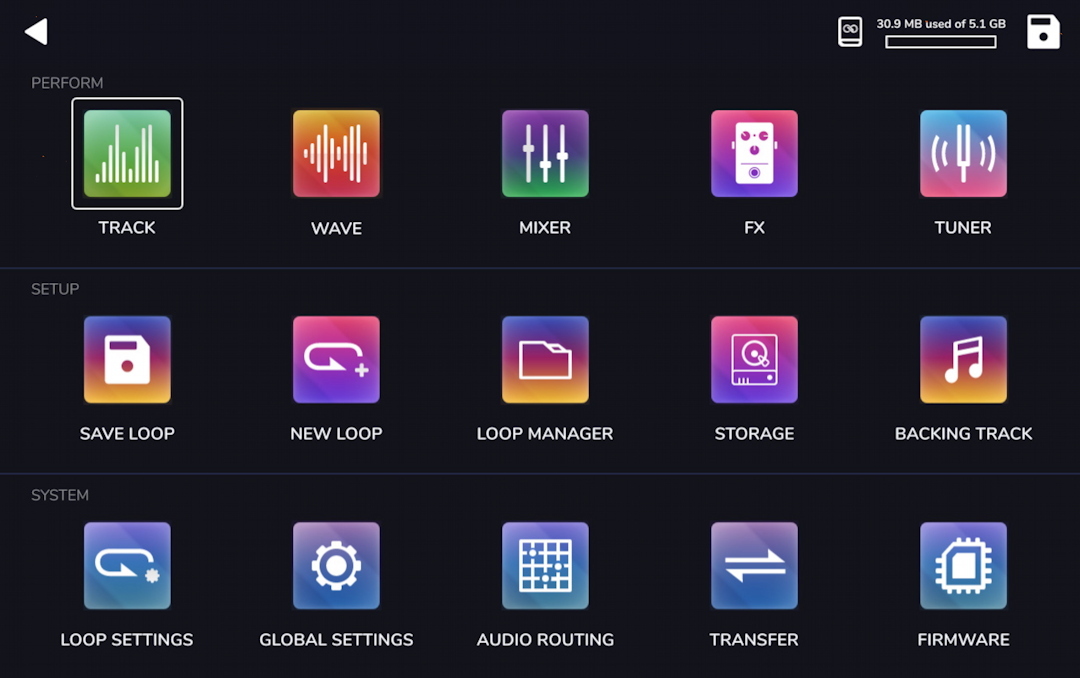
The Navigation Menu on the Sheeran Looper X
Tap the square icon in the top-left corner of the display to pull up the Navigation Menu.
It’s divided into three sections: Perform, Setup, and System.
Tap on each icon to bring up a different submenu.
Under Perform, you will see:
- Track. View simple bar graphs of signal strength for each of the four tracks or sections.
- Wave. View waveforms of each loop.
- Mixer. Adjust the mix of your tracks and add effects.
- FX. Access the FX Racks. Assign a chain of multiple effects to each track and edit the parameters of each effect. Assign groups of effects to the Looper X’s pedals so you can turn them on and off in live performance. Assign effects parameters to an optional expression pedal.
- Tuner.
Under Setup, you will see icons that bring up pages to manage and store your loops: Save Loop, New Loop, Loop Manager, Storage, and Backing Track.
Under System, you will see:
- Loop Settings. Set parameters like tempo, time signature, click track, and count-in. Choose from the five Looper Modes. Set track length and quantization. Under Time Stretch, enable syncing audio to tempo. You can also customize the functions of each pedal.
- Global Settings. This is where you configure using your Looper X as an audio interface to your computer, set MIDI parameters, and more. The Info menu displays the current version of the firmware.
- Audio Routing. Set up the signal routing you need for your live- or studio rig.
- Transfer. Connect your Looper X to your computer to transfer loops and audio files.
- Firmware. Put your Looper X in the mode that allows you to install a new firmware version from your computer.
Learn more in the Sheeran Looper X User Guide > 5.0 Menu (page 19).
Using the Sheeran Looper X with Your Computer
The Sheeran Looper X can connect to your computer over USB so that you can transfer audio files and loops from your computer to the Looper.
You can also use the Looper as an audio interface to connect to your computer and to record to your DAW. The Looper outputs a 24-bit, two-channel stereo signal with sample rates of 44.1-, 48-, 88.2- or 96 kHz. The Looper can also receive a stereo audio signal from your computer or DAW.
Remember that if you are on Windows, you need to download and install the PC Driver from the Looper X Support and Downloads page.
To connect to your computer, with the Looper shut down, attach the included USB cable to the orange USB-B port on the back of the Looper. Connect the other end of the USB cable to your Mac or PC, with an adapter cable if necessary. Now power up the Looper.
Learn about transferring files in the Sheeran Looper X User Guide > 5.12 Transfer (page 45).
Learn about using Sheeran Looper X as an audio interface in the Sheeran Looper X User Guide > 6.1 USB Recording (page 46).
Sheeran Looper Instructional Videos
Sheeran Loopers: The Sheeran Looper X Product Overview
Sheeran Loopers: Using the Sheeran Loopers File Converter
Sheeran Looper X – Backing Up Loops
Sheeran Loopers: The Sheeran Loopers Story
Related Articles
When you need help, Sweetwater has the answers!
Our knowledge base contains over 28,000 expertly written tech articles that will give you answers and help you get the most out of your gear. Our pro musicians and gear experts update content daily to keep you informed and on your way. Best of all, it’s totally FREE, and it’s just another reason that you get more at Sweetwater.com.


Offer applies only to single-receipt qualifying purchases. Select manufacturers may require that only the manufacturer’s products qualify towards the minimum purchase amount needed to be eligible for promotional financing. Otherwise, an invoice that meets the minimum purchase amount and contains at least one qualifying manufacturer product is eligible for promotional financing. No interest will be charged on promo purchase balance, and equal monthly payments are required on promo purchase until it is paid in full. The payments equal the amount financed divided by the number of months in the promo period, rounded up to the next whole dollar. These payments may be higher than the payments that would be required if this purchase was a non-promo purchase. During the last month(s) of the promo period the required monthly payment may be reduced due to the prior months’ rounding. Regular account terms apply to non-promo purchases. New Accounts as of 07/31/2025: Purchase APR is 34.99%. Penalty APR is 39.99%. Min Interest Charge is $2. Existing cardholders: See your credit card agreement terms. Subject to credit approval.
Offer applies only to single-receipt qualifying purchases. No interest will be charged on the promo balance if you pay it off, in full, within the promo period. If you do not, interest will be charged on the promo balance from the purchase date. The required minimum monthly payments may or may not pay off the promo balance before the end of the promo period, depending on purchase amount, promo length and payment allocation. Regular account terms apply to non-promo purchases and, after promo period ends, to the promo balance. New Accounts as of 07/31/2025: Purchase APR is 34.99%. Penalty APR is 39.99%. Min Interest Charge is $2. Existing cardholders: See your credit card agreement terms. Subject to credit approval.
The estimated required monthly payment shown which excludes taxes and delivery equals the amount financed divided by the number of months in the promo period, rounded up to the next cent. During the last month(s) of the promo period the required monthly payment may be reduced due to this rounding. These payments apply only with the financing offer shown. If you make these payments by the due date each month, you should pay off this amount financed within the promo period, if it is the only balance you are paying off. If you have other balances on your account, this payment will be added to any other minimum monthly payments.
Applies only to select items from this manufacturer. Ask your Sweetwater Sales Engineer for more details.