
Roland Juno-DS Setup Guide
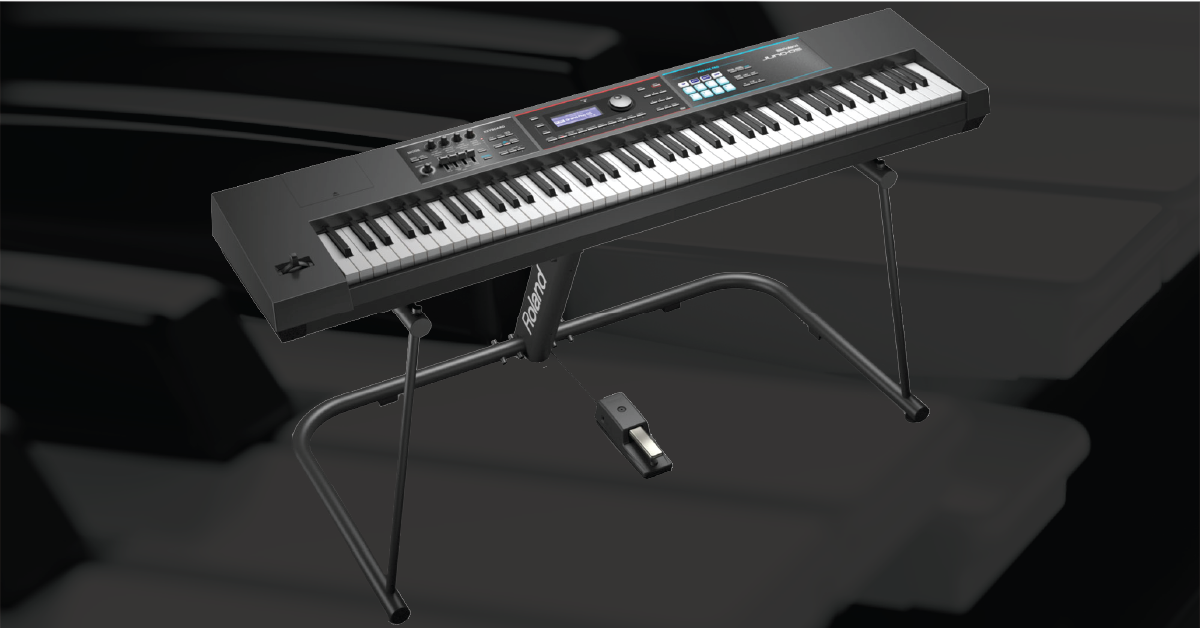
The Roland Juno-DS is a very powerful synth to have in both studio and live rigs. That’s why in this guide, we will show you how to register, set up, and connect the synth for the first time. This article only scratches the surface, though, so be sure to check out the owner’s manual for more information. Follow the sections below to get started.
Register the Juno-DS
Before we get started, the first thing to do is register the Juno-DS with Roland. By registering the synth, you’ll gain access to Roland’s product support, an extended warranty, training videos, and important updates. Follow the steps below to register.
- Log in to your Roland Backstage account. If you don’t have one yet, then you can create one here.
- Roland will then send an account activation email to the registered email address to complete the account creation process.
- If you don’t see the email in your inbox, then be sure to check your spam folder.
- On your account home page, click My Gear and select Register a Product.
- Fill out the information, including the serial number, and then click Register.
- Keep your Sweetwater invoice on hand because you’ll need to enter the purchase date, method, and dealer (Sweetwater).
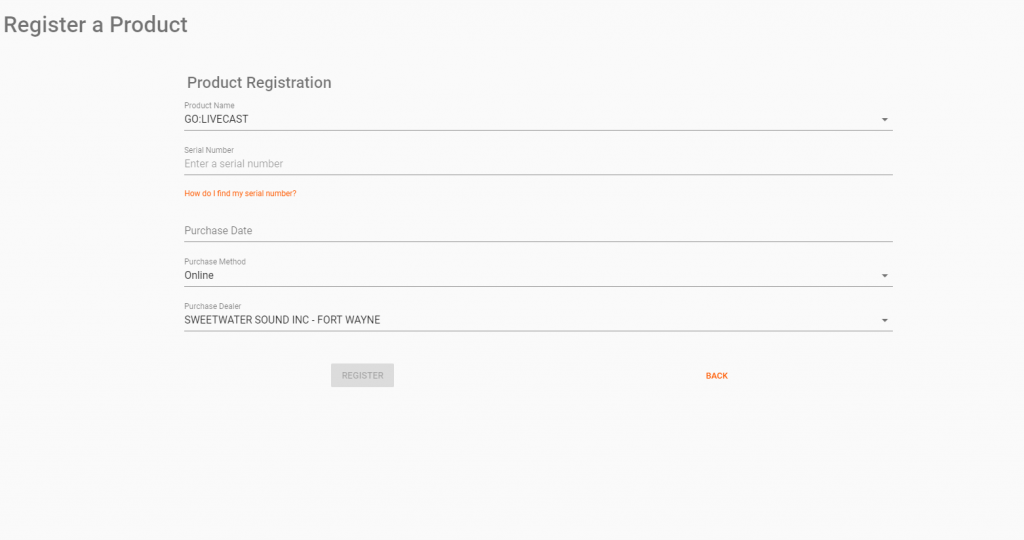
Click the image to register your Roland Juno DS
Juno DS setup and connections
There are plenty of ways to integrate your Roland Juno-DS into your live or studio rig. With a few setting changes and connections, you’ll be up and running in no time. The sections below outline how to connect with external hardware and setting up on a computer.
Before we begin:
If you need to make changes to a specific setting in places like the audio I/O, foot pedal, or MIDI menus, then you’ll need to navigate to the System Settings menu.
- To do this, press the MENU button, use the jog wheel to select SYSTEM, and then press ENTER.
- Use the left and right arrow buttons to navigate the tabs, use the up and down arrow buttons to select the tab’s settings, and use the jog wheel to update its value.
External hardware
There are quite a few connections on the back of the Juno-DS, so expansion is easy. When you make the audio output connections, make sure the Juno-DS is turned off and that the input gain and master level are turned all the way down. Doing this will prevent any loud pops, which can potentially cause harm to your gear.
Audio inputs
There are two audio input jacks on the Juno-DS. You can connect microphones using an unbalanced XLR to ¼-inch TS cable to the back of the Juno-DS. You can also connect external audio players, such as a mobile device, via the ⅛-inch balanced input using a balanced ⅛-inch to ⅛-inch TRS cable. You can use the fader on the Juno-DS’s left side, but you’ll also want to adjust the knob on the back (located next to the MIC IN jack) to a point where the microphone isn’t clipping. It may take a little time to find the right balance between the fader and knob, but this will ensure you get the best sound possible.
Juno-DS input tips
- If you’re not getting any output from your microphone, then it means you’re probably using a condenser microphone, which won’t work with the Juno-DS. You must use a dynamic microphone.
- Audio from an external audio device connected to the EXT INPUT terminal is not fed to the USB. It is fed through the Juno-DS and then fed through the main outs and headphones.
Roland Juno-DS — How to use the Mic Input and Vocoder
Audio outputs
There are two sets of audio outputs on the Juno-DS, so the setup is simple. You can connect the main outs to a mixer or keyboard amp. If you’re running a mono setup, make sure to use the leftoutput. The other audio output is for headphones.
Using the MASTER VOLUME knob will increase and decrease the output from the main outs and the headphone jacks. If you want to fine-tune levels other than just the master volume, you’ll need to go into the System Settings.
- In System Settings, use the right arrow button to navigate to SOUND, then use the down button to scroll through the sound options.
- Update the Master Level, Output Gain, and Audio Levelso that everything is at a comfortable listening level.
Foot pedals
IMPORTANT: Using third-party pedals may cause malfunction or damage to the Juno-DS.
You can connect one expression pedal and one pedal switch to the back of the Juno-DS. You must use the Roland EV-5 for the expression pedal and a DP series for the pedal switch. You can change what the pedals control by going to the Pedal tab within the System Settings menu.
- Check out the user manual for more information on all of the pedal parameters you can change on the Juno-DS!
MIDI and USB
The Juno-DS allows you to connect external instruments via the MIDI and USB-B ports. Depending on your application, you may need to update your MIDI settings within the System Settings.
Suppose you’re connecting the Juno-DS to your computer via USB. In that case, you have two options depending on what driver mode you’re in: you can transmit both MIDI and audio over USB, or you can just send MIDI over USB to your computer or an iOS device. Follow these steps to change the driver mode.
- Go to the System Settings and navigate to the MIDIwindow.
- Use the Parameter dial to navigate to USB Driver. Select between Generic and Vendor.
- Generic: This enables “class-compliant” mode. You will need to enter Generic mode if you want to connect to an iOS device.
- Vendor: This is used when you connect the Juno-DS to your computer. You will need the Juno-DS driver for it to function correctly.
- Power cycle the unit to apply the change.
- If you’re in Vendor mode, go to the Roland DS driver download page to select the latest driver for your OS.
- Install the driver, and then connect your Juno-DS to your computer.
Important note for Juno-DS 76 owners:
If you plan on connecting the DS76 to your computer, you will need to attach the included ferrite core to a USB cable. This helps reduce any noise caused by EMI (electromagnetic interference).
- Connect the ferrite core to the end of the USB cable, which connects to the Juno-DS.
- The ferrite core should be attached approximately 10 cm from the jack.
- Press the two halves together until they’re secured in place. Don’t pinch with too much force, as it may damage the cable.
- Do not remove the core after it has been connected!
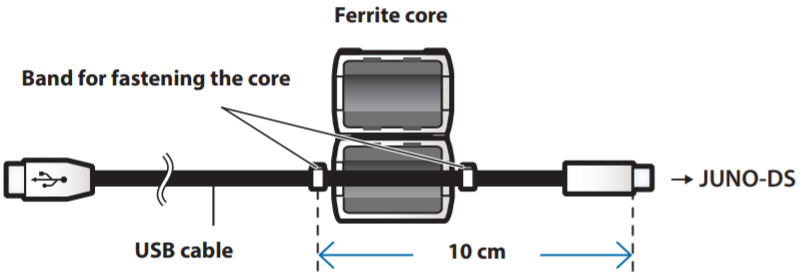
Attaching the ferrite core to the included USB cable
Continue to our next guide to learn how to work with sounds on the Roland Juno-DS!
Learn more about how to work with the sounds built inside the Roland Juno-DS!
Related content
Sweetwater’s JUNO-DS Bonus Thumb Drive — Daniel Fisher
Synth Clips Playlist by Daniel Fisher
Additional resources
- Roland Juno-DS Owner’s Manual
- Juno-DS61 Driver
- Juno-DS76 Driver
- Juno-DS88 Driver
- Free Roland Axial Sound Libraries
Roland Juno-DS Tutorial Series Playlist
When you need help, Sweetwater has the answers!
Our knowledge base contains over 28,000 expertly written tech articles that will give you answers and help you get the most out of your gear. Our pro musicians and gear experts update content daily to keep you informed and on your way. Best of all, it’s totally FREE, and it’s just another reason that you get more at Sweetwater.com.


Offer applies only to single-receipt qualifying purchases. Select manufacturers may require that only the manufacturer’s products qualify towards the minimum purchase amount needed to be eligible for promotional financing. Otherwise, an invoice that meets the minimum purchase amount and contains at least one qualifying manufacturer product is eligible for promotional financing. No interest will be charged on promo purchase balance, and equal monthly payments are required on promo purchase until it is paid in full. The payments equal the amount financed divided by the number of months in the promo period, rounded up to the next whole dollar. These payments may be higher than the payments that would be required if this purchase was a non-promo purchase. During the last month(s) of the promo period the required monthly payment may be reduced due to the prior months’ rounding. Regular account terms apply to non-promo purchases. New Accounts as of 07/31/2025: Purchase APR is 34.99%. Penalty APR is 39.99%. Min Interest Charge is $2. Existing cardholders: See your credit card agreement terms. Subject to credit approval.
Offer applies only to single-receipt qualifying purchases. No interest will be charged on the promo balance if you pay it off, in full, within the promo period. If you do not, interest will be charged on the promo balance from the purchase date. The required minimum monthly payments may or may not pay off the promo balance before the end of the promo period, depending on purchase amount, promo length and payment allocation. Regular account terms apply to non-promo purchases and, after promo period ends, to the promo balance. New Accounts as of 07/31/2025: Purchase APR is 34.99%. Penalty APR is 39.99%. Min Interest Charge is $2. Existing cardholders: See your credit card agreement terms. Subject to credit approval.
The estimated required monthly payment shown which excludes taxes and delivery equals the amount financed divided by the number of months in the promo period, rounded up to the next cent. During the last month(s) of the promo period the required monthly payment may be reduced due to this rounding. These payments apply only with the financing offer shown. If you make these payments by the due date each month, you should pay off this amount financed within the promo period, if it is the only balance you are paying off. If you have other balances on your account, this payment will be added to any other minimum monthly payments.
Applies only to select items from this manufacturer. Ask your Sweetwater Sales Engineer for more details.