
Raven MTi2 Setup Checklist for Mac

Overview
Slate Media Technology’s Raven MTi2 is a control surface designed to give you complete control over your recording projects through features such as the multi-touch display and the customizable toolbar.
However, having a strong command with the Raven relies on the premise that you have effectively setup your MTi2. That is why, with Slate Media Technology’s help, we have put together a setup checklist to get you up and running quickly and smoothly. With that being said, let’s jump right in!
How the MTi2 Works
The most important thing to remember when starting out with the Raven is how it works. The Raven simply “listens” to what its three software counterparts (UPDD, V-Control, and your DAW) are doing. Because those applications are telling the Raven what to do, it is crucial that these also get the necessary attention during the setup process.
Raven Setup Checklist
1. Check Connections
Check your monitor connections and your USB connection for the correct setup. Here are a couple things to remember:
-
No unpowered USB hubs
-
No odd HDMI converters
-
Make sure to turn on the power button on the back of the Raven.
2. Verify UPDD Daemon Status
Open the UPDD Daemon and check that the status is OK, set to Monitor 1, and the screen name is Raven. You may need to run the Configure setup for UPDD. Follow the two-part instructions below.
How to Check UPDD Daemon Status
1. Click on UPDD Daemon icon.
2. Choose Status.
3. Verify the following:
- Status: OK
- Monitor: 1
- Screen Name: Raven
How to Run the UPDD Configure Setup: Click on the UPDD Daemon icon and select Configure. Hold your finger on the targets and release when a dark blue ring appears. For more information, read this article by Touch Base.

3. Check Displays
Open Display settings and confirm your Raven’s main display and set to 1080p.
How to Adjust Display Settings
1. Select the Apple icon and choose System Preferences.
2. Click Displays.
3. Under the Display tab, select 1080p.

4. Disable Energy Saver
Follow the instructions below to turn off Sleep Settings.
How to Disable Energy Saver
1. Select the Apple icon and choose System Preferences.
2. Click Energy Saver.
3. Adjust the settings to match Step 3 shown below.

5. Adjust Security & Privacy Settings
Confirm that all apps have been added in the Accessibility window and are allowed through the firewall. Follow the instructions below.
How to Adjust Security & Privacy Settings
1. Go to System Preferences and select Security and Privacy.
2. At the bottom of the window, click the lock and enter your password, and click Unlock.
3. In the Firewall tab, make sure Firewall is turned off.
4. In the Privacy tab, make sure the following apps are in the Accessibility window.
- Raven MTi
- Your DAW
- V-Control Pro
Note: If you need to add applications, click the + and add the necessary apps.

6. Turn on Pinch Zoom
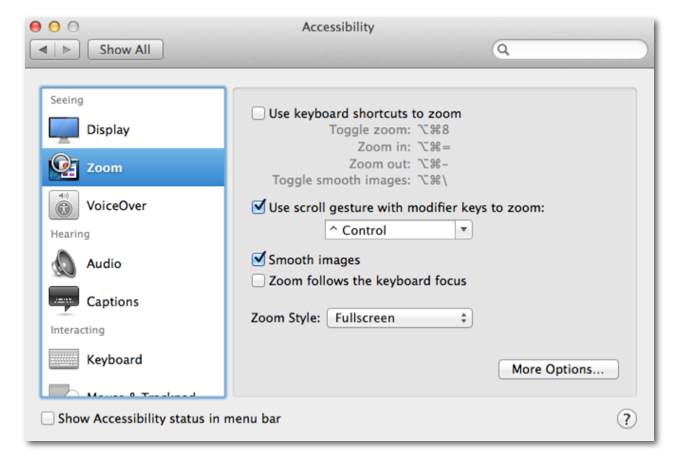
Turn on Pinch Zoom for gestures for macOS in the Accessibility tab. Follow the two-part instructions below.
Part 1: How to Turn On Pinch Zoom
1. Select the Apple icon and choose System Preferences.
2. Click Accessibility.
3. Check the Use scroll gesture with modifier keys to zoom box.
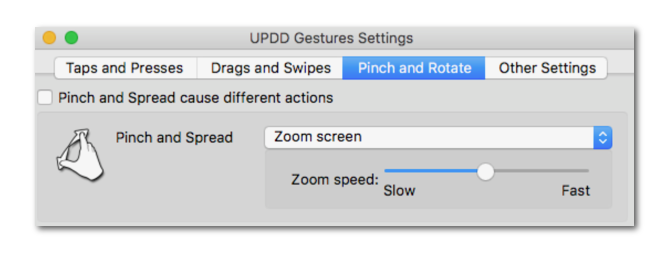
Part 2: How to Adjust Pinch Zoom Settings
1. Click on the Hand icon. ![]()
2. Select Settings.
3. In the Pinch and Rotate tab, you can adjust settings as shown below.
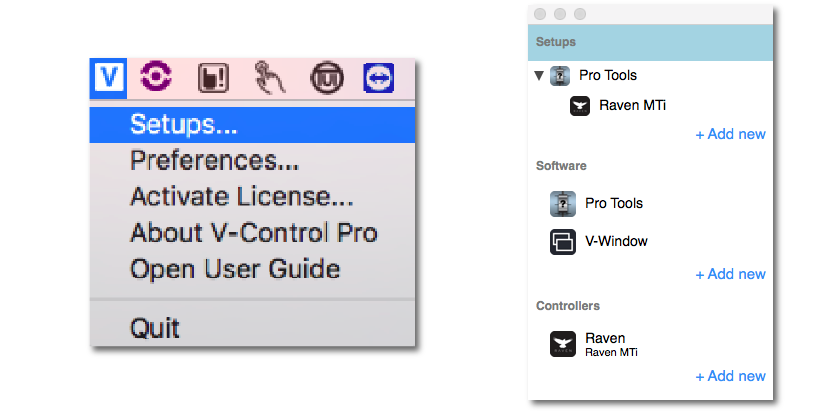
7. Check the V-Control Pro Setups Window
To begin, open V-Control Pro and your DAW. Then, confirm that the DAW is showing in the V-Control Pro setups. In this example, we will use Pro Tools as our DAW.
How to Check the V-Control Pro Setups Window
1. With your DAW and RAVEN open, select the V-Control Pro icon.
2. Select Setups…
3. Check that your DAW appears in the Setups column on the left side.
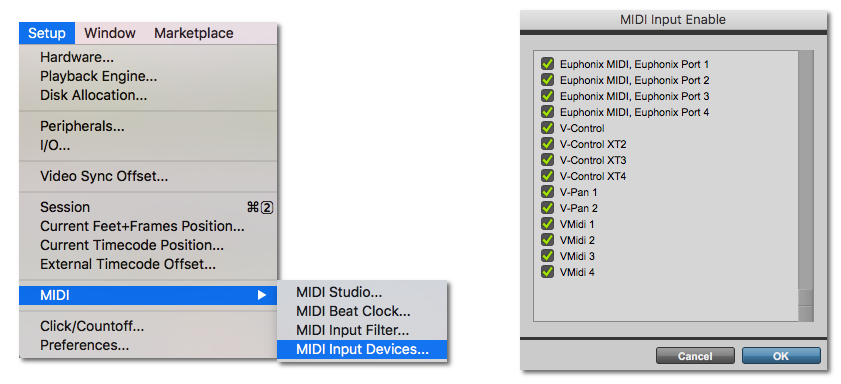
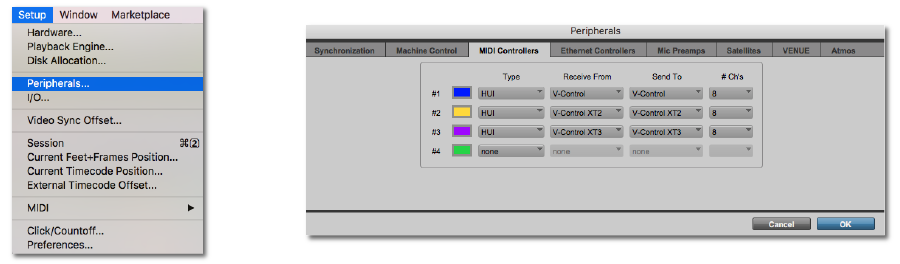
8. Adjust HUI Connections
Adjust the HUI connections in the DAW controller setups. To do this, we need to enable all MIDI devices and then configure your MIDI controllers. Follow the two-part instructions below.
Part 1: Enable MIDI Devices in Pro Tools
1. Go to the Setup tab.
2. Choose MIDI and select MIDI Input Devices…
3. Make sure all your MIDI devices are checked.
Part 2: Configure MIDI Controllers in Pro Tools
1. Go to the Setup tab.
2. Select Peripherals…
3. Under the MIDI Controllers tab, adjust the settings as shown below.
9. Confirm that Applications Connect to Raven
Launch Raven and confirm it connects to UPDD and V-Control Pro.
10. Set Up the Pro Tools Internal Mixer Alignment
Import or select the window layout templates and align Raven Internal Mixer. Save the session as a template so it can easily recall the settings. Read our Pro Tools Internal Mixer Alignment article to do this!
11. Check Batch Commands
Check that Batch Commands are working and triggering on the Raven. If they are not working, perhaps key commands have not been imported or the DAW is not open as an administrator.
For Batch Command Training, watch Slate TV’s video below.
Wrapping up…
At this point, your Raven should be up and running smoothly. If not, check the Helpful Links section below or take a look at Slate’s Support Page.
Helpful Links
How do I setup my Raven MTi2 with Pro Tools?
How do I setup my Raven MTi2 with Cubase in Windows 10?
PC Optimization Guide for Windows 10
Mac Optimization Guide for macOS 10.13 High Sierra
Slate Announces Major DAW Compatibility Updates for Raven
When you need help, Sweetwater has the answers!
Our knowledge base contains over 28,000 expertly written tech articles that will give you answers and help you get the most out of your gear. Our pro musicians and gear experts update content daily to keep you informed and on your way. Best of all, it’s totally FREE, and it’s just another reason that you get more at Sweetwater.com.


Offer applies only to single-receipt qualifying purchases. Select manufacturers may require that only the manufacturer’s products qualify towards the minimum purchase amount needed to be eligible for promotional financing. Otherwise, an invoice that meets the minimum purchase amount and contains at least one qualifying manufacturer product is eligible for promotional financing. No interest will be charged on promo purchase balance, and equal monthly payments are required on promo purchase until it is paid in full. The payments equal the amount financed divided by the number of months in the promo period, rounded up to the next whole dollar. These payments may be higher than the payments that would be required if this purchase was a non-promo purchase. During the last month(s) of the promo period the required monthly payment may be reduced due to the prior months’ rounding. Regular account terms apply to non-promo purchases. New Accounts as of 07/31/2025: Purchase APR is 34.99%. Penalty APR is 39.99%. Min Interest Charge is $2. Existing cardholders: See your credit card agreement terms. Subject to credit approval.
Offer applies only to single-receipt qualifying purchases. No interest will be charged on the promo balance if you pay it off, in full, within the promo period. If you do not, interest will be charged on the promo balance from the purchase date. The required minimum monthly payments may or may not pay off the promo balance before the end of the promo period, depending on purchase amount, promo length and payment allocation. Regular account terms apply to non-promo purchases and, after promo period ends, to the promo balance. New Accounts as of 07/31/2025: Purchase APR is 34.99%. Penalty APR is 39.99%. Min Interest Charge is $2. Existing cardholders: See your credit card agreement terms. Subject to credit approval.
The estimated required monthly payment shown which excludes taxes and delivery equals the amount financed divided by the number of months in the promo period, rounded up to the next cent. During the last month(s) of the promo period the required monthly payment may be reduced due to this rounding. These payments apply only with the financing offer shown. If you make these payments by the due date each month, you should pay off this amount financed within the promo period, if it is the only balance you are paying off. If you have other balances on your account, this payment will be added to any other minimum monthly payments.
Applies only to select items from this manufacturer. Ask your Sweetwater Sales Engineer for more details.