
iPad Optimization Guide for Live Musicians
NOTE: iPadOS 26 was released on September 15, 2025.
This article is based on iPadOS 18, released on September 16, 2024, but these tips are relevant to all recent versions of iPadOS and iOS as well.
Apple released the first iPad in 2010, and it’s become so indispensable to musicians that we can hardly remember life before it.
Since so many pieces of gear you buy from Sweetwater can be controlled by an app for the iPad, we are providing this guide to walk you through the basics of setting it up for use on stage or while recording. With these tips, you can make modest improvements to performance, reduce distractions by turning off notifications, optimize for legibility, and improve battery life.
In 2019, Apple “forked,” (divided) iOS, the operating system for the iPhone and iPad, into two versions: iOS and iPadOS. Nonetheless, many of the tips in this article apply both to the iPad and to the iPhone.
For more in-depth explanations, check Apple’s iPad User Guide.
- How you optimize your iPad depends on how you use it
- First up: Turn off and start up your iPad
- Get to know your Settings
- Turn off Wi-Fi, Bluetooth, or Cellular Data if you don’t need them
- Minimize distractions: Turn off Notifications and Alarms
- Set up your iPad for high legibility
- Extend battery life and increase performance
- Apple’s iPad User Guide
How you optimize your iPad depends on how you use it
How you optimize your iPad depends on how you use it on stage. You may use it for:
- Mixer and hardware effects control
- Individual monitor mix control
- Sheet music, chord charts and lyrics
- Audio playback, virtual instruments and effects processing
- Live recording with an iPad DAW
You may even be hooking up an audio interface that is Apple MFi-certified for iOS and iPadOS, using a Lightning connector cable for an older iPad or a USB-C data cable for a newer model.
First up: Turn off and start up your iPad
You’ll get a boost in performance by shutting down your iPad and booting it up again. You should do this before starting a recording session or setting up your iPad on stage. It takes less than a minute.

Slide to Power Off
When you hold down the combination of buttons to turn the iPad off, the screen will go blank except for a message, “Slide to power off.” Drag the circular power icon to the right, and wait for your iPad screen to go completely black, indicating that it is shut down.
Once it is shut down, press and hold the top button and the iPad will boot up.
How to turn it off depends on the model:
Models with Face ID or with Touch ID in the top button
Simultaneously press and hold the top button and either volume button, and then drag the slider.
Models with the Home button
Press and hold the top button, and then drag the slider.
Turning the iPad off from Settings
You can also turn off any model by going to Settings > General > Shut Down, then dragging the slider.
Learn more in Apple Support: Turn iPad on or off.
Get to know your Settings
No matter your application, you configure and optimize your iPad using Settings.
Settings icon

The Settings app
Settings is where you can not only set preferences globally, but also for individual apps. We will go over the major Settings that relate to optimization for music, but along the way, you will learn about other settings you can adjust.
Turn off Wi-Fi, Bluetooth, or Cellular Data if you don’t need them

Wi-Fi and Bluetooth in Settings
Optimizing your iPad is primarily about turning off things you don’t need when you are on stage or when recording.
For example, if you only use your iPad to display sheet music while on stage, you can turn off Wi-Fi, Bluetooth, and Cellular data. But do you have a Bluetooth page-turning pedal? Then you’ll need to leave Bluetooth on.
If you only use your iPad as a recording or playback device or an effects processor, and your microphones, instruments and MIDI controller go through an audio interface, then you can turn off Wi-Fi, Bluetooth and Cellular data.
If you use your iPad to control your digital mixer or your personal monitor mix, however, you will need Wi-Fi and perhaps Bluetooth.
Go to Settings > Wi-Fi, Settings > Bluetooth, and Settings > Cellular (if you have an iPad with cellular capability) to turn off what you don’t need.
Minimize distractions: Turn off Notifications and Alarms
You may not have an iPad dedicated to stage work. You probably use the same iPad for emails, texting, social media, and who knows what else. All those apps send Notifications to alert you when new messages appear. Notifications appear as sounds, vibrations, badges, and banners, on your iPad’s main screen, the Lock Screen, or the Notification Center.
While you are on stage, you will want to turn off Notifications. This is especially important if you are using your iPad for audio output. You don’t want notification sounds going through the PA. Fortunately, it’s not all or nothing: if you need it, iPadOS gives you flexibility in permitting certain Notifications to come through.
Silent Mode
Go to Settings > Sounds and click the button to turn on Silent Mode. This will turn off the audio for ringtones, alerts and system sounds. However, the iPad will still play audio from alarms and timers, as well as apps that play music and videos.
Swipe Down for the Control Center

The Control Center
Swipe down from the top-right corner of your iPad to open the Control Center. It’s a shortcut that provides frequently-used commands and icons to open specific apps, and you can customize it. Practice the swipe gesture, as you will use Control Center frequently.
Airplane Mode

The Control Center buttons for Airplane Mode, Cellular Data, Wi-Fi and Bluetooth
Notifications come in over Wi-Fi, Bluetooth, or Cellular data. The simplest way to stop these notifications and increase your battery life is to shut off Wi-Fi, Bluetooth, and Cellular data altogether.
The iPad has a single setting that disables these connections. It’s called Airplane Mode. In the Control Center, tap the Airplane symbol to disable the connections. Tap the Wi-Fi, Bluetooth, and Cellular symbols to turn each on separately.
Focus and Do Not Disturb

The Focus control set to Do Not Disturb
iPadOS provides settings for minimizing distractions under a feature called Focus.
Swipe down to open Control Center. In the lower left, you’ll see Focus. Tap on that to pull up a menu of different choices. Select Do Not Disturb.
Do Not Disturb means that although your iPad continues to receive messages, those messages will no longer trigger Notifications, alert sounds, or vibrations. When you tap on it, you will be in Do Not Disturb mode until you turn it off.
You can select a duration if you tap on the three dots on the right.

The Do Not Disturb dialog
If you click on Settings, you will be sent to a dialog where you can extensively customize Do Not Disturb. You can let certain messages through, such as those from specific people in your Contacts or alerts from particular apps. You can also control which Notifications appear on your Home Screen and Lock Screen while Do Not Disturb is engaged. You can set up specific times of the day when Do Not Disturb automatically turns on and off.
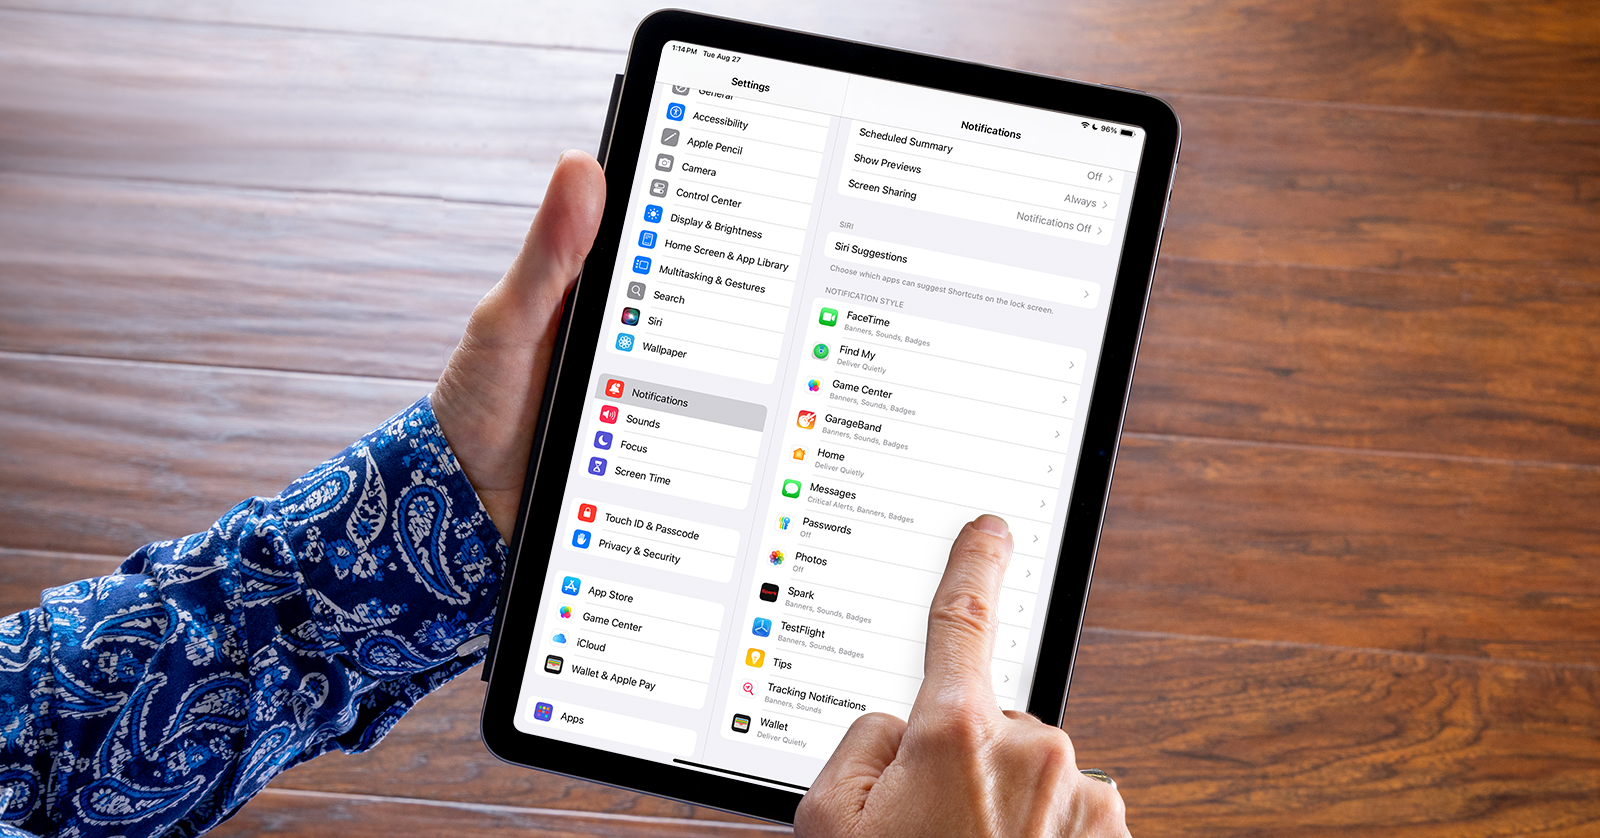
Notifications for Individual Apps

The Notifications Pane in Settings
You have control over the specificity of Notifications, on an app-by-app basis.
Go to Settings > Notifications. Under Notification Style you will see an alphabetical list of most of the apps on your iPad. Tap an app’s name and turn Allow Notifications on and off. If an app is set with Notifications on, you will have additional settings to customize whether that app will send Alerts via Sounds or Badges, and whether Banner notifications will appear on the Lock Screen, the Notification Center, or Banners, which refers to messages overlaying whatever app you are using at the time.

The Messages pane within Notifications in Settings
Calendar, Clocks, Alarms
Before you perform with your iPad, check your Calendar and make sure there are no events with reminders scheduled to go off during your performance. Calendar Sounds will ring out whether Do Not Disturb is turned on or not.
You may have set specific Alarms on your Clock app. Again, check to make sure you have no Alarms scheduled during that time because the chosen Alarm sound will ring out even if Do Not Disturb is on.
Set up your iPad for high legibility
Your iPad may be mounted an arm’s length or farther away on stage. Your stage lighting may be bright or dark. If your screen is hard to read, you don’t need to rely on the iPad’s default settings for things like brightness, color scheme, and text size. You can customize many settings and save yourself from having to squint.
Depending on your model of iPad, you have options for adjusting screen brightness and color. You can also alter the color scheme and reduce image transparency for greater contrast. Once you are on stage under the lights, adjust the screen brightness on your iPad to the lowest level where you can clearly read the screen. Lower brightness means longer battery life. Depending on the stage lighting, the lower brightness may be less of a distraction to your bandmates or audience. You can also experiment with color scheme settings. You may find one that makes it easier to read the screen onstage.
If you are using a chart or sheet music apps such as ForScore or iReal B, make sure that your settings work well with that app. It’s all about legibility.
Control Center
Adjust Screen Brightness
Open Control Center, then drag the Brightness slider up or down.

The Display & Brightness pane in Settings
Alternately, go to Settings > Display & Brightness, and drag the slider there.

Adjust the text and display size in the Accessibility settings
Under Settings > Accessibility, tap Display & Text Size, then turn on Auto-Brightness. Your iPad will automatically raise or lower the screen brightness based on the ambient light. This may be helpful if your stage lighting varies dramatically during the show.
You can usually leave Auto-Brightness on and override it with the slider in Control Center or you can turn it completely off. If you do, the screen may be too bright in low light, requiring manual adjustment if you want to maximize battery life.
Turn Dark Mode on or off

Selecting Dark Mode in Settings
Dark Mode gives the iPad user interface a color scheme with higher contrast that is less intrusive and may be easier to read on a dark stage. InDark Mode, some apps may adopt an “inverted” appearance with white text on a black background, but it varies by the app. Experiment by going into each app and seeing if it has a preference for a dark theme.
Open Control Center, touch and hold the Brightness icon, then tap the Dark Mode icon to turn it on or off.
You can also go to Settings > Display & Brightness > Appearance and tap Dark.
Night Shift
Night Shift reduces blue light, giving a much “cooler” visual effect. You can try it out, but you may find that it makes the display less legible on a dark stage.
Open Control Center, touch and hold the Brightness icon, then tap the Night Shift icon.

The Brightness, Dark Mode, Night Shift and True Tone control pane in Control Center
True Tone
On some newer iPads, True Tone adapts the color temperature to match the light in your environment. We find that turning True Tone off results in better legibility; see what you think.
Open Control Center, touch and hold the Brightness icon, then tap the True Tone icon to turn it on or off.
Brightness Again
Depending on your combination of settings for Dark Mode, Night Shift, and True Tone, you will probably want to manually adjust Brightness all over again. It’s all about readability.
Settings
Under here you will find all the settings we adjusted in Control Center, and then some.
Auto-Lock
Under Auto-Lock, you can set how long until your iPad locks its screen or shuts down the display. Generally speaking, on stage you want to set this to Never. But you may want to switch it back when you are off stage, for privacy and to conserve the battery.
Text Size
This crucial slider changes the size of the display text in the entire user interface. If your iPad is mounted farther away and the user interface is hard to read, increase the Text Size. This will affect Apple apps’ Settings, Home Screen, and user interface. Individual third-party apps may or may not follow theSettings Text Size. In that case, you should go inside a particular app and see if it has specific settings for adjusting text size.
Bold Text
This on/off switch does what it says. All text elements in the user interface will appear in boldface.
Display Zoom
There are two settings, Default and More Space. The latter actually reduces text size and makes icons smaller. Try each option and see if you like More Space better. Then check each app you use to see if it works well in More Space mode.
Accessibility

The Accessibility settings
Go back to Settings > Accessibility.
This dialog replicates some of the settings in Display & Brightness, but there are a couple of on-off switches you can try to see if it makes the iPad easier to read on stage.
Larger Text
This setting enables you to override the Text Size setting from Display & Brightness and use an even larger system text size. Check your apps to see if they display correctly with a larger text size.
Reduce Transparency
This setting improves contrast by reducing transparency on some backgrounds.
Increase Contrast
Increases color contrast between app foreground and background colors.
Auto-Brightness
Automatically raises or lowers the screen’s brightness by measuring the light in your surroundings.
Other Settings
There are other settings here to adjust color balance or invert colors which may be helpful to people with different kinds of color blindness or vision impairment. You can try out the settings but make sure you set things back if you don’t find them helpful.
Extend Battery Life and Increase Performance
If you can’t plug in and charge your iPad on stage, you will be concerned about battery life. Temporarily shutting off background processes will extend battery life and free up processing power for modestly increased performance.
Background App Refresh and Location Services

The Background App Refresh pane within the General pane in Settings
Settings > General > Background App Refresh, enabled by default, allows any app that accesses the internet to get updates constantly, whether you are using the app or not. Examples would be a social media app or newspaper app that continually downloads new stories. You can turn off Background App Refresh for most all apps with one button, or you can make the setting for each app individually.
Settings > Privacy & Security > Location Services, enabled by default, permits location-aware apps to constantly broadcast your location to the servers of the company that makes the app, over cellular data. An example would be an app for a grocery store that tracks you along your trip to the store to alert them as to when you will arrive to pick up your order. You can turn off all Location Services with one button, or make the setting for each app individually.
Battery Usage by App
Settings > Battery > Battery Usage by App is a table of the apps using the most battery life. By examining this, you can identify certain apps and see if turning off Background App Refresh and Location Services reduces battery usage.
Settings for Individual Apps

Settings for an individual app on your iPad
Go to Settings, and in the pane on the left, scroll all the way to the bottom and select Apps. In the pane on the right you will see a list of most of the apps you have installed. Select an entry to access settings specific to that app. You will discover preferences you didn’t know you could adjust. You can also make settings for Notifications, Location Services or Background App Refresh under each app.
Apple’s iPad User Guide
We hope you’ve learned about settings and preferences for your iPad that you didn’t even know you could adjust.
Learn more in Apple’s iPad User Guide.
Related Articles
When you need help, Sweetwater has the answers!
Our knowledge base contains over 28,000 expertly written tech articles that will give you answers and help you get the most out of your gear. Our pro musicians and gear experts update content daily to keep you informed and on your way. Best of all, it’s totally FREE, and it’s just another reason that you get more at Sweetwater.com.


Offer applies only to single-receipt qualifying purchases. Select manufacturers may require that only the manufacturer’s products qualify towards the minimum purchase amount needed to be eligible for promotional financing. Otherwise, an invoice that meets the minimum purchase amount and contains at least one qualifying manufacturer product is eligible for promotional financing. No interest will be charged on promo purchase balance, and equal monthly payments are required on promo purchase until it is paid in full. The payments equal the amount financed divided by the number of months in the promo period, rounded up to the next whole dollar. These payments may be higher than the payments that would be required if this purchase was a non-promo purchase. During the last month(s) of the promo period the required monthly payment may be reduced due to the prior months’ rounding. Regular account terms apply to non-promo purchases. New Accounts as of 07/31/2025: Purchase APR is 34.99%. Penalty APR is 39.99%. Min Interest Charge is $2. Existing cardholders: See your credit card agreement terms. Subject to credit approval.
Offer applies only to single-receipt qualifying purchases. No interest will be charged on the promo balance if you pay it off, in full, within the promo period. If you do not, interest will be charged on the promo balance from the purchase date. The required minimum monthly payments may or may not pay off the promo balance before the end of the promo period, depending on purchase amount, promo length and payment allocation. Regular account terms apply to non-promo purchases and, after promo period ends, to the promo balance. New Accounts as of 07/31/2025: Purchase APR is 34.99%. Penalty APR is 39.99%. Min Interest Charge is $2. Existing cardholders: See your credit card agreement terms. Subject to credit approval.
The estimated required monthly payment shown which excludes taxes and delivery equals the amount financed divided by the number of months in the promo period, rounded up to the next cent. During the last month(s) of the promo period the required monthly payment may be reduced due to this rounding. These payments apply only with the financing offer shown. If you make these payments by the due date each month, you should pay off this amount financed within the promo period, if it is the only balance you are paying off. If you have other balances on your account, this payment will be added to any other minimum monthly payments.
Applies only to select items from this manufacturer. Ask your Sweetwater Sales Engineer for more details.