
How to Upgrade your Guitar Pots
Upgrading the pots in your electric guitar can be a great way to add some extra tone to your axe. So in this guide, we will show you how to upgrade your volume pots and tone pots. You’ll also learn what potentiometers are and how they work, and we’ll also provide some tips and tricks along the way. Follow the sections below to get started.
What is a potentiometer and how does it work?
A potentiometer or “pot”, is a variable resistor that changes your tone or volume by increasing or decreasing resistance. Adding a capacitor or “cap” to the pot turns it into a simple EQ. Turning the wiper adjusts the amount of resistance and, in turn, determines which frequencies are allowed to pass.

Tone pot vs. Volume pot
People often ask “what’s the difference between a tone pot and volume pot?” The only difference between a tone pot and a volume pot is whether there is a capacitor attached. Since a potentiometer is a resistor, putting a cap between the pot and ground turns it into an EQ. Because we can vary the amount of resistance by turning the pot up or down, we can choose how much high-end frequency content gets rolled off.
The values of the potentiometer and capacitor you use for your tone knob will determine which frequencies it will attenuate. Most guitars will typically use capacitors with 0.001 – 0.1 microfarads. The other value to consider is the pot itself, which is usually written on the back. Before removing any existing pots, verify their value. This value will play a prominent role in the brightness of your tone and how the pot will interact with your pickups.
A couple good rules of thumb to remember
- The higher the capacitance value is, the bassier your tone will be.
- The higher the potentiometer resistance value, the more high end will pass through.
There are certainly no rules against trying out different pots and experimenting with tone, but here are some guidelines that are useful in determining the best choice for upgrading or replacing your existing pots.
Long shaft vs. Short shaft
Be sure that you choose the correct shaft length when replacing your pots. If you need to mount the potentiometer to a thicker-topped guitar (Gibson Les Paul), you’ll likely need a long shaft pot for it to be securely mounted. Guitars with pots mounted to the pickguard or models with thinner tops will require short shaft pots.
Also, take a quick look at your guitar knobs. If the inside of your knob has tiny teeth or spines, it will fit by being pushed onto a split shaft pot. If it doesn’t, it likely has a set screw on the side of the knob and will be used with solid shaft pots.
Audio vs. Linear tapered pots
Lastly, you’ll want to determine whether an audio tapered or linear tapered pot will be right for you. In most cases, you’ll want to choose audio tapered as it sounds more natural than a linear tapered pot. The reason is that a linear taper changes resistance evenly, and the human ear doesn’t perceive sound this way.
If your pot sounds like there are rapid or sudden spikes in your volume or tone, you likely hear the result of a linear pot. The audio tapered pot resolves this by using a logarithmic curve that sounds like a more steady increase or decrease in volume or tone.
How to install a pot
Once you’ve decided on the pot that’s best for you, it’s time to heat your soldering iron and get it installed. Set your soldering iron to the temperature you’re comfortable working with. Rosin core 60/40 solder will typically melt at 370 degrees, but setting your iron to 600 degrees or so is ideal. You want the soldering iron to be hot enough to do the job quickly but not so hot that it burns up your components.
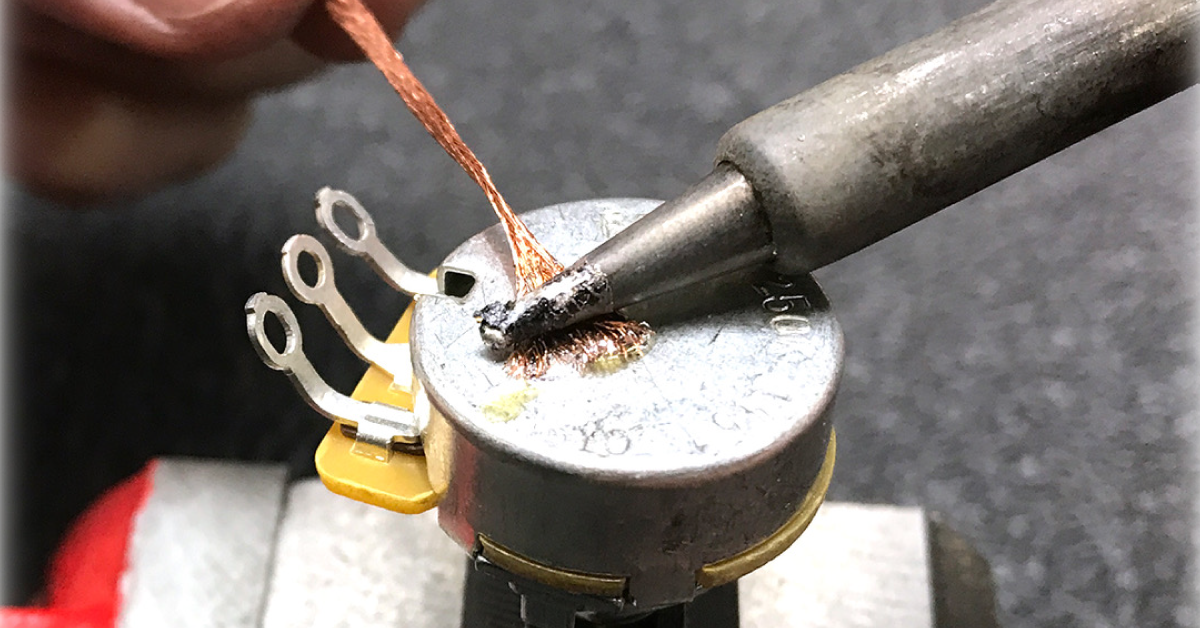
1. Remove the old solder
If you’re installing brand new components, you can likely skip this step. Once your soldering iron has had time to heat up, use some solder wick to remove any old solder from the lugs. Solder wick is braided copper wire that will soak up old solder. To use it, put your solder wick between the old solder and your iron. Once the solder begins to flow, the wick will soak it up.
Removing old solder
2. Tin the lug and wire
PRO TIP: Alligator clips or a set of “helping hands” are a great way to hold components in place while you solder.
Before connecting the wires to the lugs, you’ll want to tin both of them. To tin a wire, run your soldering iron and the solder down both sides of the exposed wire, leaving just enough solder to fill the gaps between the filaments. Next, tin the lug with just enough solder to cover the entire hole. If done correctly, the solder will be shiny and smooth. Tinning the lug and the wire reduces how long you have to hold your iron on the components and prevents heat damage.
Tinning the lug of a potentiometer
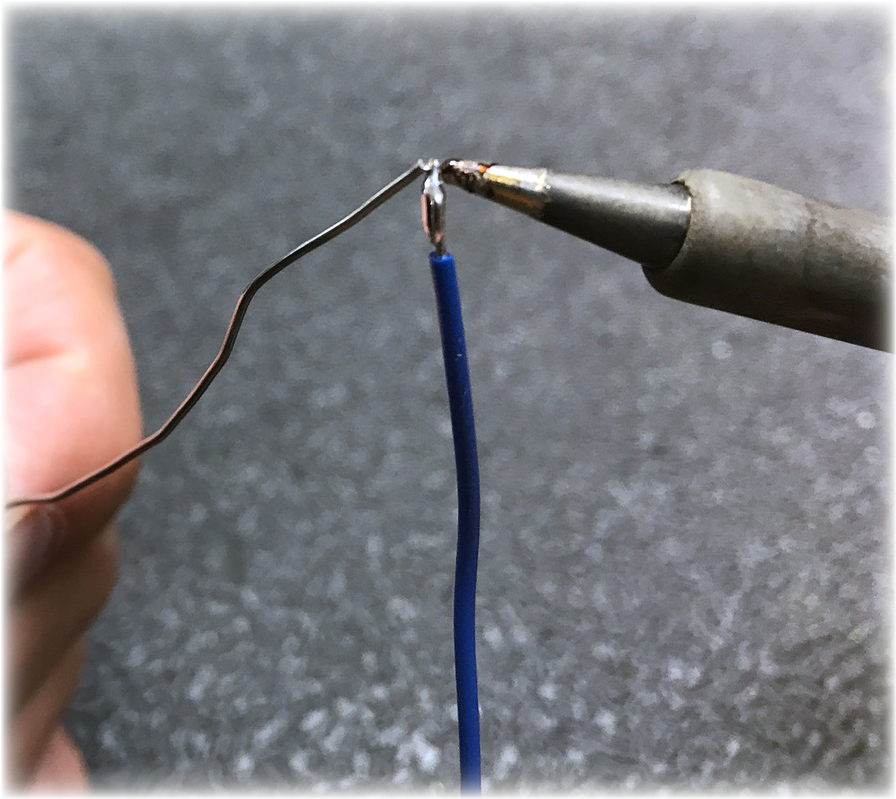
Tinning the wire
3. Soldering the wire
Now to connect the wire to the proper lug. There are some pretty tricky guitar cavities out there, so it may take some ingenuity to determine the best way to hold things while you solder. You’ll want to heat the wire and lug enough that a nice, shiny solder joint secures the wire and pot. Usually, heating the wire and lug from one side while applying the solder to the other will give you the best results.
Be sure you don’t over-solder, as excess solder will need to be removed and isn’t necessary for a secure solder joint. If your solder joint has a dull gray look, you may want to remove the solder with solder wick and try again. Bad solder joints tend to fail at the worst possible time.
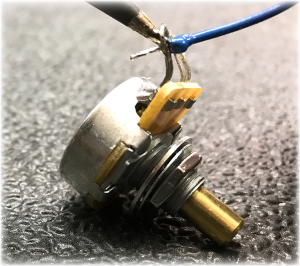
Making a solder joint.
More resources
Seymour Duncan wiring diagrams
If you’re looking for resources or a wiring schematic to help get you started with making the proper connections, our friends at Seymour Duncan have a great page dedicated to helping their customers find the best wiring diagram. It will walk you through choosing your pickup, volume, and tone configurations and will provide you with an accurate wiring schematic right away.
If soldering your own pots still sounds daunting, check out the pre-wired kits from Emerson Custom. Emerson Custom has pre-wired kits for almost any guitar that drop right in. These kits are top of the line components that are already wired, assembled for a proper fit and ready for installation.
Related Articles
When you need help, Sweetwater has the answers!
Our knowledge base contains over 28,000 expertly written tech articles that will give you answers and help you get the most out of your gear. Our pro musicians and gear experts update content daily to keep you informed and on your way. Best of all, it’s totally FREE, and it’s just another reason that you get more at Sweetwater.com.

