
Evertune Tuning and Setup Guide
EverTune overview
In this article, we will give you a comprehensive look at the EverTune bridge system, including what it is, how to set it up, and how to optimize it for your playing style. After that, we will show you how to make other guitar setup fixes such as adjusting your guitar’s action and intonation. Follow along below and get started!
- What is EverTune and what are its benefits?
- How does EverTune work?
- EverTune tuning process
- Set up your EverTune to bend
- Changing strings with an EverTune installed
- Advanced Evertune setup
What is EverTune and what are its benefits?
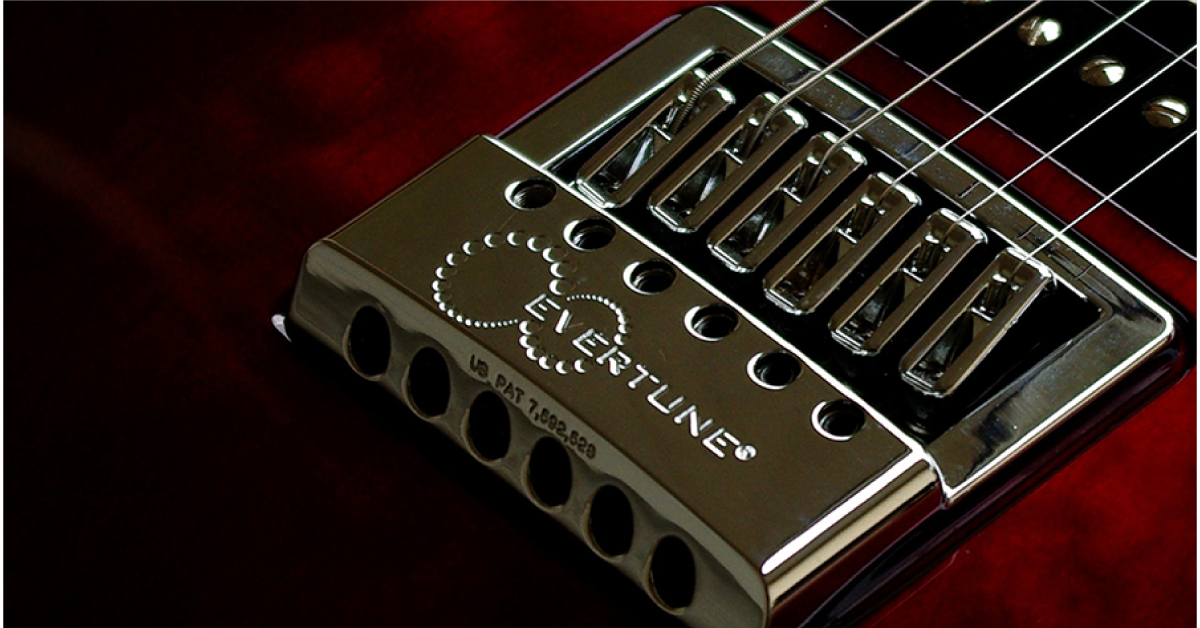
The EverTune is a bridge system that is commonly misunderstood. Because traditional guitar bridge styles remain popular, the EverTune bridge modern design is often overlooked. Despite its misconceptions, the EverTune could be one of the most innovative guitar inventions since the Floyd Rose.
The EverTune bridge allows you to maintain the precise tuning of an electric guitar. With an EverTune bridge, you will retain the ability to keep consistent tuning and intonation across all strings, regardless of how heavy you play or environmental conditions your instrument may be exposed to, such as changes in humidity or temperature.
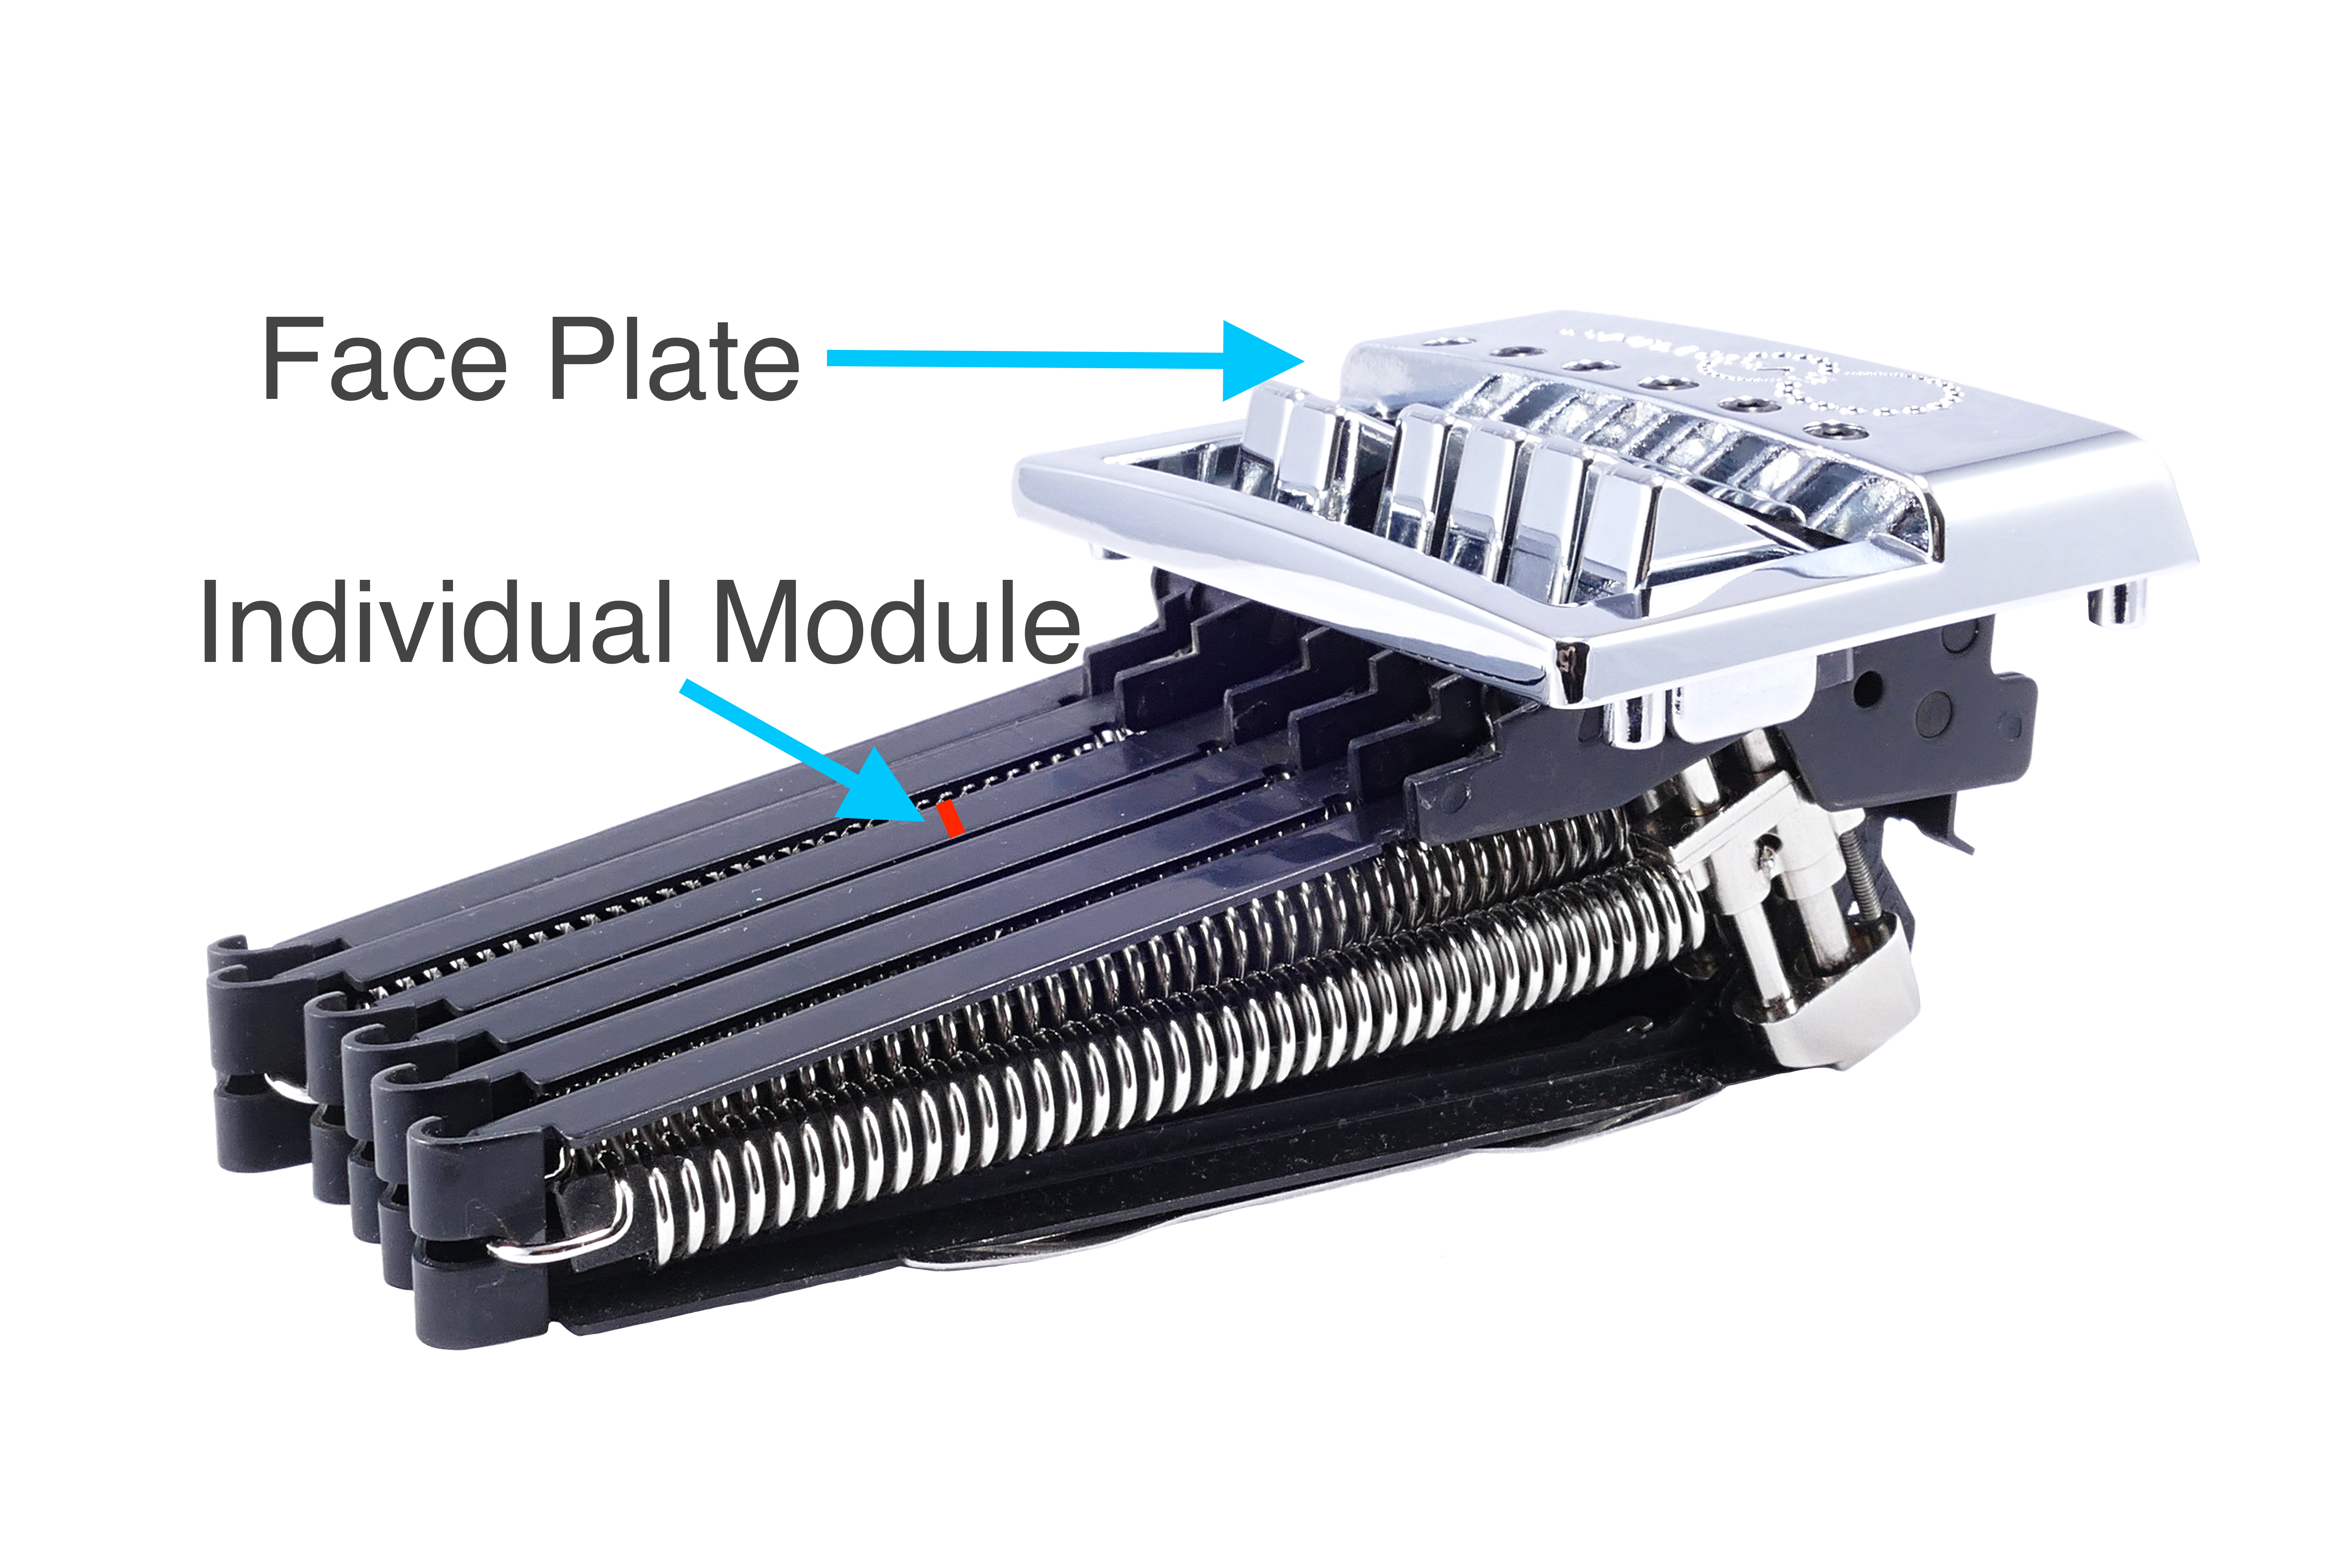
Full bridge system
Individual model
How does EverTune work?
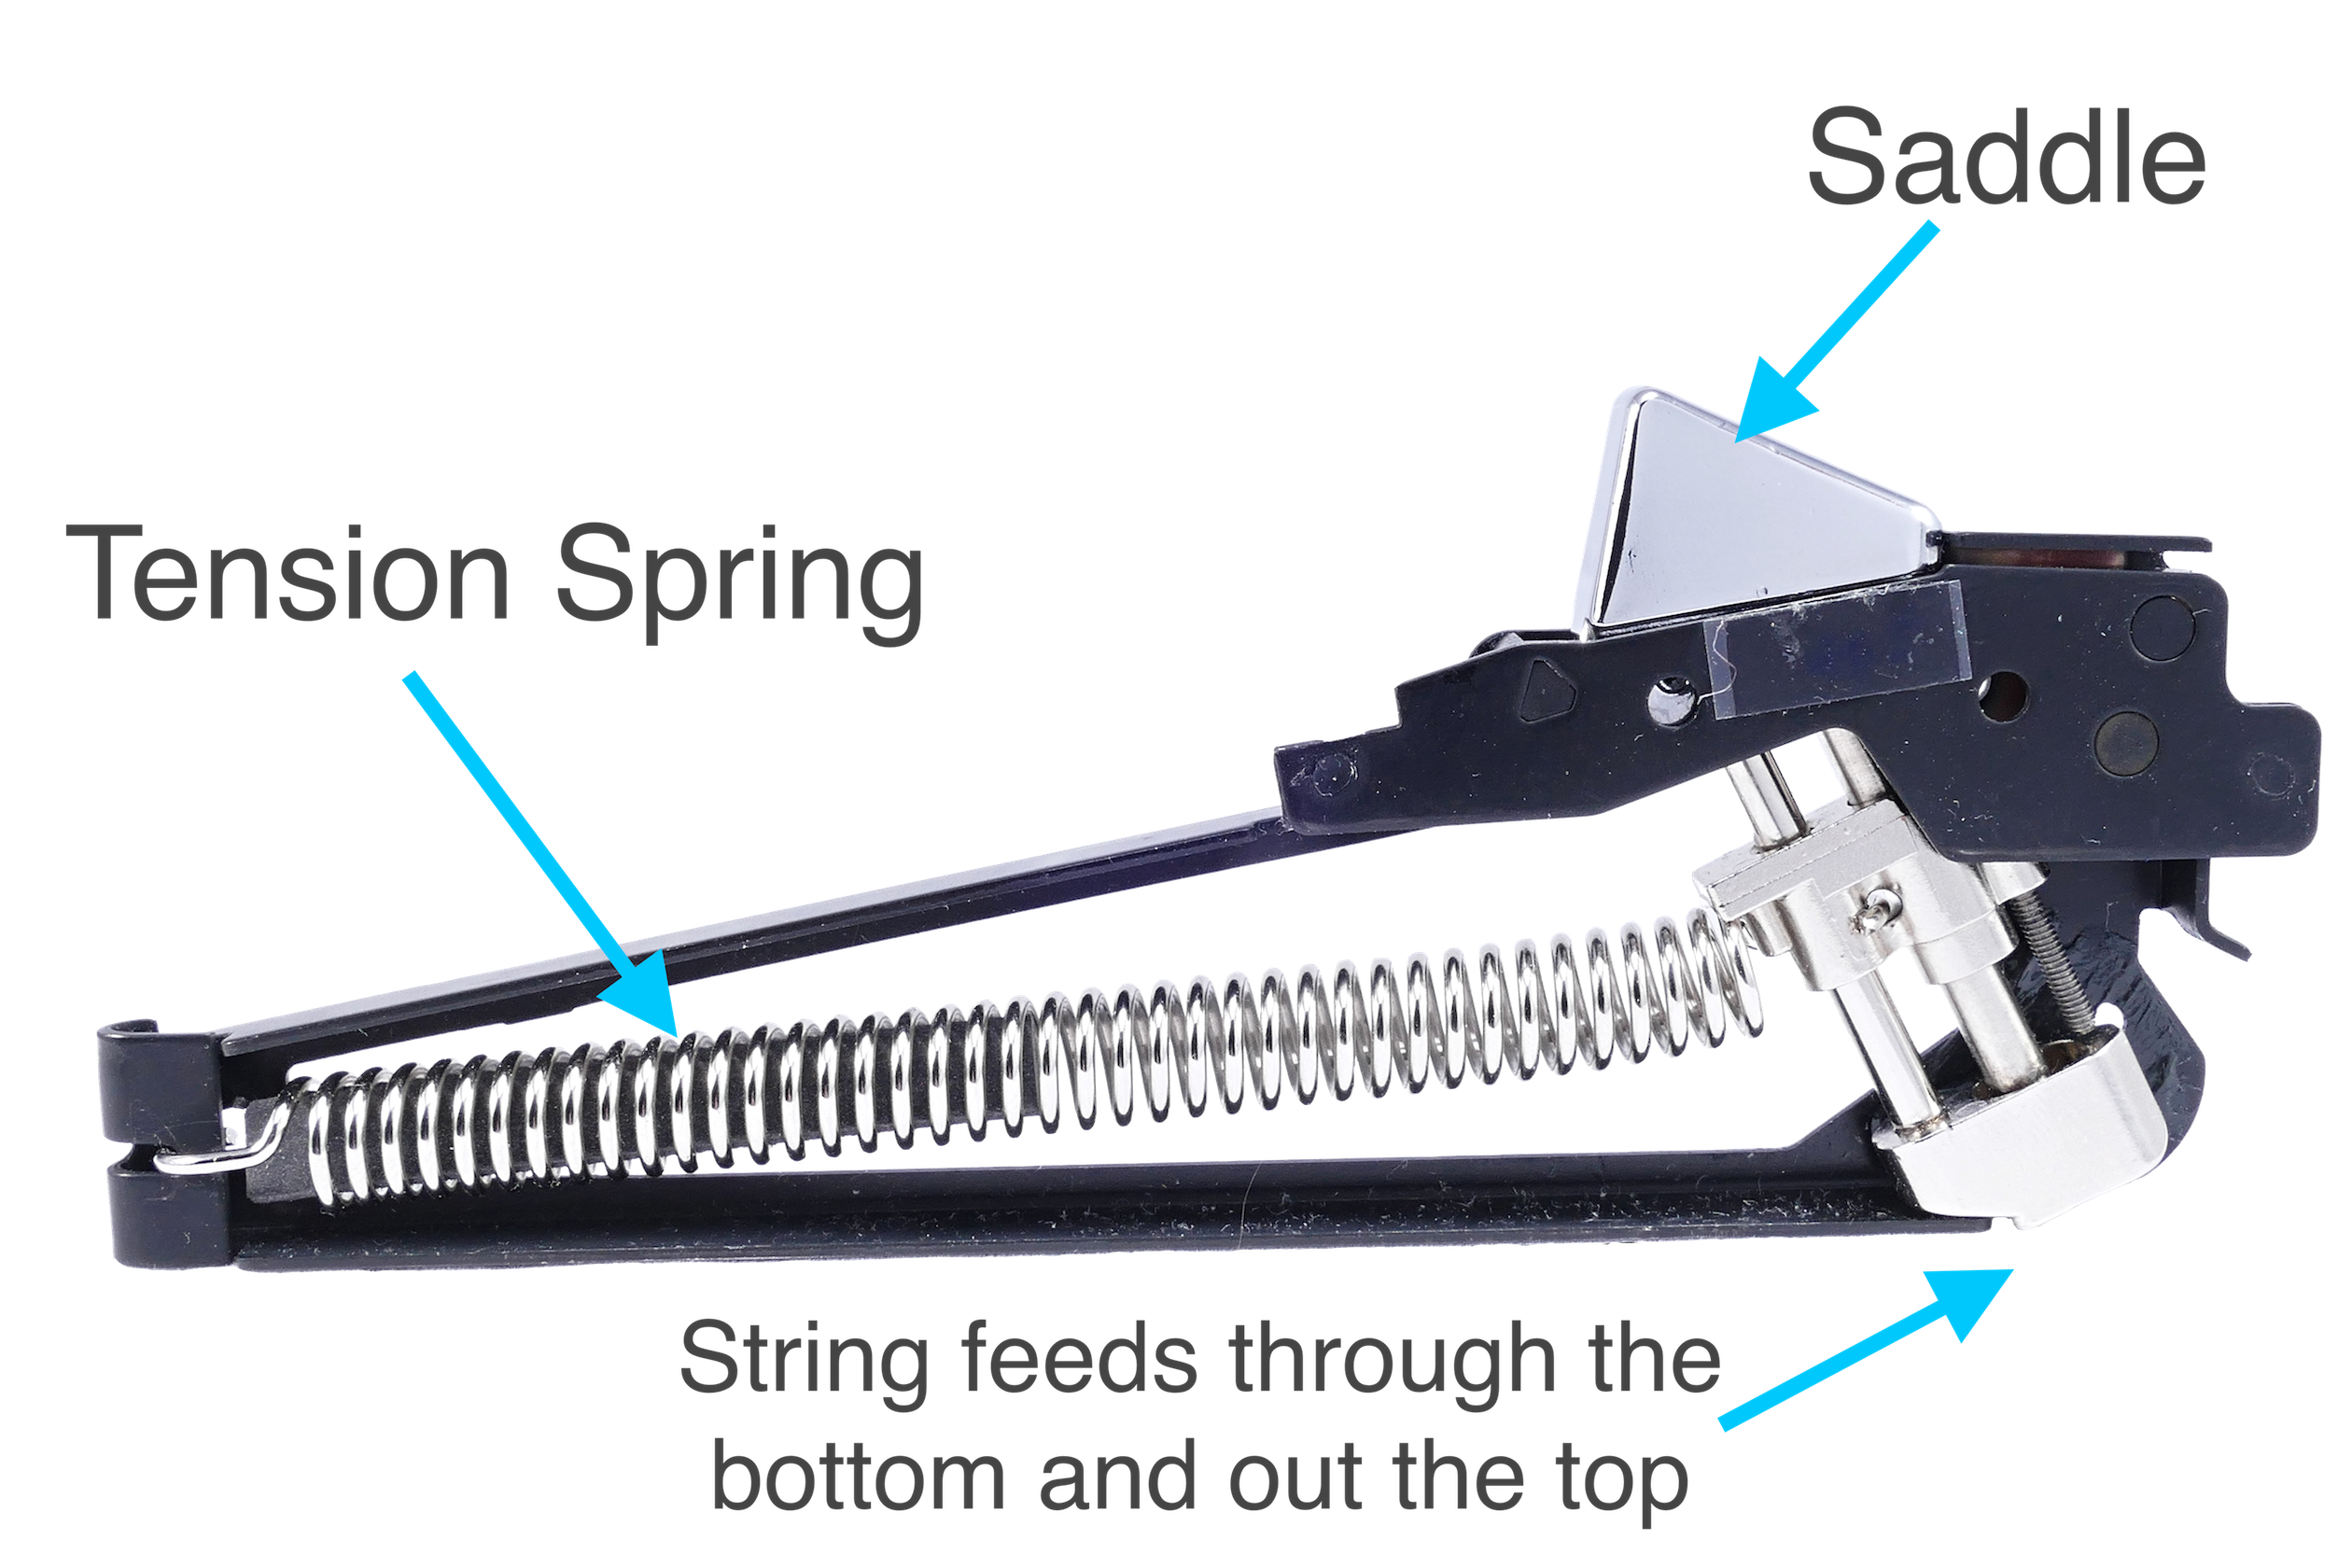
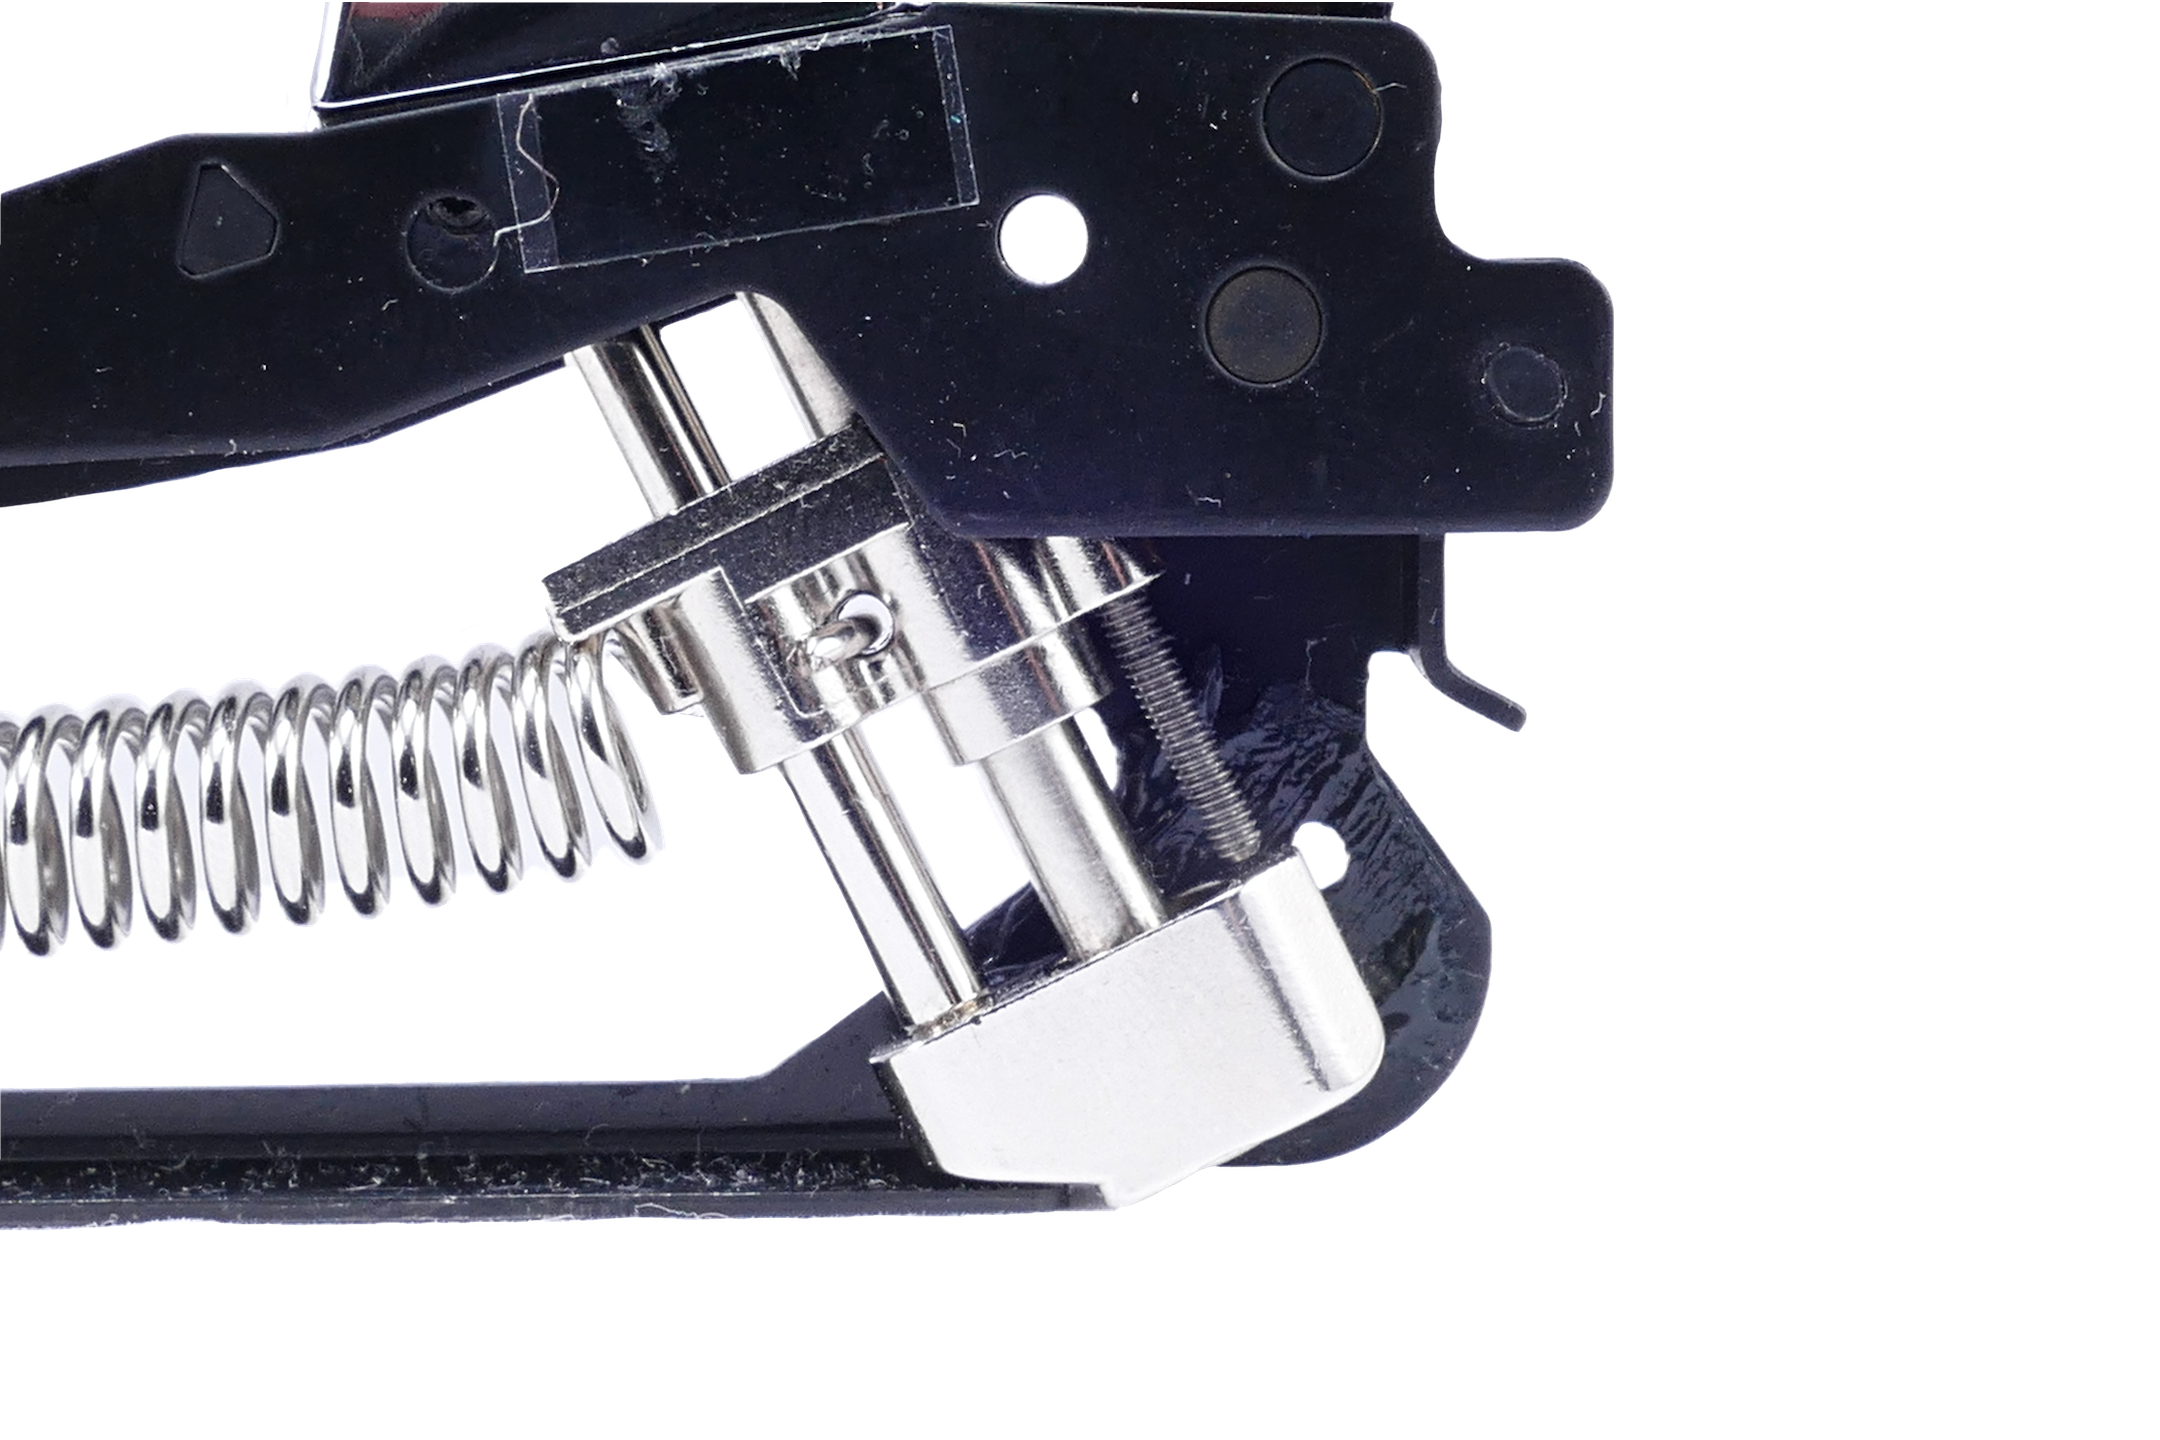
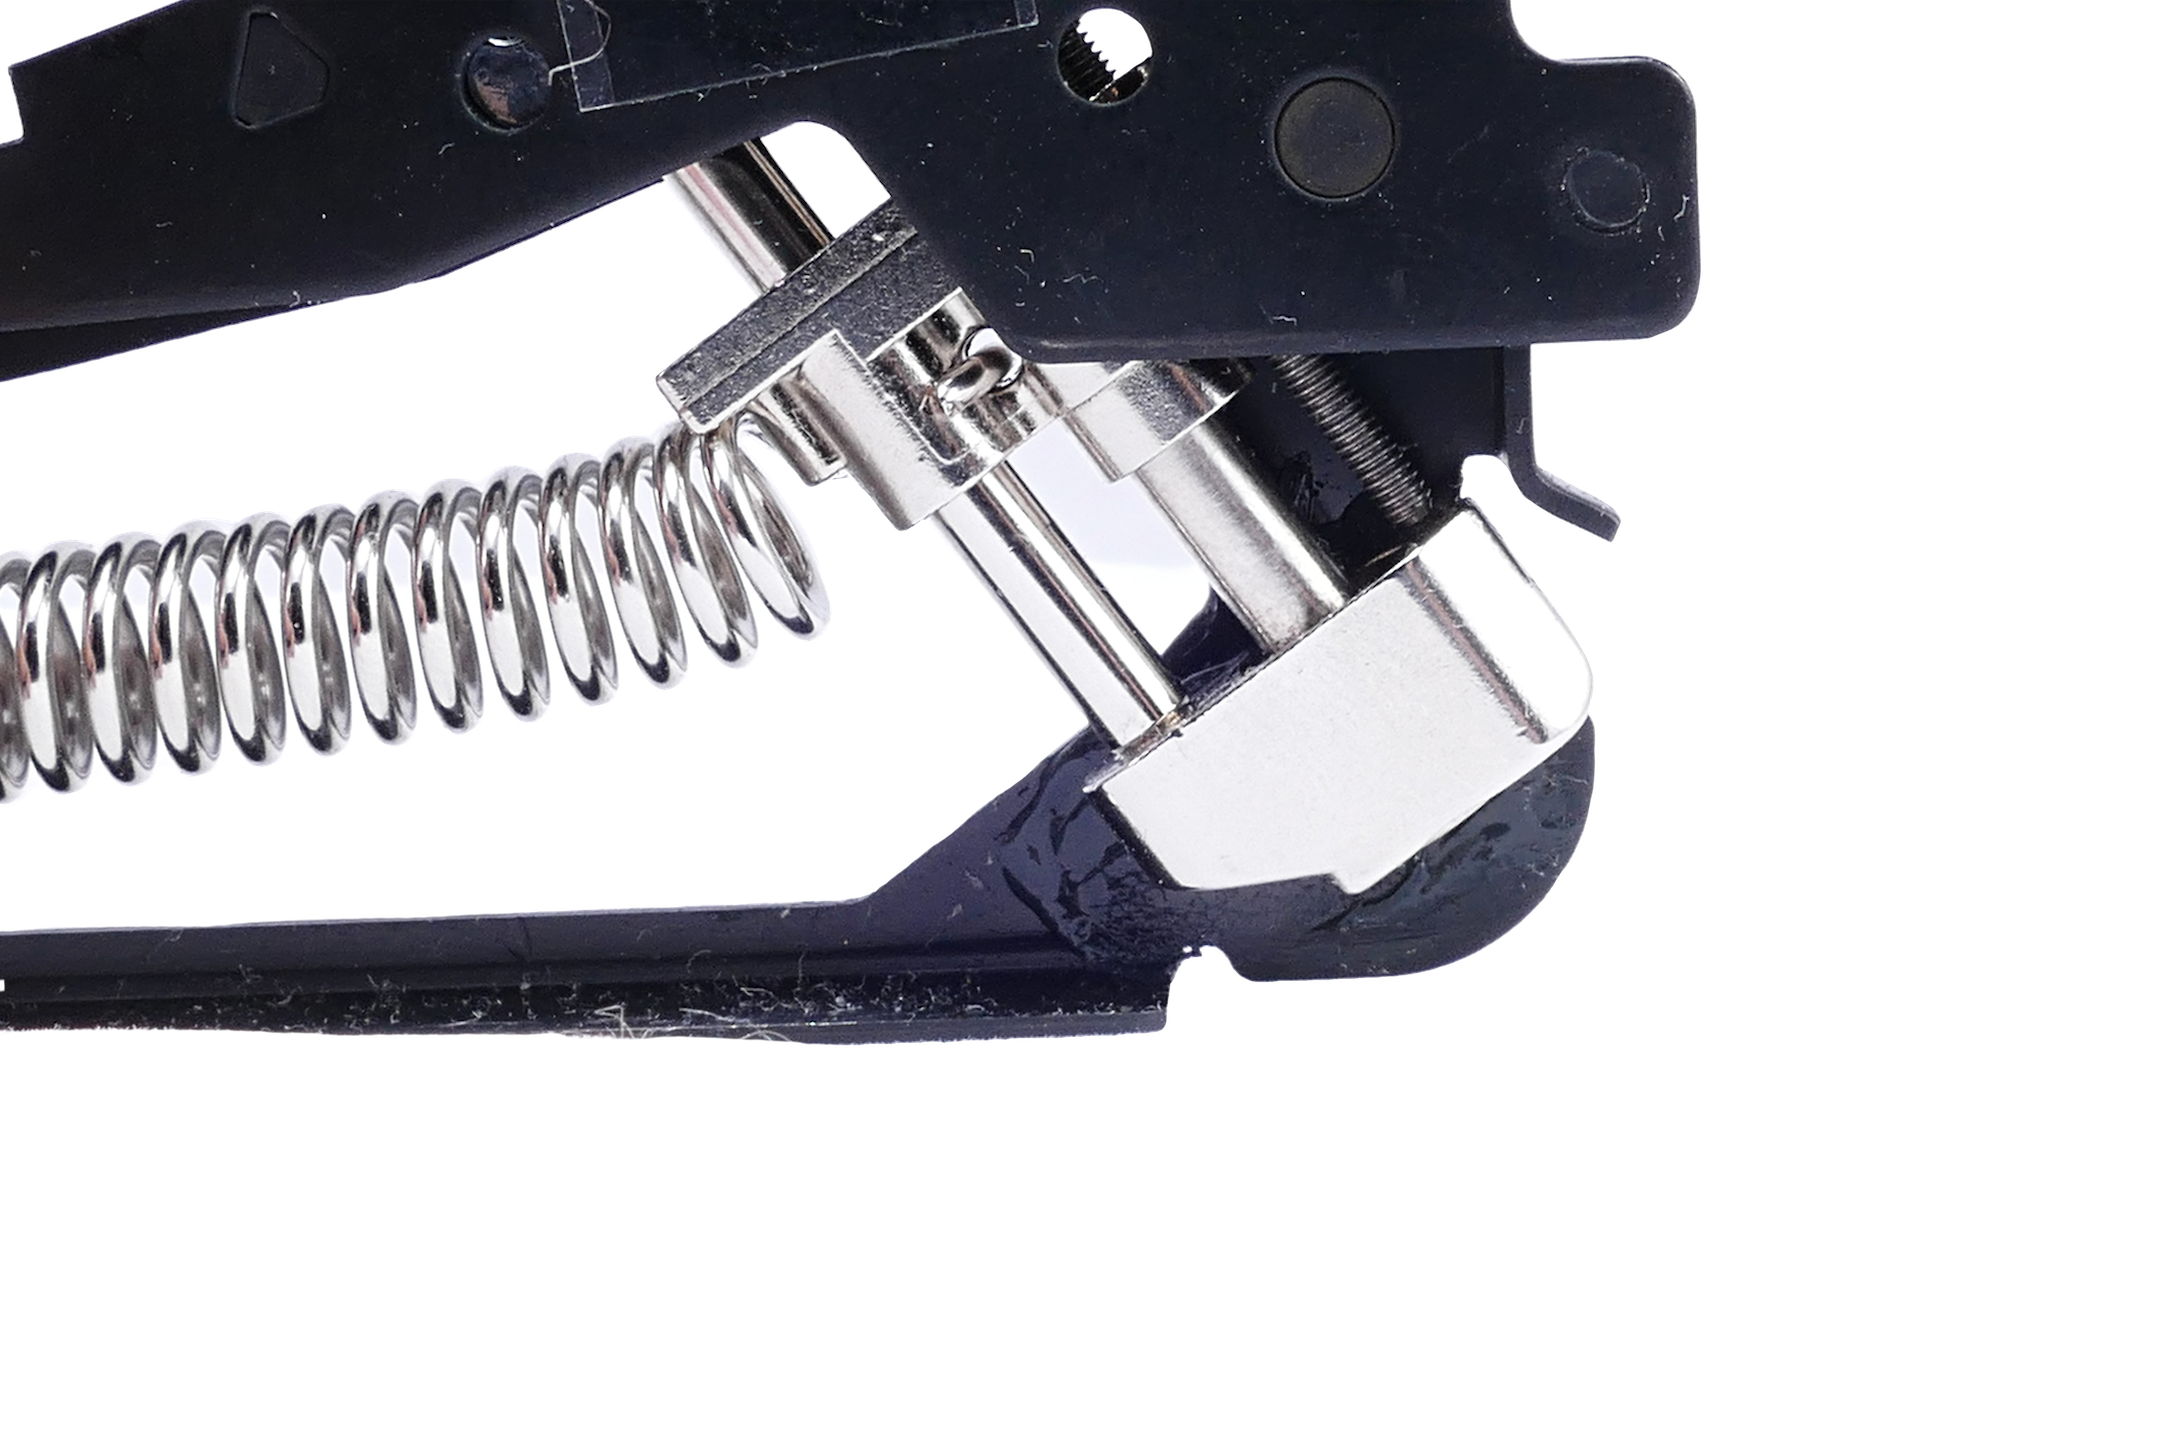
The EverTune utilizes a “floating” saddle system. Each saddle is housed in an independent module that gives it the ability to pivot. Tension from the guitar string pulls the saddle one way, while a spring inside the module pulls back the other direction at equal tension. This balanced or “activated” state allows for the saddle to compensate for, thus canceling any change in tension that may occur to the string from bending, heavy playing, or changes in humidity/temperature, etc.
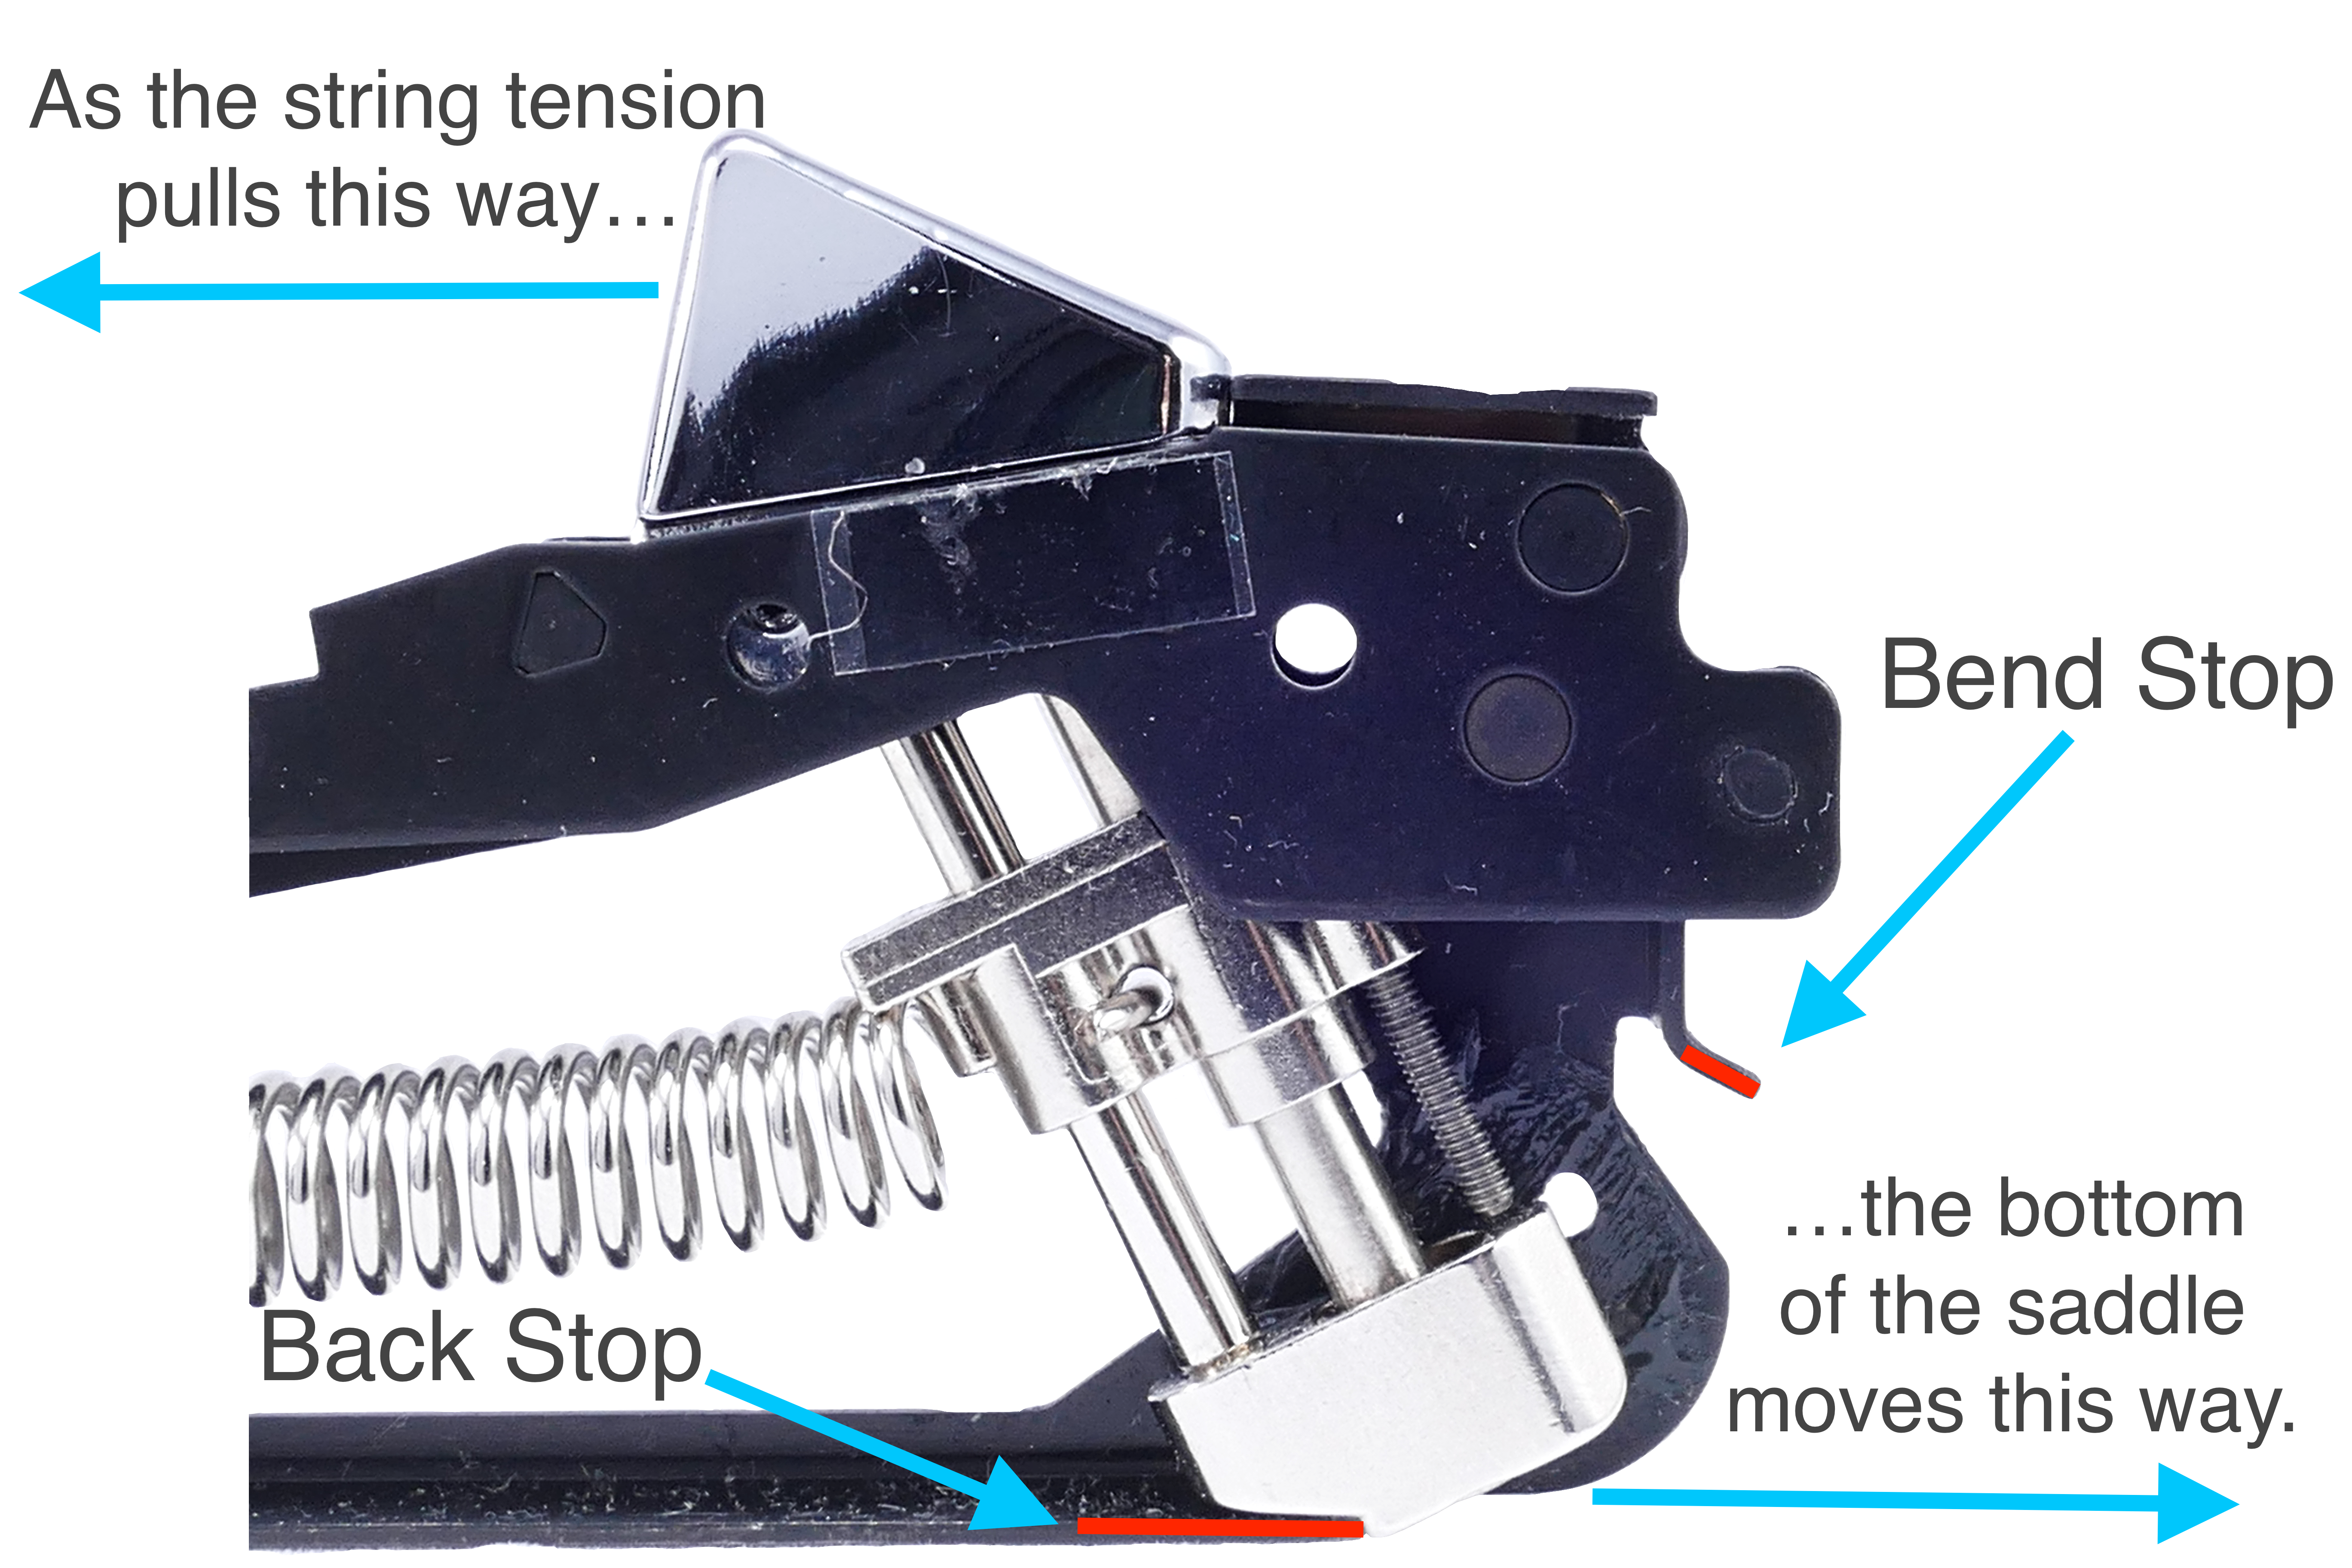
The pivoting saddle has a defined range of motion. There are two points within the module that stop the saddle from moving. These points are called the Back Stop and the Bend Stop. Once the saddle hits one of these points, the saddle can no longer compensate, and the pitch of the string will begin to change. EverTune refers to these points as “Zones.” Here’s how this works:
EverTune bridge zone 1
When there is not enough string tension to allow the saddle to float, the spring pulls it against the Back Stop. This is referred to as Zone 1. You will hear the pitch of the string change when turning the tuning key.
Zone 1
EverTune bridge zone 2
As string tension increases, the saddle begins to move off of the Back Stop and float in between the Back Stop and Bend Stop. This is referred to as Zone 2. The saddle is considered to be “activated” in this state. You will know you are there when the string’s pitch stops changing and remains the same as you turn the tuning key.
Zone 2
Zone 2 explained
EverTune bridge zone 3
As the tuner continues to turn, the saddle moves further from the Back Stop (Zone 1) and closer to the Bend Stop. Once the saddle hits the Bend Stop, it is now in Zone 3. You will recognize when this happens as the string will rise in pitch again.
Zone 3
As long as the saddle has room to pivot (Activated with the saddle floating freely in Zone 2), the string will not change pitch, no matter how hard you bend the strings. This is what gives the EverTune bridge it’s incredible tuning stability. Because of this concept, there is a common misconception that an EverTune bridge system will not allow you to bend your strings intentionally. This perception, however, is false.
While you certainly can set a saddle up to not allow the string to bend pitch, one of the greatest parts of the EverTune is that it can maintain its incredible tuning stability while still allowing the ability to bend strings like any other guitar. Utilizing Zone 3 in your EverTune setup will allow you to bend your strings’ pitch like a typical guitar while still retaining stable tuning. (More on that later.)
Now that we know the basic mechanics of how the Evertune bridge system works, we can set up our EverTune equipped guitar to play great and allow you to bend strings like a typical guitar. One of the EverTune bridge’s best features is that once you’ve completed the initial setup, you will rarely (if ever) need to make any further adjustments to the instrument. The only tools you will need (besides an amp and tuner), are the included EverTune key, or a 2.5mm Allen wrench.
A Look Inside EverTune
EverTune tuning process
The first step in setting up your guitar with an EverTune installed is to make sure it’s in tune. With an EverTune bridge, tuning works a bit differently than a standard guitar, but it’s still easy to do. The critical thing to remember with an EverTune bridge is that your tuning keys on the headstock are not for tuning the pitch but instead determine which Zone the saddle rests. The string’s primary tuning will be done via the Spring Tension Screw, located in the saddle. Here are the steps to get your guitar in tune:
Get your guitar in tune
- Activate the Saddle (Find Zone 2).
- Use the tuning key to position your saddle within Zone 2 of the EverTune bridge. You do not need to worry about what pitch your string is at when completing this step.
- You will know when you’ve reached Zone 2 when the pitch of your string stops changing as you turn the tuning key.
- Use the spring tension screw to tune your string to pitch.
- Once your saddle is in Zone 2, check your tuner to see what note the string is. Remove the wrench from the saddle for the most accurate reading.
- If you need to tune up, tighten the spring tension screw. Loosen this screw if you are above pitch, and you need to tune down.
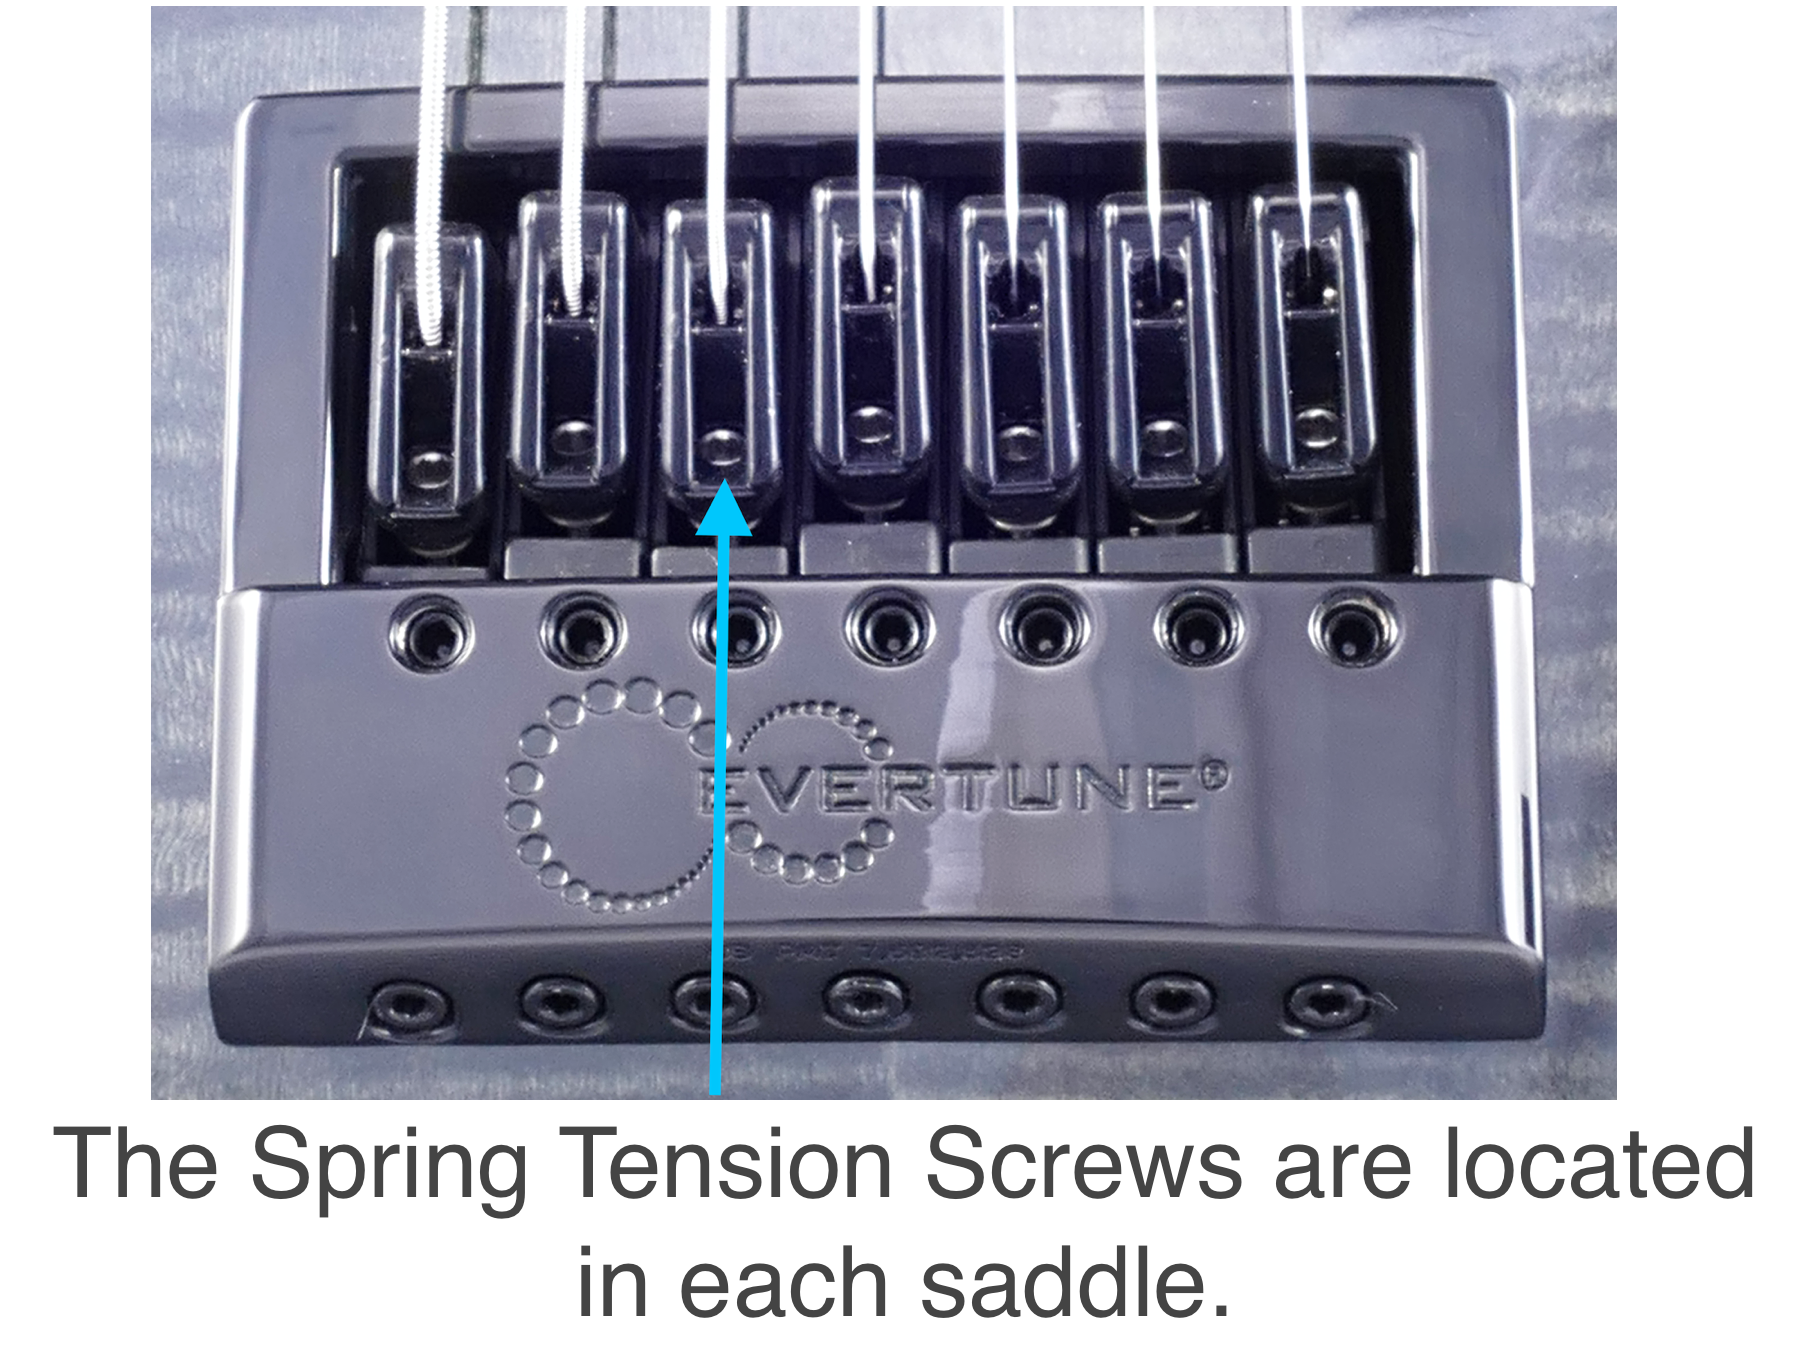
The spring tension screws
Notes on tuning with the EverTune bridge
- Step 1 is often tricky for those who have not had prior experience with an EverTune bridge system. It may seem odd at first using the tuning key to find Zone 2. Just remember to find the point where the strings’ pitch stops changing as you turn the tuning key and not worry about what note the string is.
- Adjusting the spring tension screw changes the balance between the string and spring. If you notice that the pitch stops changing as you adjust this screw, you may have moved out of Zone 2. It’s good to occasionally recheck your Zone placement while tuning if your strings are far from their target pitch.
- If the spring tension screw (or any other screw for that matter) becomes hard to turn or stops moving altogether, Do not force the screw any further. Continuing to turn a screw could damage the EverTune bridge saddle, which would be a potentially expensive repair or part replacement.
Set up your EverTune to bend
Now that our guitar is in tune, we can set it up to bend notes like you would on any other guitar. What’s great about the EverTune bridge is that because each saddle is an independent system, you can control which strings will be allowed to bend (or not), and how responsive those strings are to your playing style. So, if you’re a player who only bends notes on certain strings, you can set your guitar up to bend on only the strings that you want. Setting your guitar up to bend is pretty simple:
- Once in tune, use the tuning key to move the saddle into Zone 3.
- If properly tuned, your saddles should already be set in Zone 2. Remember, in Zone 2, your string pitch will not change as you turn the tuning key.
- Use the tuning key to wind the string up further. Once you hear the pitch begin to rise again, you know you are in Zone 3.
- Once in Zone 3, turn the tuning key back the other direction about a quarter (¼) turn, back into Zone 2.
- The goal is to keep your saddle activated in Zone 2 (for tuning stability), but right on the verge of hitting the Bend Stop (Zone 3). This way, once you start bending the string, the saddle hits the Bend Stop and allows the pitch to rise just as a typical guitar would.
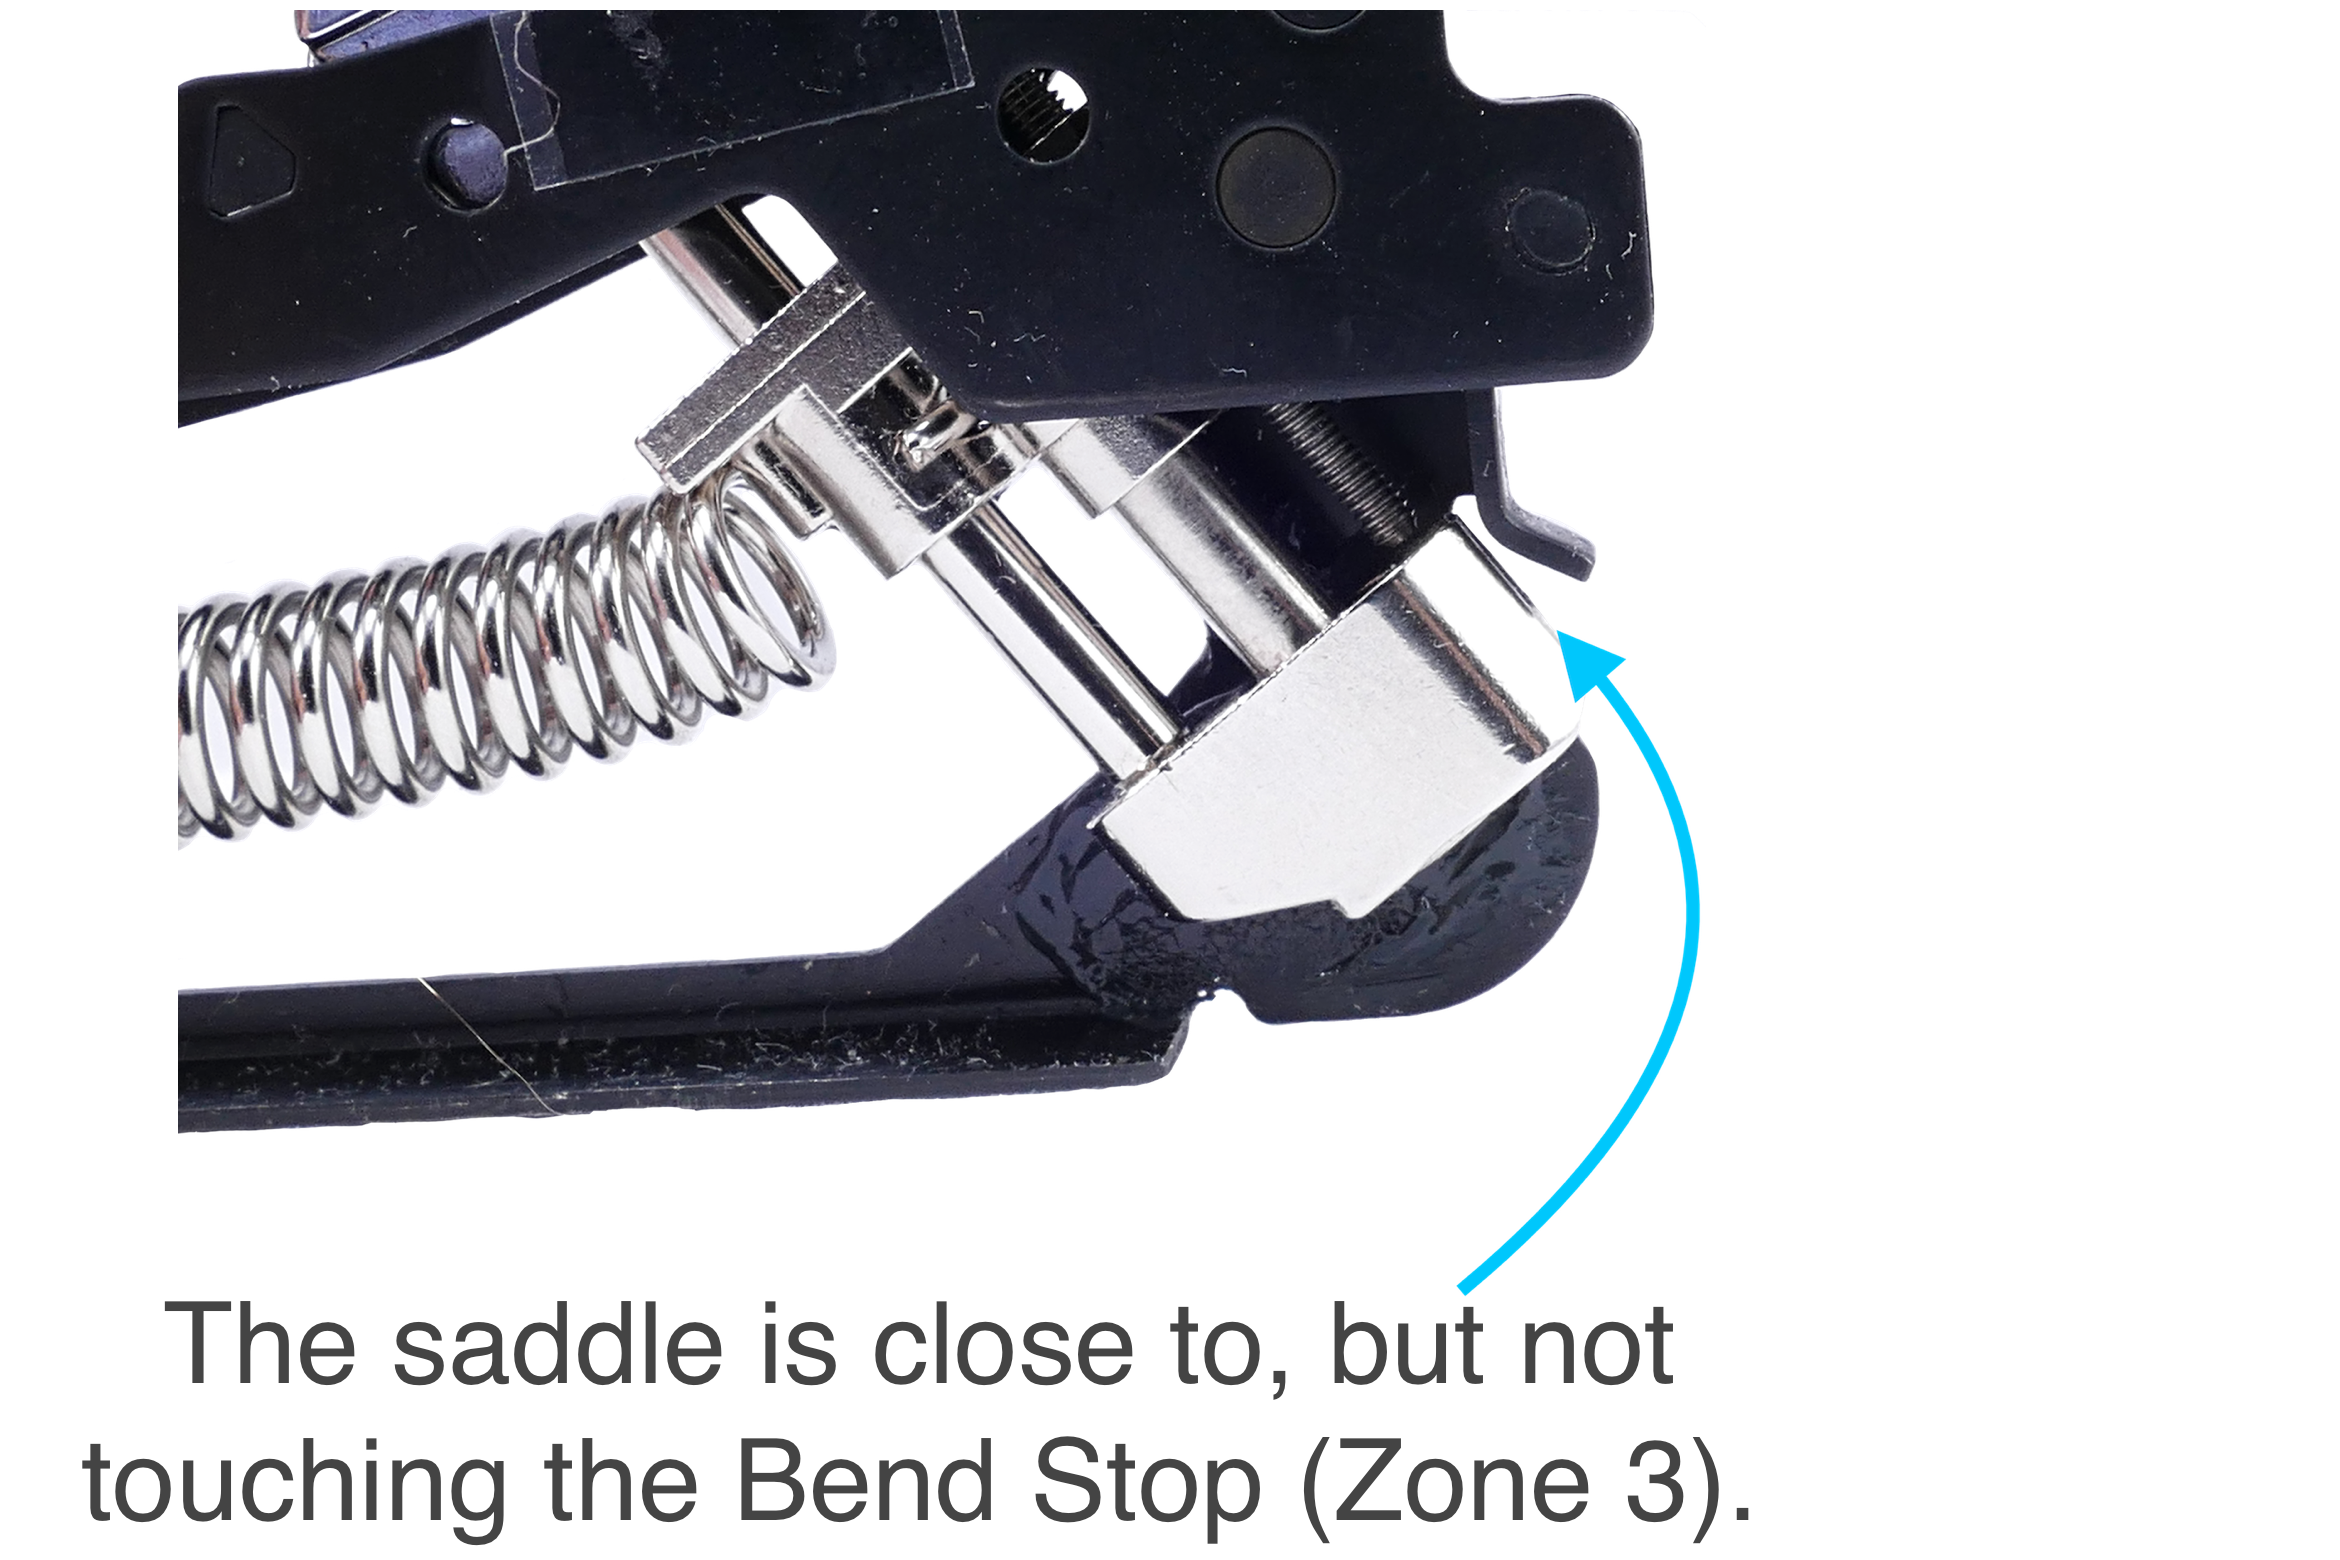
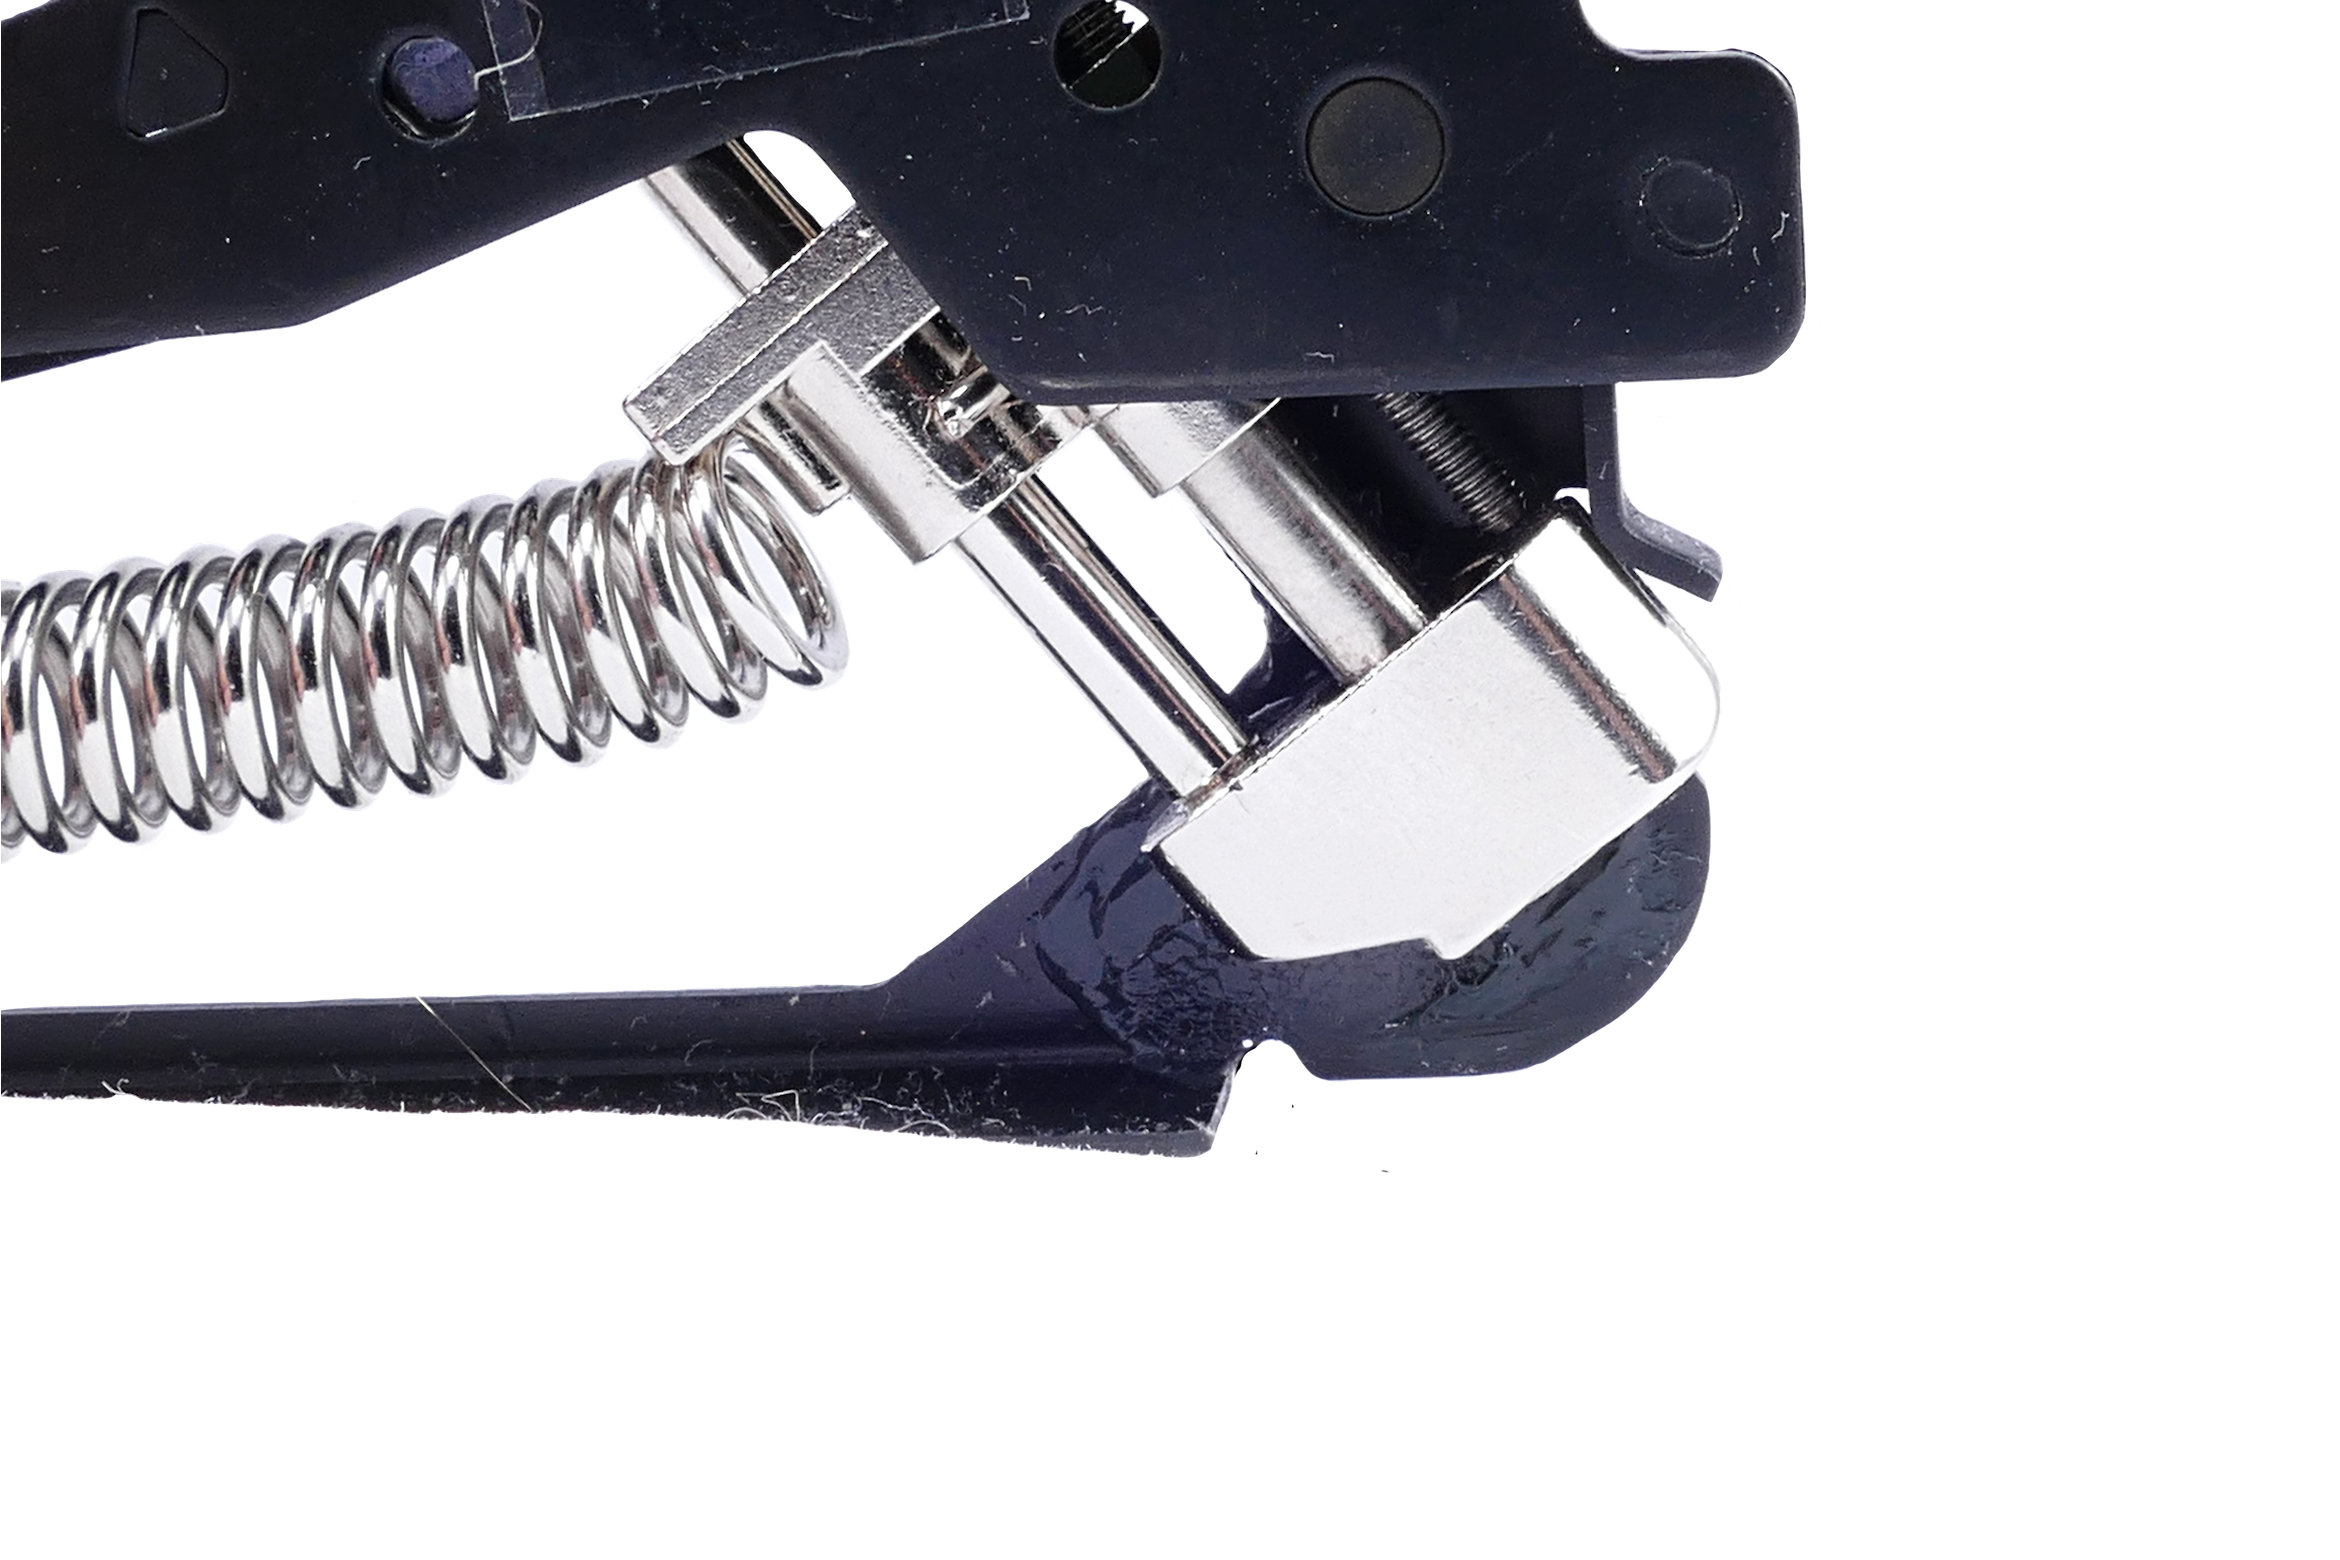
Bend stop
Notes on bending guitar strings with the EverTune bridge
- How close you have the saddle of the EverTune positioned to Zone 3 will determine your bend sensitivity. The closer you are, the faster the pitch will change. The further the saddle is from Zone 3, the more force is needed to bend the string out of pitch. (You can use this to your advantage as it allows you to customize how responsive each string is to bending.)
- It’s not a bad idea to check your tuning after adjusting your bend sensitivity. If the saddle needed to move quite a bit to reach the end of Zone 2, the string’s tuning might change slightly. You should only need to adjust the spring tension screw slightly (if at all) to get the string back in tune.
- If you’ve set your guitar up to bend, but are experiencing some buzzing or rattling while playing, you may need to adjust your Zone placement. Sometimes while setting the bend sensitivity, the saddle is placed too close to Zone 3, to where it is making very slight contact with the bend stop, resulting in buzzing when the instrument is played.
Setting Saddle into Bend Position
Changing strings with an EverTune installed
With your EverTune bridge set up, you will rarely (if ever) need to make any further adjustments. At some point, however, you’ll want to change your strings. Because the EverTune bridge contains no string locking mechanisms, changing strings is the same as it would be on any string-through style body/bridge system.
Assuming your new strings are the same gauge as the old strings, your guitar should be in tune once you rewind your saddle placement up to Zone 2. It’s always a good idea to stretch your strings and reset your bend sensitivity to your liking, which will require a slight Zone adjustment. If you decide to change string gauges, you will need to follow the tuning and bend setup procedures listed above.
Advanced EverTune setup
Now that we’ve covered the EverTune bridge system basics, we can discuss the more advanced adjustments: intonation and action. Making these adjustments is pretty straightforward. However, we consider these advanced adjustments because you need to understand what these concepts are on a standard guitar before applying it to your EverTune equipped instrument.
If you are not familiar with these concepts, do not fret. We have some helpful articles about setting action and adjusting intonation that walk you through how these work. If you already have a good grasp on setting up intonation and action, read below to learn how to make these adjustments on your EverTune.
Adjusting EverTune action
- Make sure your guitar is in tune using the tuning process.
- Use the action adjustment screw, located on the top of the bridge to set your action to the desired height.
- Turn this screw clockwise to lower the action, counter-clockwise to raise it.
- Check your tuning (retune if needed) and re-measure your action.
- Adjusting action typically doesn’t change your tuning much. However, it’s always a good idea to check it just to be sure.
- Repeat steps 2 & 3 until your action is set to the desired height.

Action adjustment screws.
Adjusting EverTune intonation
- Make sure your guitar is in tune using the tuning process.
- Use the intonation adjustment screw, located on the tail end of the bridge, to move the saddle back and forth.
- If your intonation is sharp, turn the screw clockwise to move the saddle back. If your intonation is flat, turn the screw counter-clockwise to move the saddle forward.
- Retune the string and recheck your intonation.
- Intonation adjustments change where the saddle is placed within Zone 2, which could drastically bring you out of tune. It’s important to always reset your Zone and retune that string after making an intonation adjustment.
- Repeat steps 2 & 3 until your intonation is set correctly.

Intonation adjustment screws.
Intonation
Additional resources
Zone 2 By Ear
Zone 2 By Eye
Tuning EverTune at the Bridge
Setting Bend Sensitivity
When you need help, Sweetwater has the answers!
Our knowledge base contains over 28,000 expertly written tech articles that will give you answers and help you get the most out of your gear. Our pro musicians and gear experts update content daily to keep you informed and on your way. Best of all, it’s totally FREE, and it’s just another reason that you get more at Sweetwater.com.


Offer applies only to single-receipt qualifying purchases. Select manufacturers may require that only the manufacturer’s products qualify towards the minimum purchase amount needed to be eligible for promotional financing. Otherwise, an invoice that meets the minimum purchase amount and contains at least one qualifying manufacturer product is eligible for promotional financing. No interest will be charged on promo purchase balance, and equal monthly payments are required on promo purchase until it is paid in full. The payments equal the amount financed divided by the number of months in the promo period, rounded up to the next whole dollar. These payments may be higher than the payments that would be required if this purchase was a non-promo purchase. During the last month(s) of the promo period the required monthly payment may be reduced due to the prior months’ rounding. Regular account terms apply to non-promo purchases. New Accounts as of 07/31/2025: Purchase APR is 34.99%. Penalty APR is 39.99%. Min Interest Charge is $2. Existing cardholders: See your credit card agreement terms. Subject to credit approval.
Offer applies only to single-receipt qualifying purchases. No interest will be charged on the promo balance if you pay it off, in full, within the promo period. If you do not, interest will be charged on the promo balance from the purchase date. The required minimum monthly payments may or may not pay off the promo balance before the end of the promo period, depending on purchase amount, promo length and payment allocation. Regular account terms apply to non-promo purchases and, after promo period ends, to the promo balance. New Accounts as of 07/31/2025: Purchase APR is 34.99%. Penalty APR is 39.99%. Min Interest Charge is $2. Existing cardholders: See your credit card agreement terms. Subject to credit approval.
The estimated required monthly payment shown which excludes taxes and delivery equals the amount financed divided by the number of months in the promo period, rounded up to the next cent. During the last month(s) of the promo period the required monthly payment may be reduced due to this rounding. These payments apply only with the financing offer shown. If you make these payments by the due date each month, you should pay off this amount financed within the promo period, if it is the only balance you are paying off. If you have other balances on your account, this payment will be added to any other minimum monthly payments.
Applies only to select items from this manufacturer. Ask your Sweetwater Sales Engineer for more details.