
Universal Audio Apollo, UAD-2 Satellite, and Arrow Setup Guide
In this article, we will walk you through how to get started with your Universal Audio USB or Thunderbolt audio interface on PC and Mac.
- Set Up and Connect Your Universal Audio Interface
- Register Your Purchase and Install the UA Software
- Configure Your Computer’s Audio Settings
- Is Your UA Apollo or Satellite Not Being Detected?
- Universal Audio Video Tutorial Hub
Set Up and Connect Your Universal Audio Interface
Connect the Power Supply

The Apollo locking power supply
Only power your Apollo or Satellite with the included power supply.
Apollo desktop units have a locking power-supply connection. The barrel has two small tabs which you must carefully align with the slots on the chassis. Fully insert the barrel through the slots, then rotate the barrel clockwise to the locked position. If you find that your unit shuts off at random, you have probably not locked the barrel correctly.
Connecting to Your Computer
Thunderbolt 3 or USB?
If you have a UA device with Thunderbolt, to connect to your Mac or your Windows PC, you must have a Thunderbolt 3 cable (purchased separately). Make sure that you are connecting it to a Thunderbolt 3 port on your computer.
- Learn more in our SweetCare guide Thunderbolt Connections Demystified.
Windows-only UA models utilize USB 3. Use the included USB Type-B to USB Type-A cable, which is designed for USB 3 speed. You must connect to a port on your Windows PC that supports USB 3 and not the slower USB 2 specification.
- Our SweetCare guide How do I know if my computer has USB 3.0 ports? explains how to identify the ports on your PC.
Universal Audio and Windows on Arm
All Universal Audio software and hardware are not compatible with Windows on Arm devices. In addition, for USB devices, Universal Audio recommends connecting to an Intel USB Host Controller, or one that meets the Intel xHCI 1.1 specification. Furthermore, AMD on earlier AM4 platforms may have limited functionality.
Configuring Your Computer for a Universal Audio Thunderbolt Device
If you have a UA Thunderbolt device, there are configurations you must make on your Mac or your Windows PC in order for the computer to communicate with the device. The procedure differs depending on whether you are on a Windows PC, an Intel-based Mac, or a Mac with Apple silicon. Follow the instructions in these SweetCare guides:
Register Your Purchase and Install the UA Software
To proceed, connect your UA device to your computer via Thunderbolt or USB, as appropriate to your model. Turn the power on.
Before you can use your UA Apollo or Satellite, you must create a user account with Universal Audio. Next, download and install the UA Connect app. In this app, you register your hardware, and then you are presented with all the UA software you need to use your device with your Mac or your Windows PC.
Download UA Connect
Go to the Universal Audio registration page. Click Create an Account, then do so using your email address and a password. You can also log in to your existing account.

The UA Account Device Registration page
On the Register Your Device page, pull down the menu to select your model. Click Begin.
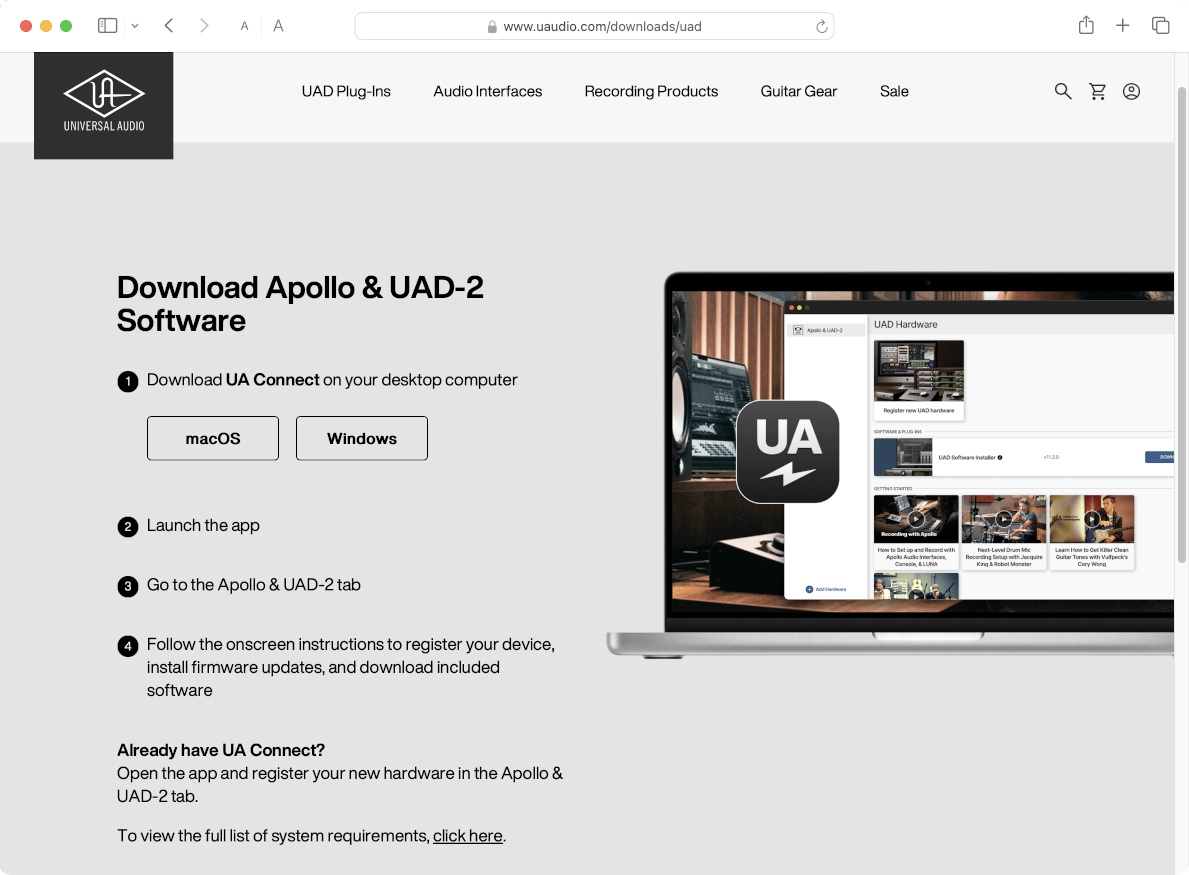
The Download page, where you download the UA Connect app
On the Download page, under Download UA Connect, click the button for macOS or Windows.
On your computer, go to your Downloads folder and run the installer. Follow the prompts.
Launch the UA Connect app. Log in to the app using your UA customer account email address and password. Select Remember Me, then click Log In.
In the pane on the left, at the bottom, you will see Add Hardware. Click the plus sign.
In the Set Up Your Hardware dialog, enter your product’s serial number. Click Enter.
You will be returned to your web browser to complete your purchase registration on the UA website.
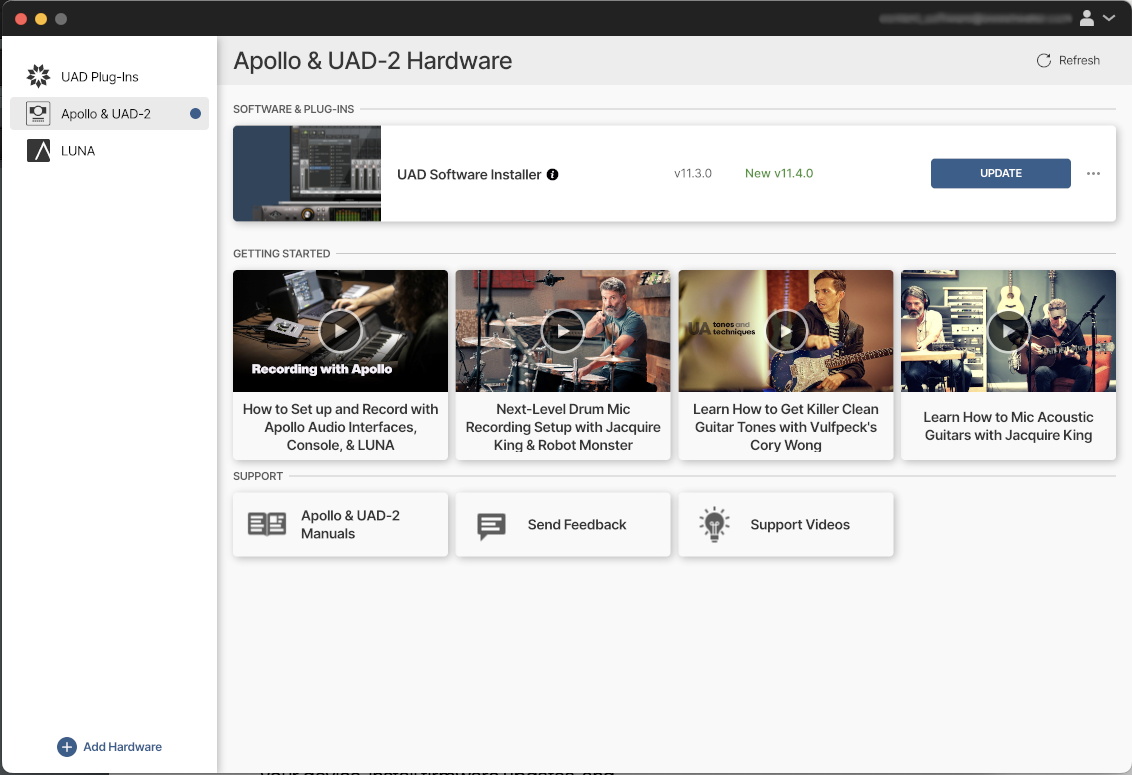
Finding the UAD Software Installer in the UA Connect app
Now that you have registered your hardware, go back to the UA Connect app.
In the pane on the left, select Apollo & UAD-2.
In the pane on the right, you will now see the UAD Software Installer. Click to download and install it. Be patient, as it’s a large download. Follow all prompts until your installation is complete.
On macOS, you will receive prompts that you need to open System Settings and grant permission in the Privacy & Security section to allow the new software to function. Learn more in Sweetwater’s Universal Audio Apollo, Satellite, and UAD-2 PCIe Thunderbolt Mac Setup guide.
Download the User Manuals
On the Apollo & UAD-2 page in UA Connect, you will see a Manuals link. Click it to open your web browser to the UA Apollo & UAD-2 Manuals page, where you can download all the relevant user manuals for handy reference.
Download UAD Console, LUNA, and Your Plug-ins
Now that you have installed the UAD Software Installer, go back to UA Connect, where you can install:
- UAD plug-ins
- UAD Console, the mixer app that you use alongside your DAW to configure all signal routing and plug-in assignments and configurations for your Apollo or Satellite
- LUNA, Universal Audio’s DAW designed to integrate with your Apollo or Satellite and the UAD Console
Authorize Your Plug-ins
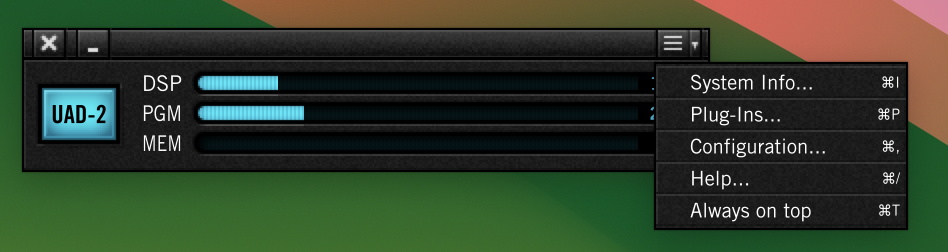
UAD Meter & Control Panel app
With your UA device connected and powered on, launch the UAD Meter & Control Panel app that UA Connect installed earlier.
From the menu on the right, select Plug-Ins.
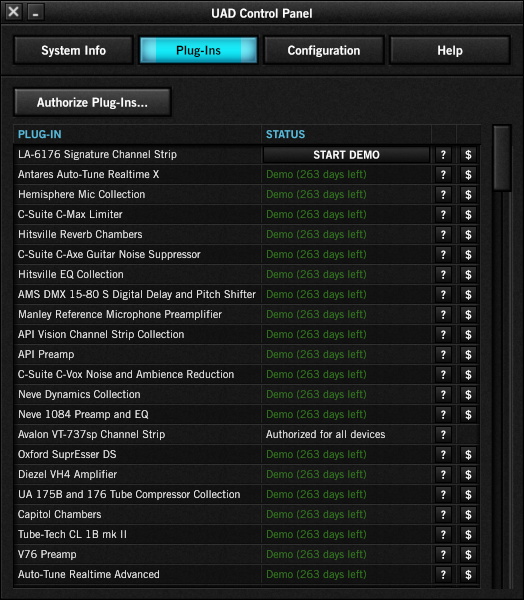
Authorizing in the UAD Meter & Control Panel Plug-Ins tab
In the Plug-Ins tab, click Authorize Plug-Ins.
- Learn more in the Universal Audio support article Authorizing UAD-2 DSP Plug-Ins.
Update the Firmware
IMPORTANT: Do not turn off the power to your UA device or to the computer, and do not disconnect the device from your computer while the update is underway. Wait until UA Connect displays the message “Power Off UAD Device.”
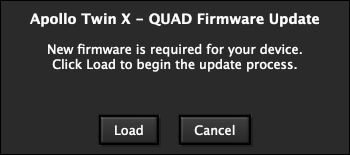
UAD Console will prompt you if you need to update the firmware.
Open the UAD Console app. It will prompt you if your device has an older firmware that needs to be updated to be compatible with the newest version of the UAD software package. If you see the firmware update dialog, click the Load button and wait while the installation proceeds.
Wait until UAD Console displays the message “Power Off UAD Device.” Power your device off and wait several seconds. Then power it on again.
Configure Your Computer’s Audio Settings
Configure your computer’s audio settings to use the Apollo via Sound Settings in Windows or System Settings in macOS. When using your interface with a DAW, make sure to choose your interface from the Playback Engine or Audio Settings menu. Follow the steps below to select your UA interface as the primary sound device for your operating system.
Windows sound settings
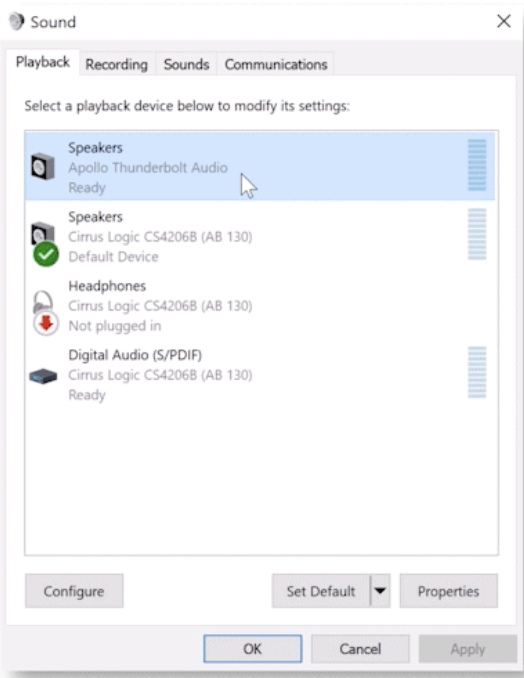
Selecting the Apollo interface in Windows Sound Settings
On Windows 10
- Right-click the Speaker icon on your Windows taskbar, then choose Sounds. Select Playback, right-click your interface, and click Set as Default Device and Set as Default Communications Device.
- Select Properties, go to the Advanced tab, and uncheck the boxes under Exclusive Mode.
- Select the Recording tab, then follow the same procedure.
On Windows 11
- Right-click the Speaker icon in the Taskbar.
- Scroll to the bottom of the window. Choose More sound settings.
- Select Playback. Right-click your interface, then click Set as Default Device and Set as Default Communications Device. Next, select Properties, go to the Advanced tab, and uncheck the boxes under Exclusive Mode.
- Select the Recording tab. Follow the same procedure.
Mac sound settings
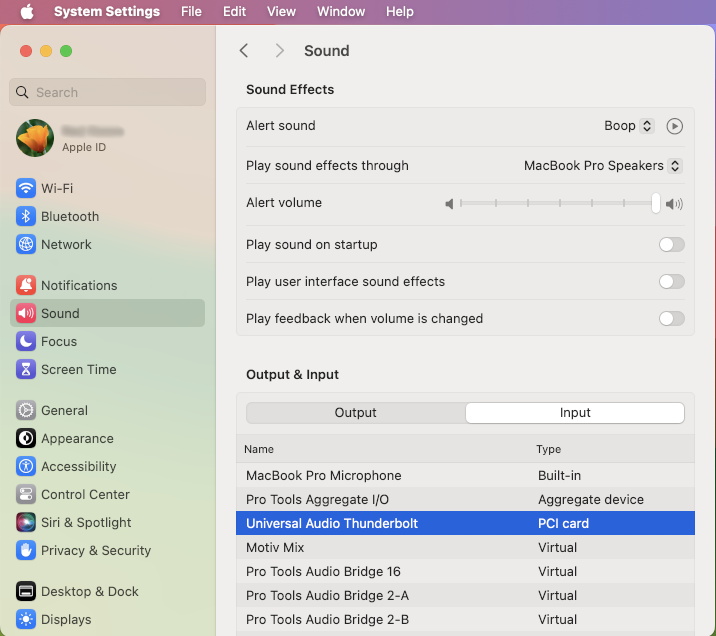
Selecting the Apollo in macOS System Settings > Sound
- From the menu bar, click on the Apple icon, then select System Settings.
- Click Sound.
- Select your interface under both the Output and Input tabs.
Is Your UA Apollo or Satellite Not Being Detected?
If your device is not detected, follow our audio interface troubleshooting guides for Mac and PC to resolve the issue.
Universal Audio Video Tutorial Hub
Now that our setup guide has got you up and running, check out some great tutorial videos from Universal Audio.
Getting Started with Apollo X Gen 2
Getting Started with Apollo X on macOS
Getting Started with Apollo X on Windows 11
Getting Started with Apollo Solo Thunderbolt for Windows
How to Setup and Record with Arrow
Apollo 8, 8p, and 16 Getting Started
UAD-2 Apollo Twin Getting Started
UAD-2 Satellite Thunderbolt Getting Started
Apollo Twin USB Getting Started
UAD-2 USB Getting Started
Universal Audio DAW setup
Learn how to set up a Universal Audio Apollo interface with your DAW.
Setting up UA Interfaces for Pro Tools on Mac OSX
Setting up UA Interfaces for Ableton Live on Mac Windows
Setting up UA Interfaces for Logic Pro X on Mac OSX
Setting up UA Interfaces for Steinberg Cubase on Mac Windows
Setting up UA Interfaces for Ableton Live on Mac OSX
UA Quicktip: Routing Windows System Sounds to Apollo
Universal Audio Console software
Console software and Universal Audio interfaces go hand-in-hand. The Console is where you assign UAD plug-ins to channels, configure routing settings, and remotely control the device. Check out UA’s three-part-series below for more information about how to use Console.
Console Part 1 (Getting Started)
Console Part 2 (Console Sections)
Console Part 3 (Expanded Systems, Flex, Driver)
Related Articles
When you need help, Sweetwater has the answers!
Our knowledge base contains over 28,000 expertly written tech articles that will give you answers and help you get the most out of your gear. Our pro musicians and gear experts update content daily to keep you informed and on your way. Best of all, it’s totally FREE, and it’s just another reason that you get more at Sweetwater.com.

