
Bluebox Mixer Getting Started Guide
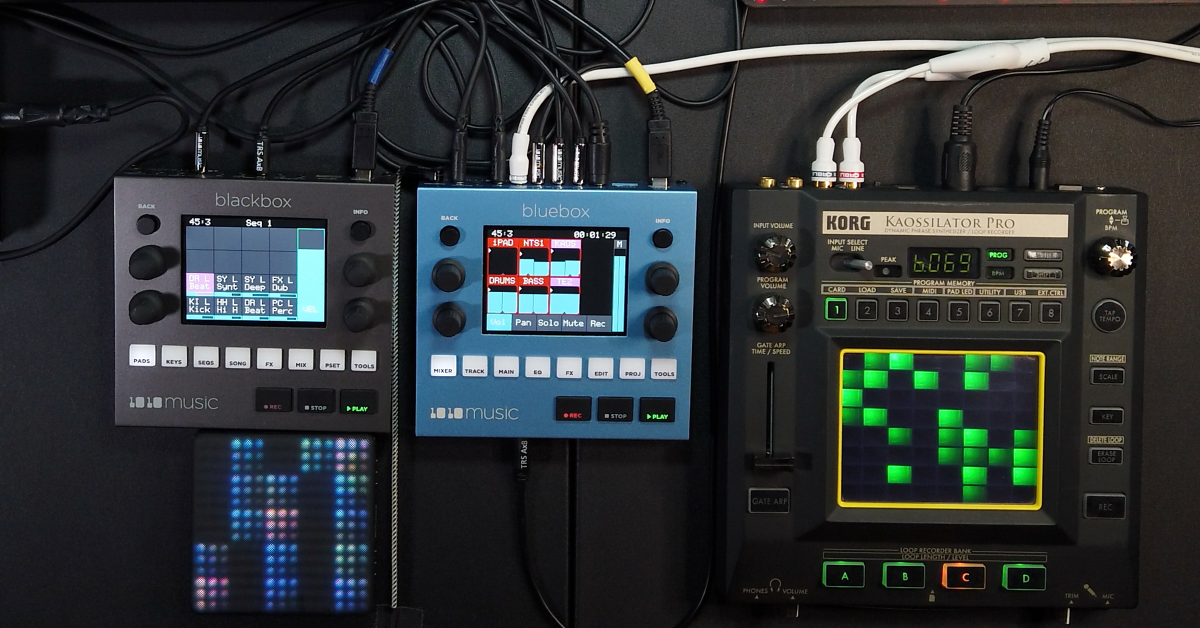
The Bluebox is a great piece of gear to connect all your gear to record, mix, and add effects out of the box. In this guide, we will go over the Bluebox mixer’s controls and functions to learn how to get the most out of your Bluebox mixer.
Getting started
What is included in the box:
- MicroSD Card
- Quick Start Manual
- 2 TRS to MIDI adapters (Type B)
- USB power brick
- 2 international power adapters for power brick
- The Bluebox itself
Before you get up and running with the Bluebox mixer, the first thing you’ll need to do is set up the SD card and check to make sure you’re on the latest firmware version.
- Insert SD card in the front Micro SD slot of the Bluebox.
- You MUST format the microSD card as FAT32 or exFAT.
- Plug the USB cable into the power brick, the power brick into an outlet, and the USB cable into the Power port on the back of the Bluebox.
- Ensure you are on the latest firmware. To check for firmware updates, you must create an account on 1010music’s forum.
- You will see the latest firmware updates for all of 1010music’s products with instructions on how to update on this forum.
- You can find the version your Bluebox mixer is on by pressing the Tools button. You will see the firmware version on the upper right corner.

Click the image to download the latest firmware.
Connections
- Power: This connection is to power the Bluebox. Connect the power supply with the USB type B cable that came with the Bluebox here.
- Device: This port allows you to connect a MIDI controller to a MIDI map and control the Bluebox from the MIDI controller.
- In 1-6: These are stereo 1/8″ ports that allow you to connect any line-level or eurorack level audio source to the Bluebox. To access all 12 inputs on the Bluebox, you need to use a male 1/8″ TRS to dual female 1/8″ TS adapter.
- Out 1 and 2: Out 1 and Out 2 on the Bluebox are each stereo outputs. Out 1 outputs the main stereo mix with the FX, while Out 2 outputs the main stereo mix without the FX. Out 2 helps send the audio signal of selected tracks to process the audio through external gear.
- Phones: By default, the phones jack outputs the signal of the CUE mix. You can change this to listen to the main mix by following the last steps in the section “Playing a Demo Project” below.
- Micro SD: Insert the Micro SD card in this slot. This is used to store your recordings and to perform firmware updates on the Bluebox.
- MIDI In and Out: Use the included TRS to MIDI adapters to connect external MIDI gear with a standard 5-pin MIDI cable. The Bluebox supports both TRS to MIDI Type A and Type B adapters.
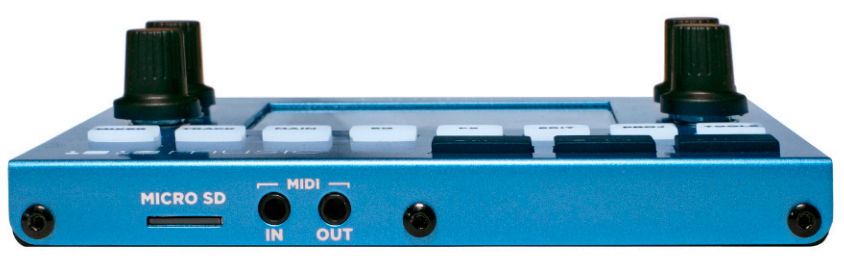
Front panel
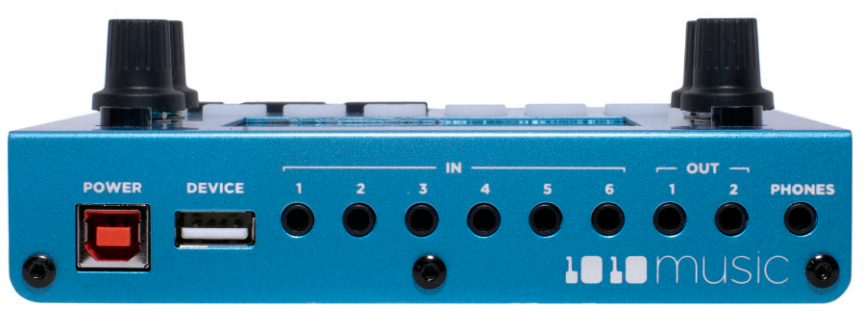
Back panel
Navigating the Bluebox
Now that we’ve covered the basic setup and connections, let’s navigate the Bluebox mixer and learn about adjusting different functions.
White buttons
They are used to select a control mode screen. Some control modes have additional pages which you can access by pressing the same control mode button again. The brightest control mode button indicates the control mode you are in.
Touch
You can adjust parameters by touching them on the screen and sliding your finger up and down the screen. You can do this for toggling parameters, sliders, knobs, or track selection.
Knobs
Used to also control parameters if you prefer not to use the touch screen. The knobs will control the parameters that have the knob focus on them.
A button
Used to change the knob focus. A pink square on 4 parameters indicates the knob focus. In the EDIT screen, the A button toggles the active playback state for a WAV file.
B button
Used to access additional configuration options for some control modes.
REC, STOP, and PLAY
Used to control playback, recording of armed tracks, and recording of the Main Mix if it is armed.
Control modes
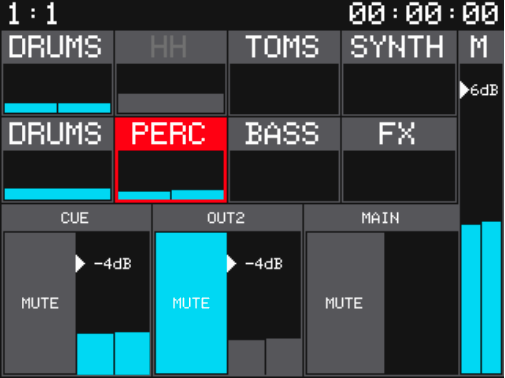
Mixer
The Mixer control mode is an overview of all channels in the project. You can control the Volume, Gain, Solo, Mute, and Record Arm parameters for each track. Pressing the MIXER button again will give you access to the Pan, FX1, FX2, CUE, and Out 2 parameters for each track.
If you press the B button on the MIXER control mode, you can choose how many tracks the project will have and if you would like to view them in a single or double row configuration.
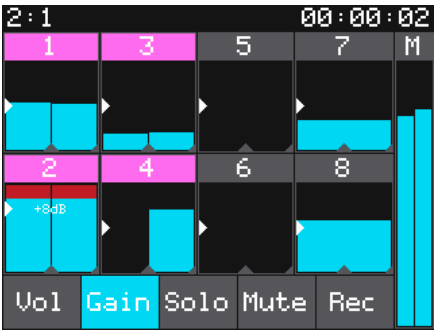
Mixer Mode
Track
The Track control mode is similar to the Mixer control mode. You have access to all of the same parameters in a different view.
Additionally, pressing the B button in this control mode allows you to route the six stereo inputs on the back of the Bluebox to a track. You can choose whether a track receives its audio from the left channel, right channel, or both channels of an input.
- Note: If it is a stereo piece of gear, select both the left and the right inputs. If it is a mono piece of gear, make sure you choose just the left input or just the right input, depending on which side it is connected to. You can connect mono gear straight into the stereo inputs of the Bluebox without a splitter cable. The signal will appear on the left and right sides, depending on the cable being used.

Track Mode
Main
The Main control mode controls the output level for the CUE mix, the Out 2 mix, and the Main mix. You can also mute each output by pressing the mute button under the corresponding output you would like to mute.
If you press the B button, you will have additional settings to choose the CUE source and whether you would like the CUE mix, Out 2 mix, FX1 mix, and FX2 mix. You can also adjust the compressor setting that is applied to the main mix on this page.
Main Mode
EQ
The EQ control mode is used to set the EQ for each track in the project. Pressing the EQ button again will show a full-screen view of the EQ curve for the selected channel.
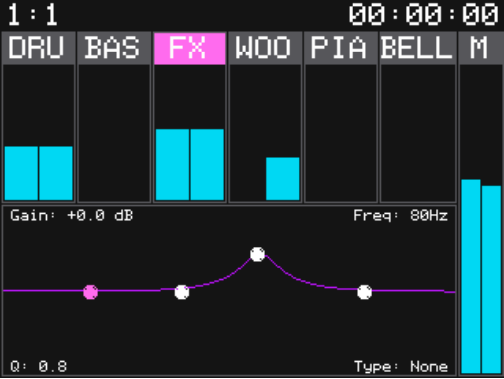
EQ Mode 1
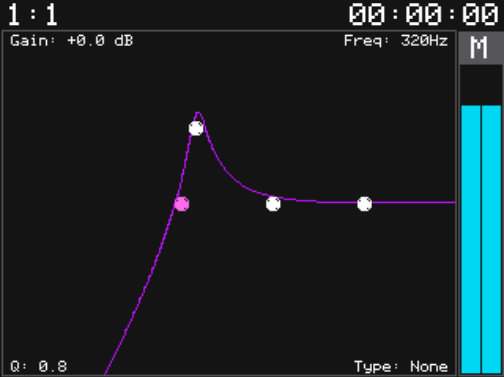
EQ Mode 2
FX
The FX control mode is used to adjust the parameters of FX 1 and FX 2. Pressing the FX button again will scroll through the four different pages to adjust FX 1 and FX 2.
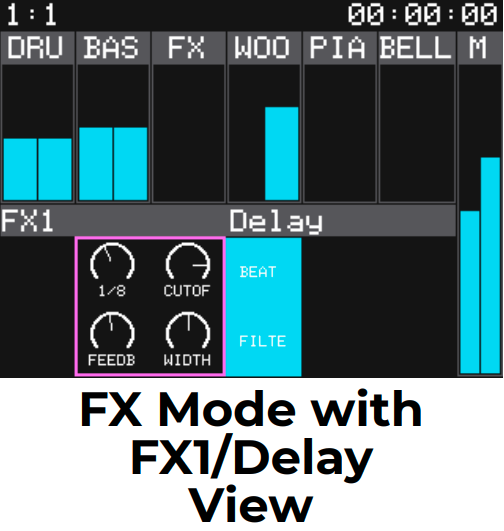
FX Mode 1
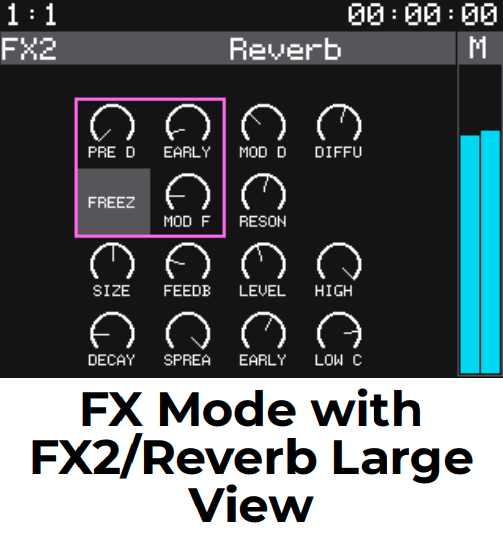
FX Mode 3
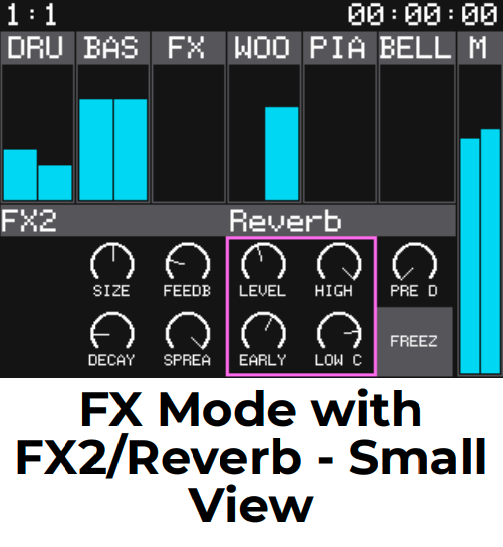
FX Mode 2
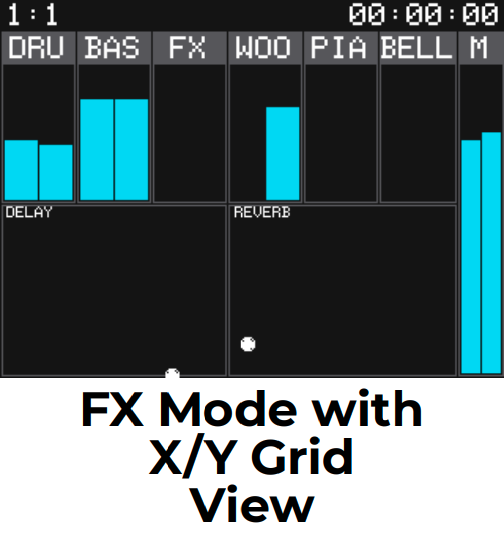
FX Mode 4
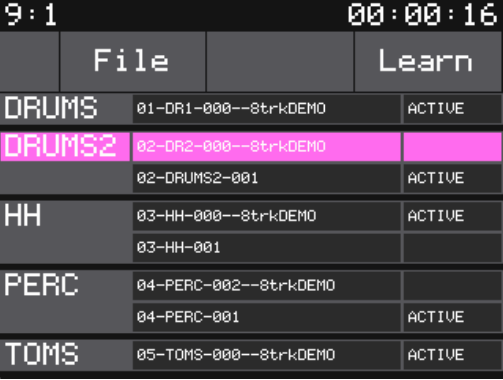
Edit
The Edit control mode allows you to add, remove, rename, or delete audio files. The add and remove functions add/remove an audio file to/from the selected track. This will not affect the actual audio file that is on the SD card. The rename and delete functions will rename/delete the audio file on the SD card.
When an audio file is loaded onto a track, highlighting the track and pressing the A button will make the audio file active/inactive for playback.
The Edit control mode also has the Learn button which allows you to map your MIDI controller’s controls to a parameter on the Bluebox. The steps on how to use Learn are in the Using the MIDI Learn Feature section below.
Edit Mode
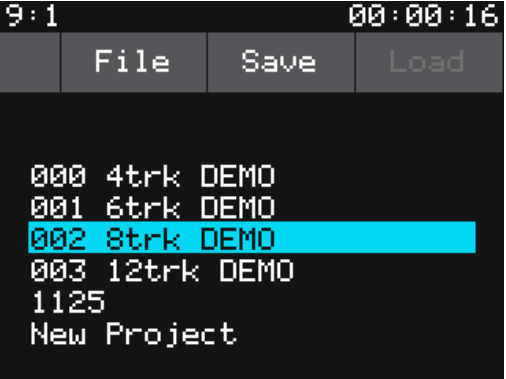
PROJ
The Project control mode is where you will manage the projects you have created on your Bluebox mixer. This is also where the Demo projects reside. Pressing the B button will show more setting to adjust for the project that is loaded.
Proj mode
Tools
The Tool control mode allows you to adjust the brightness of the Bluebox’s screen and show how much space is left on the SD card and what firmware version the Bluebox is on.
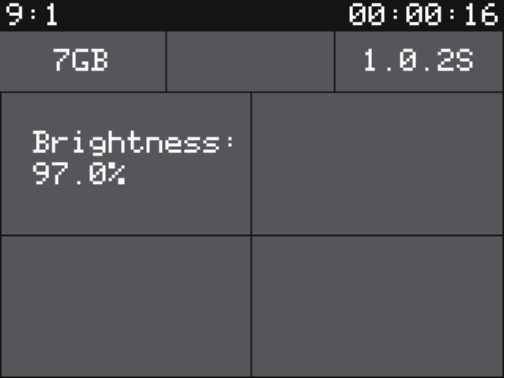
Tools mode
Recording on the Bluebox
You can record individual tracks simultaneously as well as the main mix to WAV files. These WAV files will be saved in the project folder on the SD card. Follow these steps to record a track/multiple tracks/the main mix.
TIP: Each track armed for recording will have its WAV file displayed in the EDIT control mode. Here you can make WAV files active/inactive for playback. If you recorded the main mix, the main mix WAV file will be located in the project folder with the name starting with 13-Main.
- Connect your external gear to the inputs on the back of the Bluebox mixer.
- Go to the Track control mode and press the B button to access the input routing for each track. Highlight the track you would like to record your external gear on.
- Touch the corresponding left input, right input, or both inputs that the external gear is connected.
- Refer to the note in the Track control mode section for more information on choosing the right input for stereo and mono gear.
- Go to the Mixer control mode and press the REC button on the screen. If you do not see the REC button, press the MIXER button again to go to the next Mixer control mode page.
- With the REC button highlighted, touch each track that you would like to arm for recording. To arm the main mix track, touch the rightmost track labeled “M”. The tracks that are armed for recording will be outlined in red.
- Push the REC and PLAY buttons at the same time to start recording.
- Push the STOP button when you are finished recording.
Playing a demo project
- Press the PROJ button to access the Project screen.
- Use any knob to scroll through the projects. Highlight the project you would like to load. The included demo projects end with the word DEMO.
- Once the project is highlighted, touch the Load button on the top right.
- Hit play to start the demo song.
Note: If you are using headphones, you will need to turn up the CUE for each track on either the second page of the Mixer screen or in the Track screen. Alternatively, set the CUE source to the main mix by following the steps below.
- Go to the Main screen
- Press the B button
- Change the Cue Source to Main using either of the bottom two knobs.
Using the MIDI Learn feature
One of the best features on the Bluebox is the ability to map almost every parameter to a control on a MIDI controller. This means that you can use your MIDI controllers knobs and faders to control the panning and volume for each track on the Bluebox for example.
To use the MIDI Learn function:
- Connect a MIDI controller to the Device USB port on the back or the TRS MIDI in port on the front.
- Press the EDIT button to go into the edit control mode.
- Touch the LEARN button at the top right corner. The LEARN button should highlight in blue indicating that you are in MIDI Learn mode.
- Go to a different control mode like the Mixer control page for example. You will see the mappable parameters will have a blue outline around them.
- Touch the parameter you would like to map to highlight it.
- Once it is highlighted, move the control on your MIDI controller to assign it to the highlighted parameter in the Bluebox.
- Once you are done mapping all parameters, press the EDIT button to go back to the edit control mode and touch LEARN to exit MIDI Learn mode.
Additional resources
Bluebox Digital Mixer Overview by 1010Music
An example recording session featuring the Bluebox Compact Digital Mixer/Recorder
When you need help, Sweetwater has the answers!
Our knowledge base contains over 28,000 expertly written tech articles that will give you answers and help you get the most out of your gear. Our pro musicians and gear experts update content daily to keep you informed and on your way. Best of all, it’s totally FREE, and it’s just another reason that you get more at Sweetwater.com.


Offer applies only to single-receipt qualifying purchases. Select manufacturers may require that only the manufacturer’s products qualify towards the minimum purchase amount needed to be eligible for promotional financing. Otherwise, an invoice that meets the minimum purchase amount and contains at least one qualifying manufacturer product is eligible for promotional financing. No interest will be charged on promo purchase balance, and equal monthly payments are required on promo purchase until it is paid in full. The payments equal the amount financed divided by the number of months in the promo period, rounded up to the next whole dollar. These payments may be higher than the payments that would be required if this purchase was a non-promo purchase. During the last month(s) of the promo period the required monthly payment may be reduced due to the prior months’ rounding. Regular account terms apply to non-promo purchases. New Accounts as of 07/31/2025: Purchase APR is 34.99%. Penalty APR is 39.99%. Min Interest Charge is $2. Existing cardholders: See your credit card agreement terms. Subject to credit approval.
Offer applies only to single-receipt qualifying purchases. No interest will be charged on the promo balance if you pay it off, in full, within the promo period. If you do not, interest will be charged on the promo balance from the purchase date. The required minimum monthly payments may or may not pay off the promo balance before the end of the promo period, depending on purchase amount, promo length and payment allocation. Regular account terms apply to non-promo purchases and, after promo period ends, to the promo balance. New Accounts as of 07/31/2025: Purchase APR is 34.99%. Penalty APR is 39.99%. Min Interest Charge is $2. Existing cardholders: See your credit card agreement terms. Subject to credit approval.
The estimated required monthly payment shown which excludes taxes and delivery equals the amount financed divided by the number of months in the promo period, rounded up to the next cent. During the last month(s) of the promo period the required monthly payment may be reduced due to this rounding. These payments apply only with the financing offer shown. If you make these payments by the due date each month, you should pay off this amount financed within the promo period, if it is the only balance you are paying off. If you have other balances on your account, this payment will be added to any other minimum monthly payments.
Applies only to select items from this manufacturer. Ask your Sweetwater Sales Engineer for more details.