
Alesis Strike Multipad Setup Guide

Getting started with the Alesis Strike Multipad
We’ve created this getting started guide so you can enjoy making music right away with the Alesis Strike Multipad. You’ll learn how to register and set up the device, as well as how to navigate the menus. Follow the sections below to get started.
Register the Strike Multipad
The Strike Multipad includes free a free Ableton Live Lite license. You can register Ableton Live Lite using the included registration card.
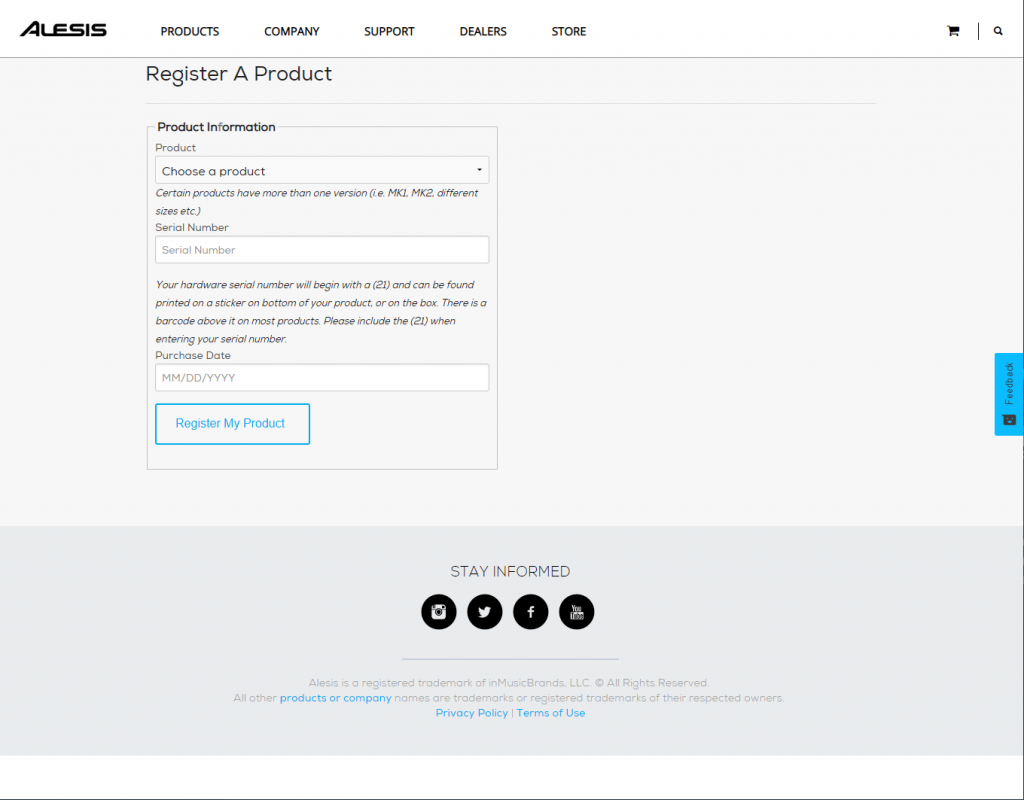
Click here to register your Alesis Strike Multipad.
Navigating modes and menus
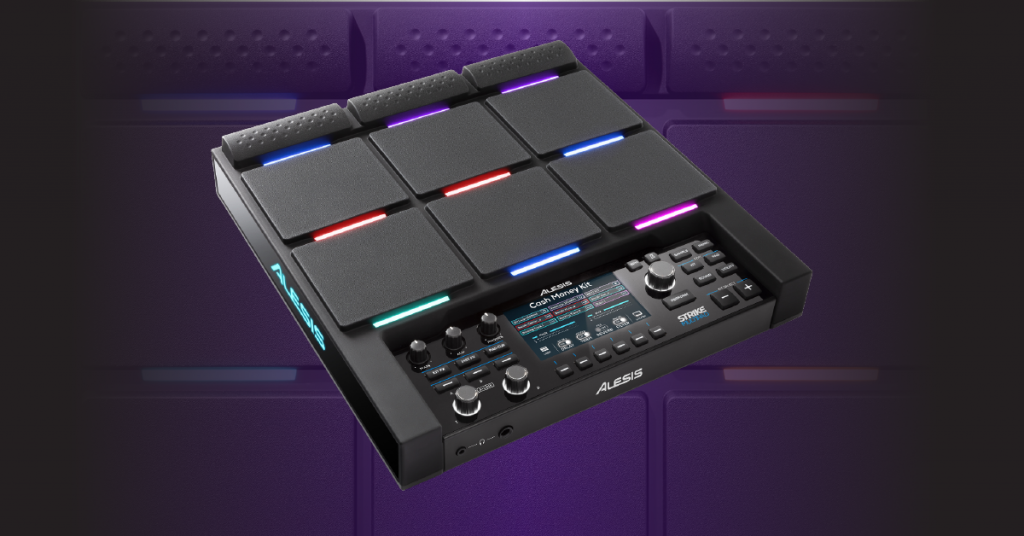
The Strike Multipad has multiple menus and modes which allow you to edit different functions within the device. These include Perform, Kit, Pad, Sound, and Utility. Each mode has unique options which give you unlimited control of each sample, pad, and kit you use. To change any function, press the Menu button you wish to access. Use the six function buttons located below the display to switch between menus. For this guide, we will list these as F buttons. Finally, scroll and click using the Main Encoder to select and edit each option.

Sections of the Alesis Strike Multipad.
Perform
When you first power on the Strike Multipad, your device is in Perform Mode and is the primary mode you’ll be in when using it. Perform mode also allows you to view basic information about the current kit, access the looper function, and view the existing sound effects which are loaded.
- Press the F1 (Kit) button to switch between factory-preset kits and user kits.
- Use F2 through F5 buttons to control the looper function.
- Press the F6 (View) button to view, enable, and disable global kit effects.
Perform Mode and Looper Overview
Kit
The Kit menu provides an overview of the kit. You can also change the kit using the Main Encoder located to the right of the display, change global kit settings, and even rename the kit.
- Press the F1 button to switch between Preset and User kits.
- Press F3 (Settings) to change the global kit settings such as the level, tempo, time signature, and logo settings.
- Use the F4 (Copy) button to copy and paste settings from one kit to another.
- Press the F5 (Rename) button to rename the current kit.
Kit Menu Overview
Pad
While in the Pad menu, you can change the settings of an individual pad. Select the pad you wish to edit by striking it, and then use the function buttons to edit the options. Please note that each pad setting is kit-specific and doesn’t save globally.
- Pressing the F1 (Feel) button will open a menu to change the feel of the pad. This includes the sensitivity, velocity curve, threshold, and fixed level which engages and disengages dynamics.
- Use the F2 (Control) button to change what the pad controls. For example, if you want to turn all effects on or off while playing, change the Control to Mst FX On/Off.
- Press the F3 (Output) button to adjust the Audio and MIDI note output of that particular pad. This is not a global setting, so
- The F4 (Light) button allows you to change the color of the pad’s LED. This is particularly useful when identifying specific samples while you’re performing.
Pad Menu Overview
Sound
The Sound menu is for changing, editing, and layering samples on the selected pad. This menu is also where you can import custom samples via a USB thumb drive.
- If you wish to change or layer the sound of a specific pad, press the F2 button to enter Browse mode, and then press the F1 button and use the Main Encoder to change the library, category, and sample.
- To import sounds and loops from an external USB thumb drive, press the F3 (Import) button, and use the Main Encoder to select the sample to import.
- The F4 (Mode) and F5 (Mix) buttons will open menus to change the playback mode and adjust the mix of that particular sample.
- Press the F6 (Edit) button to edit different types of edits to the User .WAV files.
- To edit a factory preset sound, you must enter Edit mode, and then select Copy to User to make any necessary changes.
Browsing and Selecting Sounds
Utility
While in the Utility menu, global hardware settings can be changed, such as audio and MIDI routing, external pedal functionality, and user kit backup. You can also view which firmware version the hardware is currently on. Learn more about how to update the firmware in this guide.
- Press the F1 (MIDI) button to change all global MIDI settings, including the global MIDI channel, local control, and MIDI syncing.
- To adjust the master output or input levels, and change the I/O routing, press the F2 (Audio) button to enter the Audio menu.
- Use the F4 (Pedals)button to change the external foot pedal type, behavior, and MIDI value.
- The F6 (Backup) button will bring you to the menu to import and back up any user kits that you have created. This is also where a factory reset is performed. Learn how to perform a factory reset here.
Utility Menu Overview
Setup and configuration
There are many ways you can incorporate the Strike Multipad into your touring and recording rigs. Setting it up is a breeze and making the connections are straightforward, which means you will be performing in no time. Follow the sections below to learn the different setup and connection types available to you.
Hardware connections
TIP: If samples aren’t triggering once the MIDI settings are configured, try different octaves on the external device. Depending on the kit that is selected, the pads may have different MIDI CC notes assigned to them.
To use the Strike Multipad with external MIDI devices such as a synthesizer or drum machine, you’ll use the MIDI ports on the back of the device. Depending on how you connect the devices together, you will need to change the MIDI settings within the Utility menu.
How to trigger sounds of an external device on the Strike Multipad
- Connect the MIDI OUT of the external device to the MIDI IN of the Strike Multipad using a 5-pin MIDI cable.
- Press the Utility button, and then press the F1 button to open the global MIDI settings.
- Change the MIDI settings to the following:
- Global MIDI Channel: 1 (or whichever MIDI channel the external device is set to)
- MIDI Sync: ON
- Local Control: ON
- Midi Thru: OFF
- Program Change Switch: ON
- 5-Pin MIDI to USB: OFF
How to trigger sounds of the Strike Multipad on an external device
- Connect the MIDI OUT of the Strike Multipad to the MIDI IN of the external device using a 5-pin MIDI cable.
- Press the Utility button, and then press F1 to open the global MIDI settings.
- Change the MIDI settings to the following:
- Global MIDI Channel: 1 (or whichever MIDI channel the external device is set to)
- MIDI Sync: OFF
- Local Control: OFF
- Midi Thru: ON
- Program Change Switch: OFF
- 5-Pin MIDI to USB: OFF
External triggers and footswitches
TIP: Trigger In 2/3 and 4/5 are for dual-zone triggers. However, you can use a ¼” TRS to dual ¼” TS cable and connect two single-zone triggers instead.
You can connect five additional drum pads, a hi-hat pedal, and two footswitches to the module. You can assign them to trigger additional samples or to control different functions such as turning effects on and off or switching kits.
Drum pads
- Connect the pad to the Trigger input on the back of the module, and press the Utility button.
- Press F3 (Trigger) to adjust the advanced trigger settings.
- If you’re connecting two pads using the ¼” splitter cable, you must change the Type from Head+Rim to 2 Trigger.
- Press the Pad button to assign it to a sample or control.
Footswitch
- Connect a footswitch to the Footswitch input on the back of the module, and press the Utility button.
- Press the F4 (Pedals) button to adjust the advanced pedal settings.
- If you’re using a footswitch to control functions, change the Type from Variable to Switch.
- Press the Pad button to assign it to a sample or control.
How to connect the Strike Multipad to your computer
The Strike Multipad is very versatile when connecting it to a computer. For example, you can use it as a standard MIDI controller to trigger virtual instrument samples within your DAW. You also can record audio from and to the device without needing to use instrument cables. The Multipad is class-compliant on both Mac and PC as well, so no additional driver software is necessary to operate it within your DAW. All you need to do is connect a USB cable from the device to your computer, open your DAW, and you’re ready to go.
Learn more about how to work with the Strike Multipad’s sounds!
Additional resources
How to use A-Link
Assigning and Editing Effects
How to Adjust BPM & Metronome
How to Use Pad Groups
When you need help, Sweetwater has the answers!
Our knowledge base contains over 28,000 expertly written tech articles that will give you answers and help you get the most out of your gear. Our pro musicians and gear experts update content daily to keep you informed and on your way. Best of all, it’s totally FREE, and it’s just another reason that you get more at Sweetwater.com.


Offer applies only to single-receipt qualifying purchases. Select manufacturers may require that only the manufacturer’s products qualify towards the minimum purchase amount needed to be eligible for promotional financing. Otherwise, an invoice that meets the minimum purchase amount and contains at least one qualifying manufacturer product is eligible for promotional financing. No interest will be charged on promo purchase balance, and equal monthly payments are required on promo purchase until it is paid in full. The payments equal the amount financed divided by the number of months in the promo period, rounded up to the next whole dollar. These payments may be higher than the payments that would be required if this purchase was a non-promo purchase. During the last month(s) of the promo period the required monthly payment may be reduced due to the prior months’ rounding. Regular account terms apply to non-promo purchases. New Accounts as of 07/31/2025: Purchase APR is 34.99%. Penalty APR is 39.99%. Min Interest Charge is $2. Existing cardholders: See your credit card agreement terms. Subject to credit approval.
Offer applies only to single-receipt qualifying purchases. No interest will be charged on the promo balance if you pay it off, in full, within the promo period. If you do not, interest will be charged on the promo balance from the purchase date. The required minimum monthly payments may or may not pay off the promo balance before the end of the promo period, depending on purchase amount, promo length and payment allocation. Regular account terms apply to non-promo purchases and, after promo period ends, to the promo balance. New Accounts as of 07/31/2025: Purchase APR is 34.99%. Penalty APR is 39.99%. Min Interest Charge is $2. Existing cardholders: See your credit card agreement terms. Subject to credit approval.
The estimated required monthly payment shown which excludes taxes and delivery equals the amount financed divided by the number of months in the promo period, rounded up to the next cent. During the last month(s) of the promo period the required monthly payment may be reduced due to this rounding. These payments apply only with the financing offer shown. If you make these payments by the due date each month, you should pay off this amount financed within the promo period, if it is the only balance you are paying off. If you have other balances on your account, this payment will be added to any other minimum monthly payments.
Applies only to select items from this manufacturer. Ask your Sweetwater Sales Engineer for more details.