
Ableton Push 2: Creating Tracks
Getting started
In this guide, we’ll walk you through how to create tracks in Live for the first time using the Push 2 controller. You’ll learn how to add, load, and select tracks, as well as choose the correct note input layout for your instrument. Be sure to check out Ableton’s excellent video tutorial series, as well. Follow the sections below to get started.
- Add and load devices and tracks
- Selecting and editing tracks
- Playing and programming drum beats
- Playing and programming instruments
- Recording your music
Add and load devices and tracks
TIP: Use the button located underneath the second encoder knob to enable Preview. This will allow you to hear the selected instrument before loading it onto a track.
When you first launch Ableton, a project with two blank MIDI and audio tracks are preloaded. From here, you can add instruments (devices) and audio clips. If you would like, you can also create additional blank tracks. To get you started, let’s create a new MIDI track and load a drum kit. The same instructions apply for instrument tracks.
- Press the Add Track button and use the second touch-sensitive encoder knob to select Drums.
- To change the level at which the preview is played, hold the Shift button and use the Master Volume encoder. This also affects the level of the metronome.
- Use the third encoder knob to select your kit, and then press the Load button, which is the last button underneath the display.
- You can change the device on a track at any time by pressing the Add Device button and selecting a new device.
Loading third-party virtual instruments
To add third-party virtual instruments, you first must add a MIDI track. You can then your virtual instrument from the Plug-ins menu. All third-party virtual instruments, including drum plug-ins such as EZDrummer, will load as a standard instrument and not a drum rack.
Navigate and Browse
Selecting and editing tracks
Selecting a track within your project is easy on the Push. Just use the buttons below the display that corresponds with each track. You can also use the Left and Right arrow buttons on the directional pad. After the track is loaded, use the buttons on the top of the display and select parameters you wish to edit, like the compressor or EQ.
- You can “unpack” drum racks by double-tapping its track button. This gives you the ability to adjust the parameters of each sample within that drum rack.
Change the color of your tracks
Coloring your tracks makes it easy to distinguish and organize different instruments. You can change the color of the tracks, which also changes the color of the pads on the Push. To do so, hold the Shift button, select the track, and while still holding Shift, choose a color.
Device Visualization
Clip View
Playing and programming drum beats
You can program drums in a few different ways — Either realtime recording or using the step sequencer. Using the step sequencer is useful in situations where a drum needs to be on time or if you need to add or remove an individual note. Realtime recording is best for when you want to record your exact performance, capturing all of the details of your timing and dynamics. If your beats are a little off time when recording in real time, you do have the ability to quantize it. You can also use quantization to apply swing rhythms or adjust note values.
Select the drum layout
Drum tracks have three Layouts (modes) available; Loop Selector, 16 Velocities, and 64 Pads. Most preset drum kits that are installed with Ableton have 16 samples per kit. However, if you create a drum kit that includes a lot of samples, you may want to select the 64 Pads Layout for easier access to a specific sample. To change between the Layouts, just press the Layouts button.
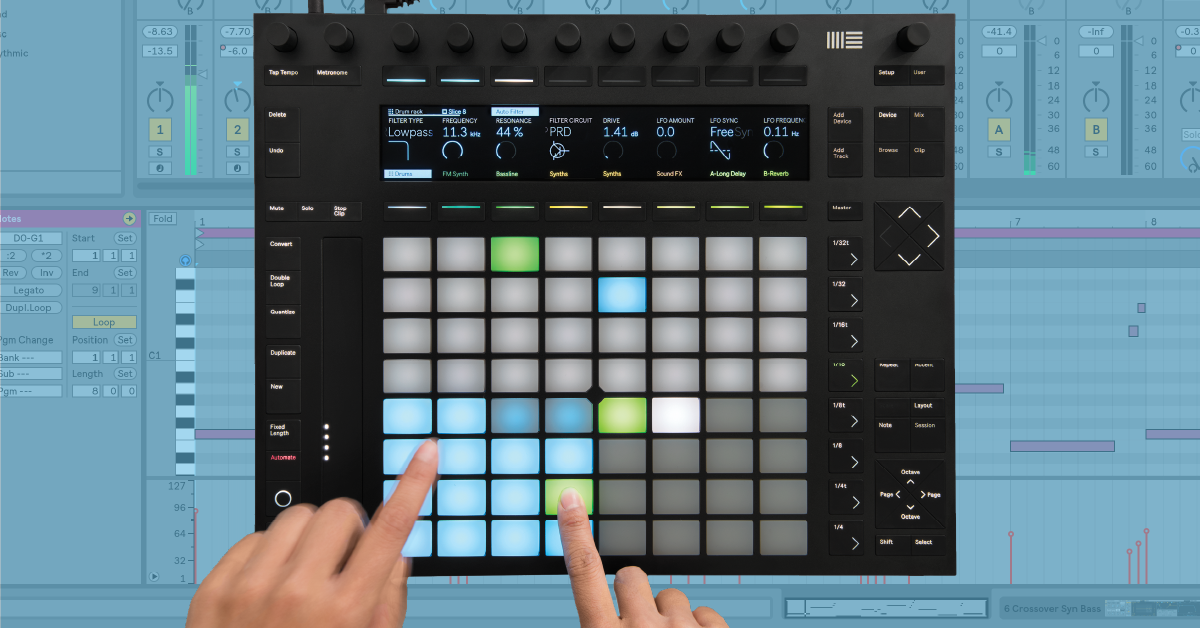
Loop Selector
While in the Loop Selector layout, the top 32 pads are a step sequencer, the bottom left pads are your drum samples, and the bottom right 16 pads are dedicated to your recorded drum clips. This mode is useful for when you want to play, use the step sequencer, and change the length of a clip all at once.
- To edit the length of a clip, press and hold one pad and tap another pad. For example, if you want to extend a clip from one to four measures, press and hold the first pad and tap the fourth pad. To go back to an individual clip, double tap the measure you want to play back or edit.
- If your drum track has more than 16 samples, use the touch strip or Octave buttons to move up and down by 16. You can hold Shift while using the Octave buttons or touch strip to move by single rows.
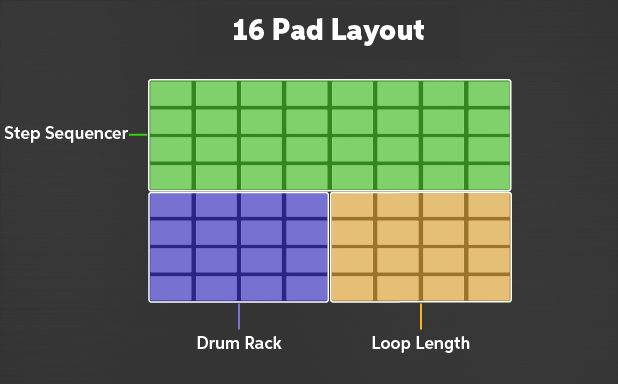
Loop Selector Layout diagram
16 Velocities
This Layout is similar to Loop Selector in regards to where the pads are assigned. The only difference between the two is that instead of selecting clips, the bottom right 16 pads allow you to choose the velocity (intensity and level) of individual samples. While the Push 2’s pads are velocity-sensitive, using this mode can give you a much more dynamic range.
- Press the pad your sample is loaded on, then press a pad on the right to select the velocity.
- The brightness of the pad will correspond to the velocity. The softer the velocity, the dimmer the pad will be.
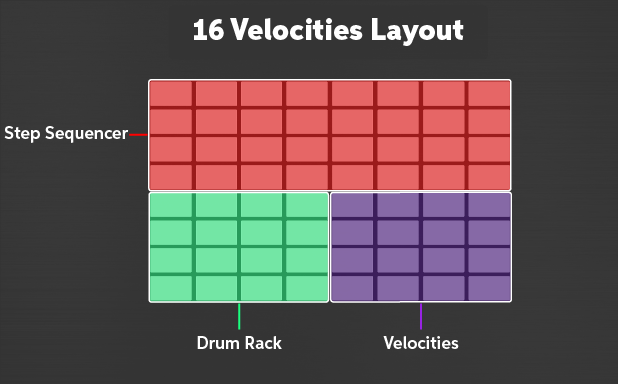
16 Velocities Layout diagram
64 Pads
64 Pads Layout is very useful when working with a drum rack which consists of more than 16 samples. Especially if you’ve sliced and sampled multiple audio files.
- Change the color of individual pads so it’s easier to distinguish between samples. Do this by holding Shift then press the pad you want to change. While continuing to hold the Shift button and select the color you want the pad to be.
- To trigger a specific sample from the 64 Pads Layout in the step sequencer, press that sample’s pad, press Layout to enter either Loop Selector or 16 Velocities, and use the top 32 pads to use the step sequencer.
64 Pad Mode
Step Sequencing Beats
Playing Drums (Advanced)
Playing Drums
Advanced Drum Techniques
Playing and programming instruments
Just like drum tracks, you can program instruments either by recording in real time or by using the step sequencer. Depending on what instrument you’re recording, you may want to consider one over the other. For example, step sequencing is ideal if you’re programming a simple bass line that consists of three notes with the same rhythm. If you’re recording an intricate piano or lead line, you may want to consider recording in real time.
Select the instrument layout
The instrument Layouts are geared towards harmonic and melodic instruments such as pads, synths, basses, and pianos. Like drum layouts, there are three available for instruments, as well. 64 Notes, Melodic Sequencer, and Melodic Sequencer + 32 Notes.
64 Notes
The 64 Notes Layout gives you access to 64 available notes on the selected instrument track. This mode is most useful for real-time recording a track such as a synth lead or a piano line.
- Hold the Layout button down to temporarily access the clip length. It will be displayed on the top row of pads.
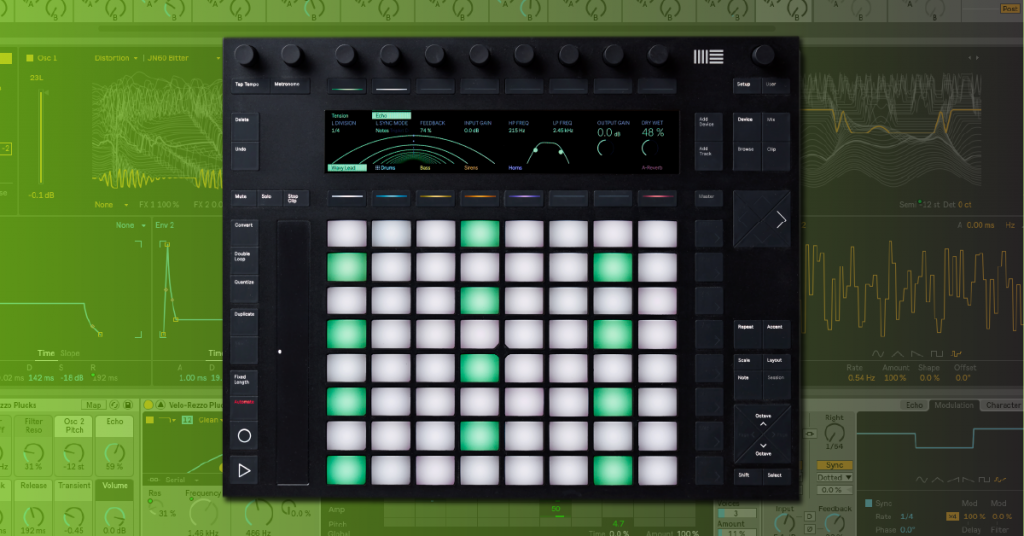
Melodic Sequencer
The Melodic Sequencer Layout is a mix between a step sequencer and keyboard. The vertical pads are the notes, and the horizontal pads represent the steps. You have visual access to one octave but can easily switch by pressing the Octave buttons.
Melodic Step Sequencer
Melodic Sequencer + 32 Notes
This layout gives you access to both the sequencer as well as a four-octave range of notes. The top half of the pad section is the step sequencer, and the bottom half is assigned to the notes. If you need to change the octave, press the Octave +/- buttons.
32-Note Melodic Step Sequencer
Scale mode
A unique feature of the Push 2 is the ability to change the key, scale, as well as the pad layout and orientation while using a melodic instrument. With a vast array of scales to choose from, this allows you to get creative on the spot. To access the Scale menu, you must have an instrument track loaded and have Note Mode enabled.
Note Mode Settings
Recording your music
TIP: If you’re recording in real-time and have a repetitive part (i.e. straight 16th notes on a hi-hat), press the Repeat button, select the subdivision you want and press Record. You can change the subdivision while recording, as well.
Once you select the Layout of your track, creating drum beats and synth lines are easy using the Push 2. When using the step sequencer, press the pad your sample is loaded on, then press the pad in the step sequencer section in which you want to add it. To record in real time, just press the Record button to begin, then press the Record button to stop recording.
- If you’re using the metronome, press and hold the Shift button and turn the Master Volume knob to adjust the level of the click.
- If you plan on recording in real time, consider enabling Count-in. This will give you a pre-count which gives you a little extra time to prepare for recording.
- Use the Page < and > buttons to skip sections of a clip to edit specific parts.
Recording in Arrangement View
Session View
Quantize and swing
If your recordings are a bit off time, or you want a bit more groove to a beat, you can quantize and apply swing to a selected track. You can also enable Record Quantize, which quantizes your track in real time while you’re recording.
- Press and hold the Quantize button to access the Quantize menu.
- Use the encoders to adjust the Swing, Subdivision, and Amount.
- To enable Record Quantize, press the button underneath the fifth encoder, then use the encoder to select the subdivision.
- Let go of the Quantize button to exit the menu, then press the Quantize button once more to apply the changes you just made.
Related content
When you need help, Sweetwater has the answers!
Our knowledge base contains over 28,000 expertly written tech articles that will give you answers and help you get the most out of your gear. Our pro musicians and gear experts update content daily to keep you informed and on your way. Best of all, it’s totally FREE, and it’s just another reason that you get more at Sweetwater.com.


Offer applies only to single-receipt qualifying purchases. Select manufacturers may require that only the manufacturer’s products qualify towards the minimum purchase amount needed to be eligible for promotional financing. Otherwise, an invoice that meets the minimum purchase amount and contains at least one qualifying manufacturer product is eligible for promotional financing. No interest will be charged on promo purchase balance, and equal monthly payments are required on promo purchase until it is paid in full. The payments equal the amount financed divided by the number of months in the promo period, rounded up to the next whole dollar. These payments may be higher than the payments that would be required if this purchase was a non-promo purchase. During the last month(s) of the promo period the required monthly payment may be reduced due to the prior months’ rounding. Regular account terms apply to non-promo purchases. New Accounts as of 07/31/2025: Purchase APR is 34.99%. Penalty APR is 39.99%. Min Interest Charge is $2. Existing cardholders: See your credit card agreement terms. Subject to credit approval.
Offer applies only to single-receipt qualifying purchases. No interest will be charged on the promo balance if you pay it off, in full, within the promo period. If you do not, interest will be charged on the promo balance from the purchase date. The required minimum monthly payments may or may not pay off the promo balance before the end of the promo period, depending on purchase amount, promo length and payment allocation. Regular account terms apply to non-promo purchases and, after promo period ends, to the promo balance. New Accounts as of 07/31/2025: Purchase APR is 34.99%. Penalty APR is 39.99%. Min Interest Charge is $2. Existing cardholders: See your credit card agreement terms. Subject to credit approval.
The estimated required monthly payment shown which excludes taxes and delivery equals the amount financed divided by the number of months in the promo period, rounded up to the next cent. During the last month(s) of the promo period the required monthly payment may be reduced due to this rounding. These payments apply only with the financing offer shown. If you make these payments by the due date each month, you should pay off this amount financed within the promo period, if it is the only balance you are paying off. If you have other balances on your account, this payment will be added to any other minimum monthly payments.
Applies only to select items from this manufacturer. Ask your Sweetwater Sales Engineer for more details.