
This is another in a series of articles addressing issues when deploying multiple channels of wireless systems. We addressed the principles of how RF works in our RF 101 – The Basics of Wireless Mics and In-ear System and RF 201 – Antennas, Distro, and More along with pointers for How to Improve Wireless Performance Using Antennas.
Once your systems are in use, how can you keep them operating dependably week after week? Let’s dive in and discuss the best practices for making those systems work flawlessly.
Preplanning pays
As annoying as you may find this, your dad was right. An ounce of prevention really is worth a pound of cure. The absolute best thing you can do to make your wireless work dependably is to start your system on the most successful footing by choosing reliable frequencies.
As we detailed in the RF 101 article, we not only have to work around TV stations but also around the destructive intermodulation artifacts that the wireless units create by interacting with each other.
Generating a list of clean frequencies is critical to operating more than a couple of channels of wireless microphones and IEM systems together. The best tool for this is a software app such as Shure’s Wireless Workbench, as detailed in the article Coordinating Wireless Frequencies for Live Sound.
Use that application or something similar, such as Sennheiser’s Wireless Systems Manager (WSM), to generate a list of compatible frequencies for use in your system. In the example below, I have generated a list of frequencies for six channels of Shure QLX-D and four channels of Sennheiser IEM with four backup frequencies for each using Workbench.

Figure 1: The 18 frequencies generated by Shure’s Wireless Workbench will give you flexibility for use with 10 wireless systems!
Test It Out
Program the frequencies into your wireless units, and next you’ll begin the process of torture testing the system. This is the same approach a tech would use at a live awards show like the Oscars.
- Lay out all your transmitters across the stage with about 2 feet separating each one. This likely approximates the worst-case scenario of all performers coming to the front of the stage at the same time. You should also have your IEM transmitters on and bring the receiver bodypacks to the stage as well.
- Sequentially turn off each of the transmitters and look at the receiver as you do so. You should not see any RF indication on the front-panel meters. If you do, then you should change the frequency of this wireless to one of your backup frequencies and start the process over. Note: If you change any channel, always start the process over from the beginning and check the first wireless again.
- Do not stop the process until you can turn off each transmitter and not see any RF activity on the meters for the channel you have just turned off. Remember that you will have to check the IEM bodypacks for this info and turn the IEM transmitters off in the rack, as their direction is the reverse of handheld and bodypack microphones.
Running this exercise will reveal any issues that you might not have accounted for, like an LED light fixture in the room that is creating noise at a frequency your software has generated. This is the best way to avoid interference and put your system on the most successful starting point.
RF Venue has a lot of expertise in this area. They call this “war gaming,” and the video below goes through the steps of this process.
Video: How to War-Game Transmitters
Baker or Sound Tech?
If you have multiple performers going on and off stage, you may be storing all the transmitters at a single location. Something to keep in mind is that the closer those transmitters are to each other, the more they interact, which causes two big problems.
First, the amplitude of the IM artifacts they are generating will increase, making your RF environment worse. Secondly, the transmitters will fight against each other and create more heat, shortening their life span.
Luckily, the solution is cheap and easy: aluminum foil bread pans.

Figure 2: Sometimes the simplest solution is the best.
James Stoffo, the father of modern frequency coordination, gets the credit for this little trick. Any metal between the transmitters functions as a local Faraday cage, which prevents the transmitters from interacting with each other. This keeps the intermod down and makes your life infinitely easier on the RF front. Because the tops of the pans are open, the main carrier frequency still transmits, and you can still see your wireless as being active on the receivers.
Do be aware that storing the transmitters this way will shorten your battery life a bit, as the bread pans effectively become very inefficient antennas for a transmitter that is on.
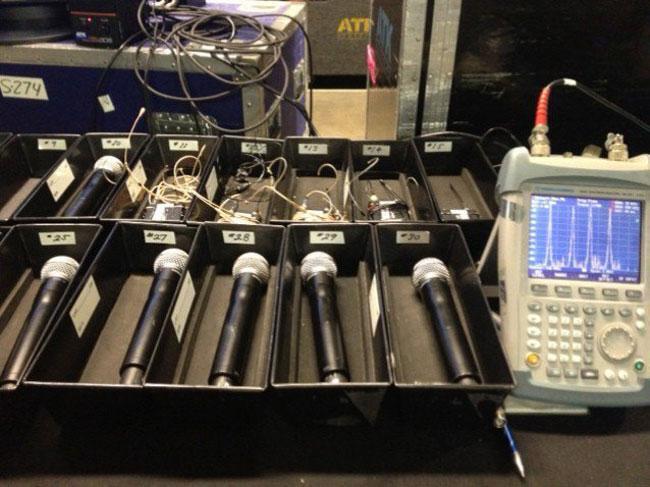
Figure 3: These professional versions of bread pans are just a little prettier. Photo courtesy of RF Venue.
Monitoring and Scanning
There is plenty of great information on the front panel of your wireless system, but it is not always in a convenient place to keep an eye on. Both Shure and Sennheiser offer you powerful monitoring tools on their computer applications that allow you to look at the readout of multiple pieces of wireless on a computer that is at your mix position.
For instance, below I have a screenshot from WSM where the performer is complaining about his IEM mix being distorted. I could pull the faders on the console down, but by looking at the WSM screen I can see that it is clipping the front end of the transmitter — so maybe it might make more sense to adjust the sensitivity of the IEM input, which I can do remotely! This is hugely powerful, and I can see the RF level, active antenna, and even battery level from the display for everything attached to the system.
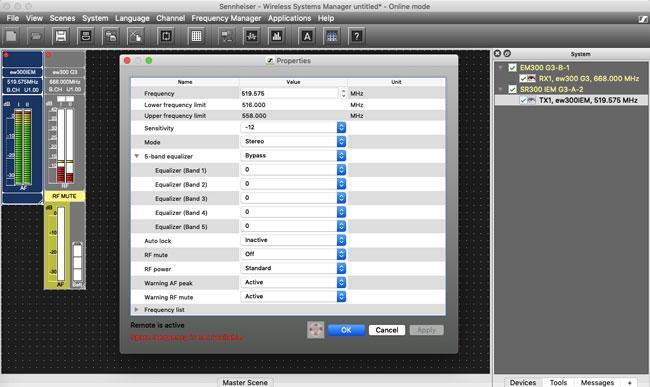
Figure 4: The input level (blue box at top left) is definitely a bit hot.
Shure’s Workbench software will also let me see a live timeline (the display on the left), so I can look back in time to where the transmitter was turned on and see that the system was doing a healthy job of switching between antennas. I also see an indicator that I had an RF overload as I stood right in front of the receiver with the transmitter.
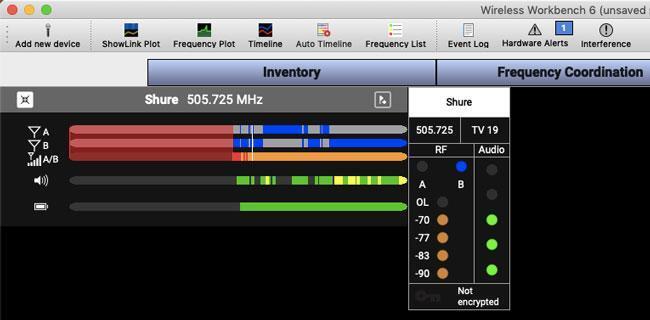
Figure 5: This display presents lots of info right where you need it.
If you are running multiple channels of wireless, having all of that information right in front of you is hugely valuable in seeing an issue coming before everything goes wrong.
While you can scan frequencies with an attached wireless receiver with either WSM or Workbench, these scans are slow, and they mean you can’t actually use that wireless for anything while you are scanning. These scans are also limited to the range that the wireless can tune to.
A better solution would be a dedicated RF scanner, like those from RF Venue in either portable or rackmount versions. They can run continuous scans over a wide bandwidth, and when coupled with monitoring software like their Vantage platform, they allow you to see what is going on in your RF environment in real time.
Spare Channel
Sometimes everything goes wrong no matter how much you plan ahead. A TV station changes its frequency, or the building next door adds a new chunk of wireless, and a system that was bulletproof last week is falling apart this week.
While you can change channels fairly quickly at a receiver, you still have to push that same frequency to the transmitter for the system to work, and that means downtime.
The only quick answer to this problem is having a spare channel immediately available. If someone is speaking behind a lectern, then the spare could be a wired microphone permanently mounted there.
If someone is truly mobile, then the only option is to have a completely redundant system that is already programmed to one of those safe channels you created with your frequency software. An additional receiver with both a handheld and a bodypack could mean that you look like a hero when everything goes haywire. It also lets you walk up to the stage with a solution rather than an attempt to troubleshoot during a performance, which is never a good feeling. I would always rather be the hero.
As I’ve shown you here, there are myriads of things that can cause wireless to have problems. If these solutions don’t address your particular situation, give your Sweetwater Sales Engineer a call at (800) 222-4700.