
Zoom R4 Quickstart Guide
The Zoom R4 MultiTrak is a portable multitrack recorder that is perfect for everyone! From podcasting to recording demos, the R4 can easily get the job done. In this guide, we will show you how to register, set up, and use it for the first time. Follow the instructions below to get started, and check out the Zoom R4 Operation Manual for more information!
Register the R4
You’ll want to register the R4 with Zoom when you first take the device out of the box. To register the R4, you’ll need the serial number of the recorder, which is located on the back of the unit.
- Go to the Zoom product registration page.
- Fill out the required information, including the serial number, which is located on the back of your R4. Click Submit.

Click the image to register your Zoom R4.
First Time Setup
NOTE: Before powering on the R4, make sure the SD card is inserted.
When you turn the Zoom R4 on for the first time, there are a few things you must do. Specifically, these are setting the date and time and choosing the battery type. Selecting the correct battery type ensures the battery life displays correctly.
- Turn the device on. Use the < (2) and > (3) buttons to select the year, month, day, and time. Once you’ve finished, press the Checkmark (4) button.
- Use the Up (2) and Down (3) arrows to select the battery type you are using, then press the Checkmark (4) button.
- If you’re not sure what type of battery you have, check the battery, as it will often be labeled (al/alkaline, NiMH, or lithium).
- Make sure you use brand-name batteries! Generic batteries often provide less charge, and the R4’s performance may be affected.
Format the microSD Card
IMPORTANT! Formatting SD cards will remove any data currently stored on them. Transfer any important files from the SD card to your computer before formatting!
For the Zoom R4 to store your recordings correctly, you must format the microSD card. While you can format the SD card on your computer, formatting it directly on the R4 will ensure everything works immediately.
- Press and hold the STOP button on the Home Screen. Press SETTINGS (4).
- Use the Up (2) and Down (3) arrows to highlight SD card. Once it’s highlighted, press ENTER (4).
- Use the Up (2) and Down (3) arrows to highlight Format, then press ENTER (4).
- Highlight Execute. Use the Checkmark (4) to confirm.
- Alternatively, you can access the SD Card Format menu by holding down the RECORD button while turning the R4 on.
Testing SD Card Performance
Testing your microSD card ensures that your R4’s performance remains consistent. It’s always good to run the test on occasion, not just when you notice lag or receive errors. This is especially true if you’re nearing the capacity of the microSD card.
There are two types of tests available: quick and full. The quick test does a swift check of the files. Think of it as just scanning the surface. Full tests take much longer, but they check every aspect of the microSD card to ensure everything works correctly.
- Press and hold the STOP button, then press SETTING (4).
- Use the UP (2) and DOWN (3) buttons to select SD card, then choose Performance Test.
- Select the test you wish to run, press ENTER (4), and press the Checkmark (4).
- Once the test is complete, the results will be shown.
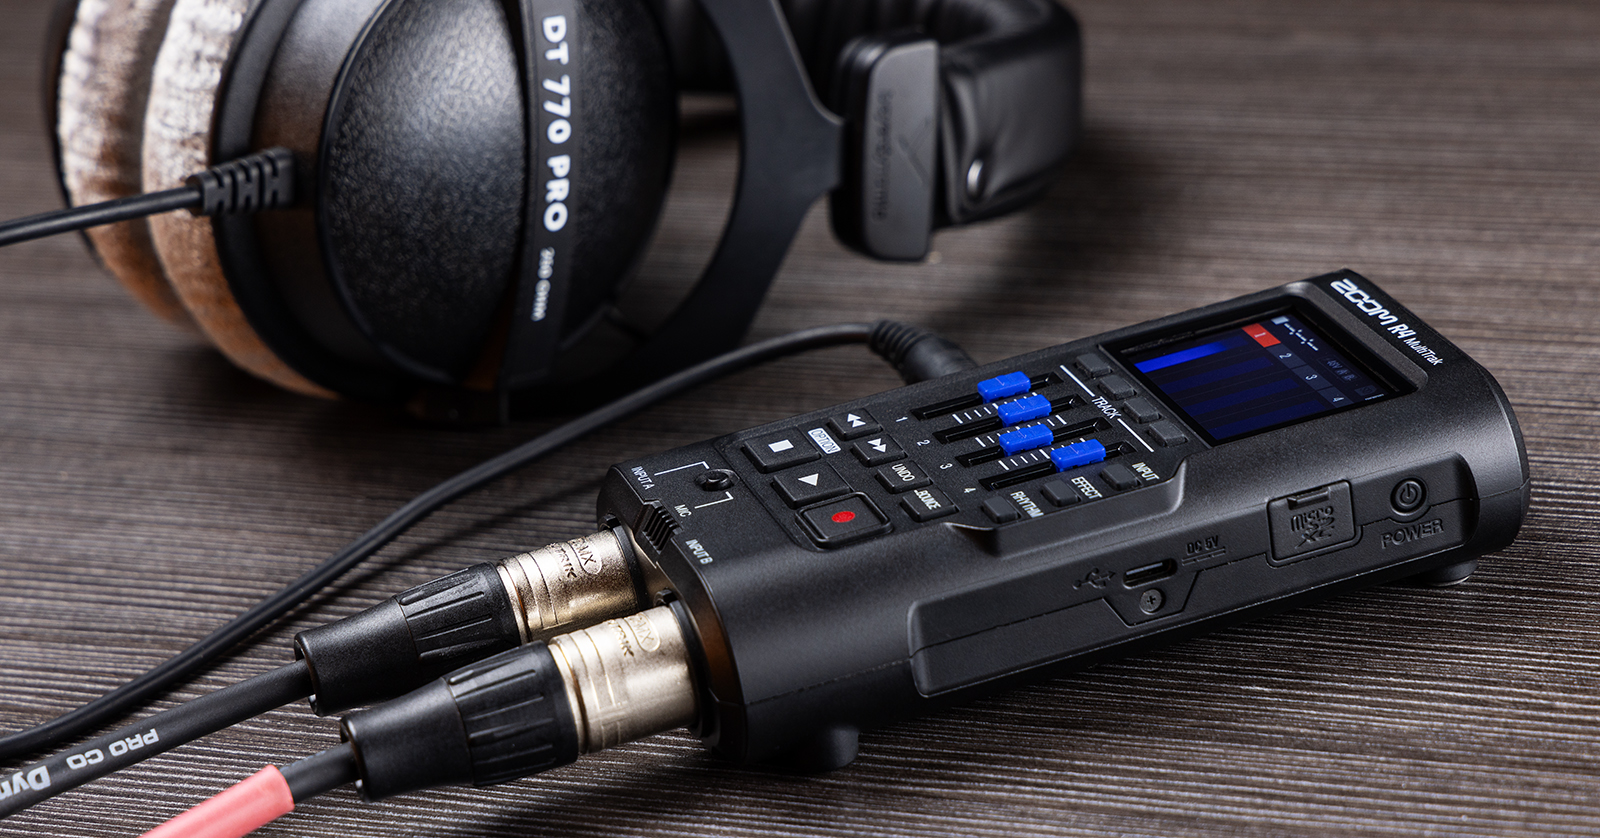
Setup and Connections
Once you format the microSD card, it’s time to get set up and connected. The process is straightforward: you just need to use an XLR or 1/4-inch cable to connect your instrument or microphone to your R4. Here are some setup and connection tips:
- By default, Channel 1 is linked to Input A, Channel 2 is linked to Input B, and Channels 3–4 are disabled. You can change the routing by pressing its associated button.
- Press the INPUT A and INPUT B buttons to cycle through the connections (disabled, normal level, and phantom power).
- Enable phantom power when using a condenser microphone.
- Ensure that phantom power is enabled after connecting the microphone and turn it off before disconnecting it. If you don’t, you risk potential damage to not only the microphone, but to the R4, as well!
- You can use microSDHC cards from 4GB to 32GB or microSDXC cards from 64GB to 1TB with your Zoom R4.
- If you’re a Windows PC user and want to connect the device to your computer, you need to download the driver before connecting. You can download the driver from the R4 MultiTrak support page.
- If you want to use the built-in mic, set the switch from INPUT A to MIC.
How to Record Audio
Now that everything is set up and connected, it’s time to start recording!
- Press and hold the STOP button and press NEW PRJ (1) to create a new project.
- Press the INPUT button, then select the tracks and input sources you wish to record.
- Each input can only be assigned to a single track.
- Play at the performance level and adjust the input gain with the faders. Once it starts clipping, bring down the fader just a little so it’s not clipping anymore. This will give you an optimal recording level.
- Once you’re ready, press the RECORD button.
- If you want a count-in (pre-count) before recording, press the RHYTHM button, use the DOWN (3) button to highlight Pre Count, press the CHECK (4) button to enable it, and press the CHECK (4) button again to apply.
- Press RECORD to begin recording.
- During playback, you can partially rerecord (punch in) tracks by pressing the RECORD button. This allows you to rerecord over a specific part that didn’t sound right.
Additional Zoom R4 MultiTrak Resources
Zoom R4 MultiTrak Quick Guides
When you need help, Sweetwater has the answers!
Our knowledge base contains over 28,000 expertly written tech articles that will give you answers and help you get the most out of your gear. Our pro musicians and gear experts update content daily to keep you informed and on your way. Best of all, it’s totally FREE, and it’s just another reason that you get more at Sweetwater.com.


Offer applies only to single-receipt qualifying purchases. Select manufacturers may require that only the manufacturer’s products qualify towards the minimum purchase amount needed to be eligible for promotional financing. Otherwise, an invoice that meets the minimum purchase amount and contains at least one qualifying manufacturer product is eligible for promotional financing. No interest will be charged on promo purchase balance, and equal monthly payments are required on promo purchase until it is paid in full. The payments equal the amount financed divided by the number of months in the promo period, rounded up to the next whole dollar. These payments may be higher than the payments that would be required if this purchase was a non-promo purchase. During the last month(s) of the promo period the required monthly payment may be reduced due to the prior months’ rounding. Regular account terms apply to non-promo purchases. New Accounts as of 07/31/2025: Purchase APR is 34.99%. Penalty APR is 39.99%. Min Interest Charge is $2. Existing cardholders: See your credit card agreement terms. Subject to credit approval.
Offer applies only to single-receipt qualifying purchases. No interest will be charged on the promo balance if you pay it off, in full, within the promo period. If you do not, interest will be charged on the promo balance from the purchase date. The required minimum monthly payments may or may not pay off the promo balance before the end of the promo period, depending on purchase amount, promo length and payment allocation. Regular account terms apply to non-promo purchases and, after promo period ends, to the promo balance. New Accounts as of 07/31/2025: Purchase APR is 34.99%. Penalty APR is 39.99%. Min Interest Charge is $2. Existing cardholders: See your credit card agreement terms. Subject to credit approval.
The estimated required monthly payment shown which excludes taxes and delivery equals the amount financed divided by the number of months in the promo period, rounded up to the next cent. During the last month(s) of the promo period the required monthly payment may be reduced due to this rounding. These payments apply only with the financing offer shown. If you make these payments by the due date each month, you should pay off this amount financed within the promo period, if it is the only balance you are paying off. If you have other balances on your account, this payment will be added to any other minimum monthly payments.
Applies only to select items from this manufacturer. Ask your Sweetwater Sales Engineer for more details.