
Yamaha CP Stage Piano Firmware Update
In this guide, we will show you how to perform a firmware update on your Yamaha CP88 or Yamaha CP73 Stage Piano. Yamaha refers to their firmware as an Operating System.
From time to time, Yamaha releases a new Operating System Update that not only provides bug fixes and new features, but also adds new instrument sample libraries and sounds to the unit. When you first take your CP Stage Piano out of the box, it’s worth checking to see if it needs to be updated. If you’ve had your CP for months and Yamaha announces a new update, here’s how to perform it.
Overview of the Update Process
To perform the update, you will need two compatible USB thumb drives of 2GB or larger.
The first thumb drive is to connect to the Yamaha CP and make a backup of your Live Set Sounds and system settings because the firmware update will erase them.
The second thumb drive is to install the firmware update.
The procedure is to plug each thumb drive into the Yamaha CP and format them there.
On your computer, download the updater from the Yamaha website. Connect your second thumb drive to your computer and copy the updater file to the thumb drive.
You then plug the updater thumb drive into the Yamaha CP and start the update process, which may take around half an hour.
Then you connect the backup thumb drive and restore your Live Set Sounds and system settings.
Now we will provide detailed instructions.
Do You Need to Update?
How to Find the Version Number of the Firmware on Your Yamaha CP
- On your Yamaha CP, press the Menu button.
- Select Version Info. Press the Enter button.
- The Version Info screen will display a Firmware version number. Write this down.
How to Find the Version Number of the Newest Yamaha CP Firmware
Go to the Yamaha CP downloads page and have a look under Firmware / Software.
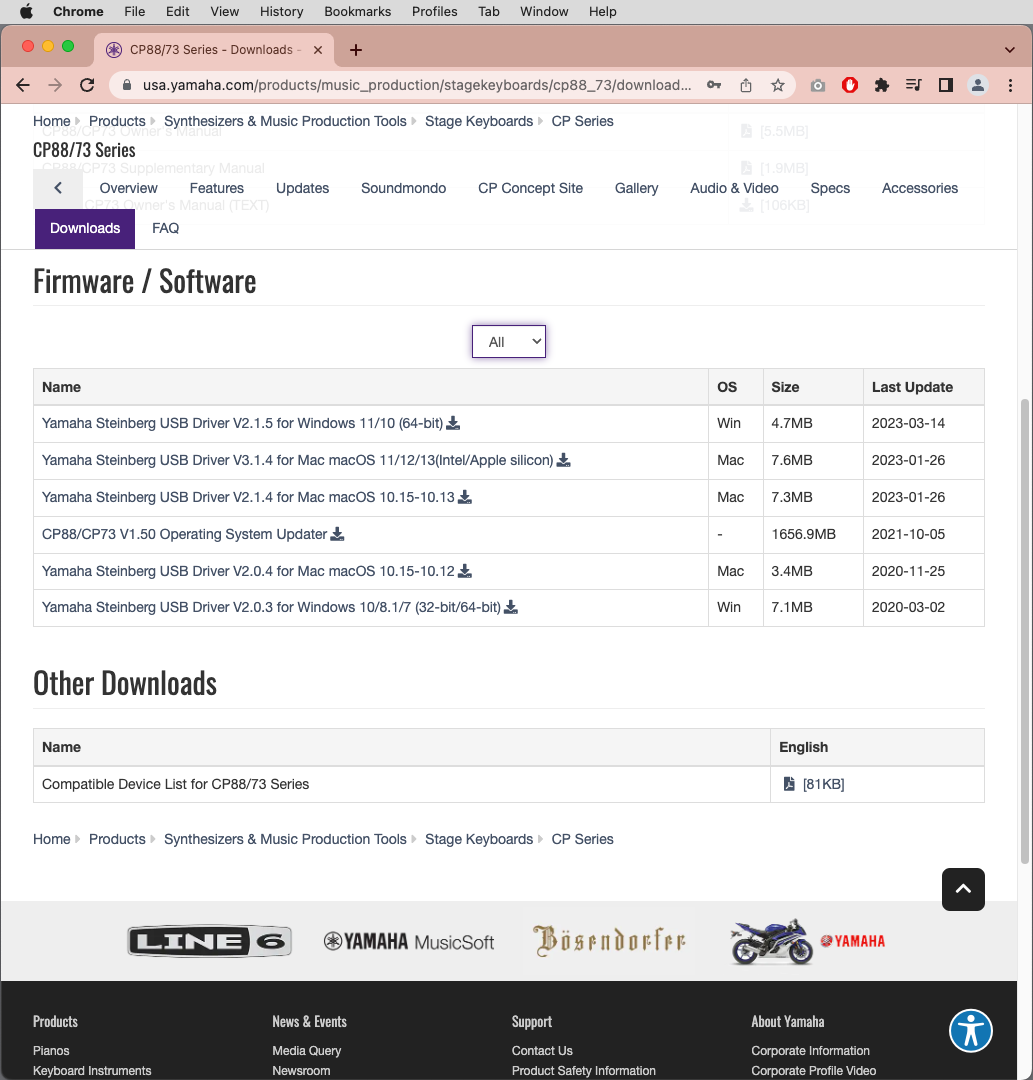
The Firmware / Software download section on the Yamaha CP product page
Check the version number of the CP Operating System Updater. If it’s a higher number than the one in your keyboard, you can perform the update.
Performing the Update Step-by-step
Formatting Thumb Drives
First, you must format the thumb drives by connecting them to the Yamaha CP.
Obtain compatible thumb drives
Most commercially available thumb drives with a USB-A connection will be compatible with the Yamaha CP. If the thumb drives you have don’t seem to work, Yamaha provides a list of makes and models it has confirmed are compatible.
Go to the Yamaha CP downloads page, under Other Downloads, and download the Compatible Device List.
Formatting
You will need to format two thumb drives.
IMPORTANT: Formatting the thumb drive will erase all data on it, so first check the drive on your computer to make sure it does not contain any important data.
Format the first drive
- Insert a thumb drive into the USB port on the back of the Yamaha CP.
- On the front panel, press the Menu button. Use the Encoder dial and the Enter button to go to the File section.
- Under the File section, find File Utility > Format. Perform the Format function.
Back up your data
Save your Yamaha CP’s settings to the thumb drive. Refer to the CP Owner’s Manual section Saving/Loading Data.
Remove the thumb drive with your data and set it aside.
Format the second drive
Format the second drive according to the instructions above, then remove it.
Prepare the Updater on your Computer
Download the Updater
On the Yamaha CP downloads page, click on the link for the newest Operating System Updater.
A new page will open. At the top it will list the version history. Scroll down and take heed of the Caution note. Review the License Agreement, click Yes, I agree, and then click the download button. The file will be large, so it may take some time.
The download is a .zip file. Locate it in your downloads folder and decompress it if necessary.
Inside the folder, you will see a long list of files in multiple languages. Find the ones that have _en in the name; they are in English. Locate these three files. (The version numbers may be different than in this example.)
- cp88_cp73_v150_Readme_en.txt. Open this Read Me file for reference.
- cp88_cp73_v15_en_sm_e0.pdf. This is the Supplementary Manual, which explains the new features in this update. You will want to read this in conjunction with the Owner’s Manual you already have.
- 8S89OS_.PGM. This is the actual updater file, and it is over 1GB in size.
Copy the Updater to the Thumb Drive
- Copy only the file ending in _.PGM to the root of the thumb drive. Don’t copy the folder, and don’t copy any additional files. The copy operation may take several minutes. Wait until it is complete.
- In the Finder on macOS, or the File Explorer in Windows, perform the Eject operation on the thumb drive. When the OS has ejected the volume, unplug it.
Perform the Update on the Yamaha CP
IMPORTANT: Do not power off the Yamaha CP or remove the thumb drive during the update process. If power is accidentally interrupted, the unit may become inoperable; if this happens, run the updater again. Consult the Read Me file for more information.
- With the Yamaha CP’s power off, connect the updater thumb drive to the USB port on the back.
- Hold down the Menu and Store buttons while you turn on the power switch. Wait until the Yamaha logo appears on the display. Don’t press any other keys.
- The display will indicate, “Now loading.” Press the Enter button to start the update.
- The display will indicate, “All user memory will be initialized.” Press Enter to continue.
- Wait for the update to complete. This could take up to half an hour.
When the update is complete, the display will indicate, “Current Ver:” Check to make sure this is the new version number and not the previous one. This will confirm that the update was installed correctly. The display will indicate, “Completed. Please turn off.” Shut down the power, and then turn it back on again. The Yamaha CP will boot up, and the new sounds and features will be available.
Related Articles
When you need help, Sweetwater has the answers!
Our knowledge base contains over 28,000 expertly written tech articles that will give you answers and help you get the most out of your gear. Our pro musicians and gear experts update content daily to keep you informed and on your way. Best of all, it’s totally FREE, and it’s just another reason that you get more at Sweetwater.com.

