
Working with Projects and Samples on the Roland SP-404MKII

In this article of the Roland SP-404MKII Quickstart series, we will show you how to work with projects and patterns. Follow the instructions below to get up and running.
Playing the default project
The SP-404MKII comes with project 1 preloaded with great samples and patterns to help familiarize yourself with the instrument. When you turn it on for the first time, project 1 should load up in Sample mode. If you have changed projects, you can load project 1 by holding the SHIFT button and pressing SUB PAD, then press pad 1 to load project 1.
Sample mode
When a project is loaded, it loads into Sample mode with the pads lit orange.
- Tap each of the 16 numbered sample pads to play its sample. When a pad is tapped, the screen will display the tempo of that sample.
- Press the bank A/F–E/J buttons to load the different banks. To load banks F–J, press its bank button until it flashes.
- Use the HOLD pad to keep samples playing after you let go. Hold the HOLD pad, then press one or more sample pads.
- Alternatively, while holding sample pads, press the HOLD pad. To release the hold, tap the HOLD pad to stop all samples or tap each sample pad to stop them individually.
- The six effects buttons to the left and right of the screen engage and disengage the effects for all sample pads. You can access effects buses 1 and 2 by pressing the BUS FX pad.
Pattern mode
Press the PATTERN SELECT button to enter the Pattern mode. This will open the main Pattern mode screen, and “Ptn” will be displayed on the screen. The pads that have patterns in them will light up purple.
- Press the bank A/F–E/J buttons to load the different banks of patterns. To load banks F–J, press its bank button until it flashes.
- Tap one of the 16 numbered pads to start the pattern. It will light up white.
- To stop a pattern, tap the pad that is playing (lit white) again. It will light up pink. Alternatively, you can press the EXIT button to stop the pattern.
- To queue up another pattern to play after the current one finishes, tap a different pad while the current pattern is playing. The queued pattern will flash pink.
- You can use the effects in this mode as well as in the mode explained in the Sample mode above.
- If you would like to go back to Sample mode, press the EXIT button several times to go back to the main Pattern mode screen, then press the PATTERN SELECT button.
Creating a new project
You can have up to 16 projects on your SP-404MKII, which can be accessed through the 16 numbered pads.
- To load a new project, hold SHIFT and press the SUB PAD. The currently loaded project will be lit yellow, pads with an empty project will be lit dark orange, and pads with projects in them will be lit bright orange.
- Tap one of the dark orange pads to load a new project. The project will load into Sample mode with all 16 numbered sample pads unlit.
Creating new patterns
Once you have all of your samples loaded into the sample pads, it’s time to start creating patterns. To enter Pattern mode, press the PATTERN SELECT button. This will open the main Pattern mode screen, and “Ptn” will be displayed on the screen.
- Press the REC button. The pads that do not have patterns assigned to them will flash bright red. If a pad already has a pattern in it, it will stay lit dark red.
- Tap one of the flashing bright red pads.
- You can adjust the record settings for this pattern by using the CTRL knobs.
- CTRL 1 will adjust the BPM of the pattern.
- CTRL 2 will adjust the length of the pattern in bars.
- CTRL 3 will adjust the strength of the quantization.
- PUSH ENTER will set the quantization grid.
- Holding SHIFT and turning CTRL 3 will adjust the click volume.
- Press the REC button to start recording.
- You can switch between rehearsal and record modes by pressing the REC button as the pattern is looping. Rehearsal mode allows you to practice playing the samples without recording. Record mode will start recording the samples that you press.
- Recording will loop so that you can overdub samples into the pattern.
- Once you are done recording, press the EXIT button.
If you need to delete a pattern
- Press the DEL button. The pads that have patterns in them will light up dark pink.
- Tap all of the patterns you would like to delete. Selected pads will light up bright pink.
- Once you have selected all the patterns you would like to delete, press the DEL button once more.
- Once deleted, the message “Operation Completed!” will appear on the screen.
Working with samples
Now that you know how to create and work with patterns and projects on a Roland SP-404MKII, let’s show you how to record, edit, and load samples.
Recording new samples
You can directly record audio from the USB input, LINE inputs, or MIC/GUITAR input onto a sample pad. If you’re recording a computer or mobile device with the USB input, be sure you have set the audio output of the computer or mobile device to the SP-404MKII. Here are the steps to do so:
- If you are not in Sample mode, then press EXIT several times, or press PATTERN SELECT if you are in Pattern mode.
- Press the REC button. Pads that do not have samples in them will flash bright red. Pads that already have samples in them will be lit dark red.
- Press one of the 16 numbered pads that is flashing bright red. The message “WAIT” will appear on the screen.
- Recording will start once the unit detects audio from any of the inputs.
- Press the pad you are recording to again or press the REC button to complete the recording. To cancel the recording, press the EXIT button.
- Once the recording is complete, the unit will return to the main Sample mode screen.
How to edit samples
Once you have samples loaded or recorded, you can change the sample’s playback mode or edit the sample on the SP-404MKII itself. The following explains how to change and edit samples:
- Press one of the 16 numbered pads to select a sample. You can use the bank buttons to select samples in other banks.
- Once you have a sample selected, you can change the sample’s playback mode using the buttons under the SAMPLE MODE section.
- BPM SYNC: Syncs the sample to the bank’s BPM.
- GATE: If lit, you must hold the pad to keep the sample playing. If unlit, the sample will play to the end when the pad is tapped. To stop sample playback when GATE is off, hold EXIT and tap the pad to stop the sample.
- LOOP: If lit, the sample will loop when it gets to the end.
- PING-PONG: Activated by holding SHIFT and pressing LOOP. Loops playback but instead of starting over when it reaches the end, playback reverses until it reaches the start, then it loops.
- REVERSE: If lit, the sample will play in reverse.
- ROLL: Loops a section of the sample. Hold ROLL while playing a sample to start the effect.
- ROLL SET: Sets the length of the roll loop. You can cycle through the values by holding SHIFT and pressing ROLL several times.
- To edit a sample, tap the sample you want to edit, then use the buttons under the SAMPLE EDIT section.
- START/END: Sets the sample’s start, end, and loop points using the top CTRL knobs.
- PITCH/SPEED: Edits the pitch, speed, volume, and panning of the sample.
- CHOP: Hold SHIFT while pressing START/END to enter chop edit mode. This mode allows you to split the sample and assign it to different pads.
- ENVELOPE: Edits the attack, hold, and release of the volume envelope for the sample. It is accessed by holding SHIFT and pressing PITCH/SPEED.
Deleting samples
If you have a sample loaded and no longer need it, you can delete it from your sample pads. To delete samples:
- Press the DEL button. Pads that have samples loaded in them will light up dark pink.
- Tap all of the sample pads you would like to delete. Selected pads will light up bright pink.
- Press the DEL button again once you have all samples you would like to delete selected.
- Once deleted, the message “Operation Completed!” will appear on the screen.
Loading new samples
You can load samples into the project with an SD card. The SD card can import 48kHz, 16-bit WAV, AIFF, or MP3 audio files. You will first need to follow the instructions to format the SD card as outlined in our Roland SP-404MKII Setup Guide.Then, you need to transfer your audio files to the IMPORT folder of your SD card using a computer with an SD card reader.
Once the files are on the SD card, follow these steps to import the samples onto the pads:
- Insert the SD card into the SP-404MKII.
- If you are not in Sample mode, then press EXIT several times, or press PATTERN SELECT if you are in Pattern mode.
- Hold SHIFT and press pad 14 to enter the IMPORT/EXPORT menu.
- Use the PUSH ENTER knob to highlight “Import from SD-CARD,” then press the PUSH ENTER knob.
- Turn the PUSH ENTER knob to highlight “SAMPLE,” then press the PUSH ENTER knob.
- The screen will now show the list of samples on your SD card. Use the PUSH ENTER knob to highlight the sample you would like to import. You can preview the highlighted sample by holding the SUB PAD.
- Use the numbered pads 1–16 to select the pad you would like to load the sample into.
- Once you select the pad where you would like to load the highlighted sample, press the PUSH ENTER knob.
- The sample will load into that pad.
- Return to the main Sample mode screen.
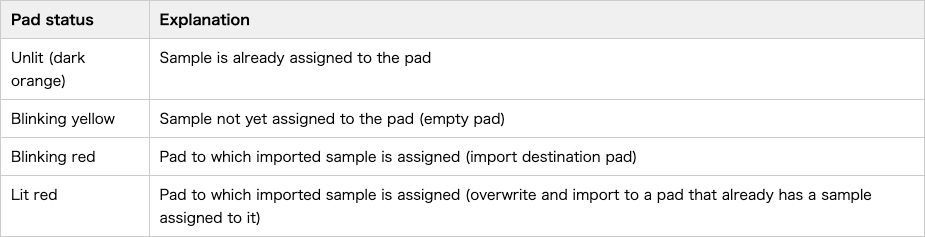
Here is a table explaining what the different lights mean for the pads
Related Articles
When you need help, Sweetwater has the answers!
Our knowledge base contains over 28,000 expertly written tech articles that will give you answers and help you get the most out of your gear. Our pro musicians and gear experts update content daily to keep you informed and on your way. Best of all, it’s totally FREE, and it’s just another reason that you get more at Sweetwater.com.

