
TASCAM DR-40X Quickstart Guide
Getting started with the TASCAM DR-40X
In this guide we will show you how to set up, connect, and record using your TASCAM DR-40X. Follow the instructions below to get started.
- Register the DR-40X
- Setting up the DR-40X
- Recording with the DR-40X
- Use the DR-40X as an audio interface
IMPORTANT!!! Before we begin this guide, please review TASCAM’s SD card compatibility list to make sure that yours is compatible with your device.
Register the DR-40X
Before everything gets connected, we’ll show you how to register the recorder. Once you register the DR-40X, you’ll get exclusive support and notifications for upgrades to your interface. Keep your Sweetwater invoice handy, as you’ll need that during the registration process. All you need to do is go to the registration page, fill out the registration form, and then click Submit.
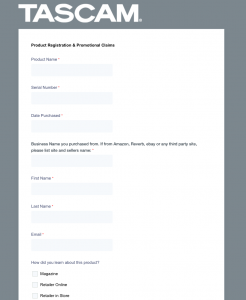
Click the image to register your TASCAM DR-40X
Setting up the DR-40X
When you power on the DR-40X for the first time, you’ll first need to update the date and time. No menu navigation is necessary for first time setup, as the correct window will automatically appear after the recorder is turned on.
Selecting a language
- Simultaneously press and hold the HOME (Stop) and Power buttons until the start up screen appears.
- Once the Language menu appears, use the + and – buttons to select your preferred language. After it’s set, press the ENTER/MARK button.
Setting the date and time
- Press the MENU button, use the + and – buttons to scroll to OTHERS, then press the ENTER/MARK button.
- Use the + and – buttons to scroll to DATE/TIME, then press ENTER/MARK.
- Use the REWIND/FAST FORWARD (left and right pads) to move between date and time values, and use the + and – buttons to change their value.
- Press ENTER/MARK to save the changes and exit the menu.
Initialize the SD card
IMPORTANT: When formatting cards on the DR-40X, TASCAM recommends that it be connected to your computer via USB or powered by new batteries or the external TASCAM power supply.
For the SD card to work correctly with your DR-40X, it must be initialized (formatted). It’s important to note that initializing an SD card will erase any current data.
- With the DR-40X powered off, insert the SD card.
- Ensure that the Write Protection switch is set to the unlocked position, or else it won’t read.
- Press the ENTER/MARK button once you see Format Error: Format Card on the display.
- Once the SD card is formatted, you will automatically be taken back to the Home screen.
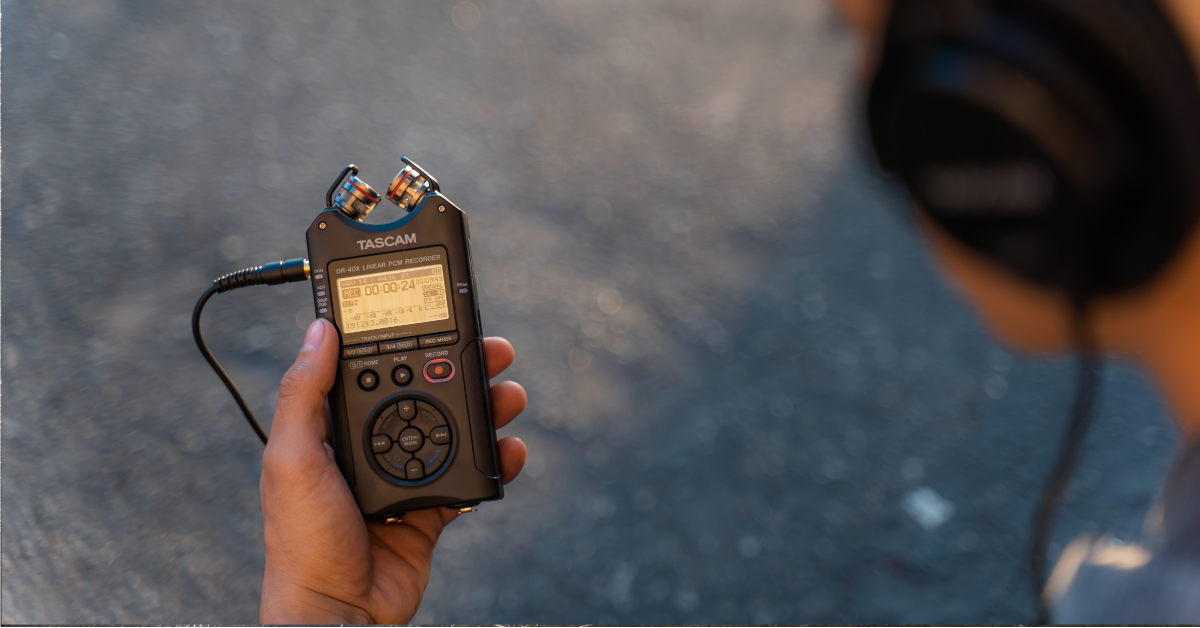
External gear and built-in microphone
TIP: If you’re using the built-in mics and are recording in an A-B position (the mics are pointing out), set the left and right channels to L-R. If using them in an X-Y pattern, set the left and right channels to R-L.
Once everything is taken care of, you can now get set up and connected. It’s a straightforward process, too. Just connect your external gear, adjust the built-in microphone, use the EXT switch to select what type of input you’re using (Line, Mic, Mic+Phantom), then start recording!
Recording with the DR-40X
So now that you’re ready to record, you can update the recording and playback settings. Depending on what and how you’re recording, you may need to fine tune these to make it sound as best as possible. Before showing you how to record, you’ll need to learn what recording mode you should choose. To change the record mode, press the REC MODE button and use the + and – buttons to select one of the following record modes:
- MONO: For mono recordings.
- STEREO: For stereo recordings.
- 4CH: When using both built-in mics as well as the two external inputs.
- OVERDUB: For recording over current recordings.
- Press the MENU button, navigate to REC SETTING, then update the Format, Sample, Track INC, and Low Cut.
- Press the MENU button to apply the changes and go back to the MENU screen.
- Press the STOP (HOME) button to go back to the home screen.
- Press the RECORD button to arm the recording. Now is when you’ll want to check and update your levels.
- Press the RECORD button a second time to begin recording. Once complete, press the STOP or RECORD button.
TASCAM DR-40X Recording Modes
TASCAM DR-40X Record Ready & Record Button
Use the DRX-40X as an audio interface
One great thing about the TASCAM DR-40X is that not only is it a portable recorder, but it can be used as a USB audio interface, as well. The DR-40X is class-compliant on Mac, but Windows users must install an audio driver beforehand so the device can work properly. Mac users can skip the Install the audio driver section and continue directly to Setting up the DR-40X as an audio interface.
Install the audio driver (Windows users only)
- Go to the DR-40X download page, scroll down to Software, then click ASIO Driver Installer to begin the download.
- Navigate to your Downloads folder and extract the installer file.
- Launch the installer, follow the on-screen instructions, then reboot your system.
Setting up the DR-40X as an audio interface
As soon as you connect the recorder to your computer, a USB screen will appear on the DR-40X.
- Use the + and – buttons to select one of the following, then press ENTER:
- BUS POWER: Powers the device when connected. No batteries or power supply necessary.
- SD CARD READER: Allows you to transfer files from the DR-40X SD card.
- AUDIO I/F: Turns the DR-40X into an audio interface.
- When AUDIO/IF is selected, use the + and – buttons to select PC/Mac.
- Select your sample rate, navigate to CONNECT, and then press EXEC.
Related content
Additional resources
DR-40X Tutorials
When you need help, Sweetwater has the answers!
Our knowledge base contains over 28,000 expertly written tech articles that will give you answers and help you get the most out of your gear. Our pro musicians and gear experts update content daily to keep you informed and on your way. Best of all, it’s totally FREE, and it’s just another reason that you get more at Sweetwater.com.


Offer applies only to single-receipt qualifying purchases. Select manufacturers may require that only the manufacturer’s products qualify towards the minimum purchase amount needed to be eligible for promotional financing. Otherwise, an invoice that meets the minimum purchase amount and contains at least one qualifying manufacturer product is eligible for promotional financing. No interest will be charged on promo purchase balance, and equal monthly payments are required on promo purchase until it is paid in full. The payments equal the amount financed divided by the number of months in the promo period, rounded up to the next whole dollar. These payments may be higher than the payments that would be required if this purchase was a non-promo purchase. During the last month(s) of the promo period the required monthly payment may be reduced due to the prior months’ rounding. Regular account terms apply to non-promo purchases. New Accounts as of 07/31/2025: Purchase APR is 34.99%. Penalty APR is 39.99%. Min Interest Charge is $2. Existing cardholders: See your credit card agreement terms. Subject to credit approval.
Offer applies only to single-receipt qualifying purchases. No interest will be charged on the promo balance if you pay it off, in full, within the promo period. If you do not, interest will be charged on the promo balance from the purchase date. The required minimum monthly payments may or may not pay off the promo balance before the end of the promo period, depending on purchase amount, promo length and payment allocation. Regular account terms apply to non-promo purchases and, after promo period ends, to the promo balance. New Accounts as of 07/31/2025: Purchase APR is 34.99%. Penalty APR is 39.99%. Min Interest Charge is $2. Existing cardholders: See your credit card agreement terms. Subject to credit approval.
The estimated required monthly payment shown which excludes taxes and delivery equals the amount financed divided by the number of months in the promo period, rounded up to the next cent. During the last month(s) of the promo period the required monthly payment may be reduced due to this rounding. These payments apply only with the financing offer shown. If you make these payments by the due date each month, you should pay off this amount financed within the promo period, if it is the only balance you are paying off. If you have other balances on your account, this payment will be added to any other minimum monthly payments.
Applies only to select items from this manufacturer. Ask your Sweetwater Sales Engineer for more details.