
Raven MTi2 Setup Guide

In this guide, we will show you how to register, connect, and configure your Raven MTi2 for the first time. Follow the instructions below to get started.
- Connect the Raven MTi2
- Create iLok and Steven Slate Audio Accounts
- Register the Raven MTi2
- Download and Install the Raven Software
- Launch Your DAW Using the Raven Software
- Update DAW Preferences
- Additional Raven Resources
Connect the Raven MTi2
IMPORTANT: Make sure your computer’s graphic driver is up to date, or you may run into glitches!
When you take your Raven MTi2 out of the box, you must first set up and connect it to your computer using the cables included in the box.
Please note that you must purchase quality, brand-name adapters if you don’t have the correct ports on your computer. Also, if you don’t have enough connections on your computer and need to use a hub, make sure it’s powered. Passive hubs do not provide enough power to transfer data to and from your Raven.
- Connect the HDMI and USB cables from the Raven to your computer, ensuring the connections are secure.
- Power on the Raven.
- If the power light is green, you’re good to go. However, if the power light is orange, there is either a connection issue with your graphics card or your computer’s graphics driver is out of date.
Create iLok and Steven Slate Audio Accounts
For the Raven MTi2 to work correctly with your computer, you must first register the device with Slate Media Technology. Once it’s registered, you will gain access to the drivers and Raven software necessary to use your device within your DAW.
NOTE: If you already have an iLok and Steven Slate Audio account, skip these steps and continue to Register the MTi2.
Create iLok Account
The Raven MTi2 software is licensed with iLok. You’ll need to link its iLok license to your iLok USB dongle to use it. If you don’t have an iLok account, you must create one and install the iLok License Manager app. Follow the steps below to get started. If you already have an account, skip these steps and continue below to create a Steven Slate Audio account. Learn more about iLok licensing in our iLok Setup Guide.
- Visit iLok’s registration page and complete the registration form. Take note of your User ID and password, as both are case-sensitive.
- Download and install the latest version of the iLok License Manager application.
- Launch the software and sign in to your iLok account.
- (Optional) Connect an iLok USB dongle. When prompted, click Yes to register it to your account.

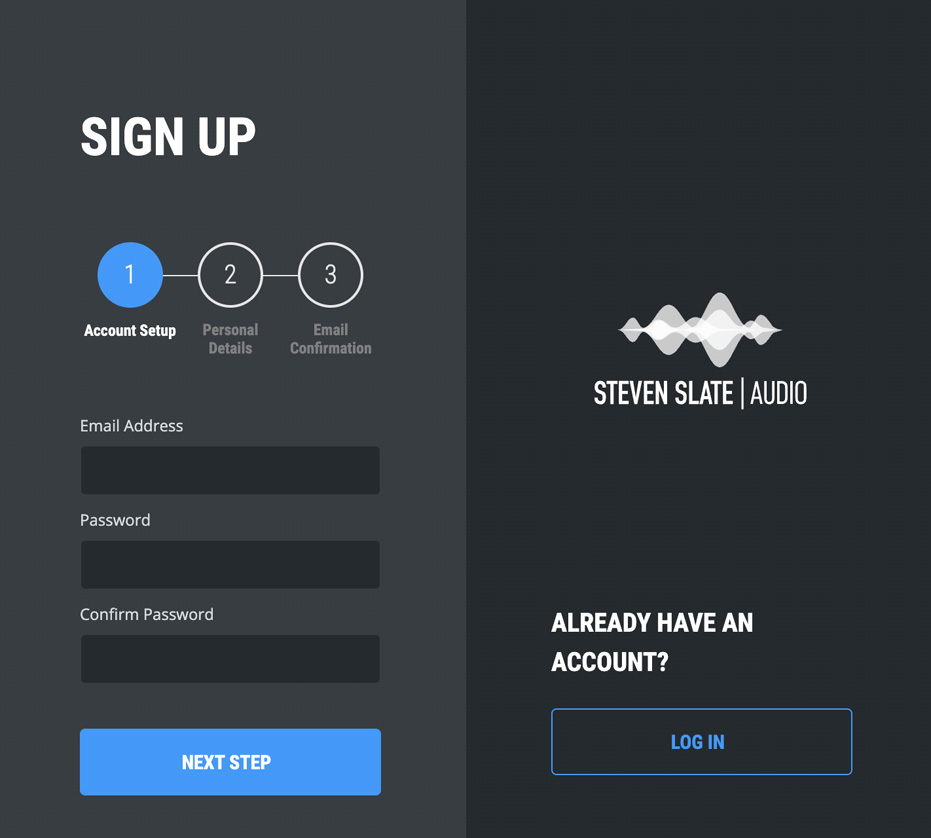
Create Steven Slate Audio Account
Once you have created an iLok account, you must create an account with Steven Slate Audio and link it to your iLok User ID.
- Log into your Steven Slate Audio account. If you don’t have an account yet, click SIGN UP and follow the account registration instructions.
- Check your spam folder if you don’t receive an account verification email!
- Once you’re logged in, hover over your name on the top right, click Account Settings, then click iLok Settings.
- Type in your iLok User ID, then click Verify. Steven Slate Audio will email you a verification code.
- Open your email inbox in a new tab, copy the verification code you received, then go back to the Steven Slate Audio account tab and paste it into the Verification Code field.
- Make sure you enter the iLok User ID exactly how you created it, or else the license may be sent to the incorrect iLok account.
Register the Raven MTi2
IMPORTANT: During registration, you will be prompted to select the DAW you want to authorize. Be sure to choose the correct DAW to use your MTi2. If using multiple DAWs, you must purchase additional Raven DAW licenses directly from your Steven Slate Audio account.
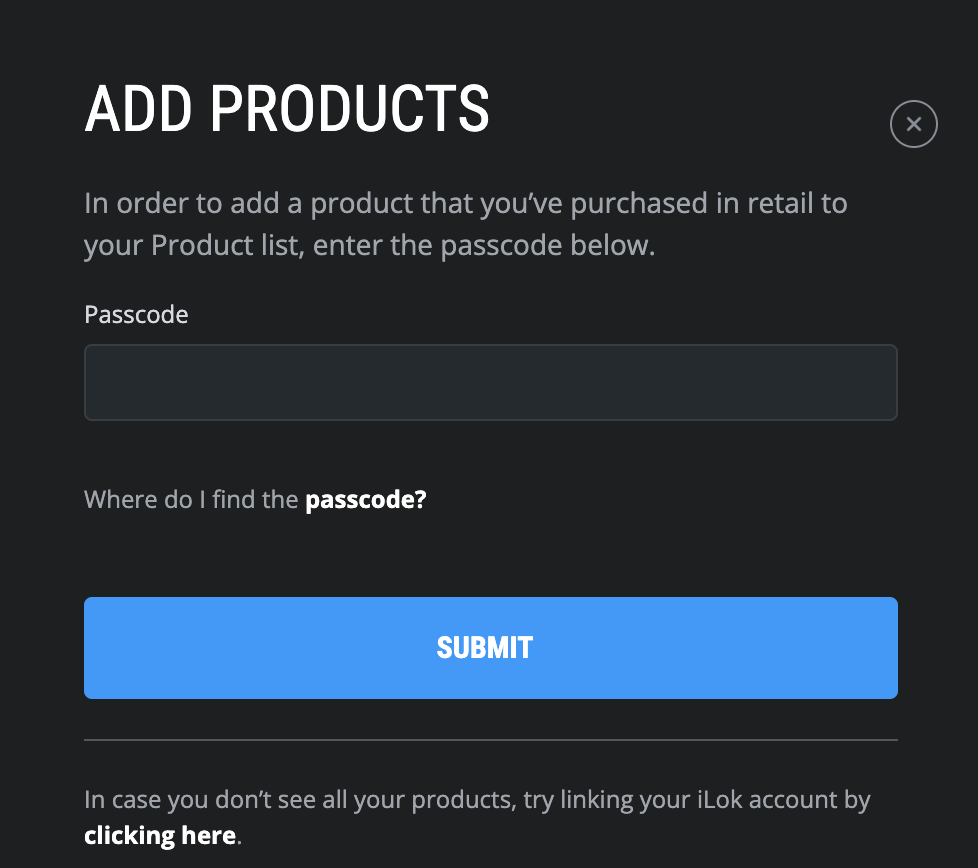
Once you have created your iLok and Steven Slate Audio accounts, you must use the Passcodecard included in the box to register your Raven MTi2.
- Go to your Steven Slate Audio account page. Click Add Products.
- Enter the included Passcode (which can be found on a card in the product’s box), click Submit, then select the DAW you want to authorize.
Activate iLok License
After you register the Raven MTi2, Steven Slate Audio will deposit a license to your iLok account. This will be listed as RAVEN **DAW**. Check out our guide about iLok licenses and Activation Codes to learn more.
- Launch the iLok License Manager software. Log in using your iLok account credentials.
- Click the Available tab and locate the Raven license.
- Right-click the license, choose Activate, then select where to activate the license (iLok USB dongle only).
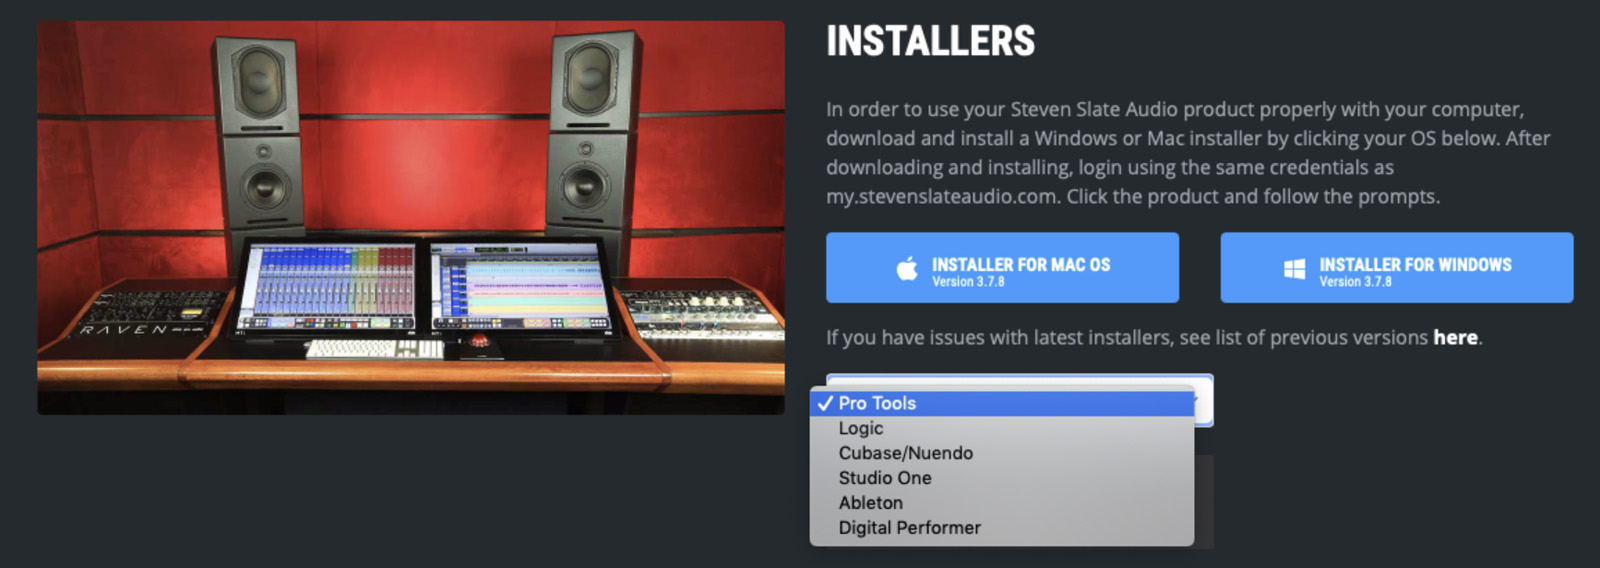
Download and Install the Raven Software
Now that you have registered and activated everything, you must install the Raven software. The installer includes the Raven standalone software, V-Control, and UPDD drivers.
- Go to your Steven Slate Audio account.
- Click RAVEN, then select the installer for your OS.
- Navigate to your Downloads folder, then locate and launch the installer.
- PC users: do not reboot your computer when prompted during installation. Only reboot it from the Start menu after the software installation is complete.
- Mac users: macOS users may be required to enable the Override Malware Protection setting for the Raven application.
Neyrinck V-Control
IMPORTANT! Neyrinck’s V-xc Pro driver software is necessary for the Raven to function correctly. You can download the V-Control Pro software here if you get a blank screen or an error while installing it.
Installing Raven Software on macOS
IMPORTANT! Every version of Mac OS X and macOS had System Preferences. Ventura changes the name to System Settings. The Slate installers refer to System Preferences, but it’s System Settings if you are on Ventura.
The Raven installer has the Raven standalone software and drivers so the device can work correctly. This means you will have to adjust and enable a few system settings during the installation process.
- When you launch the installer, the Raven standalone software will install.
- Three other installers will appear during installation: Python, UPDD, and V-Control.
- Once the Raven standalone software has finished installing, run the Python installer and follow the on-screen instructions.
- Next, launch the V-Controller installer and follow the on-screen instructions.
- Lastly, launch the UPDD installer.
- During the UPDD installation, you will be prompted to open Security Preferences (Open Security Preferences) and Accessibility (Open System Preferences) within Privacy & Security.
- Click the Open Security Preferences button in the System Extension blocked notification window.
- Once in the Security & Privacy menu, click the lock icon, enter your system credentials, and click Allow to let UPDD access the system.
- Click the Open System Preferences button in the Accessibility Access notification window.
- In the window that appears, scroll down and click the radio buttons for updd and UPDD Commander to enable access.
- While in the Privacy tab of Accessibility, click the + button to add the DAW you will be using, Raven Software, Automator, V-Control Pro, and Terminal (located in the Utilities folder).
Installing Raven Software on Windows PC
Installing the Raven Software on your Windows PC is straightforward, as all the drivers will be installed during the process. The only changes you’ll need to make are if you use multiple monitors.
- When you launch the installer, there will be a checklist of all drivers and software you can install. Leave everything checked. If you are using an MTi1, check the Raven Touch Driver box.
- When the UPDD driver is installed, you will be prompted to reboot. Click No to let the Raven software complete installation.
- Right-click anywhere on your desktop and select Display Settings.
- Click Identify, click the MTi2, then scroll down and select Make this my main display.
- Right-click anywhere on the taskbar, select Taskbar settings, then turn on Automatically hide taskbar in desktop mode.
- Open the system tray on the taskbar, right-click the UPDD hand icon, and select Calibrate.
- Follow the on-screen prompts displayed on the MTi2 to configure the touch settings.
- If the configuration display doesn’t appear after touching the center, open Configure again to complete the process.
Launch Your DAW Using the Raven Software
Now that you have completed the software installation and setup process, you can use it within your DAW. All you need to do is launch the V-Control Pro software, then launch the Raven software. From there, press Open next to your DAW’s icon, and you’re all set. Here are a few tips to ensure everything runs correctly.
- Be sure to launch V-Control before opening the Raven software each time you launch Pro Tools.
- If you receive an error stating, “Too many DAWs are running,” be sure you have the latest version installed.
- If you’ve launched in the correct order but still receive an error stating that V-Control isn’t responding, check your system to ensure the Bonjour service is running.
- Mac users only: You may be required to enable the Override Malware Protection settings for the Raven application.
Update DAW Preferences
For the Raven MTi2 to work correctly within your DAW, you must first update some of its preferences. This includes MIDI, peripheral, and mixer settings. Once these changes have been made, you can use your Raven to its full potential!
Pro Tools
- Launch the Raven software. Press Open next to the Pro Tools icon.
- Go to Setup, navigate to MIDI, and select MIDI Input Devices….
- Check all the boxes that contain V-Control and V-Pain, then click OK.
- Go to Setup, select Peripherals, and click MIDI Controllers.
- Create three HUI devices, set the number of channels to 8, and update the following settings from the Receive From and Send To dropdown boxes.
- #1: V-Control
- #2: V-Control XT2
- #3: V-Control XT3
- Open Preferences, click the Mixing tab, and check the box next to Always Fill Channel Strips when Banking.
- Click the a z (keyboard focus) icon in the top right of your Pro Tools project’s edit window to enable the native Pro Tools key commands. You should now have complete control over Pro Tools.
Mixer Alignment
After you have updated your Pro Tools settings, check out our guide on how to align the Raven’s internal mixer settings in Pro Tools.
Cubase
- Launch the Raven software. Press Open next to the Cubase icon.
- Navigate to Studio, choose Studio Setup, then click Remote Devices.
- Click the + button, select V-Control Pro, set the bank number to 24 Tracks, then click OK. The STOP button on the Raven display should now show as being pushed down. Press the PLAY button to confirm it’s communicating with Cubase.
- Press the FLOATING MIXER button on the Raven. If you only see eight faders, save and exit the current project. Reopen the project and press FLOATING MIXER again. You should now see all 24 channel faders displayed.
Studio One
- Launch the Raven software. Press Open next to the Studio One icon.
- Navigate to the Studio One menu on the toolbar. Select Options (PC) or Preferences (Mac).
- Mac users only: click the Touch Input tab, place a checkbox next to Enable TUIO multitouch devices on UPD port, change the port number to 3334, then click Apply.
- Go to External Devices, click Add, and select Control within the Mackie folder.
- Set the Receive From and Send To to V-Control.
- Click Add, select Control Extender, and set the Receive From and Send To to V-Control XT2.
- Click Add, select Control Extender, and set the Receive From and Send To to V-Control XT3.
- Click Placement, then drag the Control and Control Extenders into Group 1. Make sure that Control is first in the group.
Windows PC Users
If you’re running Windows, you must download a specific Keyscheme file for the Raven to work correctly within Studio One.
- Go to Slate’s Windows Studio One setup for RAVEN page, scroll to the bottom, and download the RAVEN Keys Windows.keyscheme file.
- Go to the Studio One menu, click Keyboard Shortcuts, navigate to the Keyboard mapping scheme, and select Import….
- Navigate to your Downloads folder, select the Keyscheme file you downloaded, and click Open.
Additional Raven Resources
When you need help, Sweetwater has the answers!
Our knowledge base contains over 28,000 expertly written tech articles that will give you answers and help you get the most out of your gear. Our pro musicians and gear experts update content daily to keep you informed and on your way. Best of all, it’s totally FREE, and it’s just another reason that you get more at Sweetwater.com.


Offer applies only to single-receipt qualifying purchases. Select manufacturers may require that only the manufacturer’s products qualify towards the minimum purchase amount needed to be eligible for promotional financing. Otherwise, an invoice that meets the minimum purchase amount and contains at least one qualifying manufacturer product is eligible for promotional financing. No interest will be charged on promo purchase balance, and equal monthly payments are required on promo purchase until it is paid in full. The payments equal the amount financed divided by the number of months in the promo period, rounded up to the next whole dollar. These payments may be higher than the payments that would be required if this purchase was a non-promo purchase. During the last month(s) of the promo period the required monthly payment may be reduced due to the prior months’ rounding. Regular account terms apply to non-promo purchases. New Accounts as of 07/31/2025: Purchase APR is 34.99%. Penalty APR is 39.99%. Min Interest Charge is $2. Existing cardholders: See your credit card agreement terms. Subject to credit approval.
Offer applies only to single-receipt qualifying purchases. No interest will be charged on the promo balance if you pay it off, in full, within the promo period. If you do not, interest will be charged on the promo balance from the purchase date. The required minimum monthly payments may or may not pay off the promo balance before the end of the promo period, depending on purchase amount, promo length and payment allocation. Regular account terms apply to non-promo purchases and, after promo period ends, to the promo balance. New Accounts as of 07/31/2025: Purchase APR is 34.99%. Penalty APR is 39.99%. Min Interest Charge is $2. Existing cardholders: See your credit card agreement terms. Subject to credit approval.
The estimated required monthly payment shown which excludes taxes and delivery equals the amount financed divided by the number of months in the promo period, rounded up to the next cent. During the last month(s) of the promo period the required monthly payment may be reduced due to this rounding. These payments apply only with the financing offer shown. If you make these payments by the due date each month, you should pay off this amount financed within the promo period, if it is the only balance you are paying off. If you have other balances on your account, this payment will be added to any other minimum monthly payments.
Applies only to select items from this manufacturer. Ask your Sweetwater Sales Engineer for more details.