
Polyend Tracker+ Quickstart Guide
The Polyend Tracker+ is the perfect standalone workstation for your studio or on the go. Thanks to its portability, you can get creative anytime and anywhere. In this guide, we will show you how to set up, navigate, and use the Tracker+ for the first time. Let’s get started! There are many features (and even a few Easter eggs), so be sure to check out the Polyend Tracker+ Manual and Tracker+ Essentials guide to learn more.
- Register the Tracker+
- Update the Firmware
- Navigating the Tracker+
- How to Create a Project on the Tracker+
- Adding Custom Samples
- Creating Patterns on the Tracker+
- Polyend Tracker+ Resources
IMPORTANT: While you can use USB power banks with the Polyend Tracker+, it is not recommended to use one with smart features, as you will run into glitches. The Tracker+ uses a 5V, 1A-rated supply.
Register the Tracker+
While taking out new gear and starting playing is always exciting, you must first register the Tracker+ with Polyend. Upon registration, you will gain access to additional features and exclusive additional instruments with which to work!
- Sign in to your Polyend account. If you don’t have an account, fill out the registration form at the bottom of the page. Polyend will send you a password reset link to create a new password.
- Once on your account page, click Register Product, use the dropdown to select Tracker+, enter the serial number, and click Register.
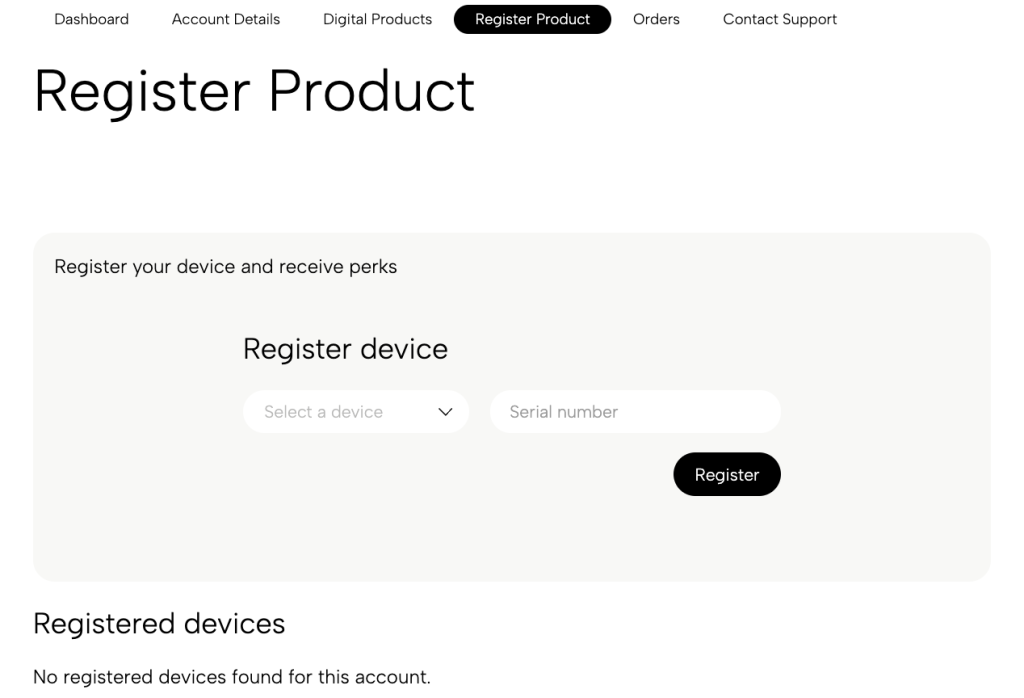
Click the image to register your Tracker+ with Polyend.
Update the Firmware
Polyend will release firmware updates that improve performance, add new features, and address any bugs that may be present in the current version. Check out our Polyend Tracker+ Firmware Update guide below to learn how to update it!
Navigating the Tracker+
The Polyend Tracker+ is easy to navigate and easy to learn. Here is an overview of each section.
Front Panel
Performance (colored) buttons
These four colored buttons (green, yellow, pink, and blue) at the top right of the unit are the four primary buttons you will use when working with the Tracker+. They match up with what you see on the display, as well.
If you want to change a specific parameter (i.e., note, instrument, or FX), just press the associated button to select it.
- Note (green): the programmed note
- Instrument (yellow): the selected instrument for that step
- FX (pink and blue): the current effect you load on that step
Grid pads
The Polyend Tracker+ has 48 multifunctional grid pads. These pads serve different purposes depending on what you’re doing. For example, they can be used for note entry or as a QWERTY keyboard, depending on your menu.
Screen buttons
The eight screen buttons are located beneath the screen and correlate with the function above them on the screen.
Function
The Function buttons are self-explanatory. These are for navigation and general actions like deleting, and copy and pasting. Hold Shift to perform additional functions labeled on buttons with smaller text.
Rear Panel
Output
This is stereo output jack. Use a 1/8-inch splitter cable to connect to two speakers. The output jack also serves as a headphone out.
Line In
The Line In jack is a standard 1/8-inch TRS jack.
MIDI In & Out
The Tracker+ uses 1/8-inch to MIDI cables to connect external MIDI gear.
Micro SD
The Polyend Tracker+ comes with a 16GB Micro SD card for storage. You can use other Micro SD cards, so long as they’re formatted to FAT32. It comes with a Micro SD to USB adapter for file transfer.
Reset
If you encounter issues with your Tracker+, insert a pin to press the Reset button to force a recovery reset.
USB
The Polyend Tracker+ can be connected to your computer for both power and data transfer. The unit can also use a portable power bank, as long as it meets the power requirements. Power banks with smart features are not recommended, as you will run into glitches.
How to Create a Project on the Tracker+
If you’re new to creating music using a tracker, it may feel a little overwhelming at first. However, Polyend makes it easy even for a beginner.
- Press File and choose New Project. A blank project, titled NewProject, will be created.
- If you want to load an existing project, press File, then choose Open. You can then use the jog wheel or the Up and Down arrows to select the project you wish to load.
- Press Pattern to enter the Pattern screen, which is the main screen you’ll be working with.
Adding Custom Samples
You can easily transfer custom samples to your Polyend Tracker+ via USB — no SD card transfer is necessary! The Tracker+ is also bus powered, so there’s no need to connect it to an external power source.
To access the Tracker+ SD card storage, you must first enable USB Mass Storage. Please note that you must use a USB cable capable of data transfer and providing power.
- Connect the Tracker+ to your computer, press the Config button, and navigate to USB.
- Highlight the middle pane, navigate to Storage, and press Enter. The Tracker+ will now enter USB Storage Mode.
- On your computer, locate the samples you wish to add. Transfer them to the Samples folder.
- Safely eject the Tracker+ from your computer.
- Press Sample Loader, then navigate to Samples. You can now add your custom samples as an available instrument.
Creating Patterns on the Tracker+
You can create a pattern one of two ways: step-by-step or live. Step recording is excellent when you want precise rhythm. Live recording is preferred if you’re recording melodies, chords, or bass lines. Don’t worry, though: any mistakes you make during recording can be easily adjusted afterward.
- Press and hold one of the first three buttons to change the following:
- Pattern: pattern number. A project can contain up to 255 patterns.
- Length: pattern length. A pattern can be up to 128 steps.
- Step Jump: This option skips the number of steps set before a new one is added. For example, if the Step Jump is set to 4, it will skip three steps before the next note is entered.
- Press and hold Instrument to select the instrument, and use the jog wheel to select the synth engine or sample you wish to use.
- Press the grid pads to preview the sample or the instrument.
- Press and hold the Note button to view the notes associated with the grid pads.
- Start recording step-by-step or live (see recording details below).
- Press Record again once you’re finished. Make sure you’re exited out of Record mode when making changes!
Step recording
Just press the Rec button and start entering the notes. Don’t forget to press Rec again once you’re finished, or else you’ll overwrite your performance!
Live recording
Hold Shift and Rec, then press the channels you want to arm. Once they’re armed, press and hold Rec and Play to begin recording. Be sure to turn on Pre-Roll to give yourself additional time to prepare to record!
- Press Config, use the jog wheel to navigate to Metronome, and press the Right arrow button to open the metronome menu.
- Highlight Pre-Roll, press Enter, and use the jog wheel to turn it on or off.
- Press Apply to confirm the change.
Change Track and Pattern Name
Like DAW software, it’s always good practice to name your tracks. This makes it easier to see what instrument is loaded onto what track. Naming a track (and patterns) couldn’t be easier!
- Highlight the track (or choose the pattern) you want to rename.
- Press the More button twice, then select Pattern Name or Track Name. The grid pads will now turn into a QWERTY keyboard.
- Create the track name using the keyboard displayed on the screen, then press Save.
- If you press Auto Name, the Tracker+ will generate a unique name for your track or pattern.
Polyend Tracker+ Resources
Here are some useful resources from our friends at Polyend to get you up and running!
Click to download the Polyend Tracker+ Essentials Guide
Click to download the Polyend Tracker+ Manual
Tracker Plus: The Workflow Guide Part 1
Tracker+ Tips and Tricks / Resample and Chop Synths
Tracker+ / Demoing Multi-Macros for Live Performance
PERC Overview / A Versatile, Powerful Drum Machine in Tracker+
Related Articles
When you need help, Sweetwater has the answers!
Our knowledge base contains over 28,000 expertly written tech articles that will give you answers and help you get the most out of your gear. Our pro musicians and gear experts update content daily to keep you informed and on your way. Best of all, it’s totally FREE, and it’s just another reason that you get more at Sweetwater.com.


Offer applies only to single-receipt qualifying purchases. Select manufacturers may require that only the manufacturer’s products qualify towards the minimum purchase amount needed to be eligible for promotional financing. Otherwise, an invoice that meets the minimum purchase amount and contains at least one qualifying manufacturer product is eligible for promotional financing. No interest will be charged on promo purchase balance, and equal monthly payments are required on promo purchase until it is paid in full. The payments equal the amount financed divided by the number of months in the promo period, rounded up to the next whole dollar. These payments may be higher than the payments that would be required if this purchase was a non-promo purchase. During the last month(s) of the promo period the required monthly payment may be reduced due to the prior months’ rounding. Regular account terms apply to non-promo purchases. New Accounts as of 07/31/2025: Purchase APR is 34.99%. Penalty APR is 39.99%. Min Interest Charge is $2. Existing cardholders: See your credit card agreement terms. Subject to credit approval.
Offer applies only to single-receipt qualifying purchases. No interest will be charged on the promo balance if you pay it off, in full, within the promo period. If you do not, interest will be charged on the promo balance from the purchase date. The required minimum monthly payments may or may not pay off the promo balance before the end of the promo period, depending on purchase amount, promo length and payment allocation. Regular account terms apply to non-promo purchases and, after promo period ends, to the promo balance. New Accounts as of 07/31/2025: Purchase APR is 34.99%. Penalty APR is 39.99%. Min Interest Charge is $2. Existing cardholders: See your credit card agreement terms. Subject to credit approval.
The estimated required monthly payment shown which excludes taxes and delivery equals the amount financed divided by the number of months in the promo period, rounded up to the next cent. During the last month(s) of the promo period the required monthly payment may be reduced due to this rounding. These payments apply only with the financing offer shown. If you make these payments by the due date each month, you should pay off this amount financed within the promo period, if it is the only balance you are paying off. If you have other balances on your account, this payment will be added to any other minimum monthly payments.
Applies only to select items from this manufacturer. Ask your Sweetwater Sales Engineer for more details.