
Korg Volca Beats Quickstart Guide
Getting started with the Korg Volca Beats
In this guide, we will show you how to register, set up, and use the Korg Volca Beats drum machine for the first time. Follow the sections below to get started.
Navigating the Volca Beats
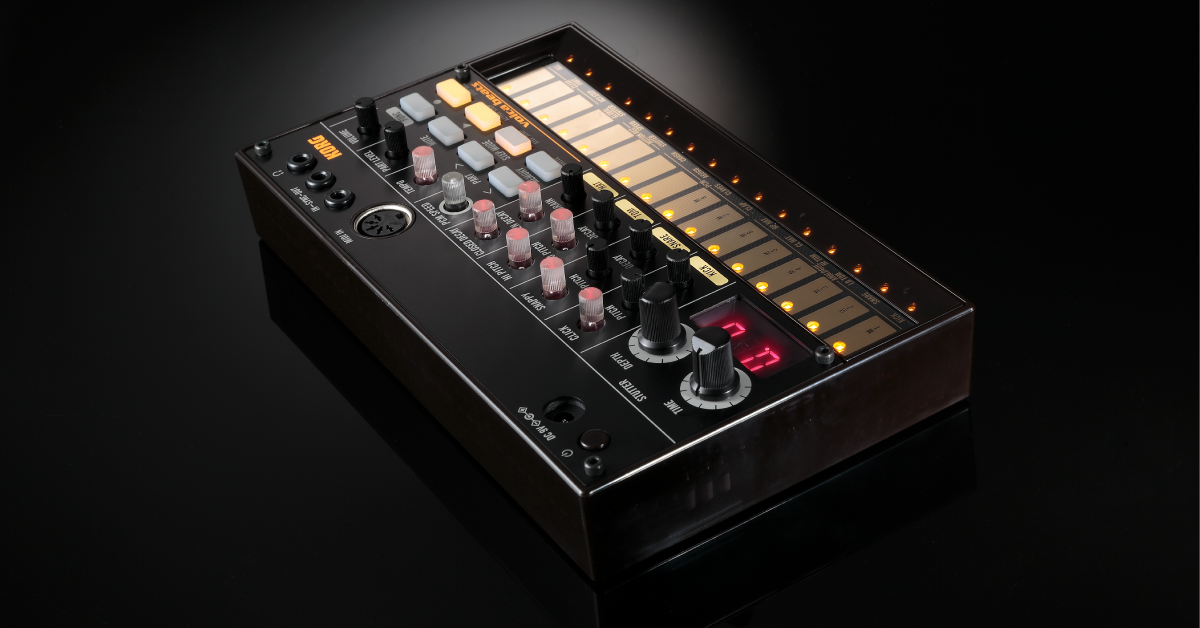
The Volca Beats is a simple yet powerful drum sequencer you can use on your own, or sync and control it with external devices, including other Volca sequencers! Setup is straight forward. Simply insert six AA batteries, turn it on, and start making drum patterns!
Use the correct power supply!
The Korg Volca series hardware requires a specific power supply. Using any other brand may damage the module.
Sections of the sequencer
The Korg Volca Beats can be broken down into three basic sections: the Input & Output, Step Sequencer, and Sound Controls. Some sections have additional controls that you can access by holding down the FUNC button, then pressing that button. If there are smaller words underneath it, that means an additional function is available.
Inputs & Outputs
This is the section where you’ll connect external devices via 5-pin MIDI cables or ⅛” inch headphone cable to control or sync with the Volca Beats.
Step sequencer
This section is where you’ll be entering and recording your beats. The last six steps have additional functions that you can access by holding down the FUNC button.
Sound controls
The sound controls allow you to alter the pitch, decay, and attack of each drum. If you’re recording the Clap, Clave, Agogo, or Crash sample, you can adjust the “PCM” to alter the speed and pitch of that particular sample.
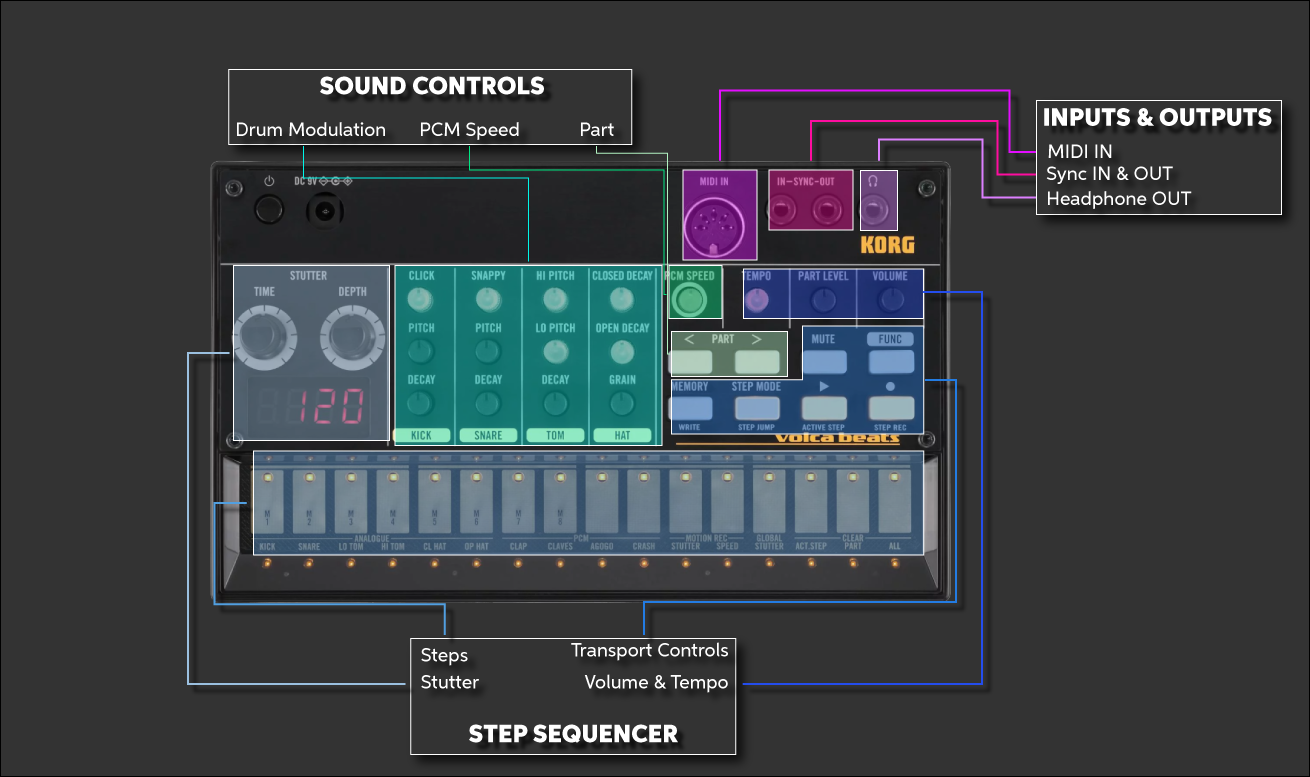
Sections of the Korg Volca Beats. Click to enlarge.
Creating a beat on the Korg Volca Beats
The Volca Beats is a great drum sequencer that allows you to create basic and advanced beats literally from your fingertips. You can program a basic hip-hop beat or you can automate pitches of certain samples, the Volca Beats has you covered. To get you started, let’s create a basic beat.
Create a basic beat
You can record beats in two different ways with the Korg Volca Beats: Live or Step. When you’re recording in Live mode, anything you perform will be recorded while it’s playing. If you’re in Step mode, it allows you to manually enter and remove individual steps. This is really useful when you need to edit a specific instrument’s pattern without having to re-record.
TIP: If you need to edit a specific sample’s pattern, press the STEP MODE button, then use the Part < and > to navigate to it.
Live recording
- Hold the FUNC and press the last step button (labeled ALL underneath) to start from scratch. Make sure the display reads LIVE.
- Press the step button associated with the drum you want to record.
- Press the Rec button to arm it, then once you’re ready, press the Play button to begin recording.
- Stop recording by pressing the Play button again.
- Once you’re happy with your beat, hold the FUNC button, press the MEMORY button, and select the slot to save it in.
Step recording
- While in Live mode, press the step button associated with the drum you want to record.
- Press the Step Mode button and enter the pattern.
- Press Play to play the pattern back.
- Once you’re happy with your beat, hold the FUNC button, press the MEMORY button, and select the slot to save it in.
Create an advanced beat
Now that we’ve created a basic beat, lets select the Agogo sample and automate its pitch so that a melody is created. The pitch automation is only available for the Clap, Claves, Agogo, and Crash. You can however automate the Stutter (swing) on any sample.
- Select the Agogo sample, then turn off Global Stutter by holding the FUNC and pressing the fourth to last pad. The light should turn off.
- Press and hold the FUNC button, then press the pad that is labeled as Speed.
- Start recording and use the PCM Speed knob to begin automation. Press the Play button once you’ve finished.
- Once you’re happy with your beat, hold the FUNC button, press the MEMORY button, and select the slot to save it in.
Related content
Learn more about how to sync Korg Volca modules together!
Learn More →When you need help, Sweetwater has the answers!
Our knowledge base contains over 28,000 expertly written tech articles that will give you answers and help you get the most out of your gear. Our pro musicians and gear experts update content daily to keep you informed and on your way. Best of all, it’s totally FREE, and it’s just another reason that you get more at Sweetwater.com.


Offer applies only to single-receipt qualifying purchases. Select manufacturers may require that only the manufacturer’s products qualify towards the minimum purchase amount needed to be eligible for promotional financing. Otherwise, an invoice that meets the minimum purchase amount and contains at least one qualifying manufacturer product is eligible for promotional financing. No interest will be charged on promo purchase balance, and equal monthly payments are required on promo purchase until it is paid in full. The payments equal the amount financed divided by the number of months in the promo period, rounded up to the next whole dollar. These payments may be higher than the payments that would be required if this purchase was a non-promo purchase. During the last month(s) of the promo period the required monthly payment may be reduced due to the prior months’ rounding. Regular account terms apply to non-promo purchases. New Accounts as of 07/31/2025: Purchase APR is 34.99%. Penalty APR is 39.99%. Min Interest Charge is $2. Existing cardholders: See your credit card agreement terms. Subject to credit approval.
Offer applies only to single-receipt qualifying purchases. No interest will be charged on the promo balance if you pay it off, in full, within the promo period. If you do not, interest will be charged on the promo balance from the purchase date. The required minimum monthly payments may or may not pay off the promo balance before the end of the promo period, depending on purchase amount, promo length and payment allocation. Regular account terms apply to non-promo purchases and, after promo period ends, to the promo balance. New Accounts as of 07/31/2025: Purchase APR is 34.99%. Penalty APR is 39.99%. Min Interest Charge is $2. Existing cardholders: See your credit card agreement terms. Subject to credit approval.
The estimated required monthly payment shown which excludes taxes and delivery equals the amount financed divided by the number of months in the promo period, rounded up to the next cent. During the last month(s) of the promo period the required monthly payment may be reduced due to this rounding. These payments apply only with the financing offer shown. If you make these payments by the due date each month, you should pay off this amount financed within the promo period, if it is the only balance you are paying off. If you have other balances on your account, this payment will be added to any other minimum monthly payments.
Applies only to select items from this manufacturer. Ask your Sweetwater Sales Engineer for more details.