
How To Use OBS
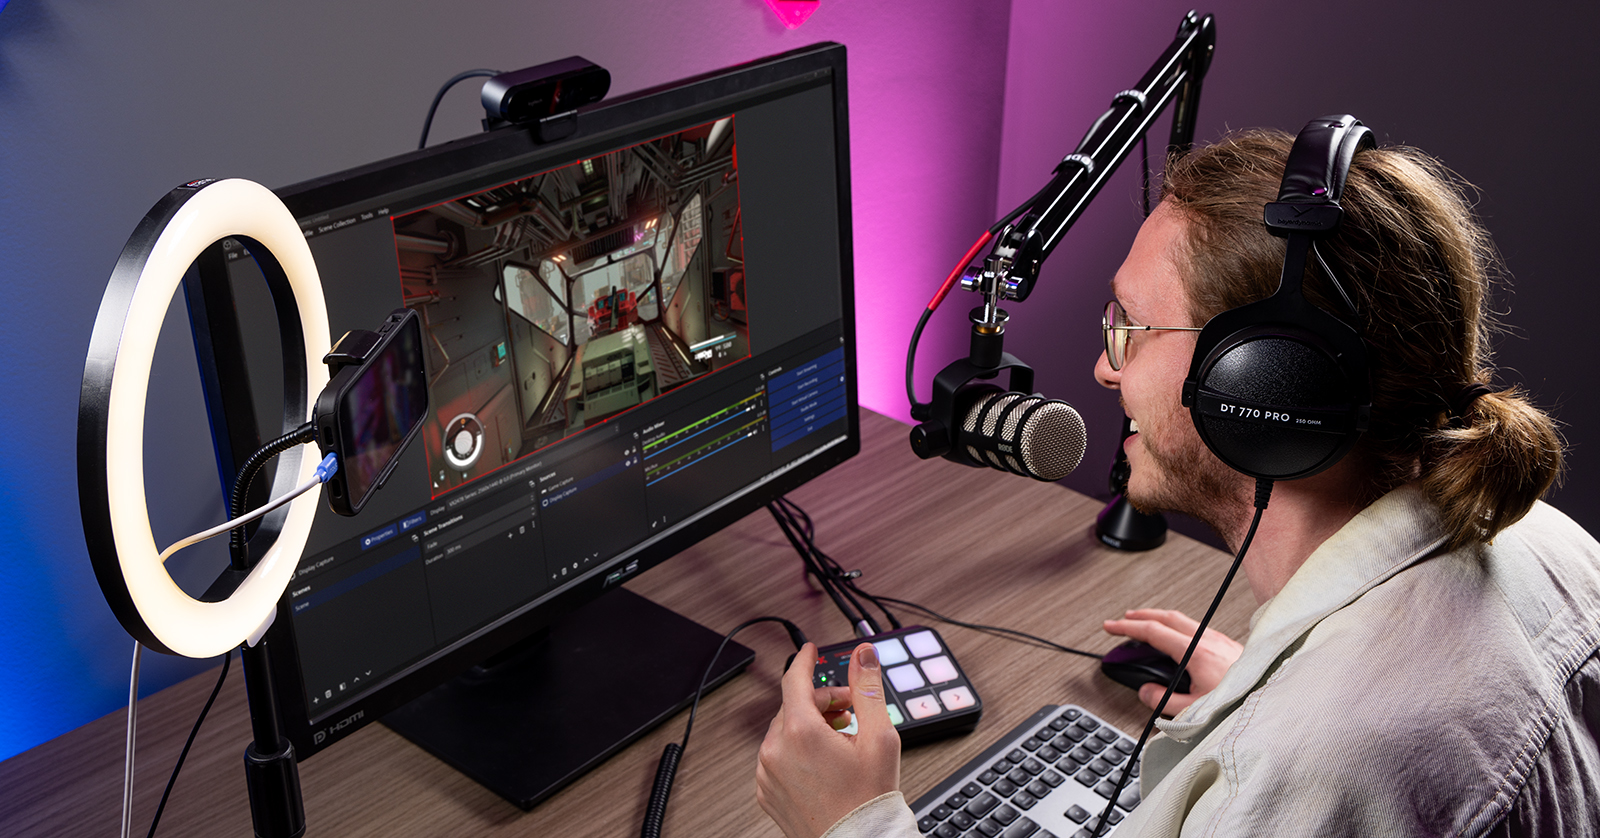
If you’re a content creator who records or livestreams audio and video, you have likely heard of OBS (Open Broadcast Software). In this guide, we will discuss what OBS is, how to set up OBS, and getting started streaming. Let’s get started.
- What Is OBS?
- Download and Install OBS
- OBS Settings for Streaming and Recording
- Navigating OBS
- How to Stream with OBS
What Is OBS?
OBS is free, open-source video streaming and recording software for PC, Mac, and Linux that you can use for all sorts of content creation, from recording and streaming games to band practices and even chat sessions with fans and friends worldwide. With its number of features, OBS can do almost anything to create unique content. It can even be seamlessly integrated with your streaming service.
Download and Install OBS
First, you need to download and install the latest version of OBS Studio and connect all your gear to the computer.
NOTE: If you are using OBS to stream, you first must create an account with your associated streaming service (Twitch, YouTube, Facebook Live, etc.), as you must link the account to OBS when setting up your stream.
- Go to the OBS download page. Click Download Installer. The OBS website will detect what OS you’re downloading the software from and show the latest installers available.
- If you plan on downloading OBS for a different OS, click that OS icon, then click Download Installer.
- Windows PC users: If you use an audio interface that runs on the ASIO protocol, you must also download the OBS ASIO plug-in. Scroll down to How to Use an Audio Interface in OBS for detailed instructions.
- macOS users: Make sure you download the correct version. There are two versions of OBS: one labeled x86_64/Intel and one labeled arm/Apple Silicon. If you aren’t sure whether you have an Intel-based Mac or Mac with Apple Silicon, check out Apple’s support article to learn more.
- Navigate to your Downloads folder, locate and run the installer, then follow the on-screen instructions.
- Connect any gear you will be using (audio interface, video camera, USB microphone, etc.).
- Launch OBS Studio.
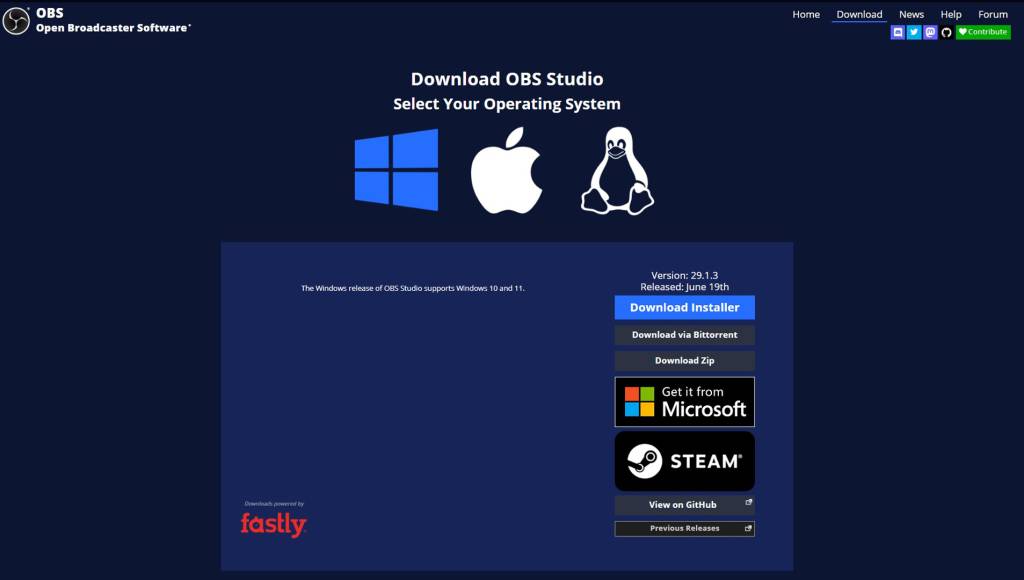
Click the image to download OBS Studio.
OBS Settings for Streaming and Recording
When launching OBS, you must first update the application’s video and audio settings. The default settings are a great starting point, but everyone’s studio setup is different, so you’ll want to head to the Settings menu to adjust settings as necessary.
NOTE: Most of the settings are straightforward to use, but there are also some advanced settings available. Unless you know exactly why something needs to be updated, do not change it.
- Click File, then select Settings. Alternatively, click the Settings button in Controls.
- Select the setting you want to change. Make the appropriate adjustments.
Auto-Configuration Wizard
When you launch OBS for the first time, it will typically run through the Auto-Configuration Wizard. If it does not, click Tools, then select Auto-Configuration Wizard. This will optimize all OBS settings based on your computer hardware. You will only have to make changes afterward if you adjust your streaming setup.
How to Use an Audio Interface with OBS
IMPORTANT! You must first install the latest version of OBS to install the OBS-ASIO plug-in.
If you’re a Windows PC user with an audio interface that relies on the ASIO driver protocol, you must first download the latest version of the OBS-ASIO plug-in for the interface to work correctly.
- Go to the OBS-ASIO GitHub download page, scroll to Assets, and click the latest obs-asio-v.*.**-windows-Installer.exe.
- Navigate to your Downloads folder, then locate and launch the installer.
- Follow the on-screen instructions. Once the installation is complete, you can connect the audio interface to your computer.
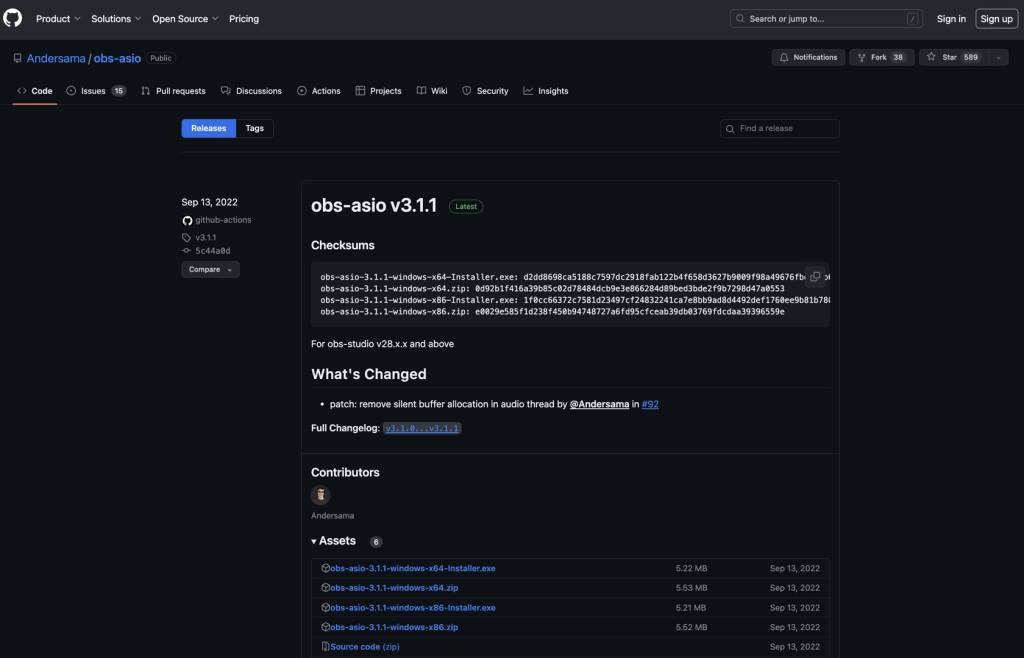
Click the image to download the OBS-ASIO plug-in.
Navigate OBS
Once you have updated your settings, it’s time to get familiar with OBS’s user interface (UI). There are five primary sections you will work with: Scenes, Sources, Audio Mixer, Scene Controls, and Global Control. What’s great is that the sections are modular, meaning you can move them around to suit your workflow.
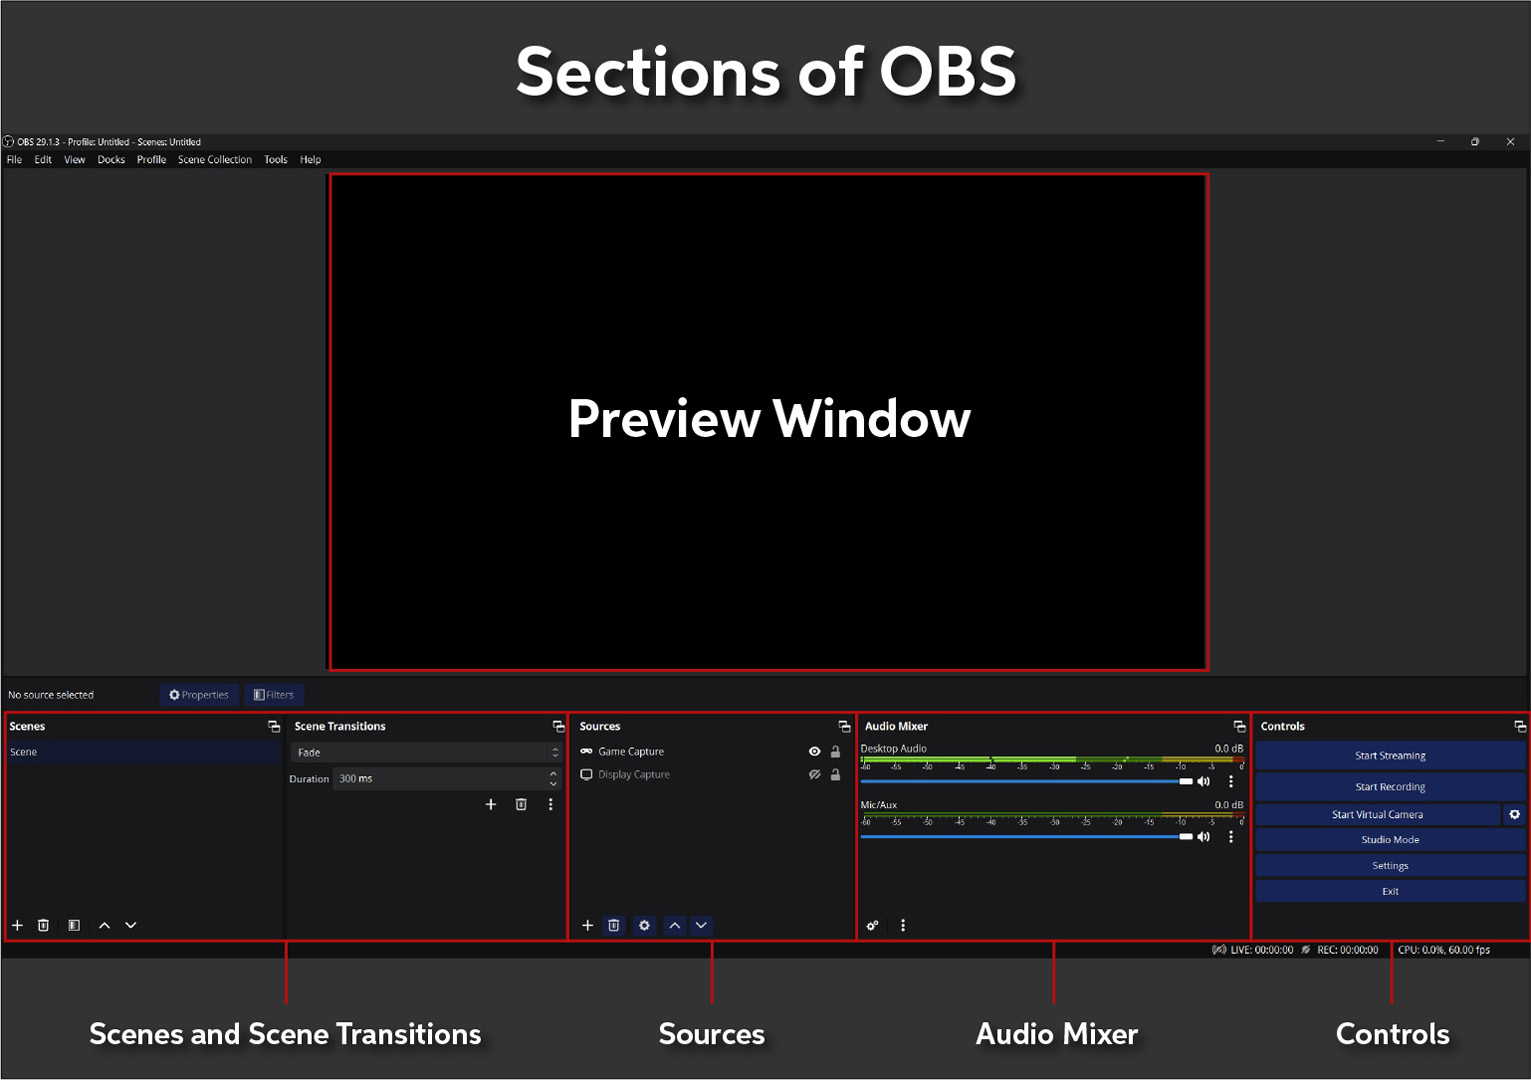
Scenes and Sources
Sources in OBS are the individual components of your stream, like video games, webcams, slideshows, text, or backgrounds. They are also resizable and layered, so if you’re livestreaming a video game and want to have your webcam on, add the video game source and video capture device, set the webcam (video capture device) as the top layer, and adjust the size of the video capture device source.
You can create scenes to preserve your particular source settings or reopen specific visuals, overlays, or anything else you’ve previously created. Since scenes are separate, any source you select for one scene will not appear in another. So, if you have four sources in one scene, they will not appear in another scene that has two sources.
For example, if you’re a livestreamer, you may want to have an intro. In this case, you can create a scene that’s only a background with music. Another scene could be your webcam and a video game you’re playing, and another could be a custom “I’ll be right back” animation.
Saving Scenes
Your scene layout (a Scene Collection) is automatically saved when you close out of OBS. However, it’s always good practice to manually save them in case your computer crashes or you need to transfer them over to another computer.
TIP: Give your Scene Collection a functional name so it’s easily identifiable. You can rename it anytime by clicking Scene Collection and choosing Rename.
- Create a folder. Name it something unique (like OBS Scene Collections).
- If you have any image or video assets you use, place them into the folder, as OBS searches for the file destination when you load the Scene Collection.
- Click Scene Collection, select Export, and save it to your created folder.
- To load your Scene Collection, click Scene Collection, look for the folder in which you saved the scene, and click Import.
Audio Mixer
The Mixer is where you will manage all inputs and outputs enabled in the Audio settings.
- Click the Gear icon to open the Advanced Audio Properties. This will allow you to adjust the panning, sync offset, audio monitoring, and tracks (where the audio track will be recorded in the file).
- If you hear a doubling effect or get a feedback loop, use the Audio Monitoring dropdown box to select Monitor Off.
- OBS allows you to use VST 2 and VST 2.4 effects plug-ins on your tracks. While the built-in effects work fine, using a high-quality processor plug-in can up your audio game! To add an effect, click the three dots next to the Mic/Aux, select Filters, then click the + icon. Choose VST 2.x Plug-in and select the effect plug-in you want to use.
Controls
The Controls module is largely self-explanatory: it’s where you will begin recording and streaming, access the OBS settings, enter Studio Mode, and access the Virtual Camera.
- The Virtual Camera allows you to sync OBS with any software that can use your webcam, like Zoom and Discord. Check out the OBS Virtual Camera Guide to learn more!
- Studio Mode allows you to view your livestream and an edit screen to preview any scene you’ve created without your audience noticing. Check out the OBS Studio Mode overview to learn more!
How to Stream With OBS
Now that you know what OBS is and how it works, let’s create a basic stream from scratch. If you are using OBS to stream to a streaming platform like Twitch, you first need to create an account with them, as you need to link OBS to your streaming platform’s account. This is because a Stream Key is required for the platform integration and authorization.
- Add at least one video source (e.g., a webcam, a game, or a window capture).
- Go to the Audio settings. Update the input and output devices.
- Go to the Sources module, click +, and select a video source (e.g., a webcam, a window, or a display).
- If you have a webcam with a built-in mic, it may also show up in the Audio module. If so, click the Speaker icon to mute it.
- Click File, select Settings, and choose Stream.
- Select your streaming service using the Service dropdown box. Click Use Stream Key.
- If you are streaming to Twitch, click Connect Account. This will automatically sync OBS with Twitch.
- Click Get Stream Key. You will then be taken to the platform’s content creator page, where the Stream Key is generated.
- Copy and paste the Stream Key into the Stream Key field.
- Click Apply, then select OK.
- Click Start Streaming.
When you need help, Sweetwater has the answers!
Our knowledge base contains over 28,000 expertly written tech articles that will give you answers and help you get the most out of your gear. Our pro musicians and gear experts update content daily to keep you informed and on your way. Best of all, it’s totally FREE, and it’s just another reason that you get more at Sweetwater.com.


Offer applies only to single-receipt qualifying purchases. Select manufacturers may require that only the manufacturer’s products qualify towards the minimum purchase amount needed to be eligible for promotional financing. Otherwise, an invoice that meets the minimum purchase amount and contains at least one qualifying manufacturer product is eligible for promotional financing. No interest will be charged on promo purchase balance, and equal monthly payments are required on promo purchase until it is paid in full. The payments equal the amount financed divided by the number of months in the promo period, rounded up to the next whole dollar. These payments may be higher than the payments that would be required if this purchase was a non-promo purchase. During the last month(s) of the promo period the required monthly payment may be reduced due to the prior months’ rounding. Regular account terms apply to non-promo purchases. New Accounts as of 07/31/2025: Purchase APR is 34.99%. Penalty APR is 39.99%. Min Interest Charge is $2. Existing cardholders: See your credit card agreement terms. Subject to credit approval.
Offer applies only to single-receipt qualifying purchases. No interest will be charged on the promo balance if you pay it off, in full, within the promo period. If you do not, interest will be charged on the promo balance from the purchase date. The required minimum monthly payments may or may not pay off the promo balance before the end of the promo period, depending on purchase amount, promo length and payment allocation. Regular account terms apply to non-promo purchases and, after promo period ends, to the promo balance. New Accounts as of 07/31/2025: Purchase APR is 34.99%. Penalty APR is 39.99%. Min Interest Charge is $2. Existing cardholders: See your credit card agreement terms. Subject to credit approval.
The estimated required monthly payment shown which excludes taxes and delivery equals the amount financed divided by the number of months in the promo period, rounded up to the next cent. During the last month(s) of the promo period the required monthly payment may be reduced due to this rounding. These payments apply only with the financing offer shown. If you make these payments by the due date each month, you should pay off this amount financed within the promo period, if it is the only balance you are paying off. If you have other balances on your account, this payment will be added to any other minimum monthly payments.
Applies only to select items from this manufacturer. Ask your Sweetwater Sales Engineer for more details.