
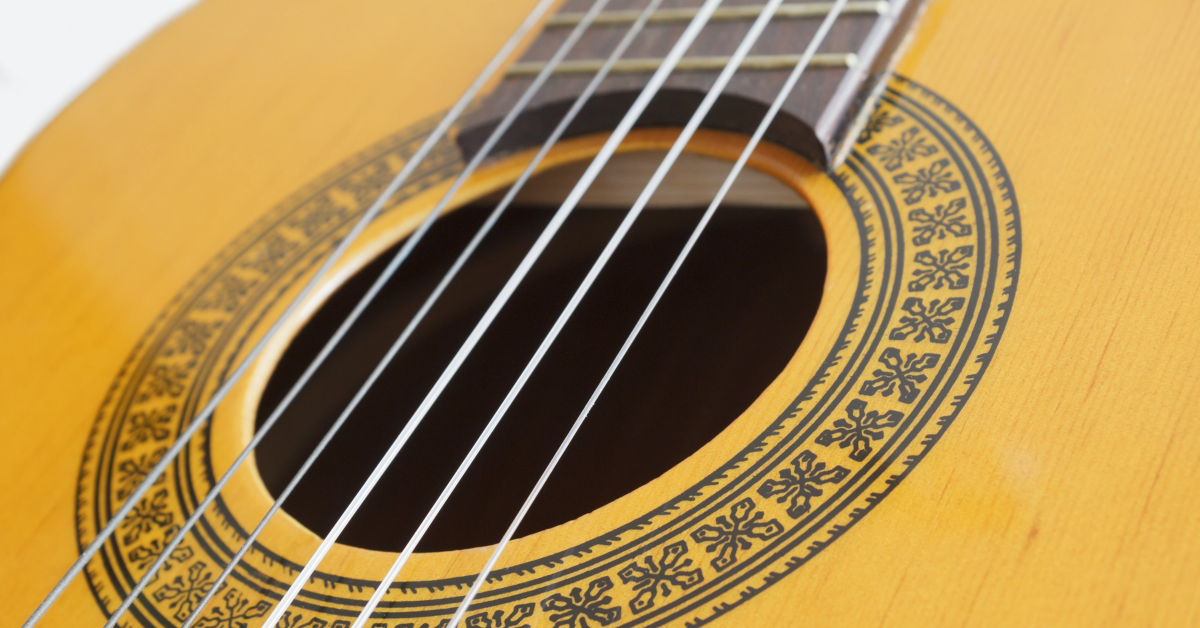
How to String a Classical Guitar
Putting on classical guitar strings may look like it involves some complicated knot techniques, but it’s really pretty simple. For most people who are changing classical guitar strings, you probably have old strings on your guitar and you want to put a fresh set on.
Before we teach you how to string a classical guitar, there are a few tools you’ll need to make the job a lot easier. You’ll want to have a string cutter and winder, a polishing cloth, guitar cleaner, and lemon oil. The steps below will show you the two simple knot techniques you will need to know to securely tie classical guitar strings to your classical guitar, with some other helpful tips along the way.
- Secure classical guitar strings to the bridge
- Changing bass side classical guitar strings
- Changing treble side guitar strings
- Securing classical guitar strings to the tuners
- Wrapping up
1. Secure classical guitar strings to the bridge
The bridge is the part of your guitar that keeps the classical guitar strings secured on the body of the guitar. Securing strings to the bridge is simply tying a knot to keep the strings locked in place. The knots on the bass side and treble side are a little different when changing classical guitar strings, so let’s take a look at one at a time.
2. Changing bass side classical guitar strings
When changing the classical bass side strings (E, A, & D), remember that they are thicker and don’t need as many wraps to secure them.
- Insert the classical guitar string through the bridge.
- Be sure that the side you’re tying has windings that extend all the way to the end of the string. If one end of the classical guitar string has less string winds, you’ll want to use that side of the string for the tuning post. Slide the string through the side closest to the soundhole and exit towards the lower bout. Leave yourself about 2 inches of extra string length so that you have enough to securely tie it to the bridge.
- Create the loop.
- Pull the classical guitar string up above the bridge and wrap it underneath the right side of the string.
- Insert the end of the string into the loop you’ve created behind the bridge.
- Secure the wrap by pulling the classical guitar string tight, ensuring that the tail of the string is resting against the back of the bridge and not on top of it as this will cause unnecessary bridge wear.
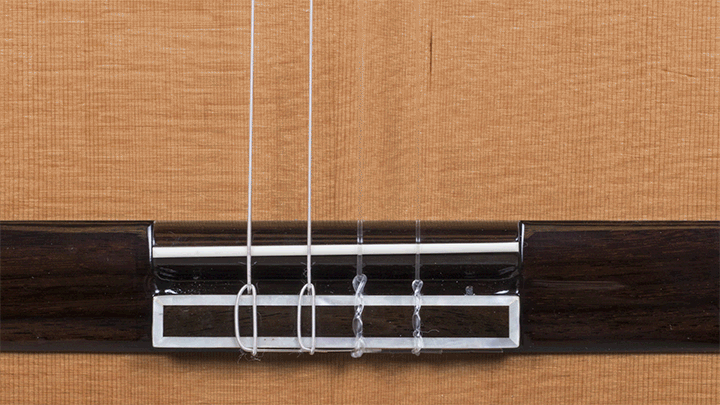
Changing bass side strings
3. Changing treble side classical guitar strings
When changing classical treble side strings (G,B and high E), remember that they require more wraps than the bass side. This one is a little more tricky to get than the bass side so just be patient. Once you’ve changed classical guitar strings a few times, you’ll get the hang of it.
- Insert the string through the bridge.
- You’ll want to slide the classical guitar string through the soundhole side and exit toward the lower bout. Leave yourself at least 2 – 3 inches of extra string length so that you have enough of a tail to securely tie it to the bridge.
- Wrap the string.
- Pull the string up above the bridge and wrap it underneath the left side of the string.
- Make your first over and under wrap.
- After the end of the string leaves the right side of the string, you’ll want to wrap it over and under the upper portion of the string that’s lying across the bridge.
- Make your second over and under wrap.
- Repeat step three and go over and under the string again, but be sure that the end of the string is routed through the loop you’ve created behind the bridge.
- Pull the wraps nice and tight.
- You’ll want to secure the wrap by pulling the string tight, being sure that the tail of the string is resting against the back of the bridge and not on the top as this will cause unnecessary bridge wear.
Protect your classical guitar!
Be sure to protect your guitar when you’re stringing a classical guitar! Unwound classical guitar strings are slippery and sometimes they can come loose when tuning the guitar up. Tape the cardboard packaging that your strings came in behind the bridge to help protect the top of your classical guitar. Believe it or not, the string winding can leave the bridge with enough force that your knot will unravel and scratch the finish. Some players will even wind their string tails into the next string wind to help prevent this.
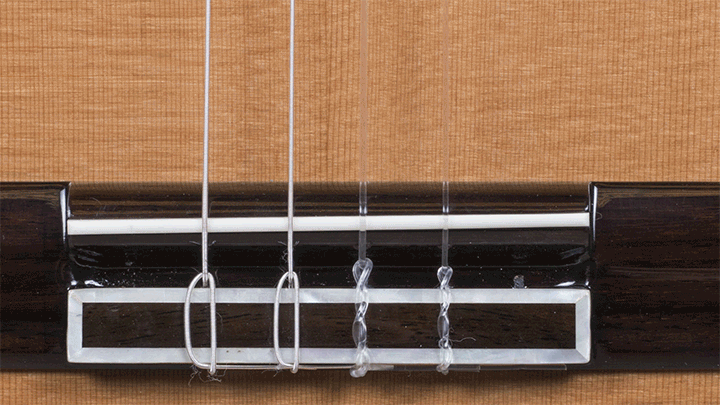
Changing treble side strings
4. Securing classical guitar strings to the tuners
When changing classical guitar strings, securing them to the bridge is half the battle. Let’s now take a look at how to secure your strings to the tuners as well as tightening and bringing your string to pitch.
- Tie the string to the tuning post.
- Many people wonder how to tie classical guitar strings. This is easily done by inserting the string through the post hole, wrapping the string up around the post, and creating a loop. You’ll then want to run the end of the string through the loop and pull the knot tight.
- Bring the string to pitch.
- Now that the nylon guitar string is tied to the tuning post, you can use a string winder to bring it to pitch. If you’re into torture, you can tune these up by hand but but we’re warning you: nylon strings will stretch… a lot. Also, make sure that as you wind the string to pull the tail end of the string tight so that your knot is secured to the post and not unraveling. Watch that the wraps you did at the bridge don’t unravel either. Once you’ve brought the classical guitar to pitch, you can use your string cutters to get rid of any of the excess string.
5. Wrapping up
Yes, our pun was intended. Now that you know how to tie your classical guitar’s nylon strings, get a fresh new set and replace those old ones. If you’re new to the classical guitar, be patient. Your strings will take much longer than a steel string set to stabilize. Usually, after a couple hours of play time, they will settle in. Be prepared to re-tune your guitar every time you get it out, however.
Related content
- Guitar Setup Part 1: Adjusting the Truss Rod
- How to Change Strings on a Bass
- Guitar Setup: How do I measure the action on my electric guitar?
- Guitar Setup: How do I use a radius gauge?
- Guitar Part 2: Setting Action
When you need help, Sweetwater has the answers!
Our knowledge base contains over 28,000 expertly written tech articles that will give you answers and help you get the most out of your gear. Our pro musicians and gear experts update content daily to keep you informed and on your way. Best of all, it’s totally FREE, and it’s just another reason that you get more at Sweetwater.com.


Offer applies only to single-receipt qualifying purchases. Select manufacturers may require that only the manufacturer’s products qualify towards the minimum purchase amount needed to be eligible for promotional financing. Otherwise, an invoice that meets the minimum purchase amount and contains at least one qualifying manufacturer product is eligible for promotional financing. No interest will be charged on promo purchase balance, and equal monthly payments are required on promo purchase until it is paid in full. The payments equal the amount financed divided by the number of months in the promo period, rounded up to the next whole dollar. These payments may be higher than the payments that would be required if this purchase was a non-promo purchase. During the last month(s) of the promo period the required monthly payment may be reduced due to the prior months’ rounding. Regular account terms apply to non-promo purchases. New Accounts as of 07/31/2025: Purchase APR is 34.99%. Penalty APR is 39.99%. Min Interest Charge is $2. Existing cardholders: See your credit card agreement terms. Subject to credit approval.
Offer applies only to single-receipt qualifying purchases. No interest will be charged on the promo balance if you pay it off, in full, within the promo period. If you do not, interest will be charged on the promo balance from the purchase date. The required minimum monthly payments may or may not pay off the promo balance before the end of the promo period, depending on purchase amount, promo length and payment allocation. Regular account terms apply to non-promo purchases and, after promo period ends, to the promo balance. New Accounts as of 07/31/2025: Purchase APR is 34.99%. Penalty APR is 39.99%. Min Interest Charge is $2. Existing cardholders: See your credit card agreement terms. Subject to credit approval.
The estimated required monthly payment shown which excludes taxes and delivery equals the amount financed divided by the number of months in the promo period, rounded up to the next cent. During the last month(s) of the promo period the required monthly payment may be reduced due to this rounding. These payments apply only with the financing offer shown. If you make these payments by the due date each month, you should pay off this amount financed within the promo period, if it is the only balance you are paying off. If you have other balances on your account, this payment will be added to any other minimum monthly payments.
Applies only to select items from this manufacturer. Ask your Sweetwater Sales Engineer for more details.