
How to Set Up a Drum Kit
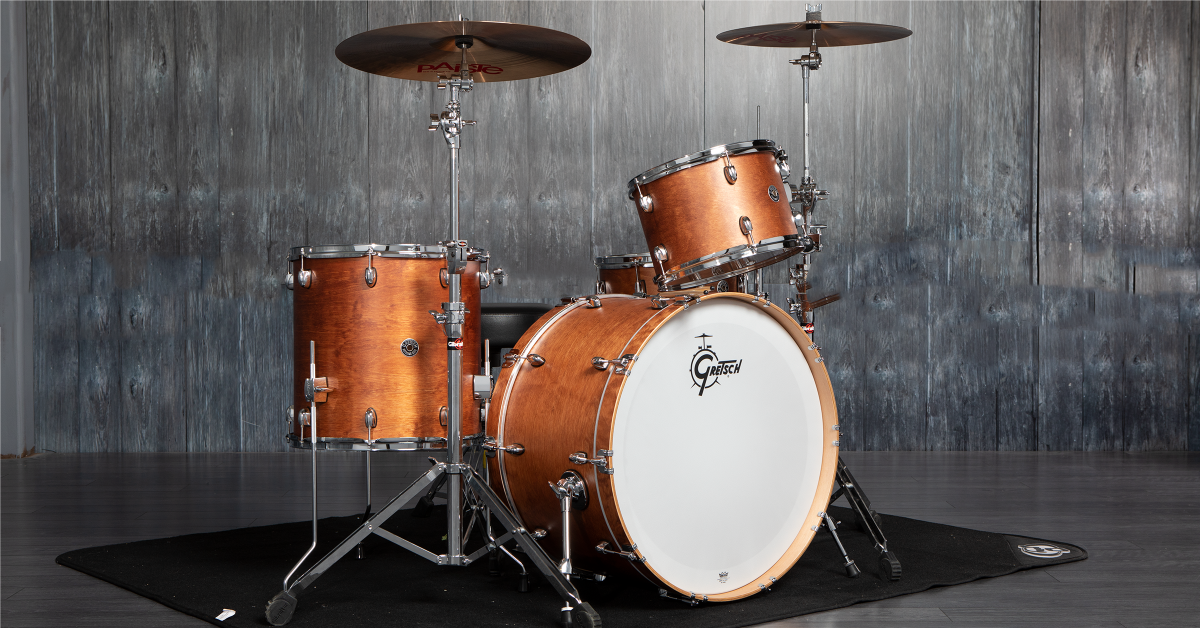
In this guide, we will show you how to set up a drum set. We will walk you through assembling stands, installing drumheads, and also positioning your cymbals. Follow the steps below to get started. We’ve also created a video guide with Nick D’Virgillio to help you along the way.
- How to install the drumheads
- Assemble drum hardware
- Setting up the drum shells
- Setting up cymbals
- Dial it in
How to install the drumheads
The first step in mastering how to set up a drum kit is head installation. You see, most drum sets won’t have hoops or drumheads preinstalled, so you’ll need to install and tune the heads before you set up your drums. You’ll have two heads for each drum: a thick head and a thin head. Make sure to place the thicker head on top (batter side) and the thinner head on the bottom (resonant side). Continue below to install the heads onto your drums.
- Lay the drumhead on the shell. For the bass drum, make sure that the drumhead with the logo on it is installed on the side closest to the bass drum legs.
- Place the drum hoop over the head and line up the holes from the hoop so they match the position of the lugs.
- Most drum hoops have a flat end and a rounded end; make sure the flat end is the one that touches the head.
- Place the tension rods through the holes of the hoop, insert them into the lugs, and finger-tighten them until you can’t turn the tension rods with your fingers any longer.
- Bass drum tension rods are much longer and will have claw hooks that you attach to the hoop.
- Once finger-tightened, use your drum key and tune the heads up to pitch, tightening them in the pattern as seen in the photo below.
Why finger-tighten?
The main purpose for finger-tightening tension rods is so they all have equal tension before you start tightening the drumheads with your drum key. If there isn’t equal tension when tightening them, you could bend the hoop or cause damage to the shell!
Assemble drum hardware
Drum hardware may look a bit tedious and a little complicated to set up when you first take it out of the box, but it’s quite simple, so follow these steps to get your drum throne, snare stand, and cymbal stands set up.
TIP: Most drum manufacturers include spare tension rods, washers, and cymbal felts just in case you need something down the road. So if you end up with some spare parts, keep them handy in your drum toolbox.
Drum throne
Your drum throne is the base of your entire drum kit setup. Once you set it up, take some time to adjust the height and find a comfortable sitting position. The general rule of thumb is to make sure that your thighs are a little taller than parallel with the floor when you sit. Doing this can prevent back and leg fatigue, as it allows your limbs to rest in a more natural sitting position and also helps with your playing technique. Follow these steps to set up your drum throne.
- Loosen the wing nut at the bottom, expand the legs, and then retighten the wing nut.
- Place the seat on top and secure it to the height adjustment rod using the wing nut located underneath the seat.
- Raise or lower the seat by adjusting the height adjustment rod until you find a comfortable sitting position.
Positioning the throne’s legs
When setting up your drum throne, make sure the throne’s legs are wide enough to be stable, and that one of the legs is pointed behind you. Doing this will help prevent you from falling backward.
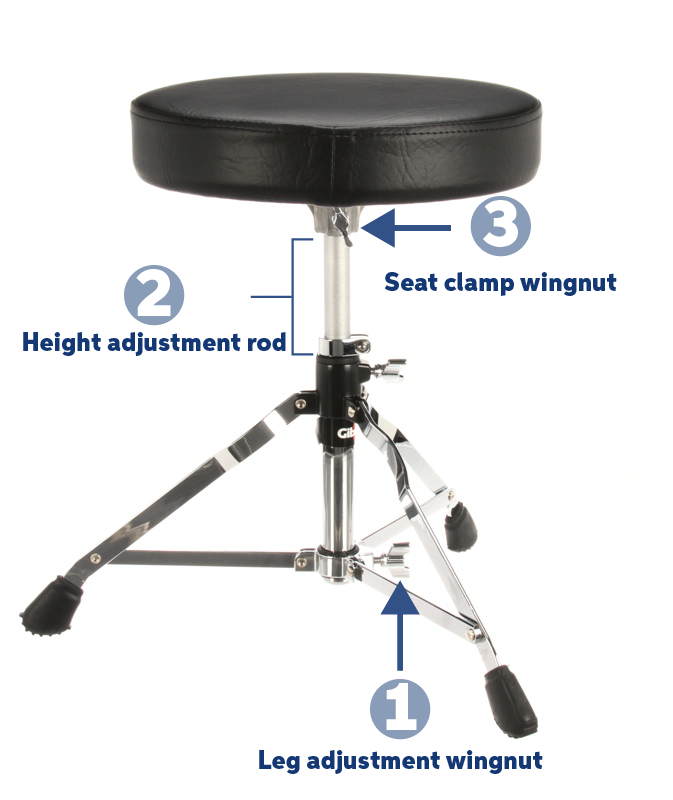
Drum throne diagram. Click to enlarge.
Snare drum stand
The snare stand is dedicated to your snare drum. It uses what’s called the basket to secure the drum to the stand. Some drummers also use it for rack toms. The setup of a snare drum stand is similar to that of a drum throne, except it can also be adjusted to angle the drum. While it’s recommended to have the snare drum level with your hips, you want to position it so you can play the drum comfortably and consistently without getting fatigued. Follow these steps to get the snare drum stand set up.
- Loosen the wing nut at the bottom to expand the legs and then tighten it back up.
- Loosen the middle wing nut and adjust the height of the stand. Tighten it back up once you find the desired height.
- Once the stand is in place, open the basket, set the drum in, and use the basket’s adjustment nut to secure the snare drum.
- Adjust the angle of the snare basket by loosening the wing nut at the joint. Once you find the drum angle that feels most comfortable for your playing, tighten the joint’s wing nut.
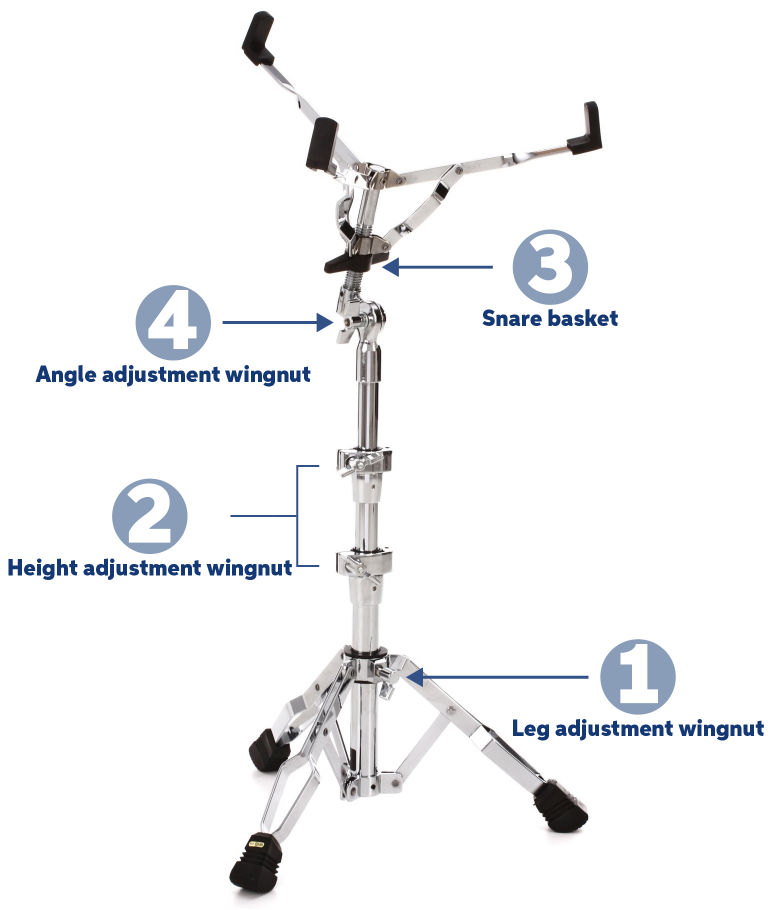
Snare drum stand diagram. Click to enlarge.
Cymbal stands
Most drum sets include a hardware pack which includes a hi-hat stand and at least one crash cymbal stand. These stands can be either straight, boom, or conversion stands, but they all serve the same purpose. You’ll dial in the positioning of the stands and cymbals at the end of this article, so follow these steps first to set them up.
Hi-hat stand
- Loosen the bottom wing nut and expand the legs. Once the stand is stable, tighten it back up.
- On the bottom of the pedal, insert the two hi-hat foot pedal brackets into the two holes located at the center base of the stand.
- Screw the pull rod (the skinny rod with threading) into the stand and insert the tube assembly over it. Position the tube to the desired height, then place the felt onto the hi-hat seat.
Straight cymbal stand
- Loosen the bottom wing nut and expand the legs. Once the stand is stable, tighten it back up.
- Next, use the middle wing nut to adjust the height of the stand itself.
- Adjust the wingnut closest to the bottom cymbal felt to change the angle of the cymbal until it feels comfortable to you while playing.
Boom and convertible stands
These stands will be assembled in the same way as a straight stand but with a few extra steps.
- Boom stands have an arm that you can extend for more precise cymbal placement. The arm angle and length are adjusted with the wing nut at the top of the stand, and the cymbal angle is adjusted with the wingnut closest to the cymbal felts. You will generally see these stands used for ride cymbals, but depending on the way you like your drum setup, you can use them for other cymbals as well.
- Convertible stands can be used as either straight or boom stand and have a hidden boom arm inside the upper tube. For detailed instructions, check out our guide about how to assemble convertible cymbal stands!
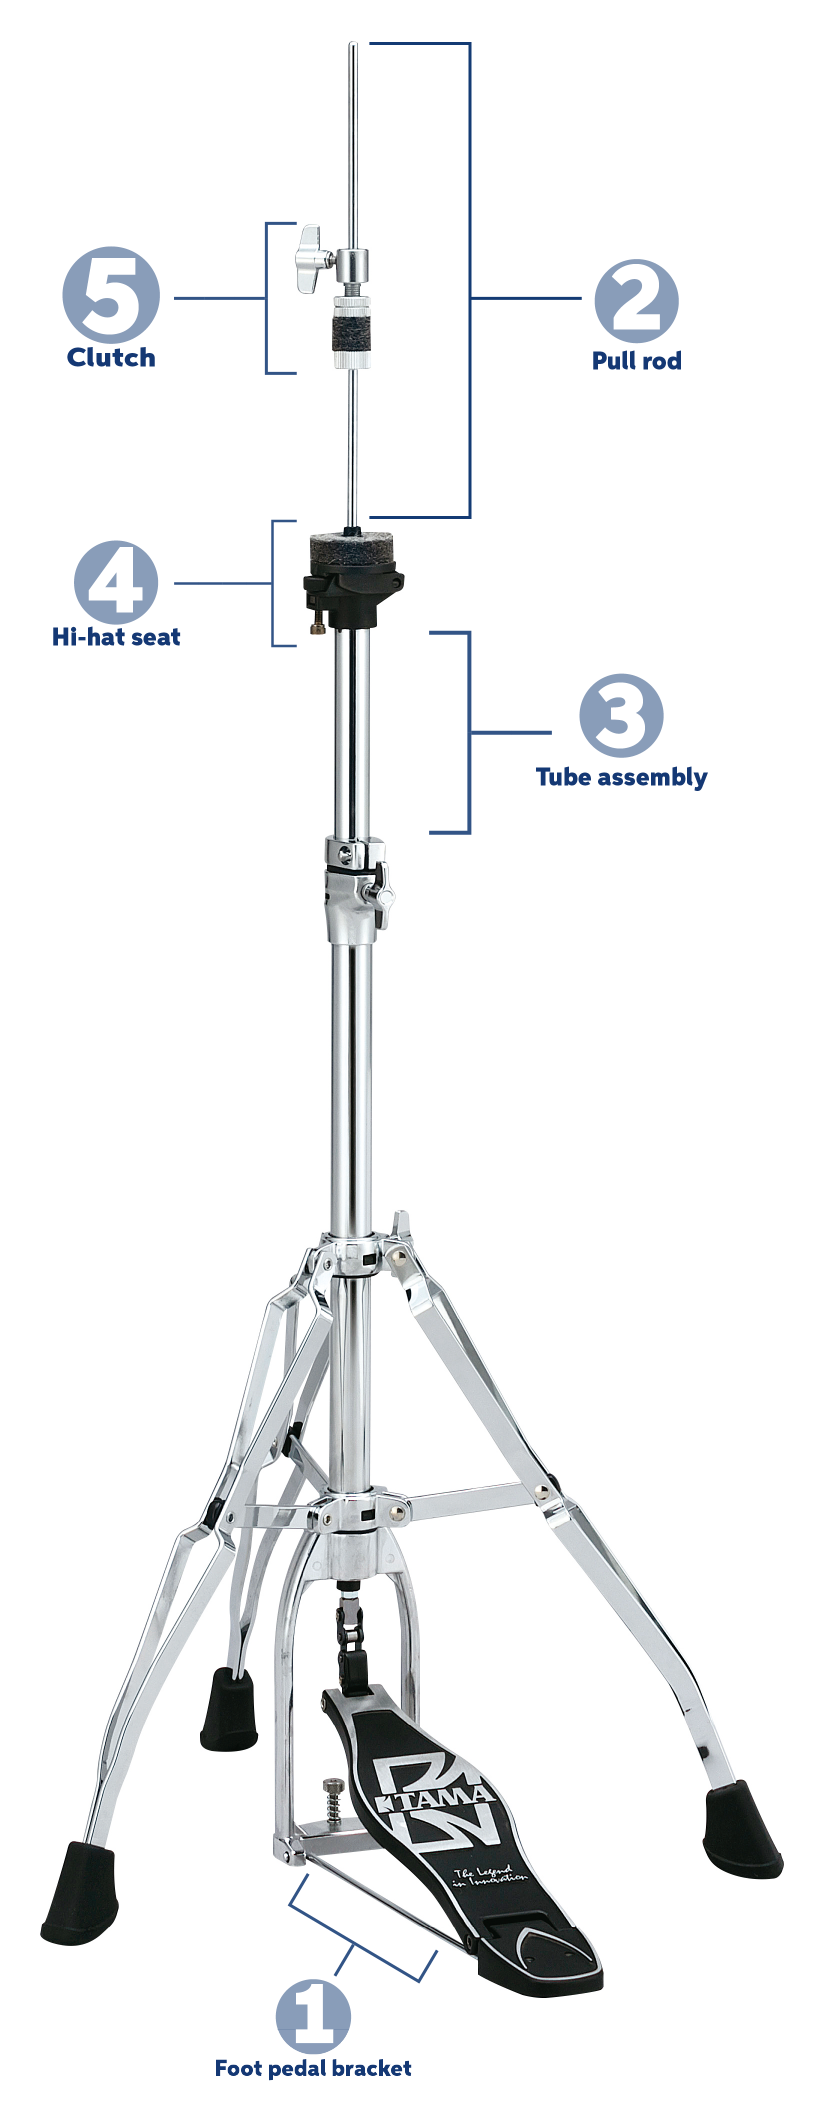
Hi-hat stand diagram. Click to enlarge.
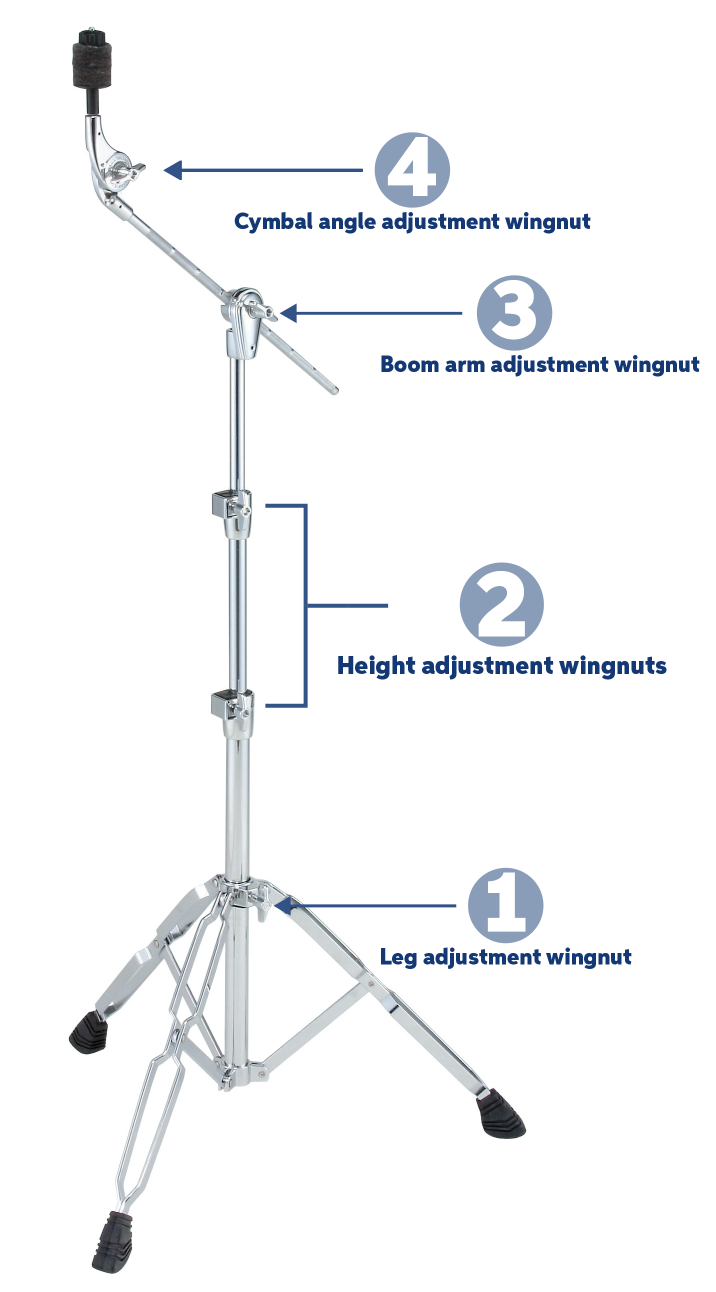
Boom stand diagram. Click to enlarge.
Setting up the drum shells
Once the heads are installed, and your drum hardware is set up, the next step is to set up the drum shells. It’s best to set them up while you sit on your throne behind your bass drum because that gives you an idea of how everything will look once you finish. You can configure the drums any way you’d like, but the most common setup to get you started is to have the snare between your legs, the small rack tom on the left tom arm, the larger rack tom on the right tom arm, and the floor tom to the right, at the same height as your snare drum. Again, this is a general guideline; set them up in the way they feel most comfortable to you.
Bass drum
- Place the bass drum on the floor with the logo head and bass drum legs facing away from you.
- Loosen the top wing nut on the bass drum legs so they swing out, and tighten them down with the legs at a slight outward angle. Loosen the bottom wing nut and extend the leg until it reaches the floor.
- Once the legs are set to the desired position, tighten everything up and attach your bass drum pedal to the hoop. To protect your bass drum hoop from being chewed up by your pedal, use a hoop protector.
Snare drum
- Place the snare drum into the snare stand basket and tighten it using the basket’s adjustment nut.
- Adjust the height of the snare stand to where it feels most comfortable while you play.
Floor tom
- Insert the floor tom legs in the floor tom brackets and tighten them down with the wing nut on the bracket.
- Make sure that the feet are facing outward so the floor tom doesn’t tip over.
- Keep the height and angle the same as the snare drum. This makes it a lot easier when you’re switching between the two.
Rack toms
- Insert the long part of the tom arm into the bass drum bracket and tighten the bracket’s wing nut.
- Slide the rack tom, via the bracket on the side, onto the tom arm and tighten it down. Remember, the small rack tom is placed on the left and the large rack tom is placed on the right.
- Angle the rack toms a little so they’re facing toward you. Not only will this make it easier to hit the drum, but it will also make playing more comfortable and less tiresome.
Setting up drum shells.
Setting up the cymbals
The final step in your drum kit setup is to set up the cymbals by placing them on the cymbal stands. When setting up your cymbals, make sure you have cymbal sleeves and felts on the stands to prevent any metal-on-metal contact! Once the cymbals are tightened down, adjust the angle and height to where they feel most comfortable to you, then move them into position.
Hi-hat cymbals
- Lay the bottom hi-hat cymbal on top of the large felt of your hi-hat stand with the bell facing down. Most hi-hat cymbals will have “Top” and “Bottom” marked on them, but if they don’t, use the thicker cymbal as the bottom.
- Remove the bottom clutch nut and one of the felts as seen in the photo below.
- Place the clutch through the top hi-hat cymbal so you have the top felt resting on the bell.
- Place the bottom felt on, then retighten the clutch nut.
- Slide the clutch onto the pull rod and tighten the clutch’s wing nut.
Crash and ride cymbals
- Lay the cymbal on top of the bottom felt of your stand with the bell facing up.
- Place the other felt on top of the bell, then tighten the wing nut a little bit until the cymbal is secured.
Prevent cracked cymbals!
The location of a crack tells a lot about how it was set up and played, and there are several simple yet effective steps you can take when setting up your cymbals to prevent damage.
- Angle the cymbal a little bit toward you, and make sure that you have a cymbal sleeve on the stand! Metal-on-metal contact can cause cracks around the bell.
- Make sure the cymbal can move freely when you place the wing nut on. If the cymbal is tightened down too much, it can’t absorb as much shock, which can cause stress fractures.

Setting up the cymbals.
Positioning the cymbal stands
TIP: If you’re playing on hard floors, such as wood or concrete, we recommend using a drum rug. This prevents your stands and drum set from sliding around and keeps everything in place. Once the stands and drums are set up, consider using gaffer tape on your drum rug to mark the placement of your drums and hardware. This step will speed up the setup process in the future!
- Adjust the height and angle to the most comfortable playing position by using the stand’s adjustment wingnuts that you worked with while setting up the stand.
- Move the stand into playing position and double-check that the stand’s leg base is wide enough.
- Place one of the stand’s legs under the cymbal, especially if you’re using a boom stand. This will help counterbalance the weight of the cymbal and the weight of the stand.
Dial it in
Now that you’ve learned how to set up a drum set, take a moment to adjust everything to your liking. There is an infinite number of possibilities when setting up and tuning your drums, but here are a few takeaways to think about:
- Drums are musical instruments, too! Not only are they the foundation of the rhythm and groove of a song, but they can also really complement what’s being played, so listen to some of your favorite bands and genres when tuning your drums to get the sound you’re looking for.
- Get creative with how you set your kit up. Some drummers like to have their cymbals high and the drums angled toward them, while others prefer to keep the drums low and flat with the cymbals closer to them. Remember, it’s all about what feels comfortable to you.
- Take care of your drum set, and it will take care of you. Just like a car, drums and cymbals need basic maintenance to extend their life. Simply wiping down and polishing your shells and cymbals, lightly spraying lubricant on your tension rods when changing drumheads, and even storing the drums in a controlled environment can really go a long way!
Related Articles
When you need help, Sweetwater has the answers!
Our knowledge base contains over 28,000 expertly written tech articles that will give you answers and help you get the most out of your gear. Our pro musicians and gear experts update content daily to keep you informed and on your way. Best of all, it’s totally FREE, and it’s just another reason that you get more at Sweetwater.com.


Offer applies only to single-receipt qualifying purchases. Select manufacturers may require that only the manufacturer’s products qualify towards the minimum purchase amount needed to be eligible for promotional financing. Otherwise, an invoice that meets the minimum purchase amount and contains at least one qualifying manufacturer product is eligible for promotional financing. No interest will be charged on promo purchase balance, and equal monthly payments are required on promo purchase until it is paid in full. The payments equal the amount financed divided by the number of months in the promo period, rounded up to the next whole dollar. These payments may be higher than the payments that would be required if this purchase was a non-promo purchase. During the last month(s) of the promo period the required monthly payment may be reduced due to the prior months’ rounding. Regular account terms apply to non-promo purchases. New Accounts as of 07/31/2025: Purchase APR is 34.99%. Penalty APR is 39.99%. Min Interest Charge is $2. Existing cardholders: See your credit card agreement terms. Subject to credit approval.
Offer applies only to single-receipt qualifying purchases. No interest will be charged on the promo balance if you pay it off, in full, within the promo period. If you do not, interest will be charged on the promo balance from the purchase date. The required minimum monthly payments may or may not pay off the promo balance before the end of the promo period, depending on purchase amount, promo length and payment allocation. Regular account terms apply to non-promo purchases and, after promo period ends, to the promo balance. New Accounts as of 07/31/2025: Purchase APR is 34.99%. Penalty APR is 39.99%. Min Interest Charge is $2. Existing cardholders: See your credit card agreement terms. Subject to credit approval.
The estimated required monthly payment shown which excludes taxes and delivery equals the amount financed divided by the number of months in the promo period, rounded up to the next cent. During the last month(s) of the promo period the required monthly payment may be reduced due to this rounding. These payments apply only with the financing offer shown. If you make these payments by the due date each month, you should pay off this amount financed within the promo period, if it is the only balance you are paying off. If you have other balances on your account, this payment will be added to any other minimum monthly payments.
Applies only to select items from this manufacturer. Ask your Sweetwater Sales Engineer for more details.