
HeadRush VX5 Quickstart Guide
The HeadRush VX5 is the perfect vocal processing pedal for any vocalist on the stage or in the studio. This guide will show you how to register, set up, and use the pedal for the first time. Follow the sections below to get started.
- Registering the VX5
- Updating the VX5 Firmware
- Setup & Connections
- Working with Presets
- Using the HeadRush VX5
Registering the VX5
Before you start, you must register your purchase with HeadRush. Registration activates an extended warranty and gives you free ReValver and Amp Cloner software.
- Log into your inMusic account. If you don’t have one, then click “Create Account” and complete the necessary information.
- On your account home page, click “Register New Product” then enter the serial number, which is on the side of the box.
- Fill out the necessary information to complete the registration process.
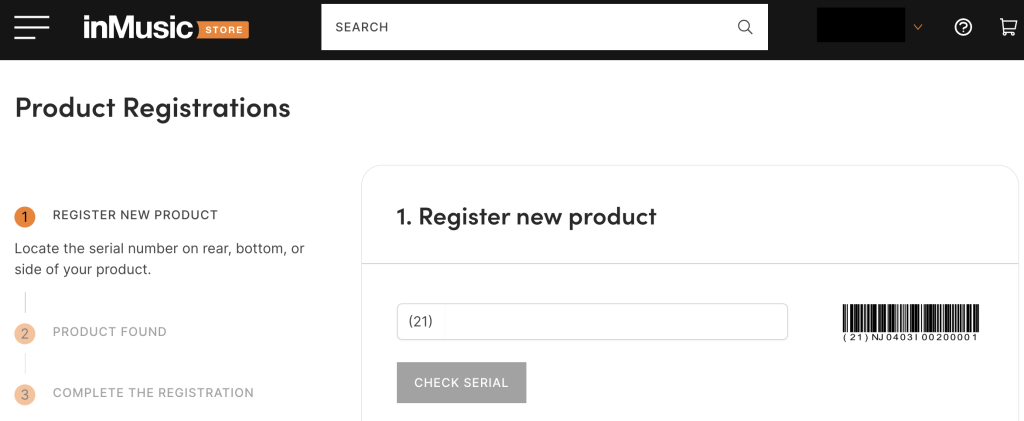
Click the image to register your HeadRush VX5.
Updating the VX5 Firmware
IMPORTANT! Make sure you update your firmware as soon as you take it out of the box! This ensures your pedal is up to date and has the latest features installed.
- Connect the power supply to your VX5, turn it on, and connect the pedal to your computer.
- Take note of the firmware version currently installed. It will be displayed when the pedal is powered on.
- Open your web browser, type “VX5.local” in the search bar, then click “Download”in the Download the Latest Firmware box. The firmware .img file will begin downloading.
- In the Update Device Firmware box, click “Upload.” The firmware process will begin.
- Don’t turn off the pedal or disconnect it from the computer while updating!
- Once complete, disconnect the VX5 from your computer and power cycle the unit.
- Confirm the firmware was installed correctly by viewing the firmware version displayed when powering the pedal on.
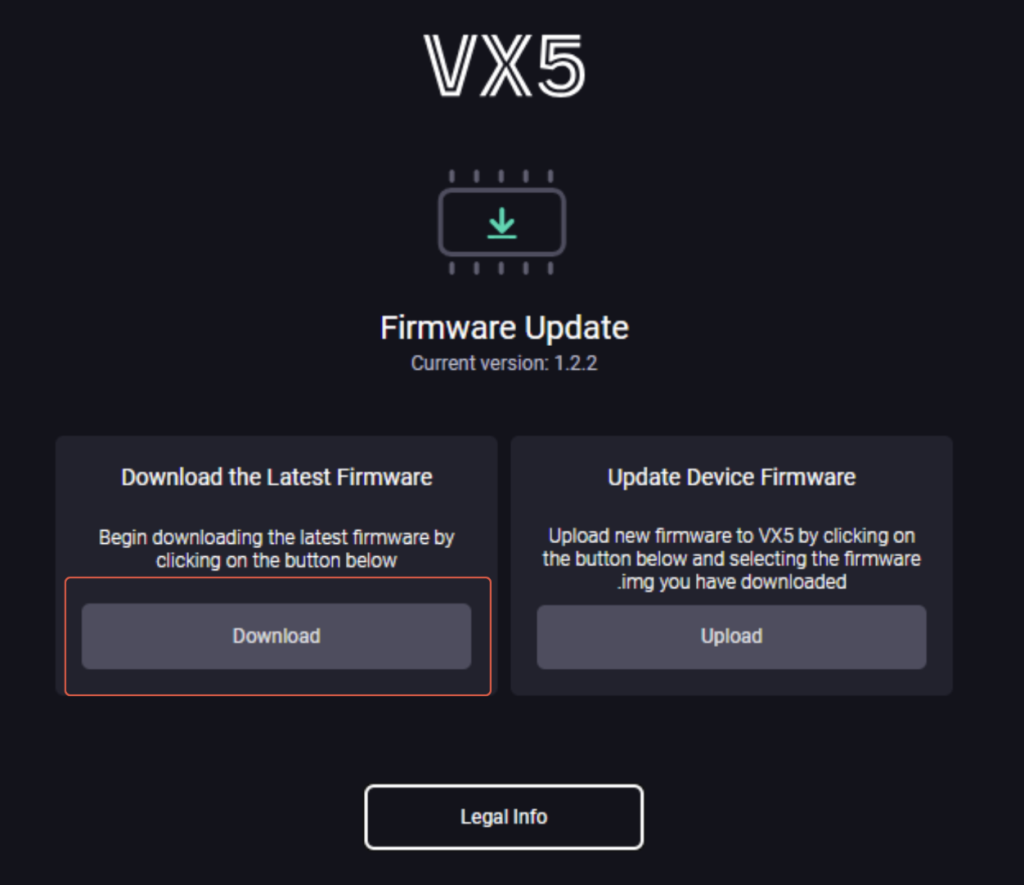
VX5 firmware update page
Setup & Connections
Connecting gear to your HeadRush VX5 is straightforward. Simply connect your guitar and microphone to the correct inputs and connect your preferred output(s); then you’re all set! Here are additional tips to get you up and running:
- Disconnect anything connected to the pedal when you’re done.
- Use a 1/4-inch TS cable when connecting a guitar.
- Connect the pedal to your amp or mixer via the 1/4-inch Guitar Thru output.
- Use a standard XLR cable to connect the VX5 to speakers or an amplifier system.
- If you have a condenser microphone, then connect it to the Mic In and then switch the phantom power to the On position. When you’re finished, switch it off before disconnecting the microphone.
- Use the Ground Lift switch if you hear any noise or hum when using the pedal.
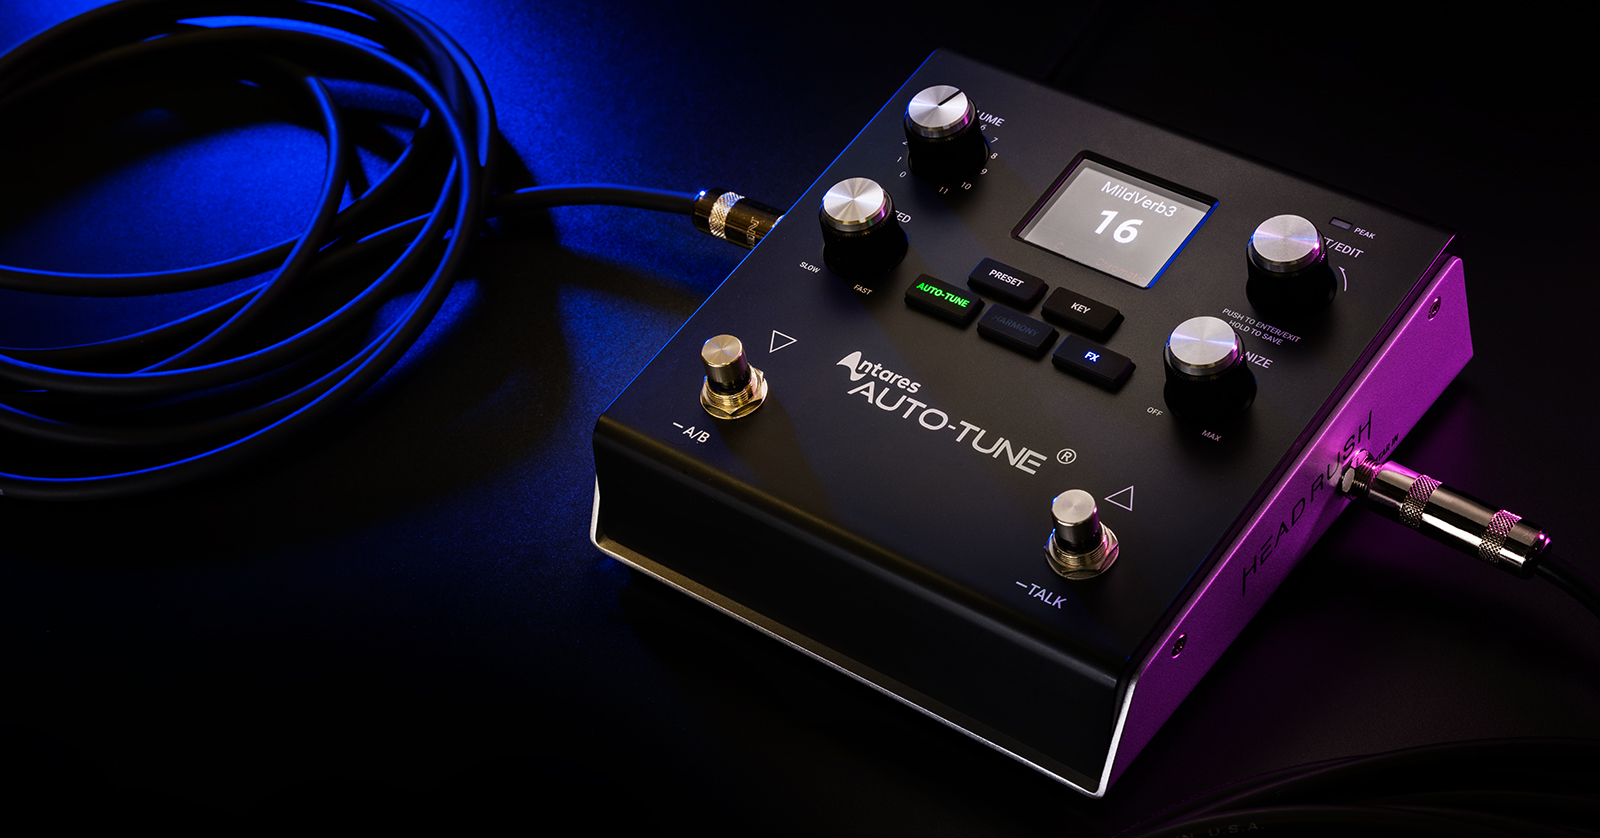
Working with Presets
Thanks to its layout and navigation system, the HeadRush VX5 is easy to work with. While there are 99 fantastic factory presets included, there are plenty of preset options you can edit and adjust to create your own, as well!
To open the preset menu, press the Preset button then use the Preset/Edit encoder to navigate and select the preset you’d like to load.
Editing a preset
After selecting a preset, you can edit the parameters, rename it, and save it for later use. Use the various encoders and buttons on the VX5 to edit their assigned parameters.
Speed
Speed adjusts the speed at which the input signal is corrected in milliseconds (0ms–400ms). Slow speeds produce more natural pitch correction whereas fast speeds produce more exaggerated pitch correction.
Humanize
Like the Speed parameter, the Humanize parameter adjusts how natural or digitized the signal sounds. The more you turn the Humanize encoder to the left (counterclockwise), the more digitized the signal will sound.
Key
Press the Key button and use the Preset/Edit encoder to change the key, scale type, and vocal pitch range.
Harmony
Press and hold the Harmony button to enter the Harmony options menu and use the Preset/Edit encoder to adjust various parameters such as range, source, and level.
FX
Press and hold the FX button to enter the FX menu and use the Preset/Edit encoder to select the type of effects you want to add (Compressor, Flavor, Chorus, Reverb, Delay). Press the Preset/Edit encoder once more to edit the settings.
Auto-Tune
Pressing the Auto-Tune button will turn the Auto-Tune effect on and off. If you’re using Harmony and FX, then it’s best to have Auto-Tune turned off so it doesn’t affect the signal.
Renaming and saving the preset
Once you have found the perfect sound, you can rename and save the preset for later recall.
- Press the Preset button to return to the Preset screen then press and hold the Preset/Edit encoder to enter the Save/Copy screen.
- Use the encoder to either Save, Save and Rename, or Copy. In this instance, select “Save and Rename.”
- Press the Preset/Edit encoder then rotate it to cycle through letters and numbers. Once you’ve finished naming your preset, press the Preset button.
Using the HeadRush VX5
The HeadRush VX5 is a no-frills pedal, which means you can spend more time playing and less time memorizing the pedal sequence or switch you need to use to access a specific function.
One great feature is assigning specific effects to a particular footswitch without changing presets. This is done using the A/B (left) footswitch.
- Press and hold the A/B footswitch until you see A on the left side of the screen.
- Press the effect buttons you want to load on that switch (e.g., FX, Harmony).
- Press the Talk (right) footswitch. You will see B on the right side of the screen.
- Press and hold the Talk switch to bypass the pedal. This allows you to talk to the audience without any vocal processing.
- Choose the effects you want to load onto that switch. You can now swap between specific effects banks without changing the current preset.
Auto-Tune in a Pedal | HeadRush VX5 Complete Walkthrough
Related Articles
When you need help, Sweetwater has the answers!
Our knowledge base contains over 28,000 expertly written tech articles that will give you answers and help you get the most out of your gear. Our pro musicians and gear experts update content daily to keep you informed and on your way. Best of all, it’s totally FREE, and it’s just another reason that you get more at Sweetwater.com.

