
Getting Started with the M-Game RGB
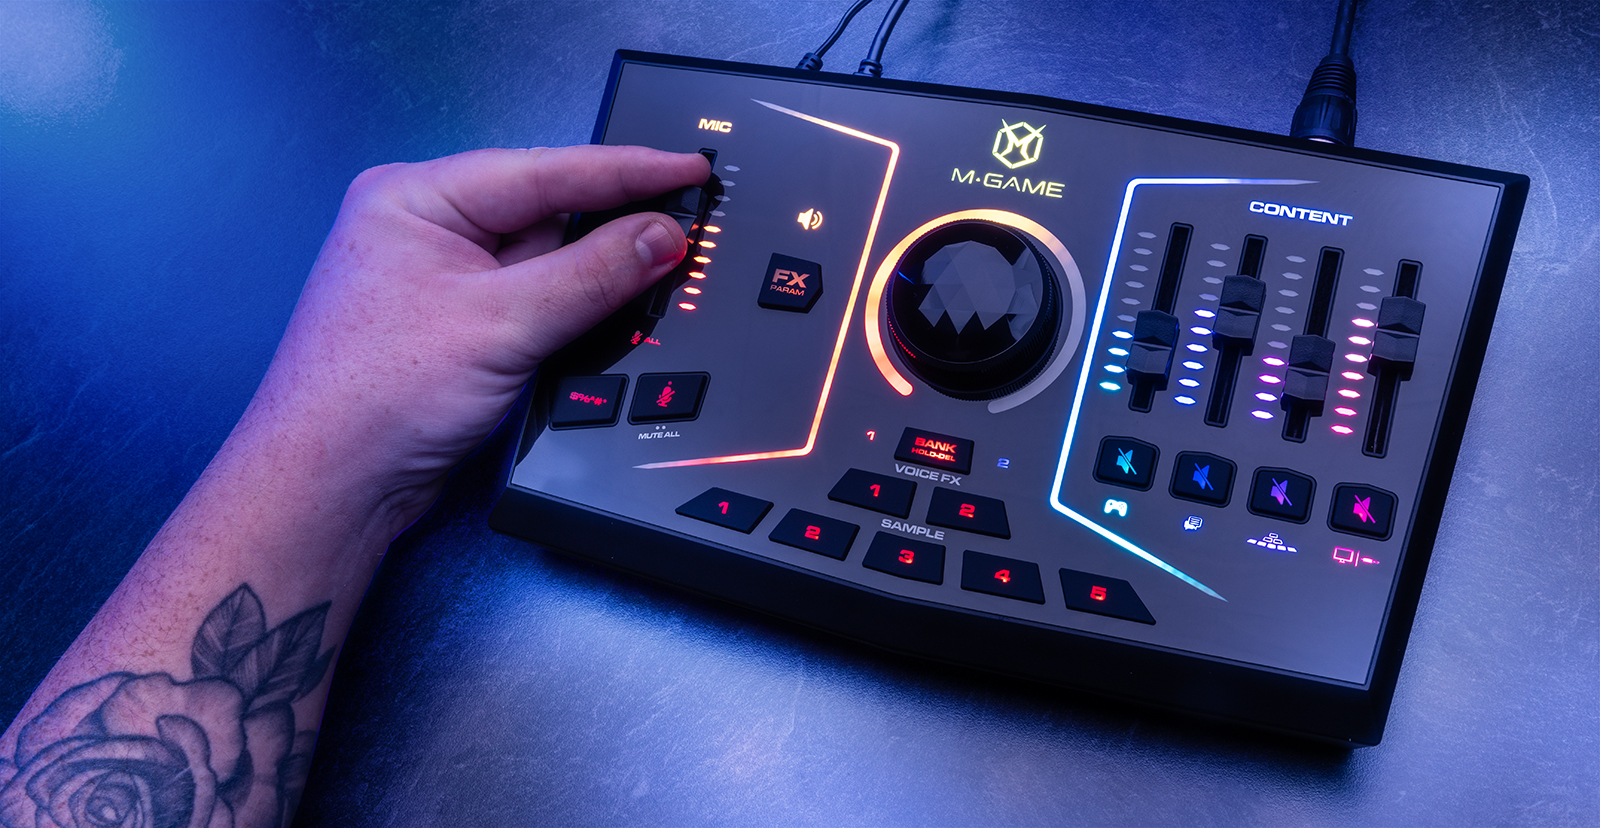
If you’re a gamer or a streamer, you need the best hardware possible. From game consoles to computer connections, M-Audio’s M-Game RGB has you covered. So, in this guide, we will show you how to register, set up, and connect the M-Game for the first time. There are tons of features available, and this guide only scratches the surface, so be sure to check out the M-Game Solo and M-Game Dual User Guides for more information!
Register the M-Game
Before you get set up, you’ll first need to register the M-Game interface with M-Audio. Upon registration, you’ll get access to the M-Game standalone software, which includes the drivers and control app necessary for the interface to work correctly.
- Log into your M-Audio account. If you don’t have an account, you can create one here.
- On your account home page, click REGISTER at the top of the page, then click REGISTER NEW PRODUCT.
- When prompted, enter the Serial Number at the bottom of the unit or on the side of the packaging. Be sure NOT to include the (21)!
- If you receive a message stating the number of registrations has been reached, you will need to submit a support ticket with M-Audio.
Download the software
Once you’ve registered your M-Game, the next thing you’ll need to do is download and install the dedicated software that is used to control and update the computer and hardware routing. The installer also includes the driver necessary for the M-Game to communicate with your computer correctly.
- On your account home page, locate the newly registered M-Game, click View Downloads, then click M-Game RGB Software.
- Navigate to your Downloads folder, then locate and launch the M-Game installer.
- Follow the on-screen instructions, then connect the M-Game to your computer to complete the installation process.

M-Game Setup and Connections
TIP: Be sure to connect the M-Game RGB to your computer before powering on the interface.
Most audio interfaces can only connect to a computer, but the M-Game RGB interface also allows you to connect your mobile devices, TV, and game consoles! This makes it perfect for gamers and streamers alike. Let’s go over the basic setup and connections so you can get up and running! Check out the M-Game Solo and M-Game Dual User Guides for more information.
- Connect the M-Game to your computer via USB, then connect your headset, speakers, and headphones at the back of the unit. If you’re a Mac user, you must use an official Apple USB-C to USB adapter.
- If you have an M-Game single computer setup, use the USB Stream Port. If you have a dual computer setup, use the USB Stream Port for the streaming computer and Game USB Port for your gaming computer.
- Navigate to your computer’s sound settings and set it as the default recording and playback device.
- PC: Right-click the Speaker icon on your Windows taskbar and click Sounds. Select Playback, right-click your interface, and click Set as Default Device and Set as Default Communications Device. Lastly, choose Properties, go to the Advanced tab, and uncheck the boxes under Exclusive Mode. Click the Recording tab and follow the same procedure.
- Mac: Click the Apple icon from the Menu Bar and select System Preferences. Click Sound, then select the M-Game under the Input and Output tabs.
- Launch the M-Game Control Panel and click Set Mic.
- Talk into the mic as loudly as you expect to talk while streaming, and adjust the fader so it begins clipping. Once you see it clip, the mic LED will flash.
- While continuing to speak into the mic, turn the Mic Gain down to a point where it stops clipping.
- If you’re using a condenser mic, click Phantom Power in the M-Game Control Panel.
- If you’re using a low-gain mic (e.g., SM7B), use the software’s BOOST feature.
- On the right side of the M-Game Control Panel, use the dropdown to select the source of where your audio will be coming From.
- Launch the streaming software you’ll be using, then go into its audio settings to update the default input and output device.
- Refer to the streaming software’s User Manual to learn how to update its sound settings.
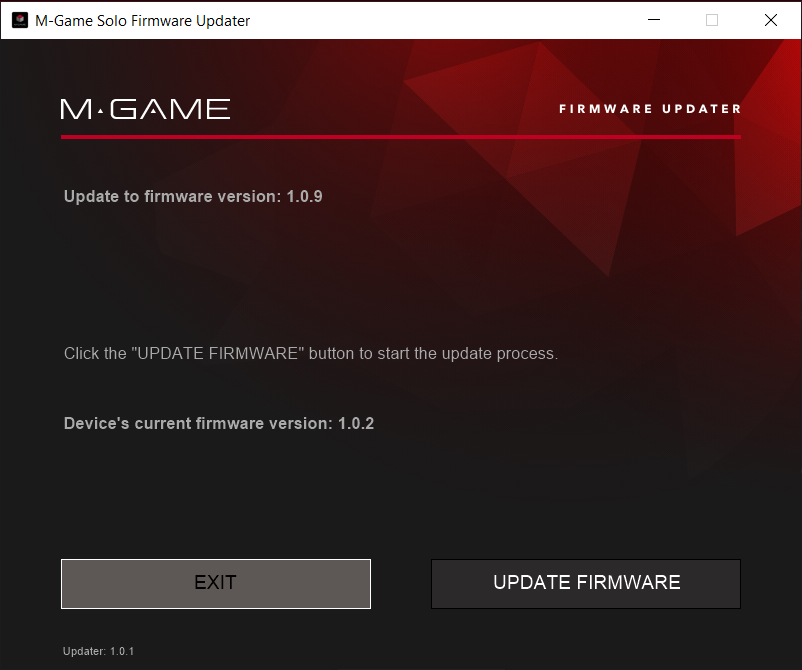
Firmware update
IMPORTANT: Be sure not to disconnect or power off the interface while updating the firmware!
When you first launch the M-Game Control Panel, you may be prompted to update your firmware. If this is the case, click Update Firmware and follow the on-screen instructions. The process should only take a minute or two.
Setup tips
Here are a few tips for when you’re setting up the M-Game interface.
- If you have a headset with a mic, connect it to both the Mic In and HP Out.
- If you’re using a headset with a built-in microphone, connect it to both the 3.5mm Mic In and the HP Out.
- Depending on the model of the headphones, you may need to use the included 3.5mm splitter cable.
- The TRS connection will take priority over the XLR Mic input.
- Connect an optical cable to the streaming source (TV or game console), then connect an HDMI cable from the streaming source to your computer.
- If you own an M-Game RGB Dual and have a dual computer setup, connect the main streaming computer via the USB Stream port and the gaming computer to the Game USB port.
When you need help, Sweetwater has the answers!
Our knowledge base contains over 28,000 expertly written tech articles that will give you answers and help you get the most out of your gear. Our pro musicians and gear experts update content daily to keep you informed and on your way. Best of all, it’s totally FREE, and it’s just another reason that you get more at Sweetwater.com.

