
How to Use Focusrite Control
In this guide, we will show you how to use Focusrite Control with your Scarlett interface. That means you’ll learn how to set up, route, and adjust settings in the app. Follow the sections below to get started.
- Navigate Focusrite Control
- How to route audio in Focusrite Control
- Pairing an iOS device with Focusrite Control
Navigate Focusrite Control
TIP: Hovering your mouse over any part of the software will show you a description of what the function does.
Focusrite Control is the standalone software where you will make various changes with the Focusrite interfaces. This includes changing clock sources, routing, sample rate, and, depending on your device, pairing with your iOS device. When you launch Focusrite Control, there are three windows you’ll be working with. The Output Routing, Input Settings, and Device Settings.
Scarlett and input settings
The Input Settings window is straightforward. Unlike other interfaces that use physical controls, you can perform various functions in Focusrite Control. These functions include changing the input source between LINE and INSTRUMENT, turning the PAD (–10dB) on and off, and engaging the AIR preamp for each channel. Clicking the gear icon will pull up the Device Settings.
Within Device Settings, you will change the sample rate and the clock source. You can even change your device’s name and change the colors of the gain halos on the interface. If you own a Scarlett 6i6, 18i8, 18i20, Clarett, or Red model interface, you will also go to the Device Settings window to connect to the Focusrite iOS Control app.
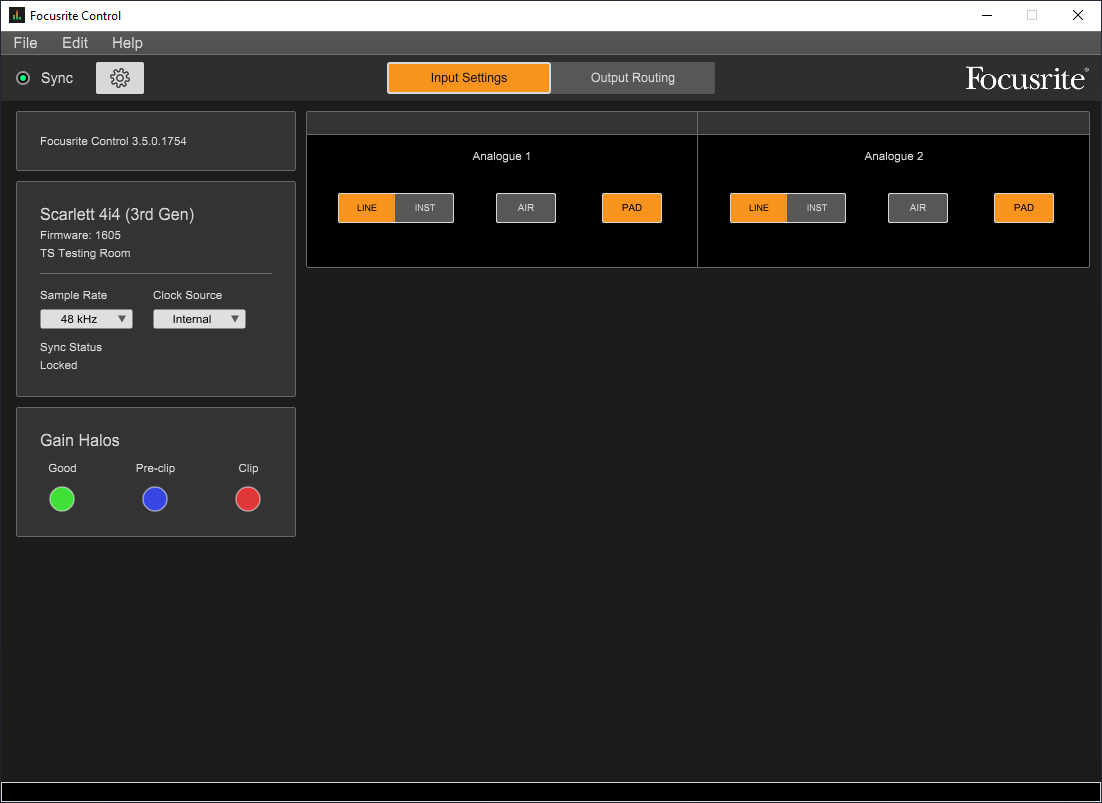
Focusrite Control input settings. Click to enlarge.
No hardware connected error
If you launch Focusrite Control and receive an error that says No Hardware Connected, ensure that the USB cable is fully inserted and that the drivers are installed correctly. Check out our guides on resolving audio interface issues on PC and Mac if that doesn’t work.
Focusrite Control output settings
The Output Routing window is where you assign your inputs and outputs to different sources. You can also adjust the panning and signal level of individual inputs and outputs. It’s comprised of three separate sections — Hardware Inputs, Software (DAW) Playback, and Outputs. To get you started, let’s explain each section of the app.
Outputs
All available outputs on your Scarlett/Clarett interface are located on the left side of the Focusrite Control window. You’re able to give each output a custom name by typing in the box between the Output Source and Output Identifier (e.g., Nearfield Monitors). You have three output routing sources you can choose from. Playback (DAW), Analog, and Custom Mix. If Playback (DAW) or Analog is selected, you will see the routing for the selected output.
- Playback (DAW): Signal only from your DAW software/computer.
- Analog: Signal only from hardware inputs (direct monitoring).
- Custom: A combination of both Playback (DAW) and Analog.
Hardware inputs
When the Output Source is set to Custom Mix, the Hardware Input section will allow you to assign any of the physical inputs to a specified output. You can add Mute/Solo, adjust panning and levels for each individual input, which is particularly useful when creating custom headphone mixes.
Software (DAW) playback
Focusrite Control allows you to add additional outputs along with the Master Stereo output. Playback 1-2 is typically your computer’s default Left and Right output. In most cases, this setup is fine. If for instance, you wanted click going to your headphone mix though, you could assign the metronome to Playback 3-4 in your DAW, then add it to the Custom Mix within the app.
How to route audio in Focusrite Control
IMPORTANT: When using a sample rate of 176.4 or 192, you will see the message “Mixer is disabled at this sample rate.” You will be unable to create a custom mix. However, you can still route the Hardware Inputs and Software Playback channels directly to the outputs.
Now that you know how to navigate Focusrite Control, let’s show you how to customize routing. Focusrite Control includes a couple of basic routing presets (Snapshots). However, you can always create a custom mix from scratch. Creating a custom mix is useful when using outboard gear or recording a band that wants individual headphone mixes.
Let’s create a basic custom mix with two inputs and a direct monitor headphone mix with vocals and a metronome track. In this example, we’ll use a Scarlett 4i4 (3rd Generation) with a guitar connected to Ch. 1 and a microphone connected to Ch. 2.
Direct monitor an individual channel
- Go to File, navigate to Output Presets, then select Empty. The Hardware Inputs and Software (DAW) Outputs will be removed.
- Click Monitor Outputs 1-2 (Speakers icon) to select your Main Outs, then select Custom Mix as the source.
- Click the + in the Hardware Inputs area, then select 1 and 2 to create two mono inputs. Next, click above the channel and label them as Guitar and Microphone.
- Click the + in the Software (DAW) Outputs area, then select 1-2 to route your Main Outs.
- Click Line Outputs 3-4 (Headphone icon) to select your headphones and set the source to Custom Mix. Make sure that the Line Outputs 3-4 box is black; not grey.
- Mute Ch. 1 (Guitar) then adjust the levels of the vocal track.
- Adjusting the level of a Hardware Input channel within Focusrite Control will not affect the signal going into your DAW.
Click track
- Enable Outputs 3-4 within your DAW, then create a metronome track.
- Assign the metronome track to Outputs 3-4 inside your DAW.
- Go to Focusrite Control, then click Line Outputs 3-4 (Headphone icon) to select your headphones.
- Click the + in the Software (DAW) Outputs area, then select 3+4. Press play in your DAW and check the levels in Focusrite Control to make sure you’re getting metering on both Software Playback tracks.

Output routing in Focusrite Control. Click to enlarge.
Pairing an iOS device in Focusrite Control
You can control Focusrite Control remotely if you own an iOS device. This is a handy tool in recording situations where you’re in another room and need to make adjustments on the fly. Follow these steps to pair your iOS device.
- Download the latest version of Focusrite iOS Control on the App Store.
- Open Focusrite Control on your computer, and launch the iOS app.
- Follow the on-screen instructions to complete pairing.
- Select the computer listed on the iOS app, click Device Settings on the desktop app, then click Approve next to the iOS device listed under Remote Devices.
My interface isn’t showing up in the app!
If your Focusrite interface doesn’t appear in the iOS app, it’s more than likely an issue with your WiFi connection. For detailed troubleshooting steps, check out Focusrite’s help guide.
Related Articles
When you need help, Sweetwater has the answers!
Our knowledge base contains over 28,000 expertly written tech articles that will give you answers and help you get the most out of your gear. Our pro musicians and gear experts update content daily to keep you informed and on your way. Best of all, it’s totally FREE, and it’s just another reason that you get more at Sweetwater.com.


Offer applies only to single-receipt qualifying purchases. Select manufacturers may require that only the manufacturer’s products qualify towards the minimum purchase amount needed to be eligible for promotional financing. Otherwise, an invoice that meets the minimum purchase amount and contains at least one qualifying manufacturer product is eligible for promotional financing. No interest will be charged on promo purchase balance, and equal monthly payments are required on promo purchase until it is paid in full. The payments equal the amount financed divided by the number of months in the promo period, rounded up to the next whole dollar. These payments may be higher than the payments that would be required if this purchase was a non-promo purchase. During the last month(s) of the promo period the required monthly payment may be reduced due to the prior months’ rounding. Regular account terms apply to non-promo purchases. New Accounts as of 07/31/2025: Purchase APR is 34.99%. Penalty APR is 39.99%. Min Interest Charge is $2. Existing cardholders: See your credit card agreement terms. Subject to credit approval.
Offer applies only to single-receipt qualifying purchases. No interest will be charged on the promo balance if you pay it off, in full, within the promo period. If you do not, interest will be charged on the promo balance from the purchase date. The required minimum monthly payments may or may not pay off the promo balance before the end of the promo period, depending on purchase amount, promo length and payment allocation. Regular account terms apply to non-promo purchases and, after promo period ends, to the promo balance. New Accounts as of 07/31/2025: Purchase APR is 34.99%. Penalty APR is 39.99%. Min Interest Charge is $2. Existing cardholders: See your credit card agreement terms. Subject to credit approval.
The estimated required monthly payment shown which excludes taxes and delivery equals the amount financed divided by the number of months in the promo period, rounded up to the next cent. During the last month(s) of the promo period the required monthly payment may be reduced due to this rounding. These payments apply only with the financing offer shown. If you make these payments by the due date each month, you should pay off this amount financed within the promo period, if it is the only balance you are paying off. If you have other balances on your account, this payment will be added to any other minimum monthly payments.
Applies only to select items from this manufacturer. Ask your Sweetwater Sales Engineer for more details.