

Elektron Digitakt II Quickstart Guide
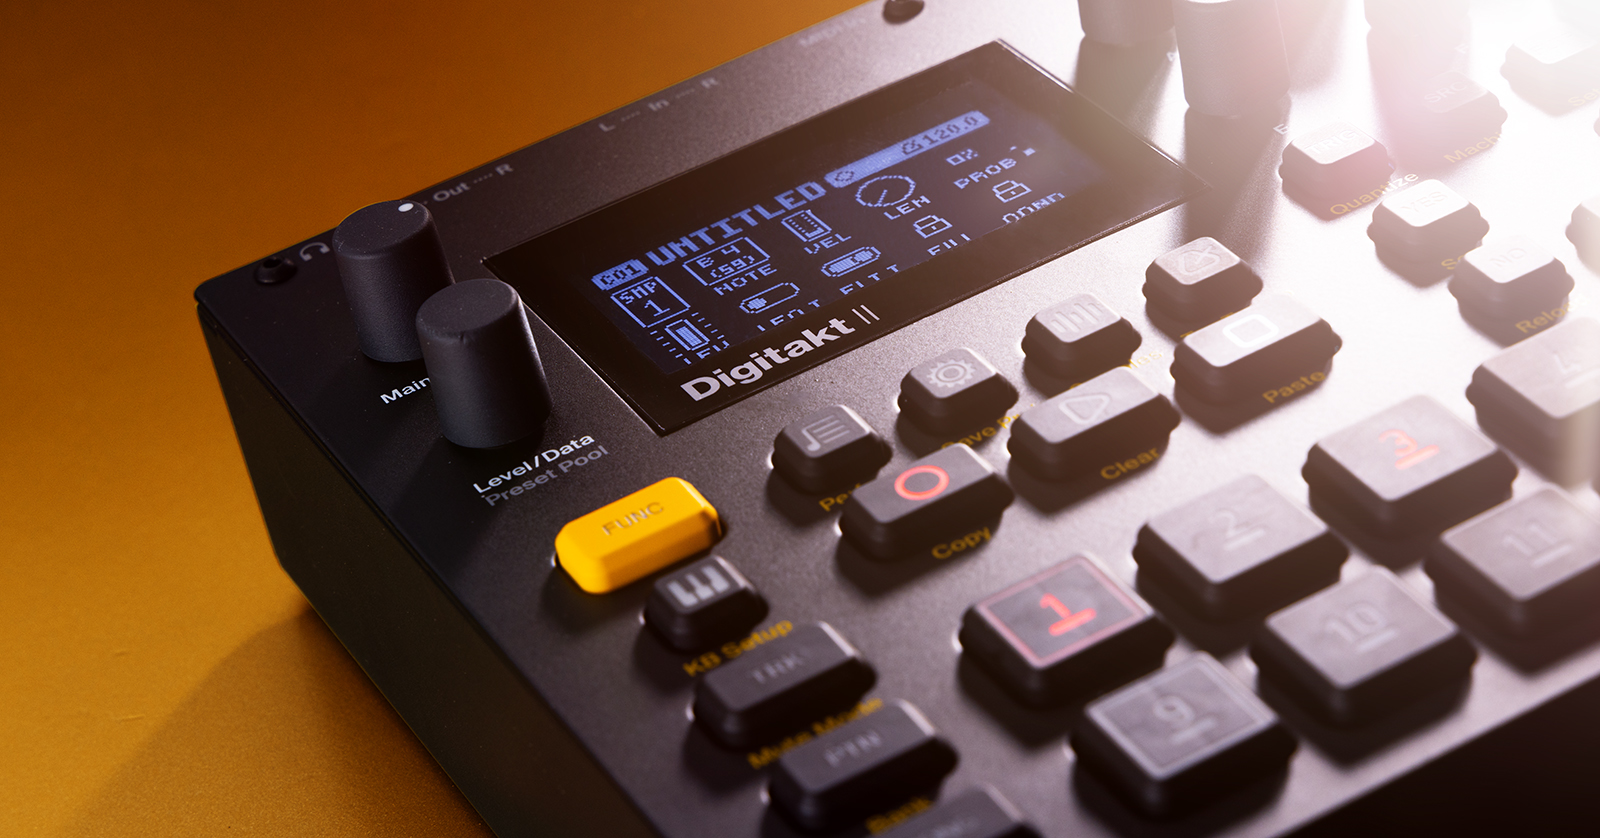
The Elektron Digitakt II is the perfect sampler to have in the studio and onstage, so in this guide, we will show you how to set up, navigate, and use the Digitakt II for the first time. This article only scratches the surface, so be sure to refer to the User Manual for more information. Follow the sections below to get started!
- Digitakt II Connections and Navigation
- Working with the Digitakt II
- Load Samples on the Elektron Digitakt II
Elektron Digitakt II Connections and Navigation
NOTE: Make sure all your gear is turned off when you make your connections!
Before we get connected, let’s navigate the unit to get familiar with the controls. We’ll also provide some tips to get you up and running fast.
Front Panel
TIP: Any buttons with orange text beneath them have a secondary function. You can access these by holding the orange FUNC button.
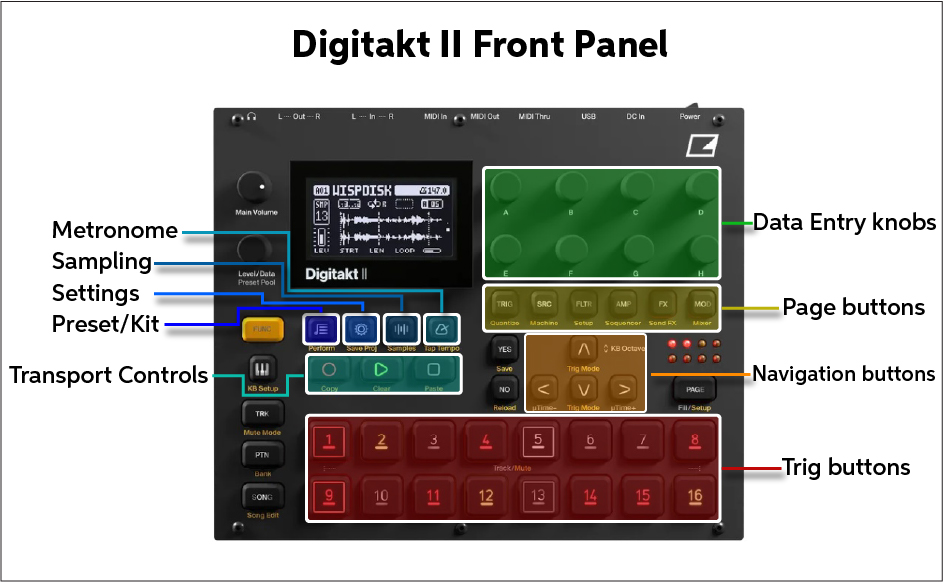
Transport Controls
These buttons allow you to record, play, and stop patterns and songs.
- If you press the Record button, you will enter Step Sequencer mode, where you can manually add notes. This is particularly useful for drums that need to stay on beat.
- If you hold Record and press the Play button, you can live record. By default, the Digitakt II will be in Unquantized mode. If you hold Record and press Play twice, it will enter Quantized mode, meaning it will automatically quantize your live recording to the closest beat. This is great when you want to record unique keyboard or drum patterns.
- If you have a lengthy sample and press the Stop button, the pattern won’t stop. Double-press the Stop button to completely stop playback, including any lengthy sample.
Data Entry Knobs
The data entry knobs (A–H) are used for changing various parameters. The parameters correspond with the parameters you see on the display.
Page
The Page buttons (beneath the parameter knobs) allow you to access the associated pages assigned to each button (FLTR will take you to the Filter page, FX will take you to the Effects page, etc.).
- If you see dots on the right of the display, this means there are submenus. Use the up and down arrows to navigate through the submenus.
Other Buttons
Most buttons are grouped together, but there are others which have specific functions.
- The Gear button opens the Settings menu.
- The Music note button opens the Preset/Kit menu.
- The Wave button opens the Sampling menu.
- The Metronome button opens the Tempo menu.
Trig Buttons
The buttons labeled 1–16 are used to play samples and to enter or remove sequencer steps.
Rear Panel
There are plenty of connections on the Digitakt II that allow you to expand your setup and use external gear.
USB
The USB connection is straightforward. Connect the Digitakt II to your computer for MIDI control and audio streaming and sampling. The Digitakt II is class-compliant, which means no additional driver software is necessary.
- Change the USB MIDI and Audio settings by pressing the Gear icon, then use the data entry knob to highlight System. Next, press the knob, select USB CFG,and switch between USB MIDI and USB AUDIO/MIDI.
- USB MIDI will only send and receive MIDI over USB.
- USB AUDIO/MIDI sets the Digitakt II to send and receive both audio and MIDI over USB.
- If you want to record an audio sample over USB, press the Sound Wave button (right of the Gear) to enter Recorder mode. Play audio from your computer, then press the Yes button to begin recording the sample.
- You can record up to 66 seconds of audio for each sample.
MIDI
There are three standard 5-pin MIDI connections that you can use to connect external MIDI instruments. Connecting to the MIDI THRU port will duplicate MIDI data coming through the MIDI IN port, so it can be used for chaining devices together.
Audio I/O
The Audio I/O is straightforward. Connect a 1/4-inch TRS, a phone plug, or a 1/4-inch mono phone cable from the OUT L/R to speakers or a mixer. Connect cables to the IN L/R to input external audio for sampling or audio processing.
Working with the Digitakt II
Now that you’ve learned how to navigate and connect your Digitakt II, it’s time to get started! This article will teach you the basics of how to get up and running, but make sure to check out the User Manual for further details!
Creating a New Project
NOTE: Whenever you see a bar on the right side of the display, it means there’s an action menu that can be expanded.
- Press the Gear button, use the up and down arrows or the Level/Data knob to highlight Projects, and press the Yes button.
- Choose Manage Projects and highlight an empty project. Use the right arrow button, choose INIT PROJECT, and press Yes.
- Once you see NEW PROJECT, press the right arrow button, highlight RENAME,and press the Yes button. You can then use the on-screen button combinations to enter the project name. Once that’s complete, press Yes.
- If you press the Gear icon while in the Project Name menu, a random name will be generated.
- Highlight the newly named project, press the right arrow button, highlight and select Load From, then press Yes. Press Yes or No to save the currently loaded project, then press No until you’re back at the main project screen.
- It’s always good practice to save any work on your current project before choosing a new project!
Create a Sequence
TIP: Press the Metronome button and use the A data entry knob to change the project tempo. Use the F data knob to change the project’s time signature.
You can create a sequence one of two ways: step-by-step or live. Step recording is a great way to lay down a simple beat. This is preferred for drum patterns.
Step Recording
- Choose the sound you wish to record by pressing its corresponding button (1–16).
- Press the Rec button to enter Rec Edit mode and enter the pattern. You can press Play to preview.
- Press the Rec button to exit out of Rec Edit mode and return to playback mode.
- Select the next sample you want to record (1–16). Follow the second and third steps above.
Live Recording
Preroll is disabled by default. This means as soon as you press the Rec and Play buttons, the Digitakt II will begin recording. To enable preroll, press the Metronome button, then use the G data entry knob to change the number of bars before recording begins.
- Choose the sound you wish to record by pressing its corresponding button (1–16).
- Press the Rec and Play buttons to begin recording, then start performing.
- The Rec button will flash, which indicates it is actively recording.
- Press and hold the Rec button and press the Play button twice to enter Quantized Recording.
- Press the Stop button to stop recording.
Load Samples on the Elektron Digitakt II
- Press the Trig button where you want to assign a sample, then press SRC.
- Use the D data entry knob to scroll through the samples. Press the Trig button to preview the sample.
- Use the Level/Data knob, scroll to an empty slot, and press Yes.
- Navigate through the folders to find the sample you wish to load. You can preview the sample by holding the FUNC and Yes buttons.
- After you’ve found the sample you want, press Yes.
Digitakt II – At A Glance
Related Articles
When you need help, Sweetwater has the answers!
Our knowledge base contains over 28,000 expertly written tech articles that will give you answers and help you get the most out of your gear. Our pro musicians and gear experts update content daily to keep you informed and on your way. Best of all, it’s totally FREE, and it’s just another reason that you get more at Sweetwater.com.


Offer applies only to single-receipt qualifying purchases. Select manufacturers may require that only the manufacturer’s products qualify towards the minimum purchase amount needed to be eligible for promotional financing. Otherwise, an invoice that meets the minimum purchase amount and contains at least one qualifying manufacturer product is eligible for promotional financing. No interest will be charged on promo purchase balance, and equal monthly payments are required on promo purchase until it is paid in full. The payments equal the amount financed divided by the number of months in the promo period, rounded up to the next whole dollar. These payments may be higher than the payments that would be required if this purchase was a non-promo purchase. During the last month(s) of the promo period the required monthly payment may be reduced due to the prior months’ rounding. Regular account terms apply to non-promo purchases. New Accounts as of 07/31/2025: Purchase APR is 34.99%. Penalty APR is 39.99%. Min Interest Charge is $2. Existing cardholders: See your credit card agreement terms. Subject to credit approval.
Offer applies only to single-receipt qualifying purchases. No interest will be charged on the promo balance if you pay it off, in full, within the promo period. If you do not, interest will be charged on the promo balance from the purchase date. The required minimum monthly payments may or may not pay off the promo balance before the end of the promo period, depending on purchase amount, promo length and payment allocation. Regular account terms apply to non-promo purchases and, after promo period ends, to the promo balance. New Accounts as of 07/31/2025: Purchase APR is 34.99%. Penalty APR is 39.99%. Min Interest Charge is $2. Existing cardholders: See your credit card agreement terms. Subject to credit approval.
The estimated required monthly payment shown which excludes taxes and delivery equals the amount financed divided by the number of months in the promo period, rounded up to the next cent. During the last month(s) of the promo period the required monthly payment may be reduced due to this rounding. These payments apply only with the financing offer shown. If you make these payments by the due date each month, you should pay off this amount financed within the promo period, if it is the only balance you are paying off. If you have other balances on your account, this payment will be added to any other minimum monthly payments.
Applies only to select items from this manufacturer. Ask your Sweetwater Sales Engineer for more details.