
Cello Quickstart Guide
Congratulations on buying a cello from Sweetwater. From concert halls to cinematic soundtracks, the cello is one of the most versatile instruments. This cornerstone of the string section adds depth and beauty to everything from the string quartet to the orchestra, from video game and film soundtracks to symphonic pop and heavy metal. The cello anchors bass lines and enriches melodies with its resonant low register, rich vocal bowed tone, and vibrant pizzicato.
TIP: In all things regarding your new cello, ask your private teacher or school orchestra director. As they teach you how to play the instrument, they will be able to answer your questions and give you advice about care and maintenance.
- Parts of a Cello
- Getting Started with your Cello
- Using a Cello Bow
- How to Hold a Cello and Use Proper Playing Technique
- Let’s Play Some Notes!
- Putting Your Cello Away
Parts of a Cello

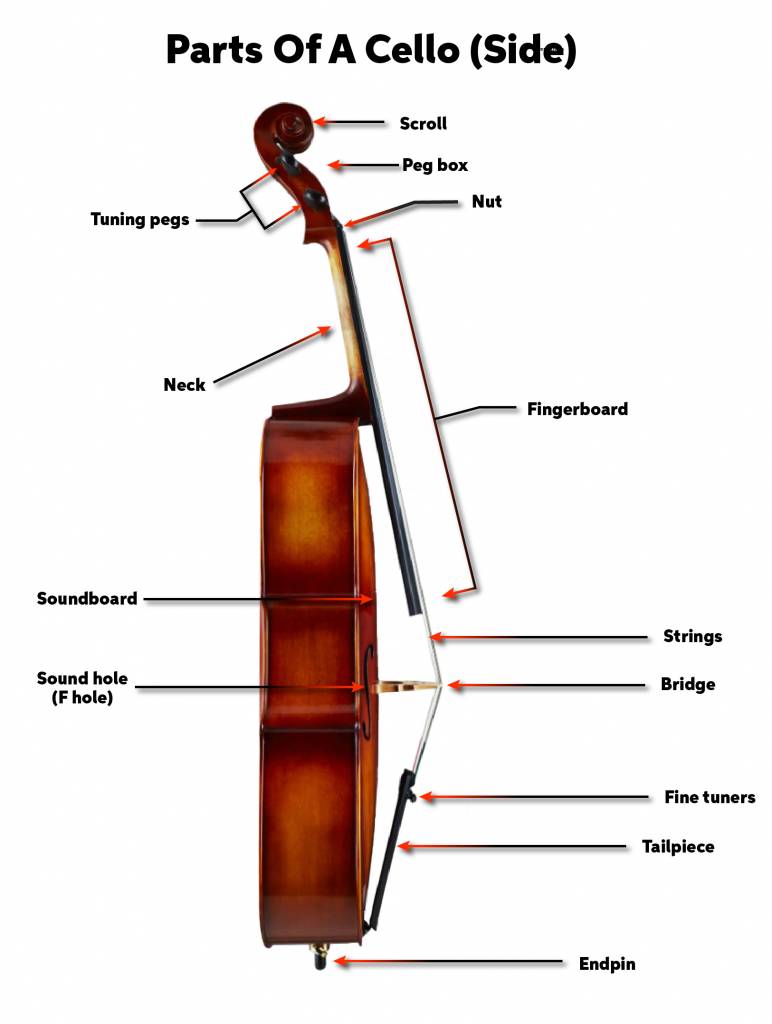

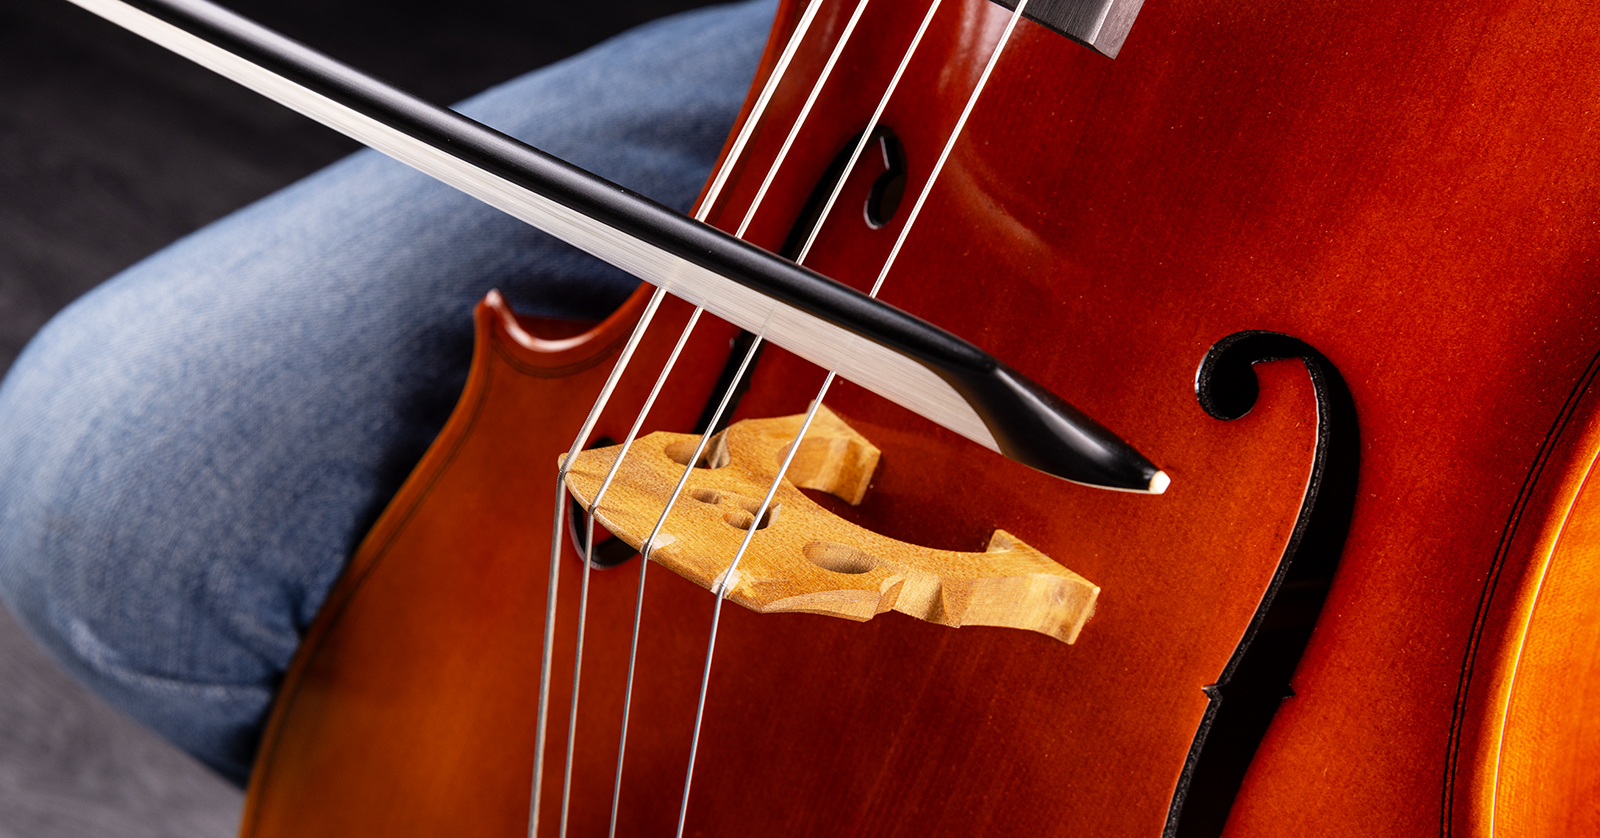
The sound of your cello starts with the four strings, tuned C2, G2, D3, and A3. The strings sound when they are excited by the bow. You produce different pitches by stopping the strings with your fingertips on the fingerboard. The strings are anchored in the tailpiece at the bottom, and pass over the bridge. They pass over the nut and are wrapped around the tuning pegs in the pegbox. The carved wood at the top of the pegbox is called the scroll. The strings are tuned by turning the tuning pegs at the top, and the fine tuners attached to the tailpiece.
The bow is a stick of curved wood (or carbon fiber) that supports a length of horsehair (or a synthetic substitute) under tension between its point and its frog. The tension on the hair is regulated by the screw mechanism below the frog. To use the bow, you need to coat the hair with rosin to create friction so the hair can excite the strings. Rosin is processed, hardened pine tree sap.
You hold the bow in your right hand and bow its hair across the strings. The friction of the bow hair causes the strings to vibrate, producing the notes.
The strings, excited by the bow, transmit energy through the bridge and cause the carved spruce soundboard of the cello to resonate. On either side of the bridge are the f-holes, which allow air to move in and out of the instrument as it vibrates.
Inside the body of the cello is a piece of wood called the sound post. It is positioned just below the bridge and connects the carved spruce soundboard of the instrument to the carved maple wood back, transmitting the vibrations throughout the body.
Retracted into the body of the cello is the metal endpin. When you take the cello out of its case, you extend the endpin, lock it into place, and set it on the floor to help you hold the instrument in the playing position between your knees.
Getting Started with your Cello
A cello, and its bow, are sensitive to changes in temperature and humidity. When your cello got shipped to you, it probably passed through several changes in temperature and humidity along the way. If you just received a new cello, bring it inside, open the box, and inspect it to make sure everything is intact. But it’s best to close the case back up and wait a full day, perhaps two, to permit your cello to acclimate to the temperature and humidity in your house. Then you can take it out.
Setting the endpin
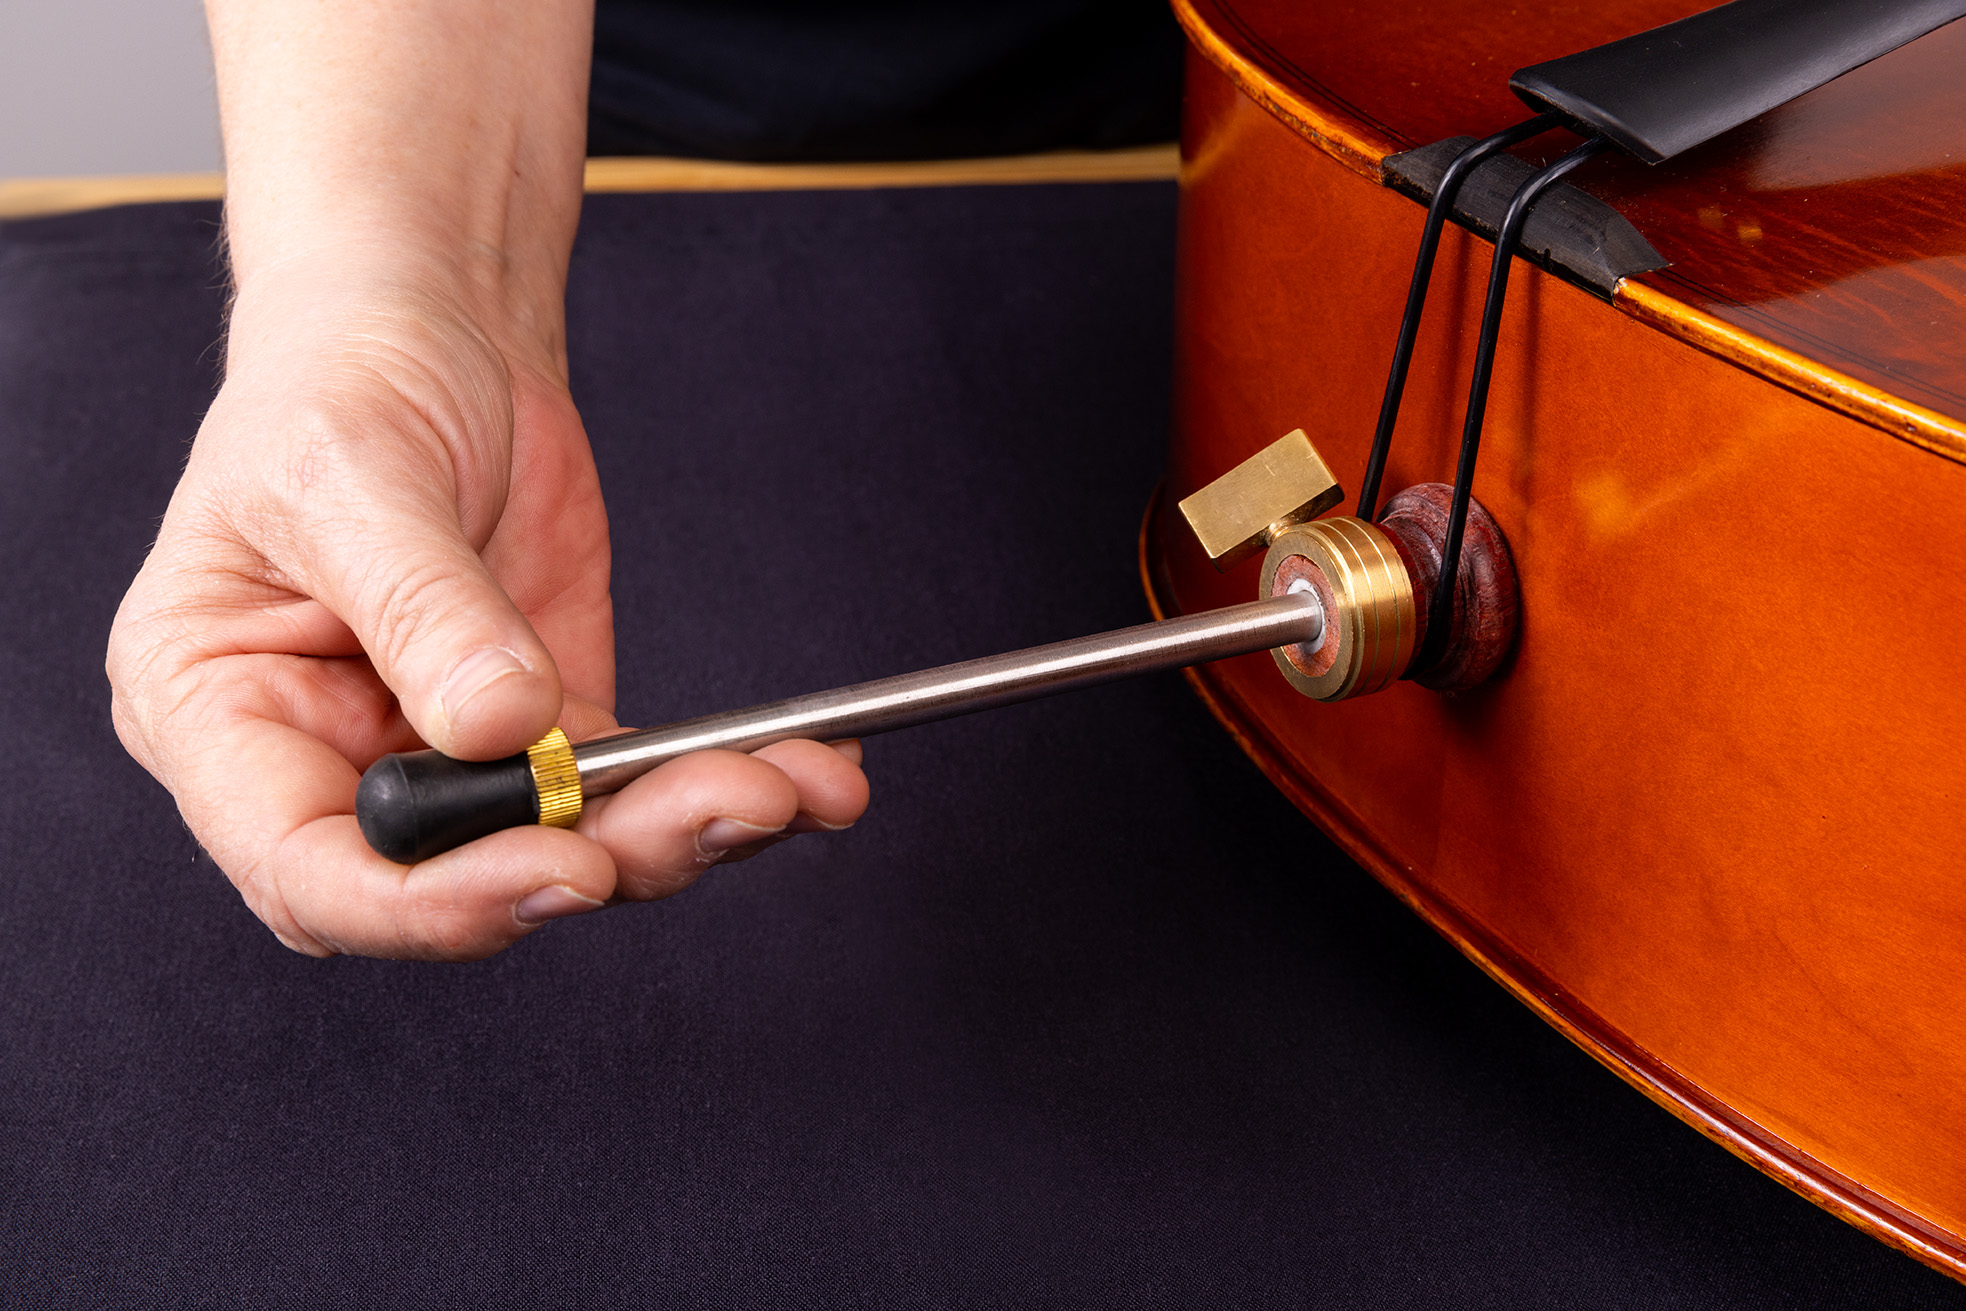
While sitting on your chair, place your cello face-up on your knees. At the base of the cello, grasp the set screw that holds the endpin in place and loosen the screw. Extend the endpin to about the length of your forearm, then tighten the set screw so that the endpin will not retract.
Now raise the cello to the playing position between your knees. The tuning peg on the lowest string should be near your left ear, and the back of the cello should rest against your chest. You may need to adjust the length of the endpin until you find the right height for you.
Tuning your cello
IMPORTANT: If you have just bought your first cello, whether you are an adult or a child, the professional string luthiers at Sweetwater recommend that you do not try to tune the instrument yourself. If you have not been taught how to do this, you can actually damage the cello. Take your new cello to your teacher or orchestra director and ask them to tune it for the first time. Follow your teacher’s advice, as learning how to tune the instrument goes hand in hand with learning how to play it.
Like every stringed instrument, a cello needs to be tuned every time it is played.
Tuning takes place at two locations: at the tuning peg in the pegbox, and at the tailpiece, using the fine tuner knob.
IMPORTANT: Do not adjust the tuning pegs yourself. Let your teacher do this for you. It is a skill you will need to be taught.
After your teacher adjusts the tuning pegs for you, between lessons you can use the fine tuners to make small adjustments.
Get an electronic tuner for cello
An electronic tuner senses the pitch of a string when you pluck it and displays whether the pitch is sharp, flat, or in tune. There are a number of tuner apps for your phone that use the phone’s microphone. These work best in a quiet room where your cello is the only sound.
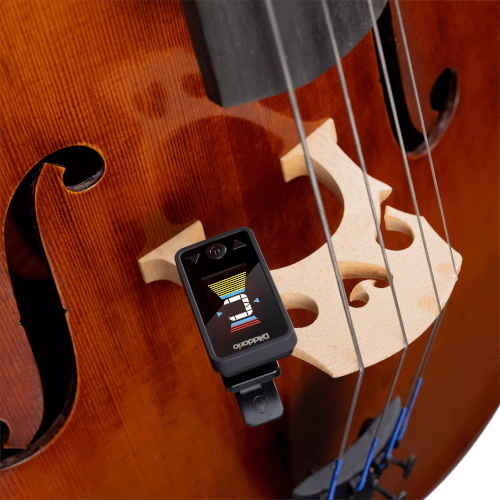
A better choice is an electronic tuner that clips to the bridge of your cello and senses the string vibrations directly. This will work in a noisy room, such as when you are with other musicians.
Fine-tuning
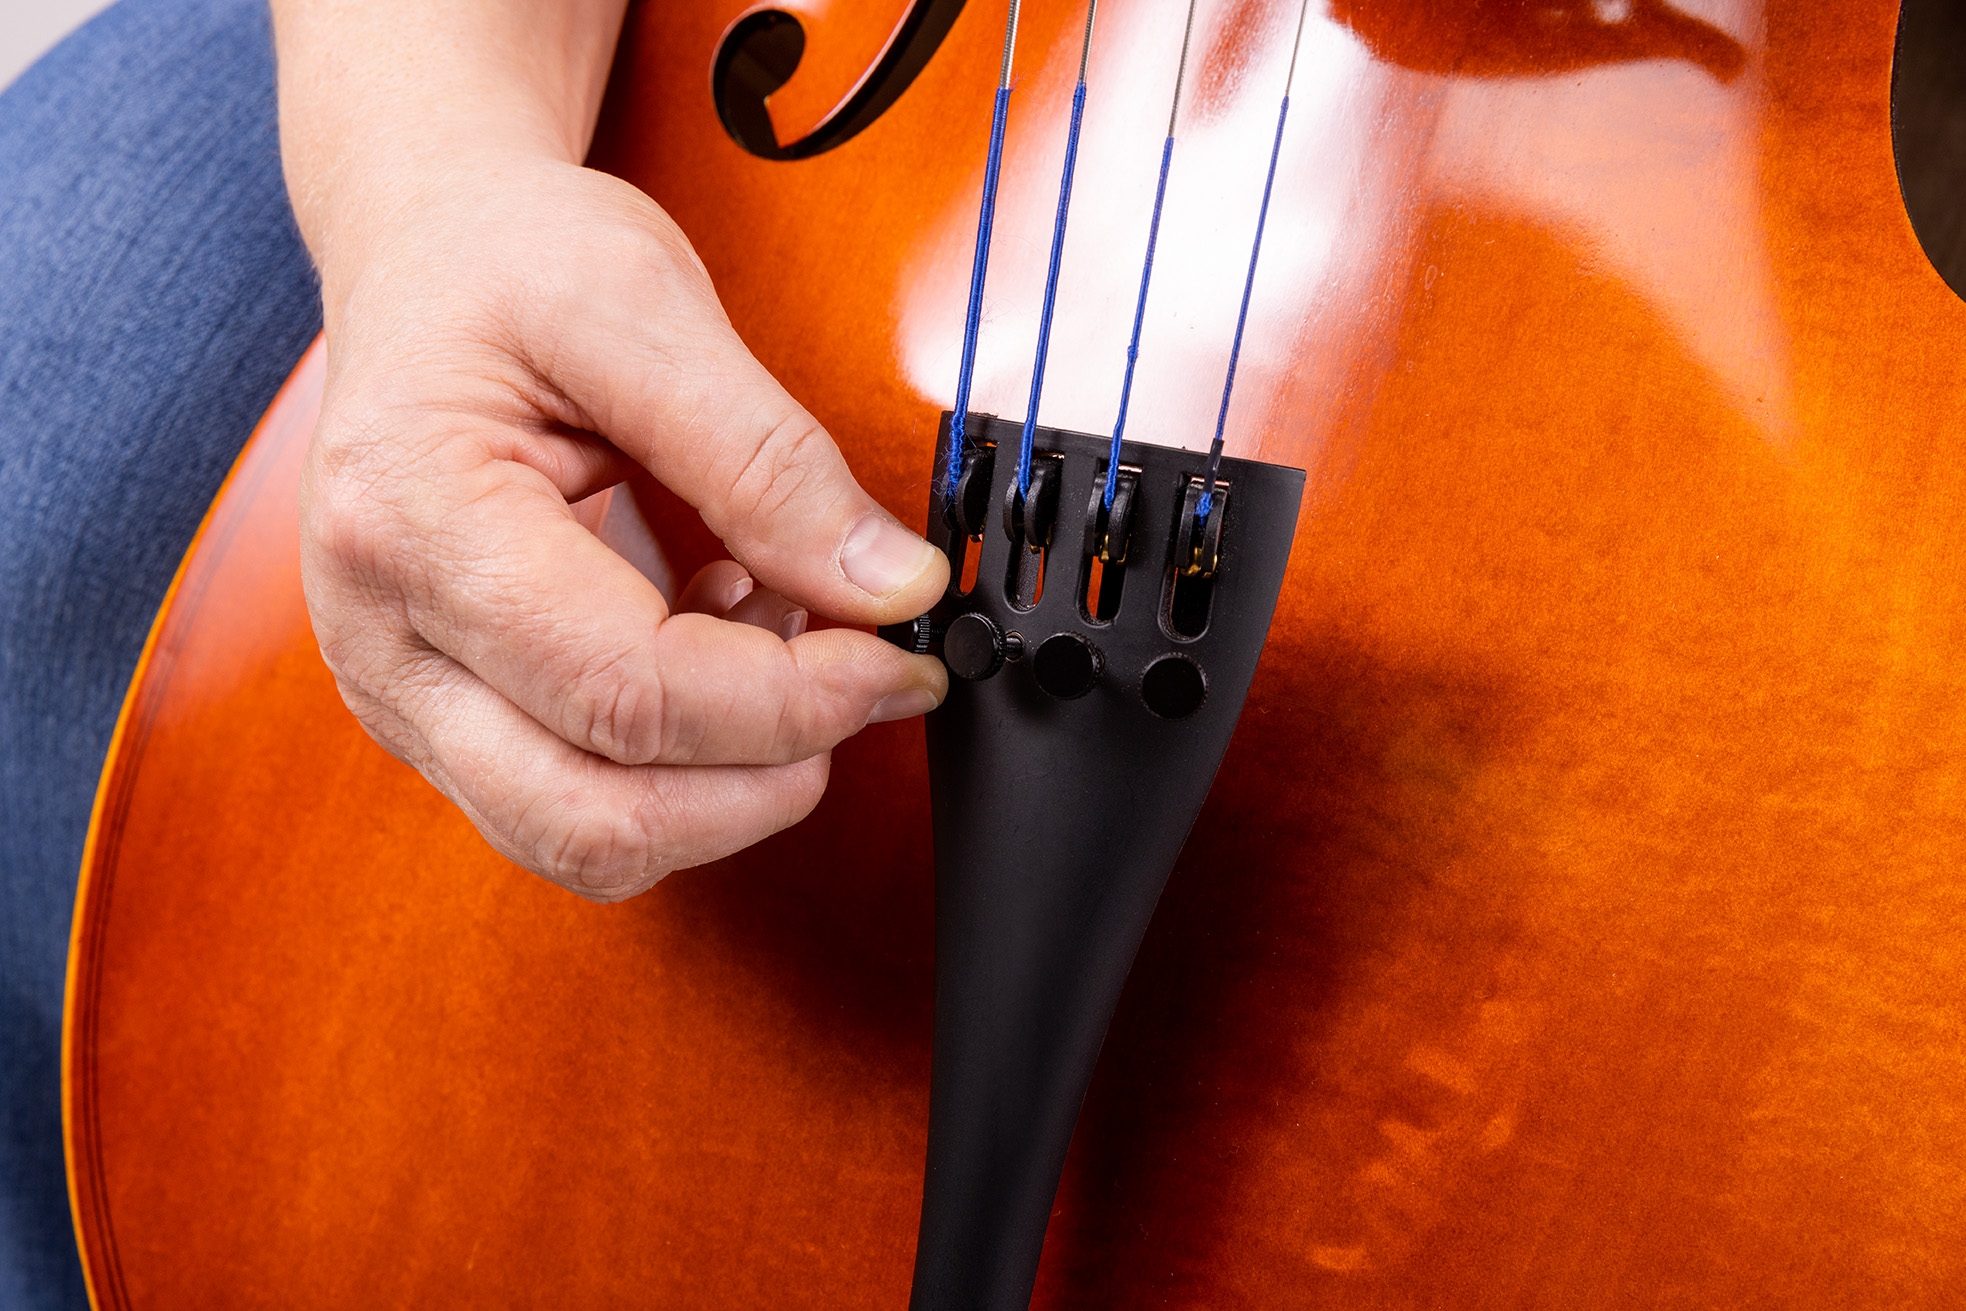
Attach your electronic tuner to your cello’s bridge, positioned so you can see its display screen. Let’s start with the “D” string. Pluck the string with a finger on your left hand and watch the screen on the tuner to see if the pitch is sharp or flat. With your right hand, reach down to the fine tuner on the tailpiece, making sure it’s the correct one, and carefully adjust the knob. Turning it clockwise raises the pitch, and turning it counterclockwise lowers the pitch. Pluck the string again and watch the display screen on the electronic tuner. Repeat until the display indicates that the string is in tune.
TIP: Intermediate and professional cellos do not come with a fine tuner on all four strings. For those strings, you have to use the tuning peg alone. You can ask a local repair shop about installing additional fine tuners if you decide that you need them.
And repeat for each string
Repeat the process for the other three strings.
Using a Cello Bow
Your bow comes to you with the hair loosened. Before you play the cello, you need to tighten the hair to playing tension. When you are done playing, you need to loosen the hair again before stowing the bow in its case. This is to protect both the stick and the hair.
The first time you play a bow with new hair, you need to apply rosin to the hair to make the hair sticky. Without rosin on the hair, your cello strings simply won’t make any sound.
How to tighten and loosen the hair on your cello bow
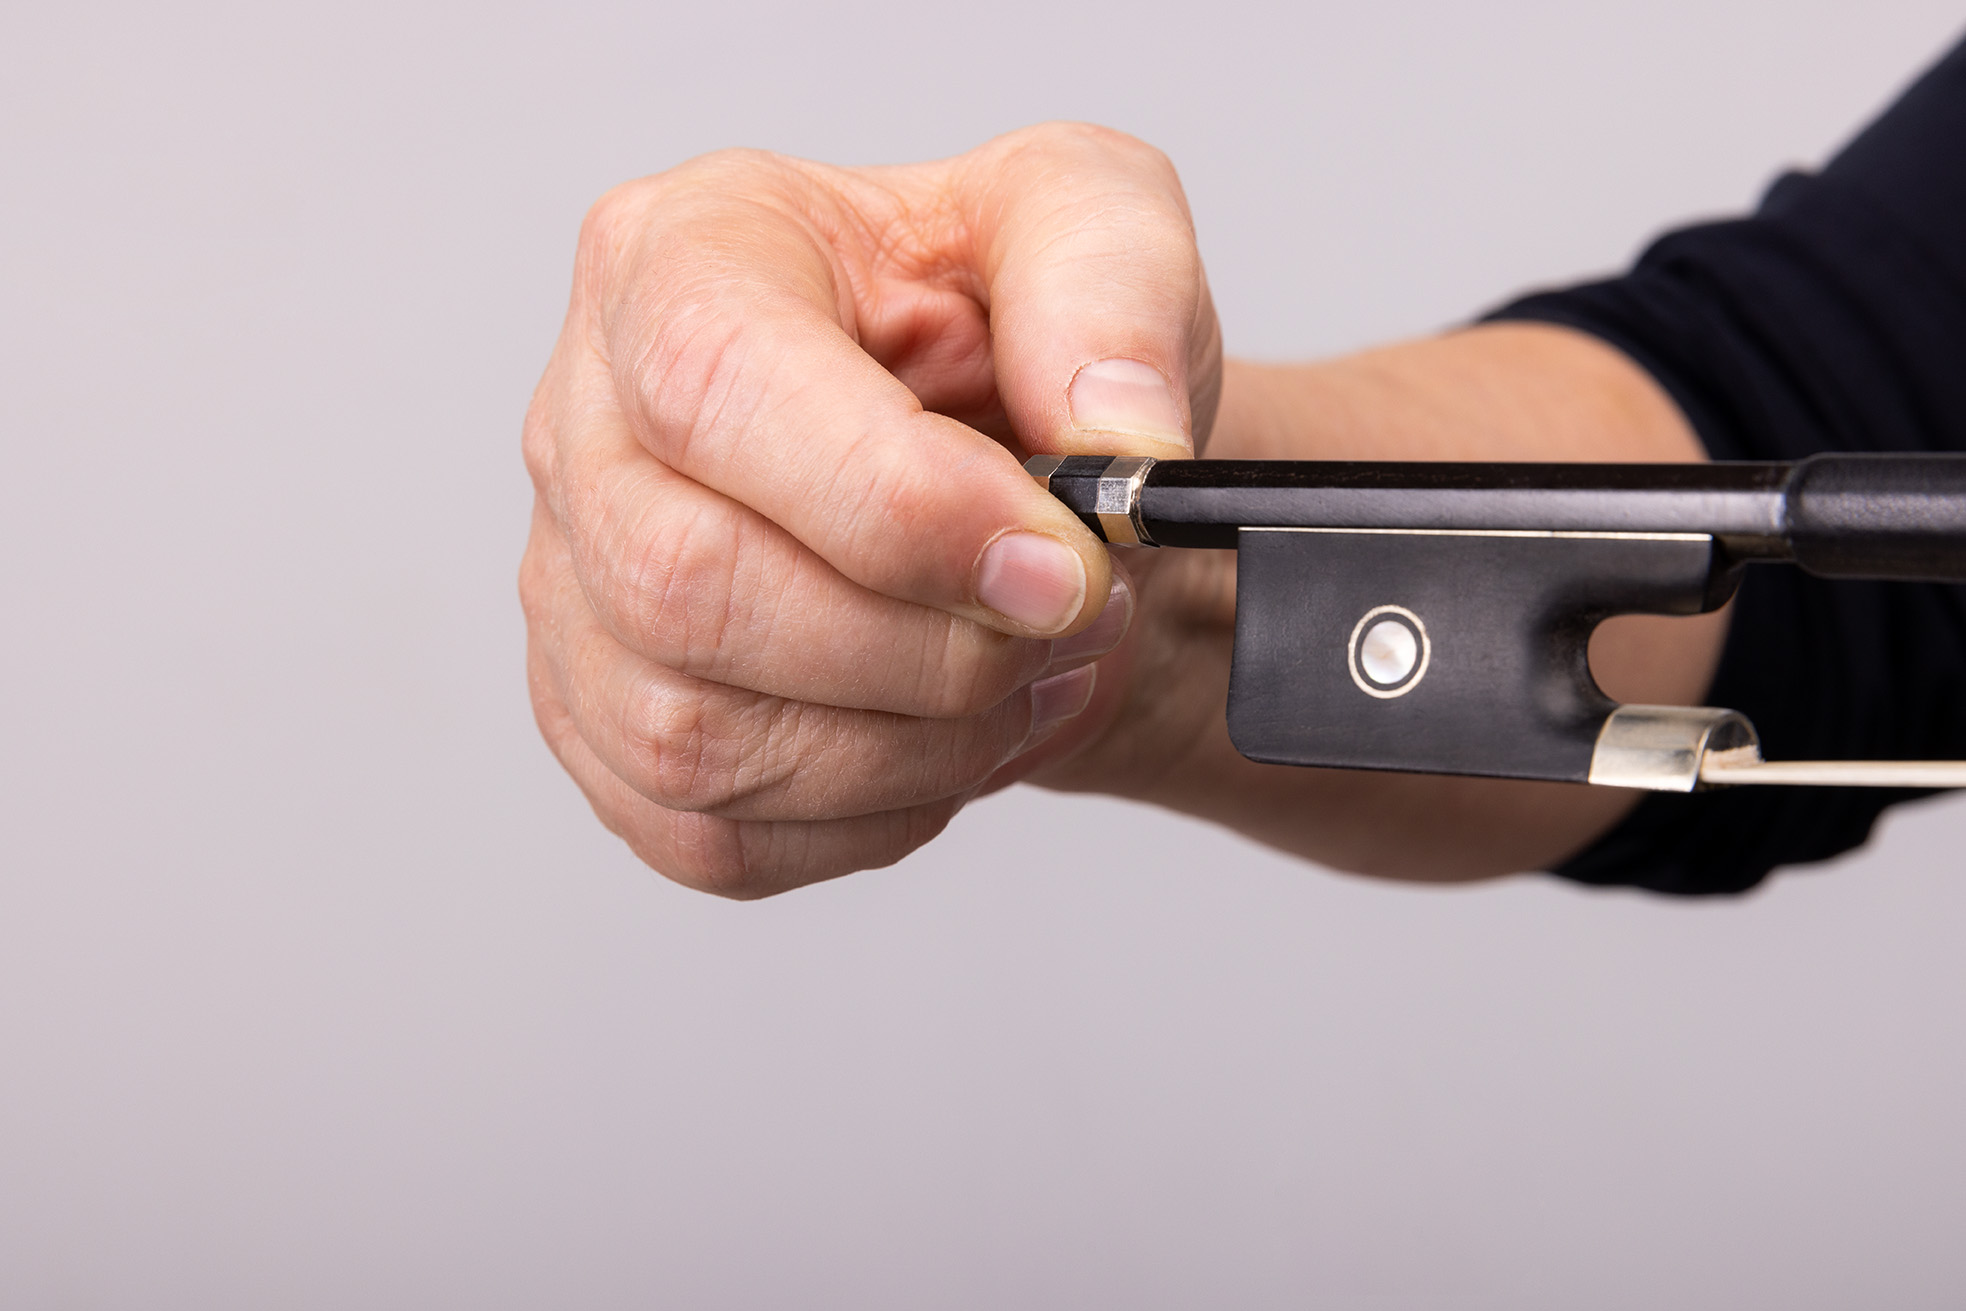
To tighten the hair, turn the screw counterclockwise. Tighten it just enough to leave a slight inward curvature in the stick. If the stick is straight, this is too much tension.
How to apply rosin to your cello bow
TIP: When your bow hair is new, you need to spend 10 to 15 minutes coating it with rosin before you can use the bow to play your cello.
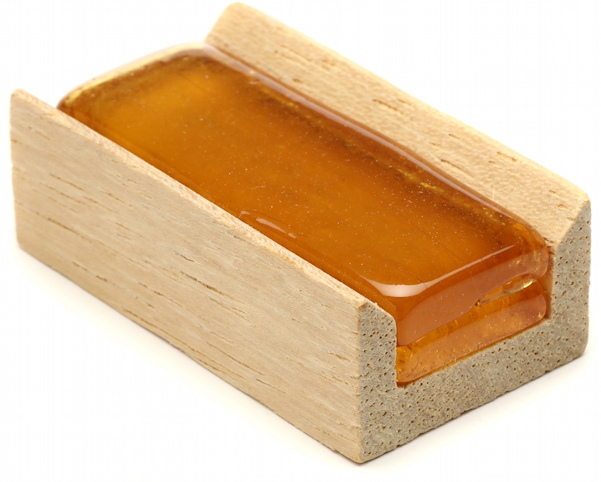
A small cake of rosin came with your cello and is inside the case. You can use this rosin to get started. It would be a good idea to buy another cake of better-quality rosin and keep it on hand, however. There are different types and formulas of rosin. Ask your teacher to help you select something suitable.
Make sure your bow has been tightened to playing tension.
Wash your hands so you don’t get your rosin dirty.
The rosin cake needs to be primed by roughening its surface so that the rosin will transfer to the hair. Scuff it with fine-grained sandpaper.

Applying rosin to the hair, from the frog to the tip
Hold your bow by the frog in one hand. Take the rosin cake in the other hand and draw the bow across the rosin cake from the frog to the tip, back and forth. For brand-new bow hair, you will need to spend 10 to 15 minutes stroking the rosin cake across the hairs to apply enough rosin. Do this gently, because the new hair has not settled in. Make sure the entire length of the hair is coated with rosin. Test it by bowing a string (see below). You will know that you have enough rosin when you can feel the hair grip the string, and it makes a clear, resonant sound at all positions along the hair. If it does not, apply more rosin.
When you are done applying the rosin, wash your hands to remove the rosin dust.
In the future you only need to apply a little rosin to the hair whenever you notice that the bow is not producing clear notes.
How to Hold a Cello and Use Proper Playing Technique

All musicians, and singers too, need to learn correct posture, in order to play without stress and strain, and to make playing more enjoyable.
Your chair is important
Because you play the cello seated, finding a chair of the correct height is important. You need a chair with no arms and a firm seat. The seat needs to be at a height where you can sit with both feet flat on the floor and with your hips at the same height with, or slightly higher than, your knees. Sit on the front part of the seat, with your back straight and tall. Don’t lean against the chair’s back.
Good posture means stress-free playing
Musicians are taught: while you sit up tall, pretend like you are a marionette with a string attached to the top of your head, and the puppet master is gently pulling the string to lift your head up. Keep your head erect and your neck free from tension. As you play your cello, you can look down with your eyes, but don’t bend your head down. If you lean your head forward and slump down, you will give yourself pain in the neck and the back.
Place your cello between your knees
Spread your knees and bring your cello to the playing position. The cello’s top should rest against your chest. Whether you are right-handed or left-handed, the neck should be to the left of your head, and the left-side tuning pegs should be at the level of your left ear. The lower bouts of the cello should fit below your knees. If the height of the cello isn’t right, adjust the length of the endpin. You do not need to grip the cello with your legs. Just balance the cello between your knees while the endpin takes the weight.
Let’s Play Some Notes!
There are two ways to play the strings. We have already mentioned bowing; the other way is to pluck the string with a fingertip on your right hand. This is call pizzicato, which is Italian for “plucked.” To get started, let’s put the bow down and pluck some notes.
You pluck with your finger about halfway along the length of the string. Don’t pluck down near the bridge, because that’s where you bow, and after you bow for a while, the strings will be sticky with rosin down there.
Pluck the open strings
The lowest string on your cello, the one on the right, is the C string. Place your right-hand thumb on the edge of the fingerboard and pluck the string with a side-to-side motion of your index finger so that the string moves parallel to the top of the cello. Don’t snap the string upward. Now pluck the next string over, producing the note G. The next string is D, and the highest string is A. Listen to each note resonate.
Congratulations: you are playing the cello!
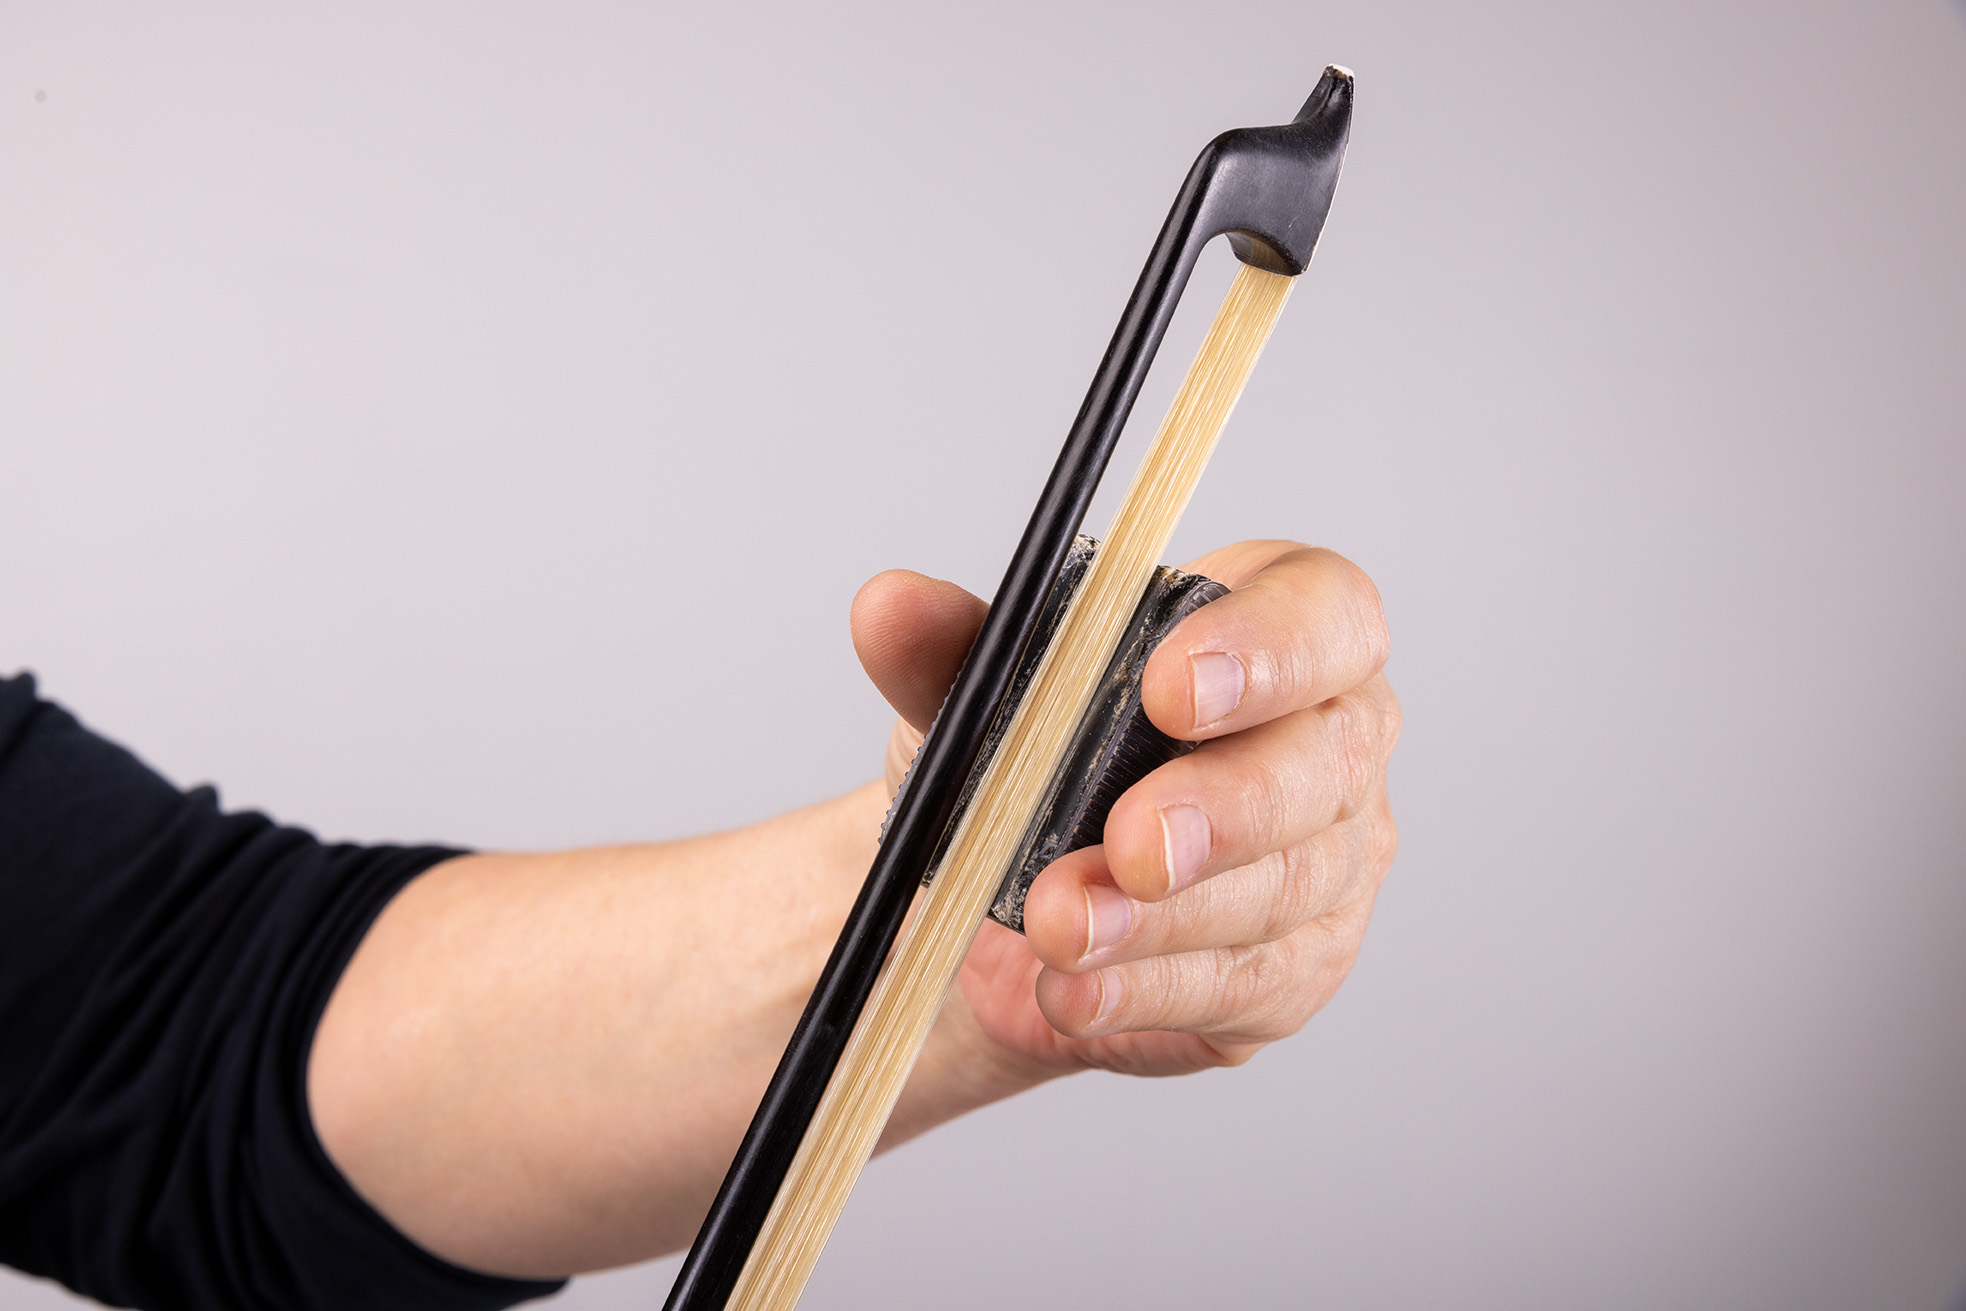
How to hold the bow
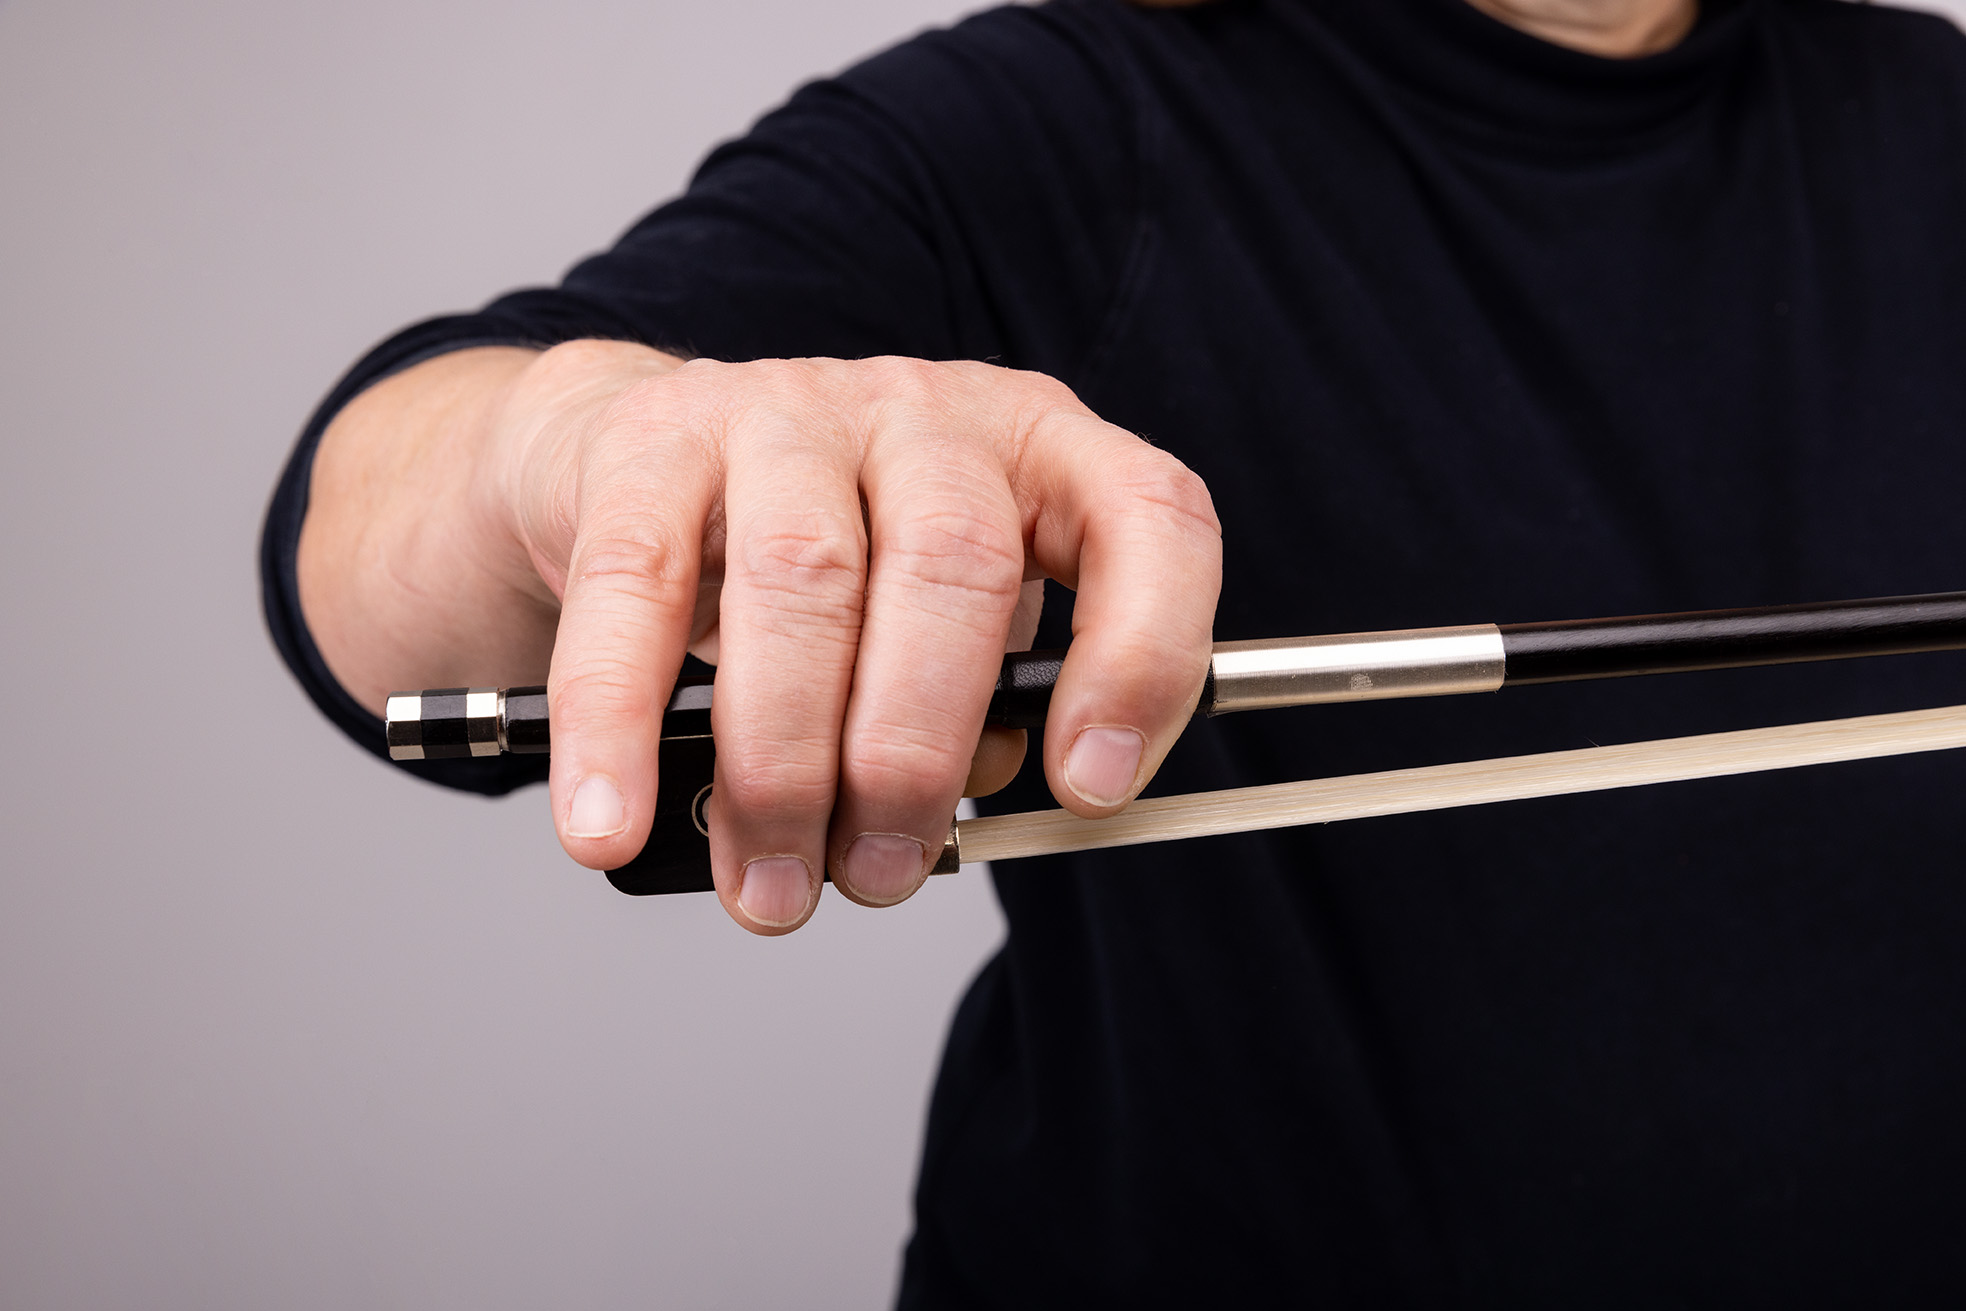

Whether you are right- or left-handed, you hold the bow with your right hand. The stick goes up, and the hair goes down; you draw the hair across the cello’s strings at a right angle to produce the sound.
Hold the bow with your hand above the frog. Place your index finger and thumb on the leather grip, with your first three fingers wrapped around the front.
Bowing the strings
Choose an open string to play. Place the bow hair against one of the strings, positioned between the end of the fingerboard and the bridge. Start with the bow against the string near the frog. Gently draw the bow outward, with a pulling action. When you hold the bow at a certain angle, you will play one string, but if you adjust the angle a little, you can bow two strings at once.
When you draw the bow outward, it is called a down-bow. When you gently push the bow in the opposite direction, it is an up-bow.
If you don’t hear any sound from the string, you need to apply more rosin to your bow hair.
Using your left hand to finger more notes
You have heard the notes of the four open strings. You produce all the other notes by using a fingertip on your left hand to press a string against the fingerboard at a certain position, while you pluck or bow the string with your right hand.
Your teacher will teach you how to use your fingers to play different notes, melodies, and scales. Your teacher may begin by having you play pizzicato. Eventually you will work on bowing the notes as well.
So how do you locate the different notes on the fingerboard? You learn by practicing and using your ear. You will come to appreciate that there are wonderful sounds and musical expressions unique to the cello, violin, viola, and upright bass that can’t be played on other kinds of instruments.
A word about fingers, fingernails, fingertips, and calluses
As with playing all string instruments, you need to file down the fingernails on your left hand, so that only the fleshy fingertips touch the strings.
When you begin to play, your fingers will not be accustomed to pressing down on the strings. As you learn to play, you may even experience a little pain in your fingertips. Don’t be discouraged; this is normal. With consistent moderate practice, your fingertips, initially soft, will develop a thicker layer of skin, called a callus, which protects your fingertips and makes playing comfortable. Your calluses develops naturally while you play.
If playing seems uncomfortable, stop for the day. Ask your teacher about using your hands, fingers, and fingertips.
Putting Your Cello Away
Every time you finish playing your cello, you should use a clean cloth to wipe off the rosin dust from the surface of the cello around the area where you bow. Rosin contains small amounts of turpentine which, over time, could eat through the cello’s varnish.
Remember to loosen the screw on the bow to reduce the tension on the bow hair. You should always put both the cello and the bow back in the cello’s case and close it until it’s time to play again.
Cello Care and Maintenance
Your cello is a delicate instrument that requires care to keep it in tip-top shape. Be sure to click on the link below and read our article on how to care for and maintain your cello. There are steps you need to take to prevent damage and costly repairs. We at Sweetwater trust you will enjoy playing your cello for years to come.
When you need help, Sweetwater has the answers!
Our knowledge base contains over 28,000 expertly written tech articles that will give you answers and help you get the most out of your gear. Our pro musicians and gear experts update content daily to keep you informed and on your way. Best of all, it’s totally FREE, and it’s just another reason that you get more at Sweetwater.com.


Offer applies only to single-receipt qualifying purchases. Select manufacturers may require that only the manufacturer’s products qualify towards the minimum purchase amount needed to be eligible for promotional financing. Otherwise, an invoice that meets the minimum purchase amount and contains at least one qualifying manufacturer product is eligible for promotional financing. No interest will be charged on promo purchase balance, and equal monthly payments are required on promo purchase until it is paid in full. The payments equal the amount financed divided by the number of months in the promo period, rounded up to the next whole dollar. These payments may be higher than the payments that would be required if this purchase was a non-promo purchase. During the last month(s) of the promo period the required monthly payment may be reduced due to the prior months’ rounding. Regular account terms apply to non-promo purchases. New Accounts as of 07/31/2025: Purchase APR is 34.99%. Penalty APR is 39.99%. Min Interest Charge is $2. Existing cardholders: See your credit card agreement terms. Subject to credit approval.
Offer applies only to single-receipt qualifying purchases. No interest will be charged on the promo balance if you pay it off, in full, within the promo period. If you do not, interest will be charged on the promo balance from the purchase date. The required minimum monthly payments may or may not pay off the promo balance before the end of the promo period, depending on purchase amount, promo length and payment allocation. Regular account terms apply to non-promo purchases and, after promo period ends, to the promo balance. New Accounts as of 07/31/2025: Purchase APR is 34.99%. Penalty APR is 39.99%. Min Interest Charge is $2. Existing cardholders: See your credit card agreement terms. Subject to credit approval.
The estimated required monthly payment shown which excludes taxes and delivery equals the amount financed divided by the number of months in the promo period, rounded up to the next cent. During the last month(s) of the promo period the required monthly payment may be reduced due to this rounding. These payments apply only with the financing offer shown. If you make these payments by the due date each month, you should pay off this amount financed within the promo period, if it is the only balance you are paying off. If you have other balances on your account, this payment will be added to any other minimum monthly payments.
Applies only to select items from this manufacturer. Ask your Sweetwater Sales Engineer for more details.