
Boss Katana Setup Guide
Getting started with the Boss Katana
NOTE: This article is about the original BOSS Katana and the Katana Mk II lines of amplifiers. If you have a BOSS Katana Gen 3 amp, see our BOSS Katana Gen 3: Setup Guide.
In this guide, we will show you how to use the Boss Katana for the first time. You’ll learn how to register the device, and also the different ways to set up and connect your amp. Follow the sections below to get started.
Register the Boss Katana
Before we get everything set up, the first thing you’ll need to do is register your Boss Katana amplifier using the Boss serial number. After registering the Katana amplifier, you’ll get access to Boss product support, an extended warranty, training videos and clinic information. Follow the steps below to register the Boss Katana, and then continue to setup and connections.
- Log in to your Roland Backstage account. If you don’t have one yet, you can create one here.
- On your account home page, click My Gear, and select Register a Product.
- Fill out the required information, including the serial number which is located on the back of the Katana and click Register.
- Keep your Sweetwater invoice handy, as you will need to enter the purchase date, method, and dealer (Sweetwater).
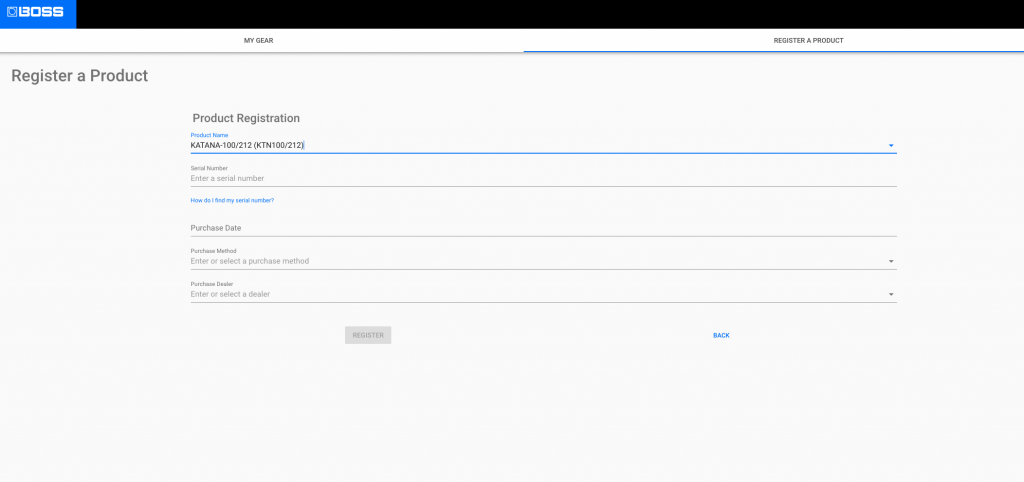
Click the image to register your Boss Katana
Setup and connections
The Boss Katana amps and head are similar to most others. Unlike their traditional counterparts, however, there are a few settings on the Boss Katana which set them apart from the rest. We’ll cover some of the Boss Katana settings and connections, as well.
Top panel

Power control
The power control settings on the Boss Katana let you control the power amp depending on where you’re playing. No matter what it’s set to, you can get the same type of high gain tone and response without needing to the output/master volume. For example, if you’re playing at a club, you might want to set it to 50 watts. You’ll get the same 50 watt tone when you’re practicing at home and set it to 0.5 watts. When the switch is set to Standby, it will mute the amp without needing to turn the unit off.
Tone Setting
The Tone Setting buttons allow you to store and recall your favorite tones on the fly. These tones could either be from the Boss Tone Central app, as well as the settings (with the exception of the master volume) on the amp itself. You can store a total of four tones on the Boss Katana-50 combo amp, and eight tones on the rest of the Katana series.
- The Panel button allows you to switch between channels. When the panel light is solid red, you can change the tones. When the panel light is blinking, you’re able to switch banks. If you’re in panel mode (solid red), you won’t be able to switch banks.
- Press and hold the Tone Channel number where you want to save your tone.
Rear panel
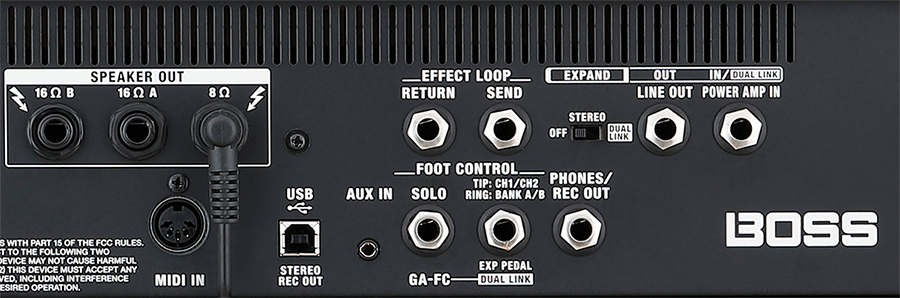
IMPORTANT: The Speaker Output of the Katana Head must be connected to a speaker cab rated for at least 8ohms.
Phones/Rec Out
This connection allows you to connect your headphones or, if your model doesn’t have a Line In connection, into an interface. It’s very useful when you’re practicing and don’t want to wake up the neighbors. When a cable is connected to this jack, it bypasses the speaker and Power Control knob.
USB
Use a USB 2.0 B to A cable to connect to your computer. Once the USB cable is connected, you can update the firmware, as well as create tones using the the Boss Tone Central app. Another feature of this amp is that, when a USB cable is connected, you can use it as a two-channel audio interface to record directly into your DAW, including the tone settings you’ve created on the amp.
- The Katana series are class-compliant on Windows, meaning additional driver software is necessary. However, Mac users will need to download and install the driver software first before connecting to a computer.
Aux in
You can connect an audio player or mobile device using a standard ⅛” cable. This allows you to practice and play along with your favorite tracks. The Aux In will bypass the entire signal chain, giving you a clean, unimpeded sound.
Stereo Expand
(Katana heads and 100 series amps only)
The Stereo Expand feature allows you to connect two Boss Katana 100 series amplifiers together and turns your mono rig into stereo. This is a great feature to fill out your mix or the room when you use modulation effects such as reverb, chorus, or delay.
- Connect a TRS cable from the LINE OUT (Primary) of one unit to the POWER AMP IN (Secondary) of the other.
- Turn the Stereo Expand switch to ON on both amps to engage Stereo Expand.
- Besides the Master volume and Power control, all settings will be bypassed.
Power Amp In
If you have an external preamp or multi-effects pedal which already has an amplified signal and don’t need to access the built-in preamp, you can connect it to the Power Amp In. This will bypass every setting with the exception of the Master Volume and Power Control. If a cable is connected to the Power In jack as well as the Input jack on the Boss Katana, the Power In jack will be disabled.
Effects loop
(Katana heads and 100 series only)
The Effects Loop connections are great for more simple setups, or if you want to use the Katana’s preamp. While effects may be alright using the Power Amp In section, it’s often better to use the effects loop, particularly with time-based effects. Check out our article for more information on how to use an effects loop. Also, be sure to check out Boss’s video below!
MIDI Input
(Katana Head and Artist models only)
Connect the MIDI Out of an external pedal to the MIDI In of the Boss Katana to control various settings such as bank and channel switching. You can also control the level of specific effects, as well. To specify a particular MIDI channel, press and hold one of the Channel buttons then power the unit on. By default, the Katana is set to MIDI Channel 1. For detailed instructions on how to control different features and MIDI CC messages, visit the Owner’s Manual.
Expression pedals and foot controller
IMPORTANT: Latching footswitches must be used, as Momentary footswitches are incompatible.
Another great feature of the Boss Katana amplifier series is foot control. With the exception of the Katana MINI and Katana AIR, you can control almost anything on your Katana. With the exception of the Boss Katana-50 MkII there are two foot control connections available. The GA-FC, which allows you to change between channels or effects, as well as an expression pedal connection (available on all Katana amplifiers) which allows you to connect a switch controller or expression pedal (volume, wah, etc.)
- For the most consistent performance, Boss recommends the GA-FC Latching Foot Controller for the GA-FC connections. ¼-inch TRS cables are required.
- Connect an expression pedal like the Roland EV-5 to the EXP jack for volume and wah control.
- You can switch both channels and banks on the Katana-50 MkII using two FS-5L latching pedals and a 14”-inch splitter cable.
Continue to BOSS Katana: BOSS Katana Studio
When you need help, Sweetwater has the answers!
Our knowledge base contains over 28,000 expertly written tech articles that will give you answers and help you get the most out of your gear. Our pro musicians and gear experts update content daily to keep you informed and on your way. Best of all, it’s totally FREE, and it’s just another reason that you get more at Sweetwater.com.


Offer applies only to single-receipt qualifying purchases. Select manufacturers may require that only the manufacturer’s products qualify towards the minimum purchase amount needed to be eligible for promotional financing. Otherwise, an invoice that meets the minimum purchase amount and contains at least one qualifying manufacturer product is eligible for promotional financing. No interest will be charged on promo purchase balance, and equal monthly payments are required on promo purchase until it is paid in full. The payments equal the amount financed divided by the number of months in the promo period, rounded up to the next whole dollar. These payments may be higher than the payments that would be required if this purchase was a non-promo purchase. During the last month(s) of the promo period the required monthly payment may be reduced due to the prior months’ rounding. Regular account terms apply to non-promo purchases. New Accounts as of 07/31/2025: Purchase APR is 34.99%. Penalty APR is 39.99%. Min Interest Charge is $2. Existing cardholders: See your credit card agreement terms. Subject to credit approval.
Offer applies only to single-receipt qualifying purchases. No interest will be charged on the promo balance if you pay it off, in full, within the promo period. If you do not, interest will be charged on the promo balance from the purchase date. The required minimum monthly payments may or may not pay off the promo balance before the end of the promo period, depending on purchase amount, promo length and payment allocation. Regular account terms apply to non-promo purchases and, after promo period ends, to the promo balance. New Accounts as of 07/31/2025: Purchase APR is 34.99%. Penalty APR is 39.99%. Min Interest Charge is $2. Existing cardholders: See your credit card agreement terms. Subject to credit approval.
The estimated required monthly payment shown which excludes taxes and delivery equals the amount financed divided by the number of months in the promo period, rounded up to the next cent. During the last month(s) of the promo period the required monthly payment may be reduced due to this rounding. These payments apply only with the financing offer shown. If you make these payments by the due date each month, you should pay off this amount financed within the promo period, if it is the only balance you are paying off. If you have other balances on your account, this payment will be added to any other minimum monthly payments.
Applies only to select items from this manufacturer. Ask your Sweetwater Sales Engineer for more details.