
Behringer RD-6 Setup Guide
The Behringer RD-6 is a great re-creation of the classic drum machine that has been a staple in music production since 1981. This is why, in this article, we will show you how to register, set up, connect, and use the Behringer RD-6 for the first time. Follow the sections below to get started.
- Warranty Registration
- Download and install SynthTribe
- Update the RD-6 firmware
- RD-6 setup and connections
- Create a drum pattern on the RD-6
Warranty Registration
By default, Behringer gives you a 1-year warranty. However, if you register your item on the website within 90 days of purchase, Behringer gives you an additional two years on your warranty. It’s free. Follow these instructions.
How to Register Your Behringer to Get the Full Warranty
TIP: Everything you purchase from Sweetwater comes with our 2-year Total Confidence Coverage (TCC) warranty. However, three years is even better than two, so please register with Behringer today.
Download and install SynthTribe
What is SynthTribe? It’s the software that you’ll use in conjunction with the RD-6. When you connect the RD-6 to your computer and launch the app, you’ll be able to change various MIDI settings such as the default MIDI input and output channels, update the firmware, and even create sequences! Install the app by following the steps in our SweetCare Getting Started with Behringer SynthTribe guide.
Update the RD-6 firmware
The last thing you’ll want to do before getting started is to update the RD-6’s firmware. Behringer will release firmware updates periodically, including new features and bug fixes to the currently installed firmware.
- Connect the RD-6 to your computer, power it on, launch the SynthTribe app. You should see your device with a yellow Get Started button.
- If the RD-6 isn’t recognized in the Synthtribe app, disconnect and reconnect the device. If that doesn’t work, try a different cable and port.
- Click the Update tab. The SynthTribe app will scan and check which firmware version is currently installed.
- If a firmware update is necessary, follow the instructions on the screen. If you’re up to date, you can close out of the SynthTribe app.
RD-6 setup and connections
IMPORTANT: Behringer recommends that you only use the included 9V power supply. Using a third-party DC power supply may not be reliable and may cause damage to your unit.
Connections on the Behringer RD-6 are straightforward. All of the rear audio output jacks (both the VOICE OUT and MIX OUT) are all unbalanced mono connections. Because of this, you’ll need unbalanced cables.
Audio
- When a cable is connected to a VOICE OUT jack, that particular voice is removed from the MIX OUT.
- Use the VOICE OUT jacks to connect specific voices to an audio interface or a mixer.
External hardware (analog)
You can integrate your external hardware such as sequencers and synthesizers with the RD-6. You can use the 3.5mm TS Sync jacks to connect to external hardware via analog clock. Use the 3.5mm TRIGGER OUT jacks to have the L.H Tom send a pulse to trigger an external device.
MIDI
Another option to integrate your external hardware is MIDI, which can connect to a MIDI interface for DAW synchronization. To control the external gear, connect a MIDI cable from the MIDI OUT port on the RD-6 to the MIDI IN port on the external device.
If syncing with an external device, you first must change the MIDI channel on the RD-6. By default, the RD-6 transmits on MIDI Ch. 1. To change it, press the SCALE FUNCTION and PATTERN GROUP buttons, then press one of the steps to select the respective MIDI channel (e.g., Step button number 5 is also MIDI channel 5). Check out Behringer’s RD-6 MIDI Sync video below for more information!
How to MIDI Sync the RD-6 with Synths and Sequencers
Sequencer-Editor & Secret Settings on your Synth
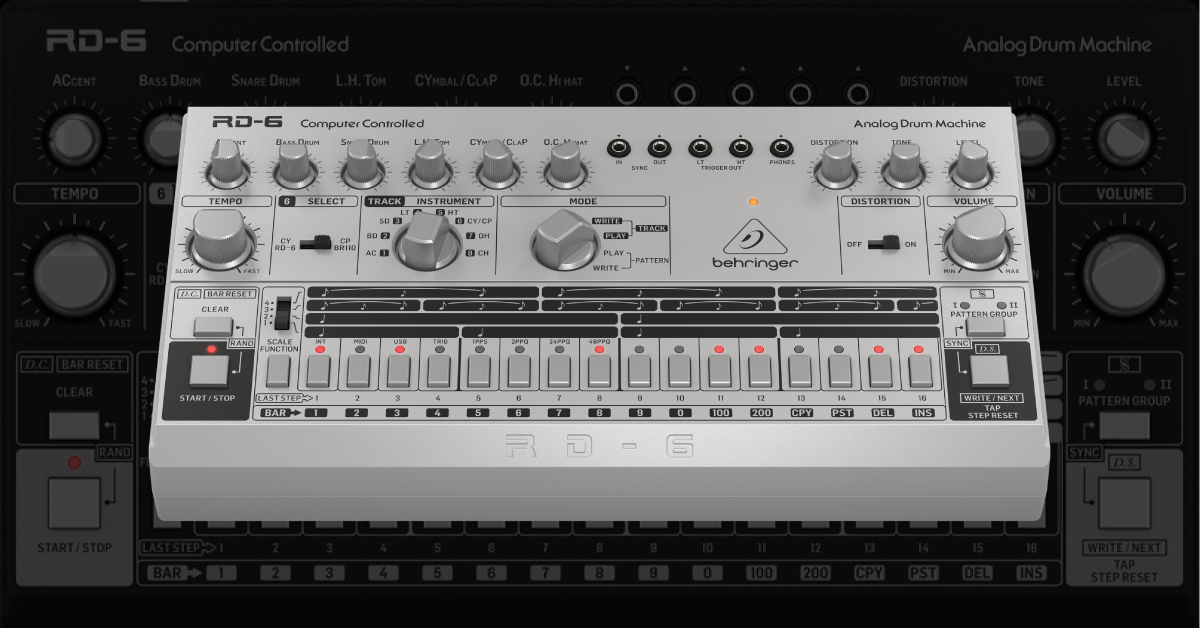
Create a drum pattern on the RD-6
TIP: By default, RD-6 patterns are 16 steps long. If you want to change the length, press and hold the FUNCTION button and select the end step.
Once all of your hardware is set up and connected, it’s time to create a drum pattern! Similar to its predecessor, you can create 32 patterns on eight different tracks. Creating a pattern is simple, so follow these steps to get up and running.
- Turn the MODE knob to Write in the Pattern section.
- Use the TRACK/INSTRUMENT knob and select the instrument you want to program.
- Record in realtime by pressing the TAP button.
- Use the 1-2-3-4 switch to change the number of steps per quarter note: quarter notes (position 1), half notes (position 2), 16th note triplets (position 3), and 8th note triplets (position 4).
- Press the START/STOP button, then use the 16 step buttons to enter the instrument’s rhythm.
- Switch to the next instrument you want to program and follow the same instructions.
- Once you’re finished, press the START/STOP button to stop.
Create a pattern chain
As mentioned, the default pattern length is 16 steps long. However, by grouping patterns together, you can create Pattern Chains. This means you can program up to 256 steps in one sequence! The process is straightforward, too. While you’re in either PATTERN WRITE mode or PATTERN PLAY mode, all you need to do is press and hold the first and last pattern buttons. This will then group them together creating a pattern chain.
Additional resources
Backing Up Your Synth Patches
MIDI Without USB: Classic MIDI Connections Explained
Seamlessly Integrate Your Hardware Synth Into a Digital Setup
Related Articles
When you need help, Sweetwater has the answers!
Our knowledge base contains over 28,000 expertly written tech articles that will give you answers and help you get the most out of your gear. Our pro musicians and gear experts update content daily to keep you informed and on your way. Best of all, it’s totally FREE, and it’s just another reason that you get more at Sweetwater.com.


Offer applies only to single-receipt qualifying purchases. Select manufacturers may require that only the manufacturer’s products qualify towards the minimum purchase amount needed to be eligible for promotional financing. Otherwise, an invoice that meets the minimum purchase amount and contains at least one qualifying manufacturer product is eligible for promotional financing. No interest will be charged on promo purchase balance, and equal monthly payments are required on promo purchase until it is paid in full. The payments equal the amount financed divided by the number of months in the promo period, rounded up to the next whole dollar. These payments may be higher than the payments that would be required if this purchase was a non-promo purchase. During the last month(s) of the promo period the required monthly payment may be reduced due to the prior months’ rounding. Regular account terms apply to non-promo purchases. New Accounts as of 07/31/2025: Purchase APR is 34.99%. Penalty APR is 39.99%. Min Interest Charge is $2. Existing cardholders: See your credit card agreement terms. Subject to credit approval.
Offer applies only to single-receipt qualifying purchases. No interest will be charged on the promo balance if you pay it off, in full, within the promo period. If you do not, interest will be charged on the promo balance from the purchase date. The required minimum monthly payments may or may not pay off the promo balance before the end of the promo period, depending on purchase amount, promo length and payment allocation. Regular account terms apply to non-promo purchases and, after promo period ends, to the promo balance. New Accounts as of 07/31/2025: Purchase APR is 34.99%. Penalty APR is 39.99%. Min Interest Charge is $2. Existing cardholders: See your credit card agreement terms. Subject to credit approval.
The estimated required monthly payment shown which excludes taxes and delivery equals the amount financed divided by the number of months in the promo period, rounded up to the next cent. During the last month(s) of the promo period the required monthly payment may be reduced due to this rounding. These payments apply only with the financing offer shown. If you make these payments by the due date each month, you should pay off this amount financed within the promo period, if it is the only balance you are paying off. If you have other balances on your account, this payment will be added to any other minimum monthly payments.
Applies only to select items from this manufacturer. Ask your Sweetwater Sales Engineer for more details.