
How to Set Up an Electronic Drum Set
In this guide, we’ll show you how to set up an electronic drum set for the first time. That means you’ll learn how to assemble the rack, connect each drum and cymbal pad, and then change the module sound settings. Continue below to get started.
NOTE: This is a general guide on setting up an electronic drum set. Your kit may include additional parts not mentioned in this guide, so refer to the included assembly guide for specific assembly instructions!
- Assemble the Drum Rack
- How to Mount Electronic Drum Pads
- Connect the Pads to the Module
- Change the Drum Pad Settings
Assemble the Drum Rack
IMPORTANT: Your electronic drum kit will be packed in multiple boxes and often include a parts list and diagram. Even small parts may have their own box or packaging, so take your time opening all included packaging and take stock before moving forward!
Drum racks may look a little intimidating to assemble, but it’s actually quite easy. While electronic drum sets vary in drum rack configurations, the foundation and setup are almost always the same. Refer to its Owner’s Manual for specific parts and instructions.
Electronic drum rack assembly tips
- Avoid over-tightening parts so they don’t strip.
- Save any spare parts in a dedicated drum bag or toolbox.
- Use a drum rug underneath to limit slip and prevent triggers from absorbing vibrations.
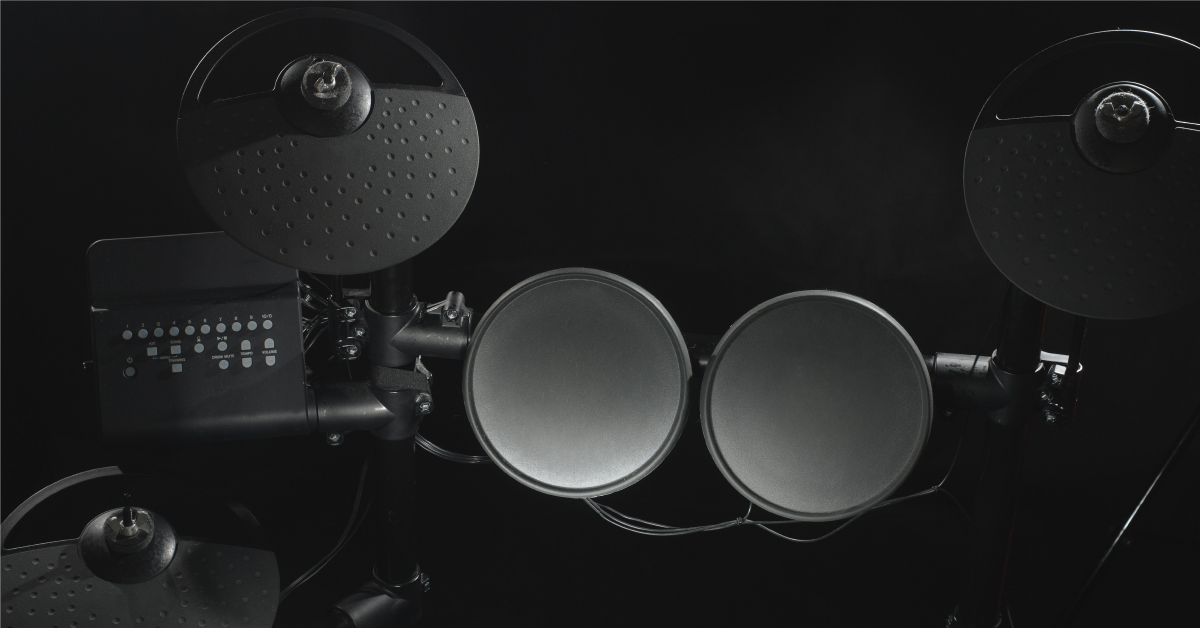
How to Mount Electronic Drum Pads
IMPORTANT: Use a plastic or rubber beater on bass drum pads, especially those with mesh heads. Felt beaters will wear out due to friction and need to be replaced. This type of damage is NOT covered under warranty.
Once the drum rack mount system is assembled, the next step is to attach the pads, cymbals, and module using drum rack clamps and mount arms. This is a simple process, so follow these steps to secure the pads and module to the rack.
Drum Pads
- Install a drum rack clamp on the rack, then tighten it down.
- Place the drum pad onto the mounting arm and tighten it down.
- Once all of the pads are mounted, adjust them to where you feel most comfortable while playing.
Cymbal Pads
- Install a drum rack clamp and tighten it to the rack.
- Insert the cymbal arm into the drum rack clamp, then tighten it down.
- Place the cymbal pad on the cymbal arm and use the top wing nut to tighten it down.
- If the entire cymbal pad is rubber, make sure the logo faces you, as this is where the trigger is located.
Connect the Pads to the Module
While some modules use multiple TRS cable connections, most require a breakout cable. The breakout cable connection is typically located either on the back or underneath the module. Most cables are labeled, but make sure that each cable is plugged into the correct corresponding drum or cymbal pad. Follow these instructions to get your pads connected to the module.
- Insert one end of the cable into the module. If the module uses a breakout cable, insert the breakout connector and make sure it’s securely in place.
- Connect the other end of the cable to your drum pad.
- Most drum modules have inputs for an additional tom or cymbal, so if you want to expand your drum set in the future, connect a ¼” TRS cable to one of those inputs.
- Hi-hat triggers will often have two cables: one for the pad and the other for the footpedal. Most hi-hat pedal cables will be labeled either HHC or Hi-hat control.
- Connect your headphones to the Headphone jack or speakers to the Main Out jacks.
- If you only have one speaker, connect it to the L (mono) output jack.
- If you only have one speaker, connect it to the L (mono) output jack.
Electronic drum cable connections
Keep it neat!
Consider using plastic or Velcro cable ties to secure them to the rack. This will keep all the cables out of the way and make it look much neater.
How Do Drum Triggers Work?
Drum triggers use piezo sensors to detect when and how hard you strike a pad. When hit, the sensor converts the force into a voltage, which is then sent down the cable. Check out our guide about how they work to learn more!
Change the Drum Pad Settings
Once you have the drum and cymbal pads set up and connected, the last step is to change the pad settings. Unlike acoustic drums, electronic drums may require some additional adjustments.
While the factory settings are a great starting point, experiment with different changes until you find the perfect balance between comfort and playability. Follow these steps to fine-tune the drum pad settings.
- Hit each pad to confirm that it’s triggering the correct drum sound.
- Begin playing and set the level on the pads, headphones, and main outputs until you find the desired volume.
- Fine-tune the following settings to fit your playstyle best. Refer to the owner’s manual for instructions on navigating these settings.
- Sensitivity: Increasing sensitivity makes the pad trigger louder sounds with a softer hit, and decreasing it makes it trigger softer sounds with a harder hit.
- Threshold: When increasing the threshold, the drum pad won’t trigger a sound until it’s hit hard enough. If it’s set too low, however, you may experience the pad trigger on its own, which is known as a ghost note.
- Velocity Curve: This changes the overall response of the pad. Different settings will change the sample’s volume depending on how hard or soft you hit the pad.
- Hi-hat splash: When you increase this setting, tapping then releasing your foot on the hi-hat pedal will more easily trigger the hi-hat’s “splash” sound.
- Crosstalk (x-talk): Changing the crosstalk affects how it responds to vibration when another pad near it is struck. Increasing this setting is especially helpful for heavier players.
Don’t hit the pads too hard!
If you want a louder hit, don’t hit it too hard; just turn the pad’s volume up. Like any other MIDI instrument, electronic drums have a set velocity range from 0 to 127, so even if you hit the pad with a baseball bat, it will only trigger at the loudest velocity, 127.
Related Articles
When you need help, Sweetwater has the answers!
Our knowledge base contains over 28,000 expertly written tech articles that will give you answers and help you get the most out of your gear. Our pro musicians and gear experts update content daily to keep you informed and on your way. Best of all, it’s totally FREE, and it’s just another reason that you get more at Sweetwater.com.


Offer applies only to single-receipt qualifying purchases. Select manufacturers may require that only the manufacturer’s products qualify towards the minimum purchase amount needed to be eligible for promotional financing. Otherwise, an invoice that meets the minimum purchase amount and contains at least one qualifying manufacturer product is eligible for promotional financing. No interest will be charged on promo purchase balance, and equal monthly payments are required on promo purchase until it is paid in full. The payments equal the amount financed divided by the number of months in the promo period, rounded up to the next whole dollar. These payments may be higher than the payments that would be required if this purchase was a non-promo purchase. During the last month(s) of the promo period the required monthly payment may be reduced due to the prior months’ rounding. Regular account terms apply to non-promo purchases. New Accounts as of 07/31/2025: Purchase APR is 34.99%. Penalty APR is 39.99%. Min Interest Charge is $2. Existing cardholders: See your credit card agreement terms. Subject to credit approval.
Offer applies only to single-receipt qualifying purchases. No interest will be charged on the promo balance if you pay it off, in full, within the promo period. If you do not, interest will be charged on the promo balance from the purchase date. The required minimum monthly payments may or may not pay off the promo balance before the end of the promo period, depending on purchase amount, promo length and payment allocation. Regular account terms apply to non-promo purchases and, after promo period ends, to the promo balance. New Accounts as of 07/31/2025: Purchase APR is 34.99%. Penalty APR is 39.99%. Min Interest Charge is $2. Existing cardholders: See your credit card agreement terms. Subject to credit approval.
The estimated required monthly payment shown which excludes taxes and delivery equals the amount financed divided by the number of months in the promo period, rounded up to the next cent. During the last month(s) of the promo period the required monthly payment may be reduced due to this rounding. These payments apply only with the financing offer shown. If you make these payments by the due date each month, you should pay off this amount financed within the promo period, if it is the only balance you are paying off. If you have other balances on your account, this payment will be added to any other minimum monthly payments.
Applies only to select items from this manufacturer. Ask your Sweetwater Sales Engineer for more details.