
Arturia AstroLab Quickstart Guide
The Arturia AstroLab, AstroLab 88, and AstroLab 37 are stage keyboards with presets from Arturia’s vast virtual instrument software collection. While you can start playing thirty-plus virtual instruments and over a thousand presets on the keyboard right away, to access the full features of the AstroLab you need to pair it with the Analog Lab Pro software on your computer. We wrote this guide to help you get started.
- Register the Arturia AstroLab and Install the Analog Lab Pro App
- Arturia AstroLab Setup and Connections
- What Is Arturia AstroLab?
- Navigating the AstroLab Keyboard
- Integrating AstroLab with the Analog Lab Pro app
- AstroLab Connect for iPhone and Android
- AstroLab and Bluetooth
- Arturia AstroLab Tutorials
Register the Arturia AstroLab and Install the Analog Lab Pro App
Register your purchase
We know you are eager to check out all the amazing presets and sounds on your keyboard, but please take the time to register your purchase with Arturia. You will need to update the firmware to make sure you are up to date with all the instruments and presets. You do that by connecting your AstroLab to your computer and running the Analog Lab Pro app. You will also want to download the user manuals for reference.
- On your computer, go to the Arturia login page. Log in if you have an account; otherwise, create a new one.
- Click on Register New Product.
- Enter the serial number and the unlock code found on the registration card in the box or on the sticker on the underside of the keyboard.
- Click Register.
Alternately, you may find a card with a QR code in the package. Take a picture with your phone and it will take you to the page on the website where you can register.
From time to time when you boot up the AstroLab, it will prompt you with the message “Get the most of our instrument and get your included software now.” Click on “Yes” and it will display another QR code. Use your phone and it will take you to the app store where you can download the AstroLab Connect app (discussed below) which in turn will walk you through registering without needing to look for the codes.
Download the User Manual
The AstroLab is exceptionally easy to use, but it’s also full of deep features. To use AstroLab to its full potential, refer to its user manuals. Go to the Arturia Downloads & Manuals page, search for AstroLab, and download these and any other manuals Arturia provides:
- AstroLab CheatSheet
- AstroLab Manual
On the same page, search for Analog Lab and download the Analog Lab User Manual.
Download the Software
Arturia Analog Lab Pro for Mac and Windows PC
TIP: If you already have Arturia Analog Lab Play, Analog Lab Intro, or an older version of Analog Lab Pro, it won’t work with the AstroLab. When you register your purchase, make sure you install the newest version of Analog Lab Pro.
After you register your AstroLab on the website on your computer, download and install the Arturia Software Center app for macOS or Windows.
Launch the app. Log in with your Arturia username and password.
In the My Products tab, you will see Analog Lab Pro. Select it, then click on the links to download, install, and activate it.
Arturia AstroLab Connect for iPhone and Android
On your phone or device, download the AstroLab Connect app from the Apple App Store or Google Play.
Update the Firmware
The first time you use your AstroLab, you need to connect it to your computer and the Analog Lab Pro app to update the firmware. From time to time, Arturia will release a new firmware, or operating system, for the AstroLab to add support for additional virtual instruments and to fix bugs. Head on over to our SweetCare Arturia AstroLab Firmware Update guide to learn more.
Arturia AstroLab Setup and Connections
Make sure the AstroLab is powered down before you connect any cables.
AstroLab Outputs and Inputs
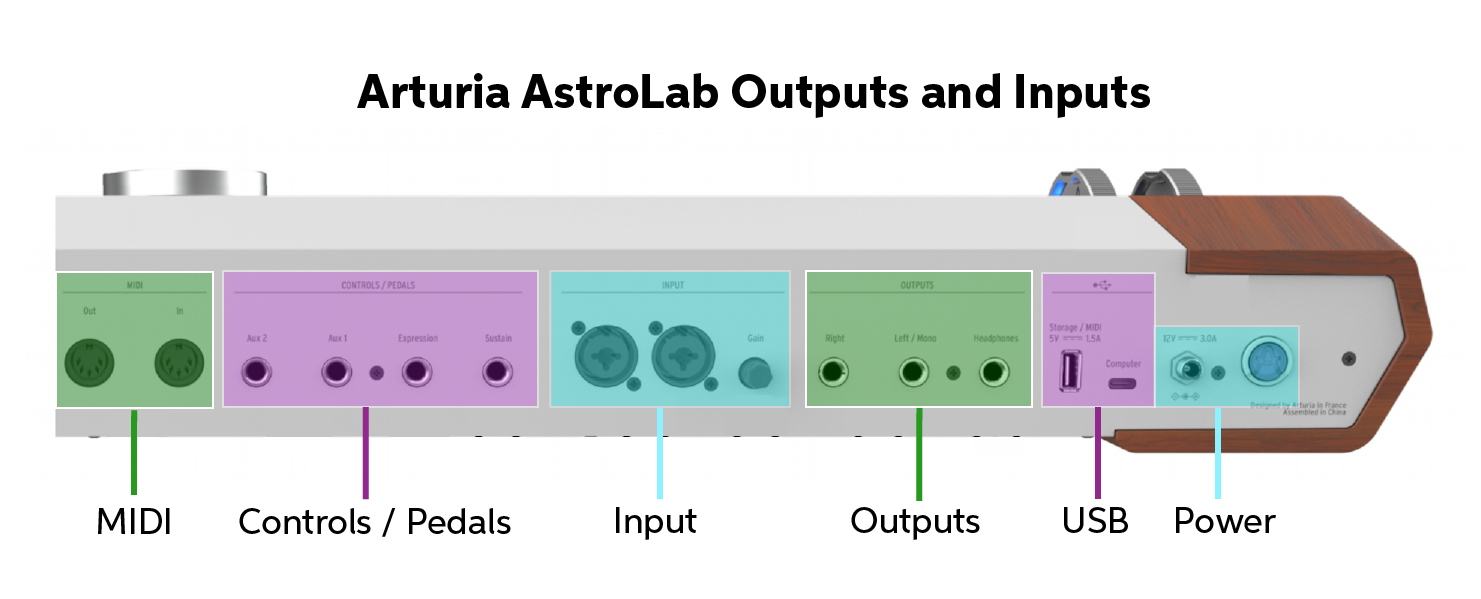
Arturia AstroLab outputs and inputs
Power
Use the included power supply. The plug connection screws into place.
The power button turns the unit on. Long-press the button to shut down the AstroLab. Wait until the display screen indicates shutdown is complete before you disconnect the power supply.
USB
The USB-A port enables connecting external storage. You can also connect a class-compliant external MIDI controller and use it to play the AstroLab using MIDI over USB.
The USB-C port is for connecting to your computer for MIDI over USB. The USB connection does not transmit digital audio.
Outputs
Headphones. Connect headphones with a 1/4-inch TRS connection. The Master Volume on the front panel controls the level.
Left/Mono and Right accept 1/4-inch TRS cables for balanced output. Connect to your mixer, your speakers, or your audio interface.
Input
Combi jacks accept XLR or 1/4-inch TRS cables for balanced signals from a pair of microphones, line-level sources, or instrument-level sources. Adjust the input level with the Gain knob. The AstroLab can provide effects processing for external input and has a vocoder Instrument as well.
Controls/Pedals
Sustain. Connect a sustain pedal (not included) with a TS connector.
Expression. Connect a continuous control pedal with a TRS connector, which can be assigned to preset volume or other parameters.
Aux 1 and Aux 2. Connect additional footswitches or continuous control pedals which can be assigned to different parameters.
MIDI
Connect an external MIDI controller using standard 5-pin DIN MIDI cables.
AstroLab Front Panel
Arturia AstroLab front panel controls
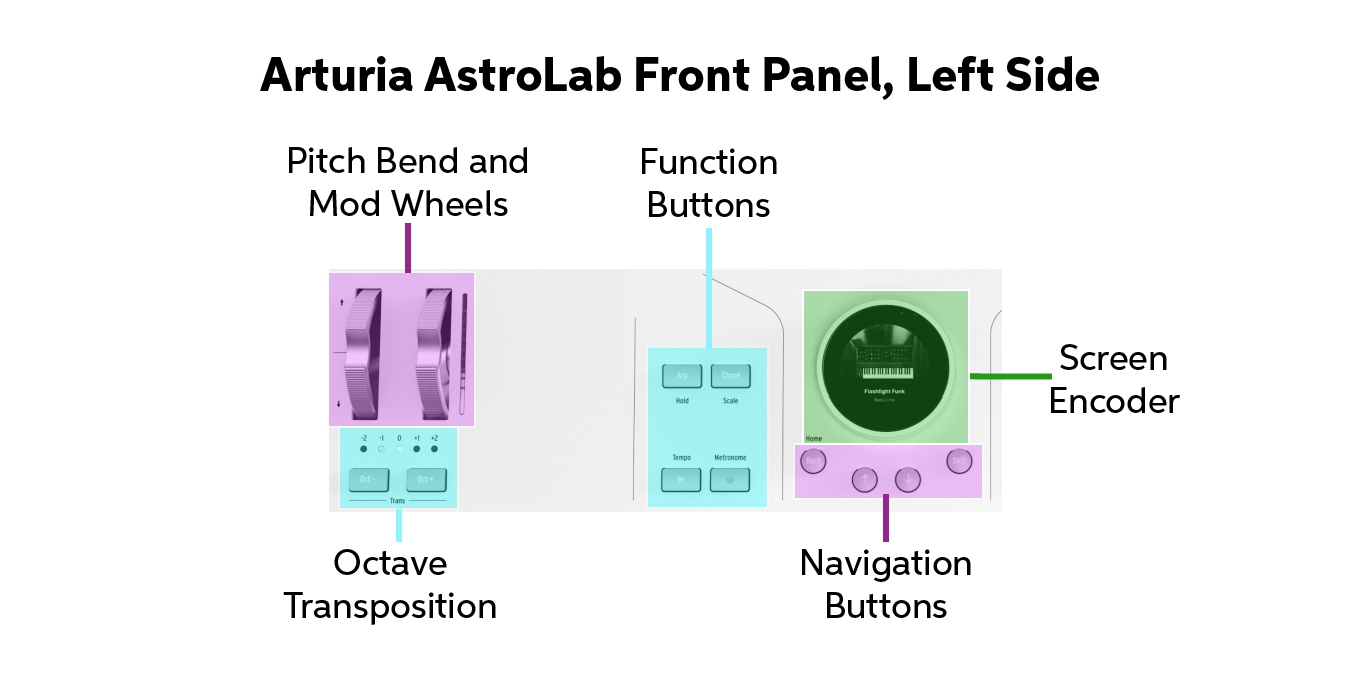
Navigation Wheel (Screen Encoder) and Navigation Buttons
The circular display screen, or Navigation Wheel, is surrounded by a rotary encoder that you turn to select different functions. Press down on the lower edge to make selections. Beneath it are the Up and Down buttons for paging through selections and the Back/Home button to move up a level. The Shift button, when held down, adds a second set of functions to many other buttons on the panel. Learn more in the AstroLab User Manual > 2.2.1 Navigation Wheel Operation.
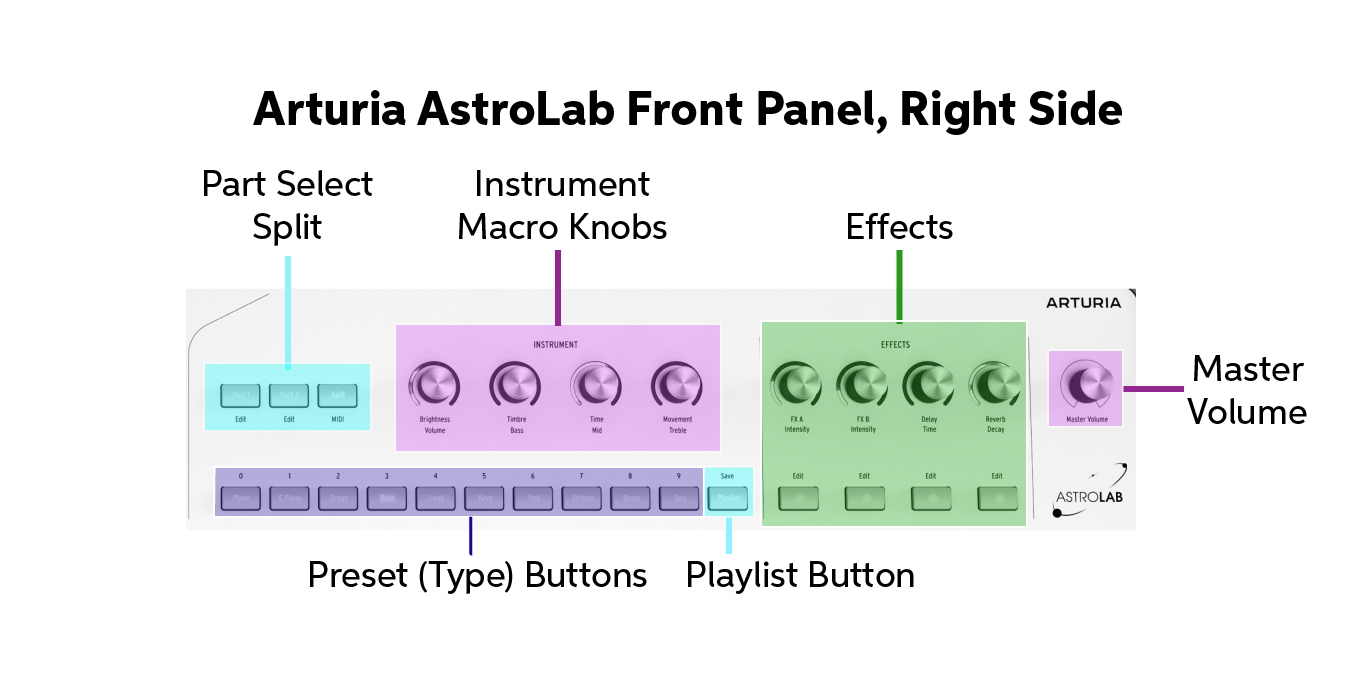
Preset (Type) Buttons
These access groups of Presets by instrument type.
Playlist Button
This loads the current playlist.
Instrument Macro Knobs
Each Preset is programmed with four different aspects of the instrument’s sound that you can adjust in real time by turning these four rotary encoders. Touch the top of an encoder, and its parameter’s numerical value is displayed on the screen.
Effects
Each Preset is programmed with four effects: two insert effects, one delay, and one reverb. Turning the rotary knob adjusts the intensity of each effect. You can toggle each effect on and off with its button. Touching the top of the encoder displays parameter values on the screen. Learn more in the AstroLab User Manual > 6. Effects.
Master Volume Knob
This controls the main and headphone outputs.
Function Buttons
These four dedicated buttons bring up several features. Learn more in the AstroLab User Manual > 8. Tempo, MIDI Looper, and Arpeggiator.
Pitch Bend, Modulation Wheel, Octave Transposition
These familiar functions enable real-time control according to the programming of each Preset.
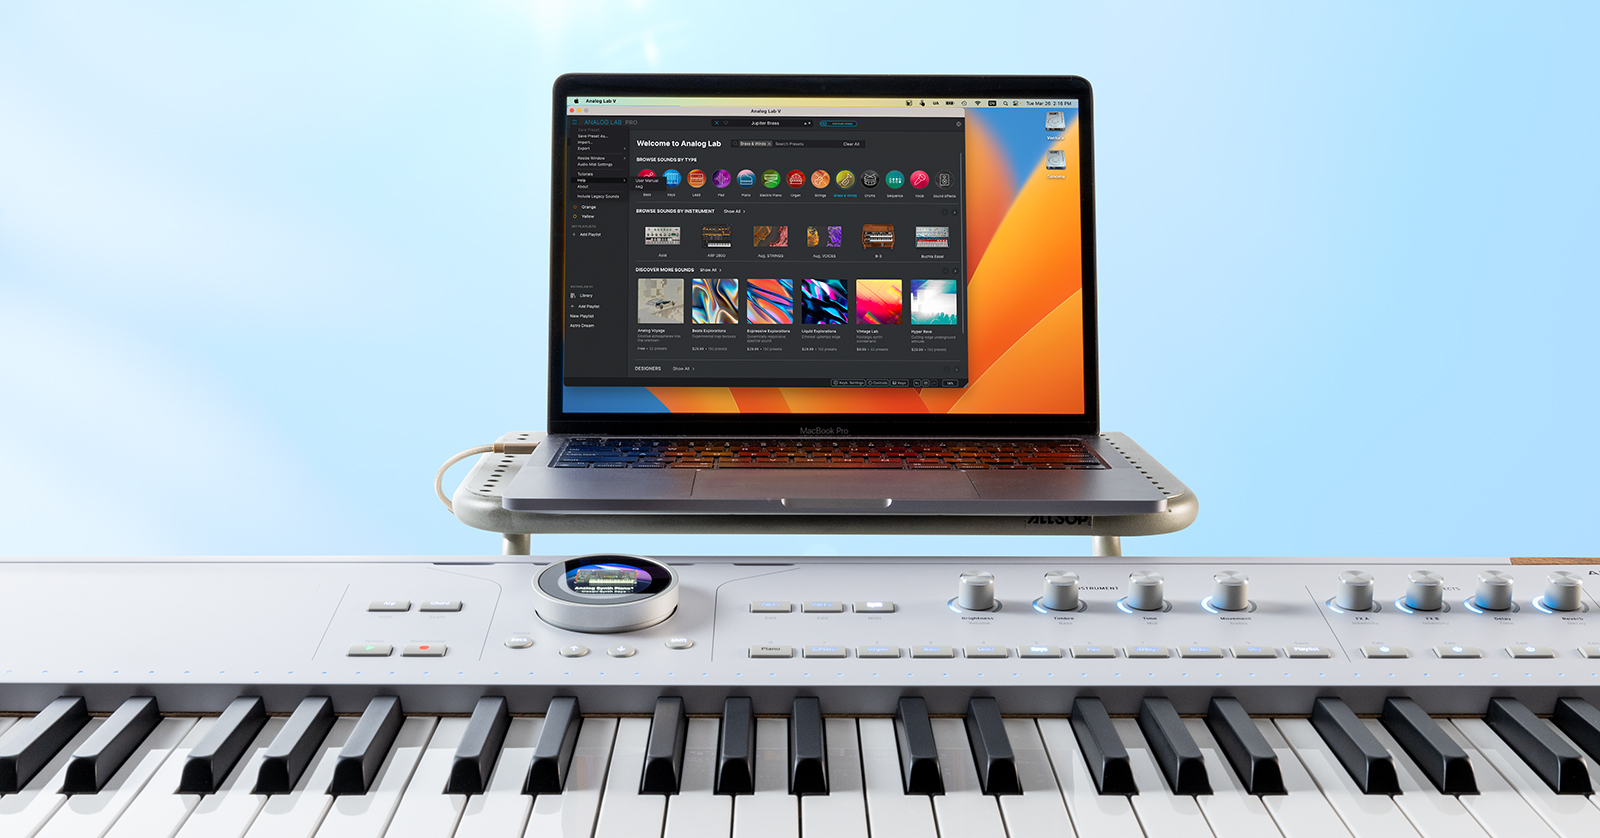
What Is Arturia AstroLab?
AstroLab is the hardware version of Arturia’s Analog Lab Pro software. You can play over a thousand Presents created from 30 virtual Instruments running on the AstroLab keyboard. You can use the four control knobs to vary the sound in real time.
When you connect the AstroLab to the Analog Lab Pro app on your Mac or Windows PC, you can more easily access all the features available from the AstroLab’s hardware controls.
You can also use Analog Lab Pro to browse additional libraries of Presets online that you can purchase from Arturia and then upload to the AstroLab.
Using Analog Lab Pro, it’s easy to edit the Effects assigned to each Preset, and to construct Sound banks and Playlists. You can then upload your Presets, Sound banks and Playlists from your computer to your AstroLab. Then you can take the AstroLab to the gig and leave your computer behind.
Connect the AstroLab to your computer using the USB-C cable. The AstroLab communicates with Analog Lab Pro by transmitting programming data, but not digital audio. In essence, in this mode, your AstroLab is a dedicated MIDI controller for the Analog Lab Pro app. On your computer, the digital audio is generated by the app. When tracking to your DAW, you use the app as a plug-in and sequence all the MIDI data from your performance on the AstroLab. All the while, because the AstroLab’s hardware plays the same sounds being created by the app, you can hook up headphones or speakers to your AstroLab and monitor what you play on the keyboard with zero latency.
Navigating the AstroLab Keyboard
You can quickly access Presets according to the nine Types represented by the front panel keys: Piano, Electric Piano, Organ, Bass, Lead, Keys, Pad, Strings, Brass and Winds, and Sequence. You can then scroll through the Presets in that type by turning the knob around the display screen or using the up and down buttons. Note that there are four more types that you can only access from the display screen: Drums, Vocals, Sound Effects, and Custom.
A Single Preset contains one Instrument. A Multi Preset contains two Instruments which may be layered or split.
Each Preset provides you with four Instrument knobs labeled Brightness, Timbre, Time, and Movement. The function of each knob is different for each preset; in fact, each knob is a macro that can change multiple sound parameters.
Each Preset is programmed with its own set of four Effects, which you can control with the four Effects knobs.
Learn more in the AstroLab User Manual > 3. Basic Operations.
You can select Effects and program all their parameters on the AstroLab by paging through menus on the display screen. Learn more in the AstroLab User Manual > 6. Effects.
The AstroLab has a MIDI looper, an arpeggiator, and modes for using the keyboard to trigger automatic chords and to restrict the keyboard to certain scales or modes. You can adjust tempo for time-based effects, and there’s a metronome. Learn more in the AstroLab User Manual > 8. Tempo, MIDI Looper, and Arpeggiator.
Here’s Arturia’s overview of getting around on the AstroLab:
Arturia Tutorials: AstroLab Overview
Integrating AstroLab with the Analog Lab Pro app
Connecting the AstroLab to Analog Lab Pro

The AstroLab Linked button appears at the top of the Analog Lab Pro home screen.
- Connect the AstroLab to your computer using the included USB-C cable and an adapter if necessary.
- Launch the Analog Lab Pro app.
- In the app, when you connect the USB cable and power on the AstroLab, you will see a blue AstroLab Linked button below the title bar.
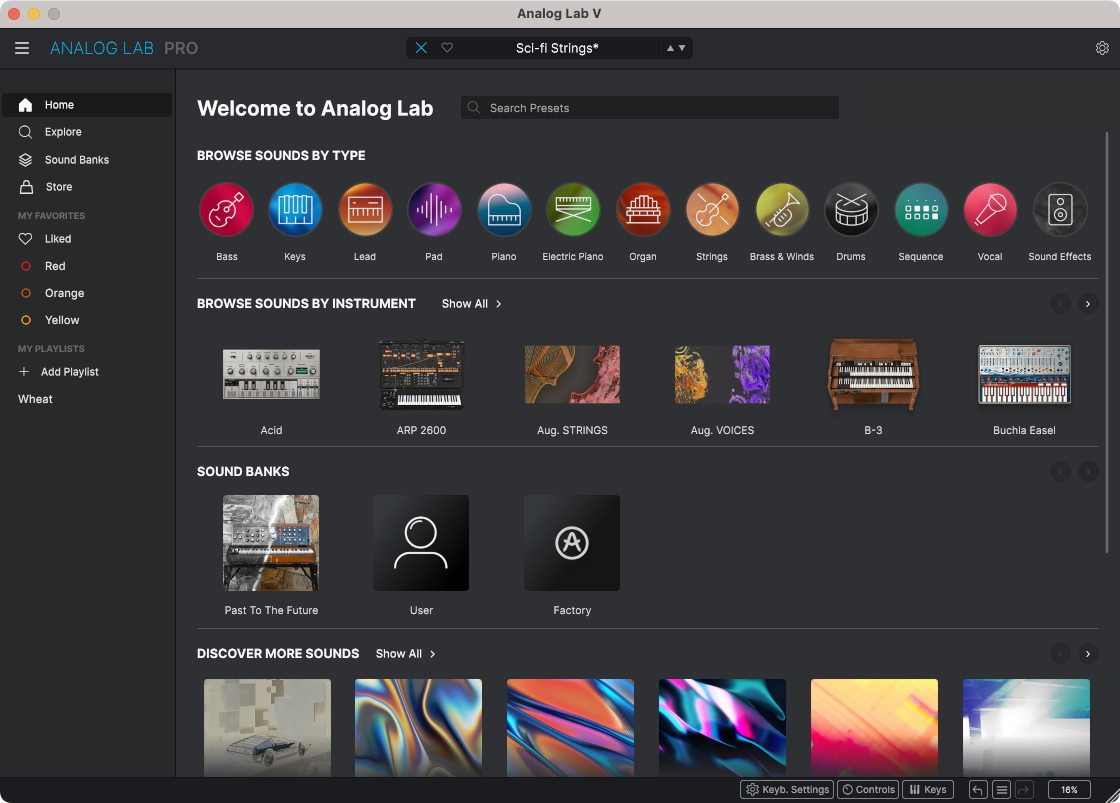
The Analog Lab Pro app’s Welcome page
The Analog Lab Pro app’s Home page lets you browse sounds by Type and by the Arturia virtual Instruments used to create the Presets.
You can also browse Sound Banks, using the Factory set or creating your own.
Under Discover More Sounds, you can purchase and download more Sound Banks from Arturia; some are free.
Scroll down, and you can browse sounds by the names of the over 100 sound Designers who have created the presets.
Editing Presets in the Analog Lab Pro App
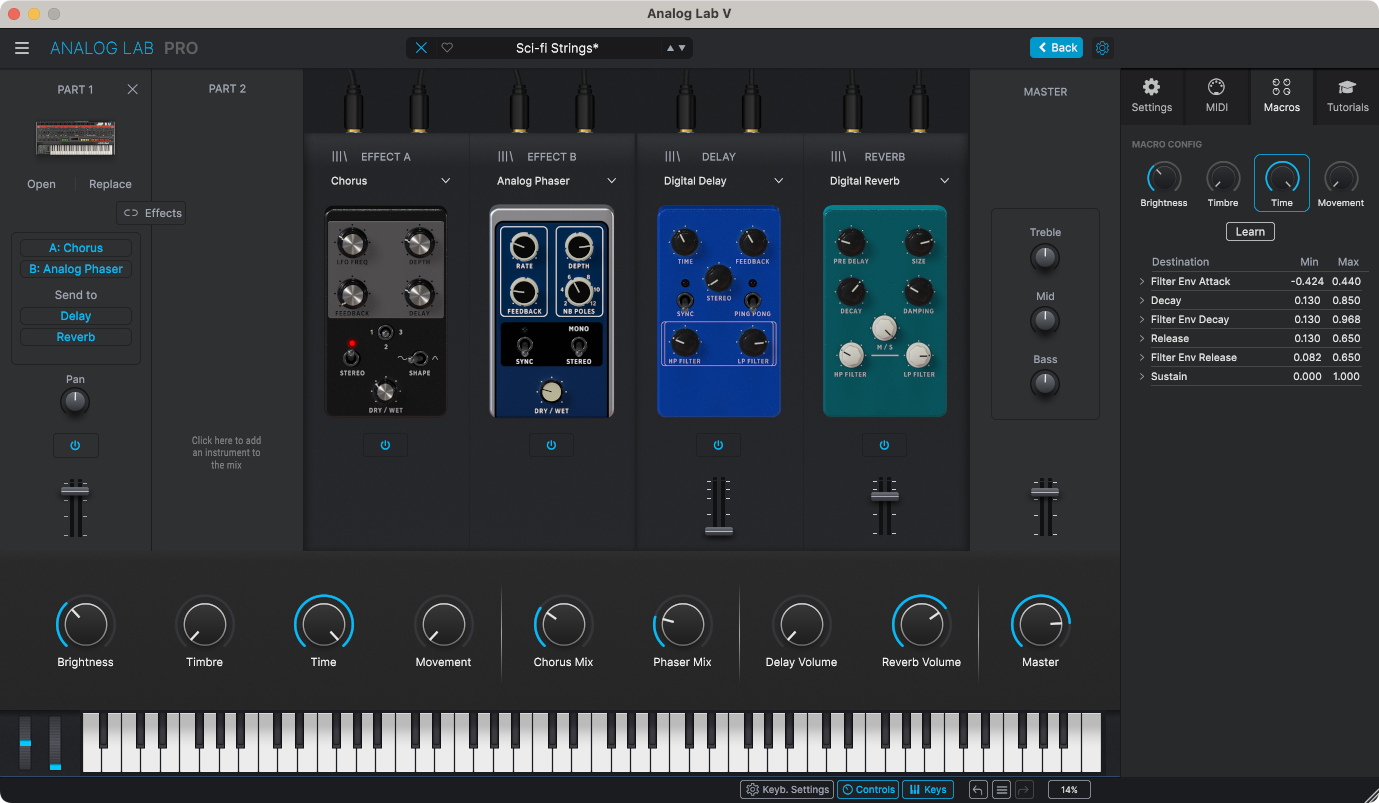
Editing AstroLab effects in Analog Lab Pro on your computer
In Analog Lab Pro, select a Preset, and click on the Edit Preset button in the pane on the right.
In the view that opens, you can choose which effect is assigned to each of the four Effects knobs. Each one is a virtual stombox, and you can adjust the knob settings.
Click the Controls button at the bottom, and you can adjust the default values for the four Instrument knobs (Brightness, Timbre, Time, and Movement).
You can save these edits as your own new Preset, put it in a Sound Bank and a Playlist, and upload it to the AstroLab.
The best part is that while you are doing all this, the changes that you make are reflected on the AstroLab in real time. You can monitor the sound either from the Analog Lab Pro app through your computer’s audio interface, or from the audio output or headphones on your AstroLab.
Here’s Arturia’s tutorial AstroLab – Analog Lab Integration:
Arturia Tutorials: AstroLab – Analog Lab Integration
AstroLab Connect for iPhone and Android

AstroLab Connect for iPhone
The AstroLab Connect app for iPhone and Android connects to your AstroLab over Wi-Fi (not Bluetooth).
The phone app is good for browsing and loading Presets, Sound Banks, and Playlists in a manner that you may find easier than using the AstroLab’s panel controls. The phone app does not provide all of the parameter editing available in the Analog Lab Pro app for your computer.
The AstroLab can join an existing Wi-Fi network to connect to the phone app. The AstroLab also has its own internal Wi-Fi hot spot. Use the hot spot to connect to the phone app at a gig, and you need not worry about using somebody else’s Wi-Fi.
The AstroLab Wi-Fi connection is only for sending control data, not digital audio.
Learn more in the AstroLab User Manual > 9. Wireless Setup.
TIP: If you have your AstroLab connected to your computer via USB and the connection to the Analog Lab Pro app is active, the Wi-Fi connection will not work, and vice-versa. Choose one or the other. You do not need to disconnect the USB cable, however. On your computer, in the Analog Lab Pro app, click on the AstroLab Linked button to unlink the connection.
Here’s Arturia’s tutorial: AstroLab Connect App:
Arturia Tutorials: AstroLab Connect App
AstroLab and Bluetooth
The AstroLab can pair with your phone or device over Bluetooth so that you can stream digital audio backing tracks to the AstroLab and play the keyboard along with the audio.
Bluetooth is not used by the AstroLab Connect app, which requires Wi-Fi.
Learn more in the AstroLab User Manual > 9. Wireless Setup.
Arturia AstroLab Tutorials
Arturia provides a playlist of short video tutorials on Youtube. You will learn a lot by spending a few minutes here.
Related Articles
When you need help, Sweetwater has the answers!
Our knowledge base contains over 28,000 expertly written tech articles that will give you answers and help you get the most out of your gear. Our pro musicians and gear experts update content daily to keep you informed and on your way. Best of all, it’s totally FREE, and it’s just another reason that you get more at Sweetwater.com.


Offer applies only to single-receipt qualifying purchases. Select manufacturers may require that only the manufacturer’s products qualify towards the minimum purchase amount needed to be eligible for promotional financing. Otherwise, an invoice that meets the minimum purchase amount and contains at least one qualifying manufacturer product is eligible for promotional financing. No interest will be charged on promo purchase balance, and equal monthly payments are required on promo purchase until it is paid in full. The payments equal the amount financed divided by the number of months in the promo period, rounded up to the next whole dollar. These payments may be higher than the payments that would be required if this purchase was a non-promo purchase. During the last month(s) of the promo period the required monthly payment may be reduced due to the prior months’ rounding. Regular account terms apply to non-promo purchases. New Accounts as of 07/31/2025: Purchase APR is 34.99%. Penalty APR is 39.99%. Min Interest Charge is $2. Existing cardholders: See your credit card agreement terms. Subject to credit approval.
Offer applies only to single-receipt qualifying purchases. No interest will be charged on the promo balance if you pay it off, in full, within the promo period. If you do not, interest will be charged on the promo balance from the purchase date. The required minimum monthly payments may or may not pay off the promo balance before the end of the promo period, depending on purchase amount, promo length and payment allocation. Regular account terms apply to non-promo purchases and, after promo period ends, to the promo balance. New Accounts as of 07/31/2025: Purchase APR is 34.99%. Penalty APR is 39.99%. Min Interest Charge is $2. Existing cardholders: See your credit card agreement terms. Subject to credit approval.
The estimated required monthly payment shown which excludes taxes and delivery equals the amount financed divided by the number of months in the promo period, rounded up to the next cent. During the last month(s) of the promo period the required monthly payment may be reduced due to this rounding. These payments apply only with the financing offer shown. If you make these payments by the due date each month, you should pay off this amount financed within the promo period, if it is the only balance you are paying off. If you have other balances on your account, this payment will be added to any other minimum monthly payments.
Applies only to select items from this manufacturer. Ask your Sweetwater Sales Engineer for more details.