
Roland TR Series Setup Guide
In this guide, we’ll discuss how to register, set up, and use a Roland TR-6S and TR-8S or the first time. We’re only scratching the surface, so be sure to check out the TR-6S user manual and TR-8S user manual for more information. Follow the instructions below to get started!
- Register the TR series drum machine with Roland
- Create a kit
- Create a pattern
- Playing patterns
- How to save kits and patterns
Register the TR series drum machine with Roland
Before we dive into setting up your TR series drum machine, the first thing to do is register the product with Roland. By registering the device, you’ll gain access to Roland’s product support, an extended warranty, training videos, and important updates about your TR series. Follow the steps below to register and then continue to setup and configuration.
- Log in to your Roland Backstage account. If you don’t have one yet, you can create one here.
- Roland will then send an account activation email to the registered email address to complete the account creation process.
- On your account home page, click My Gear and select Register a Product.
- Fill out the required information, including the serial number located on the bottom of the unit, and click Register.
- Keep your Sweetwater invoice handy, as you will need to enter the purchase date, method, and Dealer (Sweetwater).
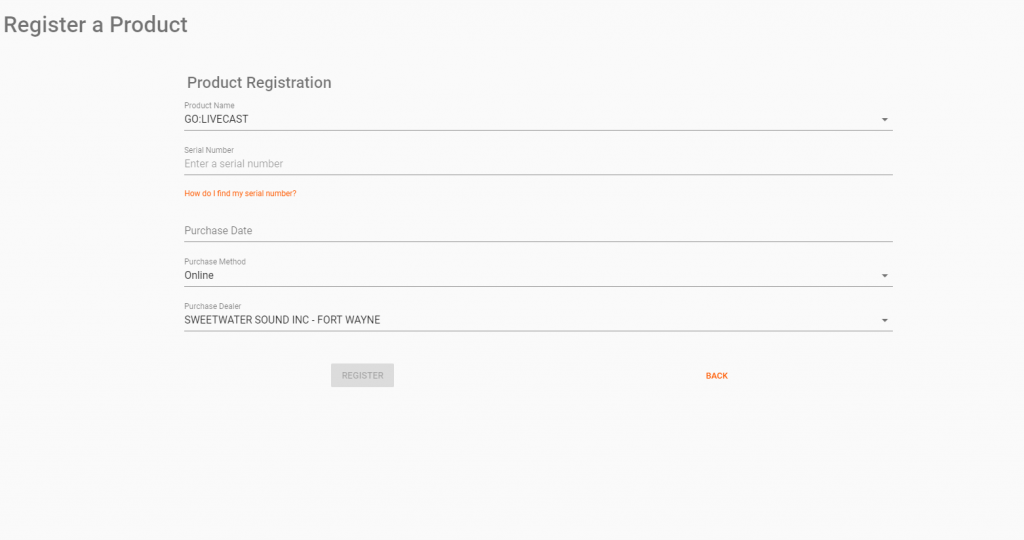
Click the image to register your Roland TR series drum machine
Create a kit
TIP: Holding the SHIFT button when changing a value will change the value by 10.
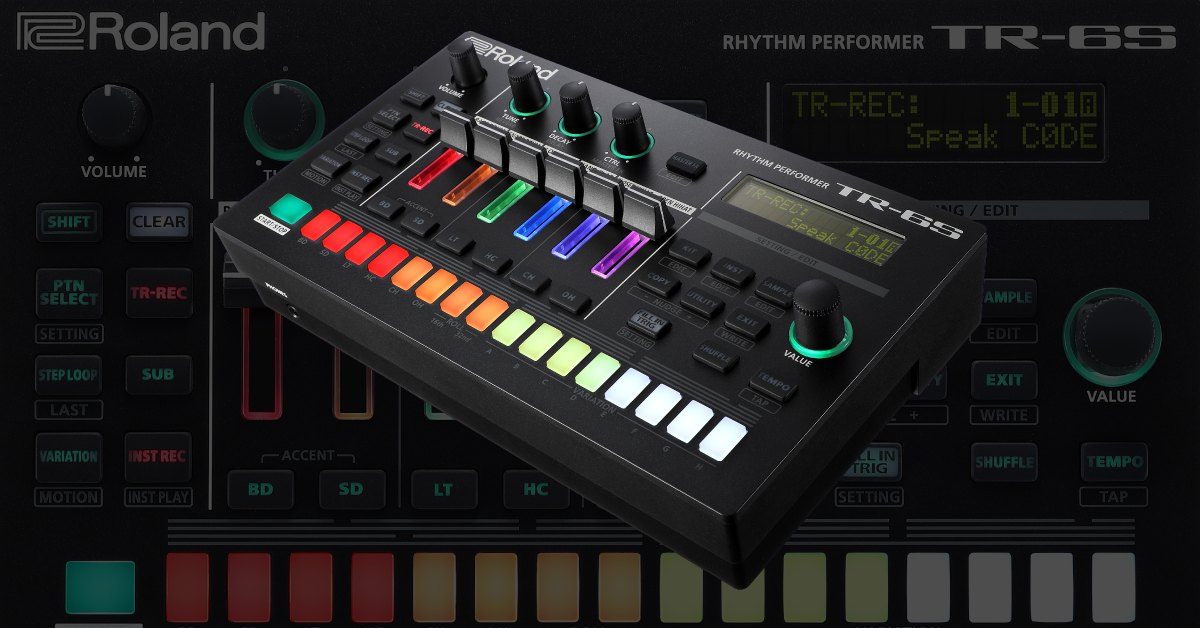
The TR drum machine has tons of great user kits and hundreds of preset sounds that are fully editable. But if you’d like, you can edit those preset samples or even import your own. It’s as simple as pressing a few buttons and turning a few knobs. Let’s create a kit from scratch.
Creating a kit
- Hold the SHIFT button and turn the VALUE knob to KIT: *069, then press the VALUE knob down. This will select the kit.
- Press the INST button to enter into the instrument edit mode and press the instrument you want to change (BD, SD, LT, HC, CH, OH).
- With the instrument button illuminated, press the INST button and use the VALUE knob to scroll through the samples, then press it once you’ve found the sample you want.
- Follow step 3 until you’re satisfied with your kit.
Importing user samples
IMPORTANT: Formatting SD cards will erase any current data stored, so be sure to back your files up beforehand.
You can import custom samples via an SDHC card. The samples can be 180 seconds long at 44.1 kHz and must be in the WAV or AIFF audio file format. For the SD card to work correctly and samples to be imported, it must be formatted on the TR drum machine and loaded to a specific folder. For more details, check out page 29 of the TR-6S manual or page 17 of the TR-8S manual!
- Insert the SD card in the device.
- Press the UTILITY button and turn the VALUE knob to SD CARD.
- Press the VALUE knob to format the SD card.
- Connect the SD card to your computer (SD card slot or USB SD card adapter).
- Go to This PC (Windows) or Finder (Mac), then open the following folders: Roland > TR device > Samples.
- Import your samples. You can create a subfolder and load them there, but you cannot create a sub-sub folder.
- For example, you can create a folder and name it Kick Drums, then load your samples there. However, you cannot create the same folder, then create two others inside it labeled Electronic Kicks and Acoustic Kicks and load samples into those.
What are the letter icons on the top of the display?
Five different letter icons can be displayed on a specific sample. It’s all dependent on what the sample is. This makes it easier for you to distinguish what the sample is. For example, a factory preset that uses a sample will display “P S”. Here is a list of what the letter icons stand for.
- P: Preset
- S: Sample
- U: User
- L: Loop
- F: FM based
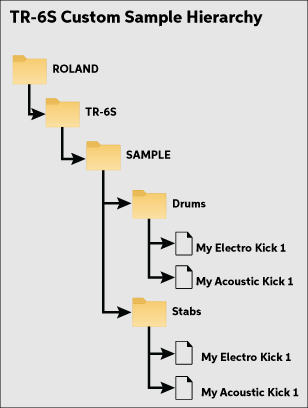
Custom sample folder hierarchy on a TR-6S
Create a pattern
Once your kit has been created, it’s time to create a pattern. It’s a straightforward process. What’s great is that it automatically quantizes when you record live, so there isn’t a need to go back and re-record. There are two ways to record: TR-REC and INST REC. Both methods are simple, so you’ll have patterns recorded.
TR-REC
TR-REC is a way to enter the steps for each instrument individually. This is useful for exact patterns. All you need to do is press the TR-REC button, press the instrument’s pad you want to add, then use the 16 step pads to enter your sample’s pattern.
INST REC
INST REC lets you record in realtime. When you record in INST REC mode, you’ll use the first six pads to trigger the drums (the instrument is located under the pad it’s associated with). The recording will be quantized to the closest beat automatically, so if it doesn’t hit on the step you want, you can either keep recording to overwrite or go into TR-REC mode to move it manually.
Playing patterns
If you have multiple patterns programmed, they can be played back in a few different ways. You can either chain them together, meaning they’ll play in order (e.g., Pattern 1 > Pattern 2 > Pattern 3 > Pattern 4), or you can manually switch between patterns. (e.g., Pattern 1 > Pattern 10 > Pattern 5)
To play in order, press the PTN SELECT button to enter Pattern mode. Next, press and hold the first pattern and last pattern that you want to be played back. To play in a different order, press the first pattern, then while playing back, press the next pattern. It will then play back once the current pattern is finished.
How to save kits and patterns
After you’ve created your new kit and recorded some patterns, you can save it to your TR drum machine. Once you’ve saved your kits and patterns, it’s good practice to export them to your SD card. Follow these steps to save and export on your TR-6S or TR-8S.
Saving kits and patterns on a TR-6S
- Hold the SHIFT button, then press EXIT.
- Use the VALUE knob to select what you want to save:
- Overwrite: Saves everything.
- Pattern: Saves just the pattern.
- Kit: Saves just the kit.
- System: Saves all system settings.
Saving kits and patterns on a TR-8S
- Press the WRITE button.
- Use the VALUE knob to select what you want to save, then press ENTER.
- Pattern: Saves just the pattern.
- Kit: Saves just the kit.
- System: Saves all system settings.
- Select the destination where the data will be saved using the VALUE knob, then press ENTER.
- Use the VALUE knob once more to select OK and press ENTER to save your data.
Additional resources
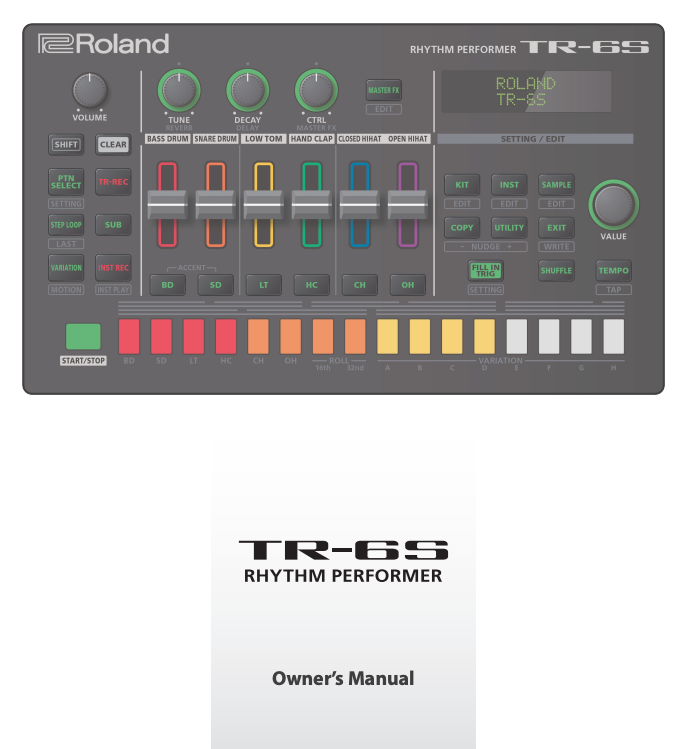
Roland TR-6S Owner’s Manual
Roland TR-8S Owner’s Manual
Roland TR-6S Rhythm Composer Video Manual
Roland TR-8S: Overview
Roland TR-6S Rhythm Performer Overview
Roland TR-8S: Sound Design
When you need help, Sweetwater has the answers!
Our knowledge base contains over 28,000 expertly written tech articles that will give you answers and help you get the most out of your gear. Our pro musicians and gear experts update content daily to keep you informed and on your way. Best of all, it’s totally FREE, and it’s just another reason that you get more at Sweetwater.com.


Offer applies only to single-receipt qualifying purchases. Select manufacturers may require that only the manufacturer’s products qualify towards the minimum purchase amount needed to be eligible for promotional financing. Otherwise, an invoice that meets the minimum purchase amount and contains at least one qualifying manufacturer product is eligible for promotional financing. No interest will be charged on promo purchase balance, and equal monthly payments are required on promo purchase until it is paid in full. The payments equal the amount financed divided by the number of months in the promo period, rounded up to the next whole dollar. These payments may be higher than the payments that would be required if this purchase was a non-promo purchase. During the last month(s) of the promo period the required monthly payment may be reduced due to the prior months’ rounding. Regular account terms apply to non-promo purchases. New Accounts as of 07/31/2025: Purchase APR is 34.99%. Penalty APR is 39.99%. Min Interest Charge is $2. Existing cardholders: See your credit card agreement terms. Subject to credit approval.
Offer applies only to single-receipt qualifying purchases. No interest will be charged on the promo balance if you pay it off, in full, within the promo period. If you do not, interest will be charged on the promo balance from the purchase date. The required minimum monthly payments may or may not pay off the promo balance before the end of the promo period, depending on purchase amount, promo length and payment allocation. Regular account terms apply to non-promo purchases and, after promo period ends, to the promo balance. New Accounts as of 07/31/2025: Purchase APR is 34.99%. Penalty APR is 39.99%. Min Interest Charge is $2. Existing cardholders: See your credit card agreement terms. Subject to credit approval.
The estimated required monthly payment shown which excludes taxes and delivery equals the amount financed divided by the number of months in the promo period, rounded up to the next cent. During the last month(s) of the promo period the required monthly payment may be reduced due to this rounding. These payments apply only with the financing offer shown. If you make these payments by the due date each month, you should pay off this amount financed within the promo period, if it is the only balance you are paying off. If you have other balances on your account, this payment will be added to any other minimum monthly payments.
Applies only to select items from this manufacturer. Ask your Sweetwater Sales Engineer for more details.