
Roland TM-2 Setup Guide
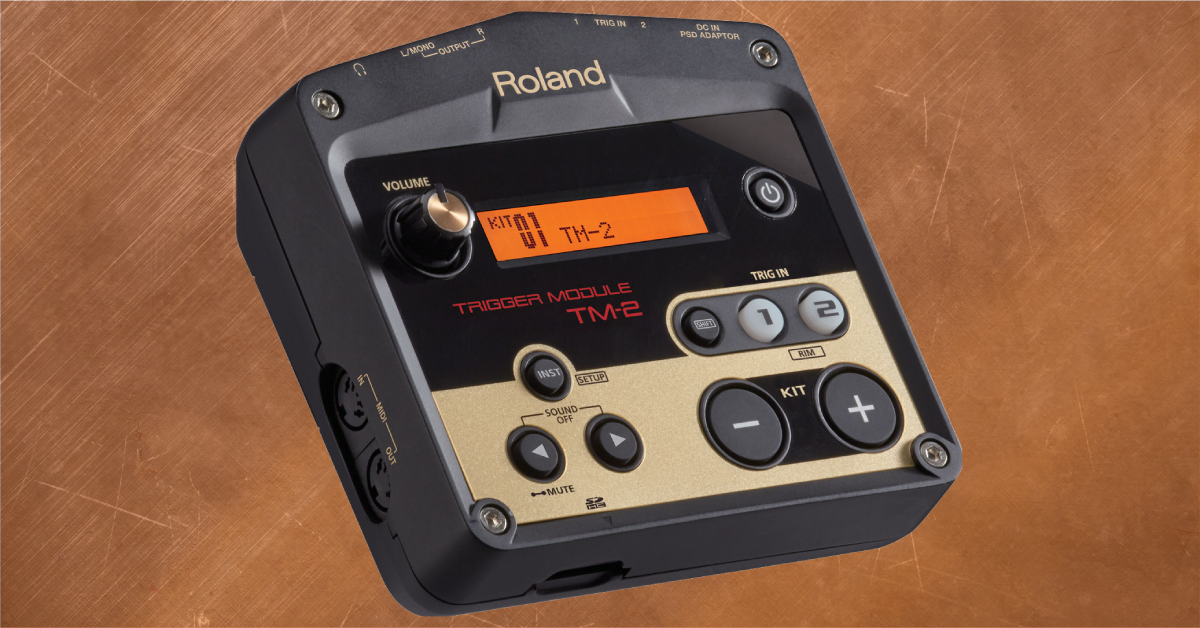
In this guide, we will show you how to register, set up, and use a Roland TM-2 electronic drum module for the first time. Follow the sections below to get started.
Register the device
Before we get started with your TM-2 module, the first thing to do is register the product with Roland. By registering the TM-2, you’ll receive an extended warranty, Roland’s product support, and exclusive training content.
- Log in to your Roland Backstage account. If you don’t have one yet, you can create one here.
- Roland will then send an account activation email to the registered email address to complete the account creation process.
- If you don’t receive an email, be sure to check your spam folder!
- On your account home page, click My Gear and select Register a Product.
- Fill out the required information, including the serial number located on the bottom of the module, and then click Register.
- Have your Sweetwater invoice with you, as you will need to enter the purchase date, method, and dealer (Sweetwater).
Update the TM-2 System Program version
IMPORTANT: You must format the SD card before transferring the System Program file over. Check out Page 17 of the TM-2 owner’s manual for instructions on how to format SD cards.
Roland will release updates to the TM-2, which will typically add new features and address any bugs that are present on the current System Program (firmware) version. Before you update the firmware, check the System Program version that’s currently installed and compare it to the latest one listed on the TM-2 download page.
Check the System Program version
- Turn the TM-2 on.
- Press and hold the SHIFT button and press INST.
- Use the arrow buttons to navigate to System, press the + button, and select INFO.
Update the System Program version
- Go to the Roland TM-2 download page and download the latest System Program listed.
- Insert the SD card into your computer, go to your Downloads folder, and then extract the TM-2 folder.
- Copy and paste the _BOOTPRG.ES_ file to the SD card’s root directory, then safely unmount the SD card from your computer.
- With your TM-2 powered off, insert the SD card.
- Press and hold the INST button then power on the TM-2. The process should take approximately 30 seconds.
- When prompted, power cycle the TM-2.
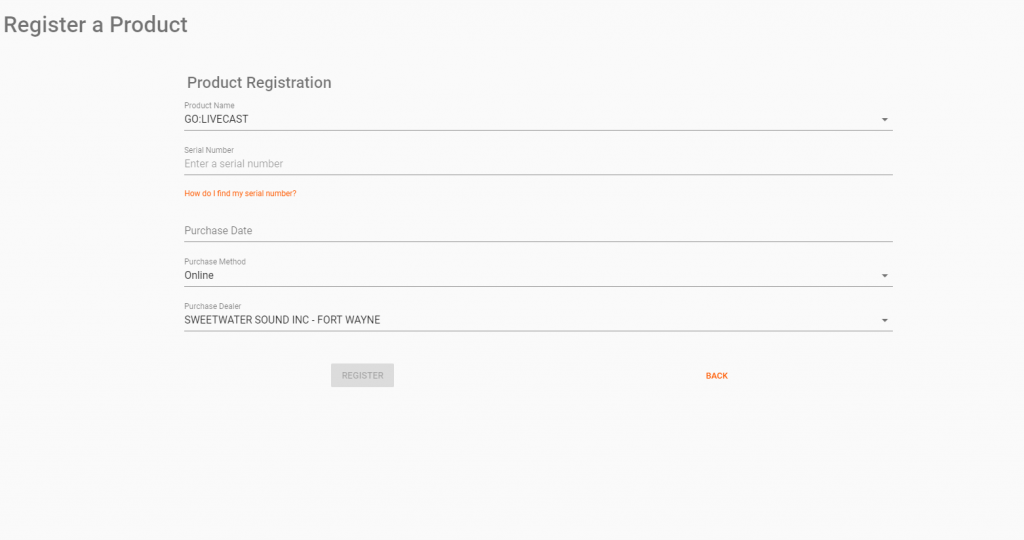
Click the image to register your Roland TM-2.
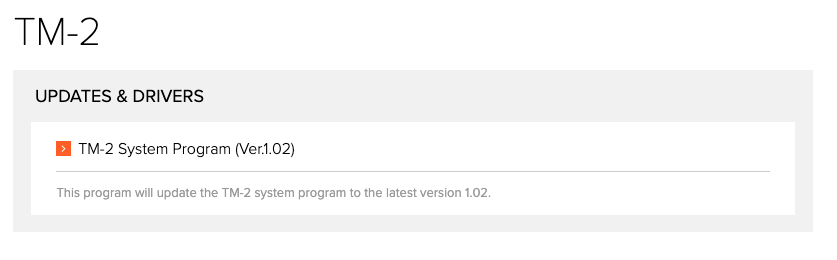
Click the image to download the Roland TM-2 System Program.
Setup and connections
IMPORTANT: Cymbal choke functions and triple-zone cymbal triggers (CY-15R, CY13R) are not supported on the TM-2.
The TM-2 is a fun yet powerful piece of gear for your drum setup. Not only can you get a unique sound out of your kit, but also, setting it up is a breeze — which means you’ll be up and running in minutes. All you need to do is connect the triggers to the TM-2 using TRS cables and select the type of pad you’re using within the module’s settings.
- If you want to connect two pads to one trigger input jack, then you’ll need a TS splitter cable. This will allow you to play the head on one pad and play the rim on the other. Please note that when connecting this way, the rim on a dual-zone pad will be disabled.
- Connect your pad(s) to the Trigger 1 and Trigger 2 input.
- Hold the SHIFT button and press INST.
- Press the + button, then press the right arrow button to enter the Trigger Setup Type menu.
- Press the Trigger 1 or 2 button to select the pad you want to change, then use the + or – buttons to select what type of pad is connected.
- Once you’ve chosen the pad, press INST to exit to the main screen.
Assigning samples to the pads
Once you have everything set up, you’ll be able to select the sounds you want to be triggered. You can assign four separate samples at one time and edit each sound. Assigning sounds couldn’t be easier, so follow these steps.
CUSTOM SAMPLES: You can import your own sounds via an SD card. Check out Page 10 of the owner’s manual for information on loading them to your TM-2.
- Press the – and + buttons while on the main screen to select a particular kit.
- Press the INST button, then hit the pad to which you want to assign the sample.
- Use the + and – buttons to select the sound you want, then hit the pad to assign the sound.
- Update the pad sound settings, and lastly, press INST to exit out to the main screen.
Related content
Drum Triggers 101: How to Start Using Drum Triggers

Additional resources
How to Use the Roland TM-2 Trigger Module
When you need help, Sweetwater has the answers!
Our knowledge base contains over 28,000 expertly written tech articles that will give you answers and help you get the most out of your gear. Our pro musicians and gear experts update content daily to keep you informed and on your way. Best of all, it’s totally FREE, and it’s just another reason that you get more at Sweetwater.com.


Offer applies only to single-receipt qualifying purchases. Select manufacturers may require that only the manufacturer’s products qualify towards the minimum purchase amount needed to be eligible for promotional financing. Otherwise, an invoice that meets the minimum purchase amount and contains at least one qualifying manufacturer product is eligible for promotional financing. No interest will be charged on promo purchase balance, and equal monthly payments are required on promo purchase until it is paid in full. The payments equal the amount financed divided by the number of months in the promo period, rounded up to the next whole dollar. These payments may be higher than the payments that would be required if this purchase was a non-promo purchase. During the last month(s) of the promo period the required monthly payment may be reduced due to the prior months’ rounding. Regular account terms apply to non-promo purchases. New Accounts as of 07/31/2025: Purchase APR is 34.99%. Penalty APR is 39.99%. Min Interest Charge is $2. Existing cardholders: See your credit card agreement terms. Subject to credit approval.
Offer applies only to single-receipt qualifying purchases. No interest will be charged on the promo balance if you pay it off, in full, within the promo period. If you do not, interest will be charged on the promo balance from the purchase date. The required minimum monthly payments may or may not pay off the promo balance before the end of the promo period, depending on purchase amount, promo length and payment allocation. Regular account terms apply to non-promo purchases and, after promo period ends, to the promo balance. New Accounts as of 07/31/2025: Purchase APR is 34.99%. Penalty APR is 39.99%. Min Interest Charge is $2. Existing cardholders: See your credit card agreement terms. Subject to credit approval.
The estimated required monthly payment shown which excludes taxes and delivery equals the amount financed divided by the number of months in the promo period, rounded up to the next cent. During the last month(s) of the promo period the required monthly payment may be reduced due to this rounding. These payments apply only with the financing offer shown. If you make these payments by the due date each month, you should pay off this amount financed within the promo period, if it is the only balance you are paying off. If you have other balances on your account, this payment will be added to any other minimum monthly payments.
Applies only to select items from this manufacturer. Ask your Sweetwater Sales Engineer for more details.