
Roland SPD-SX Setup Guide
Getting started with the Roland SPD-SX
In this guide, we will show you how to get up and running with the Roland SPD-SX. You’ll learn how to register, set up, and use the device for the first time. Follow the sections below to get started. This article only scratches the surface so feel free to check out the Roland SPD-SX manual for more information!
Register the serial number
Before we dive into setting up your SPD-SX, the first thing to do is register the product with Roland. By registering the SPD-SX, you’ll gain access to Roland’s product support, an extended warranty, training videos, and clinic information. Follow the steps below to register and then continue to setup and configuration.
- Log in to your Roland Backstage account. If you don’t have one yet, you can create one here.
- Roland will then send an account activation email to the registered email address to complete the account creation process.
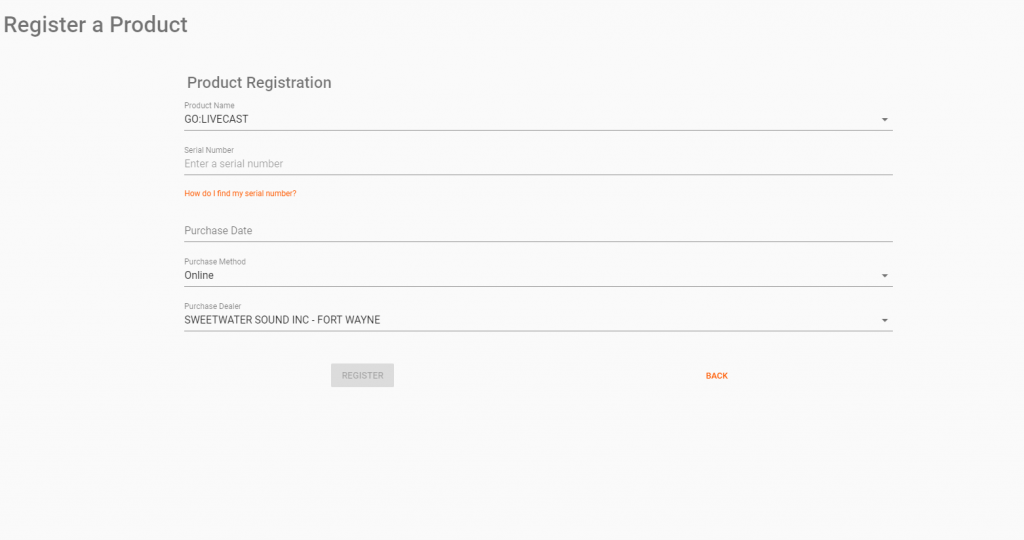
- On your account home page, click My Gear and select Register a Product.
- Fill out the required information, including the serial number located on the bottom of the SPD-SX, and click Register.
- Keep your Sweetwater invoice handy, as you will need to enter the purchase date, method, and Dealer (Sweetwater).
Click here to register your SPD-SX with Roland.
SPD-SX setup and configuration
Your SPD-SX can connect to your live or studio rig in a variety of ways. Hooking it up and routing samples to pads is really easy so you can be making music sooner. Follow the sections below to learn how to connect it to external hardware and to your computer. Check out the Roland SPD-SX manual for more setup information.
Hardware
Audio In
To sample or record audio, connect a dynamic microphone or playback device to the Audio In jacks. The SPD-SX doesn’t supply phantom power, so condenser microphones will not work. Make sure to connect with the input gain turned all the way down. Once connected, turn it up to set the input signal’s gain level.
- Use the Gain knob on the back to adjust the input level before recording audio to the SPD-SX.
- Open the MENU, and go to the SYS Settings to adjust the Audio In volume and routing.
Footswitch
You can connect up to two footswitches to the SPD-SX via ¼” TRS cables. The footswitches can control various functions such as switching between kits, turning effects on or off, and also trigger pads. Check out our guide for instructions on how to configure the footswitches with your SPD-SX.
- Roland FS-5U and FS-6 pedals are recommended for best performance possible. The Roland FS-5L is incompatible.
- Depending on which pedal you are using, you may need to change the polarity settings on the SPD-SX.
- Learn more about footswitches and external pads in the Roland SPD-SX manual.
Trigger In
You can have up to four external pads to trigger samples and change functions. Depending on which pad you’re using, you’ll need to change the type within the Trigger In menu. While third-party drum pads can be used, it’s recommended to use compatible Roland pads for the best performance.
- Connect two single-zone pads to the SPD-SX using a ¼” TRS to dual TS cable. You will then need to change the input mode within the Trigger In settings from HEAD & RIM to TRIGx2.
- If using an external third-party pad, go into the Trigger In settings and change it to PD-8. If you experience triggering issues, you may need to adjust sensitivity parameters afterward.
MIDI
You can connect the SPD-SX to and from external devices such as drum samplers or external synthesizers via 5-pin MIDI cables. You can also assign MIDI Program and Control Changes to external synthesizers.
- Change individual pad MIDI settings by going to the Kit settings inside the Menu.
- For a full list of every MIDI parameter that can be changed, visit the Roland SPD-SX manual.
Outputs
There are two sets of outputs available; the Main outs and Sub outs. The Mains are the primary output source, and the Sub outs are for connecting to an additional source, such as a stage monitor or a mixing board.
- Any pad and the Audio In source can all be individually routed to the Sub Out.
- Adjust the Sub Out volume by opening the menu, going to the SYS settings, and selecting the Audio In/Out option.
- You can assign a second sample to trigger through the Sub out, creating a layered sound. Visit our Working with Kits guide for more information.
Computer
You can record audio and MIDI data via USB cable into your DAW, or you can use the SPD-SX Wave Manager app to import and export samples. The SPD-SX is class-compliant on Windows, which means no additional driver software is required. macOS users will need to download an additional driver.
- Go to the SPD-SX download page, and download the latest version of Wave Manager. Mac users must also download the latest available driver.
- Go to your Downloads folder and unzip the compressed folder:
- PC: Right-click the .zip file, select Extract all…, and then click Extract. Open the uncompressed folder, launch the installer, and follow the on-screen instructions.
- Mac: Double-click the .zip file, open the uncompressed folder, launch the installer, and follow the on-screen instructions.
- Connect a USB cable from the Computer port on the SPD-SX to an available USB port on your computer. For best connectivity, Roland recommends connecting it to a USB 2.0 port.
- On the SPD-SX, press Menu, select Setup and choose Option.
- Change the USB mode to one of the following:
- Wave Mgr: Allows you to transfer files to and from the SPD-SX via the Wave Manager app.
- Audio/MIDI: Enables audio and MIDI streaming through the USB cable so you can record the SPD-SX within your DAW.
How to build a kit on the SPD-SX
There are over 200 factory Waves (sounds) and 16 kits built into the SPD-SX, but you can also import custom samples via a USB thumb drive or through your computer. Let’s create a kit to get you up and running. For in-depth info on customizing a kit, check out the Roland SPD-SX manual.
Change a pad sample
- While on the main screen, press the + or – button to select a kit and then play the pads to preview the sounds.
- Press MENU, select PAD and then hit the pad you wish to change the sample.
- Press + or – to change the sample, and then press EXIT two times to get back to the main screen. The changes will be automatically saved to the kit.
Name the kit
- Press the QUICK button, use the DOWN cursor arrow to select KIT NAME, and then press ENTER.
- Use the LEFT and RIGHT cursor arrows to choose the character you want to edit, and then use the + and – buttons to change the character.
- Press ENTER to save the kit name. You’ll be taken back to the main kit screen.
Adjust pad sensitivity and response
Once you’re happy with the sound of your new kit, you may need to optimize the sensitivity and threshold settings on the pads. That means you need to adjust the response in relationship with how hard or dynamic you play. While the factory default settings will work fine for most, you may experience mis-triggering or ghost notes depending on your playstyle.
- Press the MENU button, choose SETUP and then select PAD SENS.
- Play the pad you need to adjust, and use the LEFT and RIGHT cursor buttons to change the following settings, if necessary.
- Sensitivity: Adjusts how sensitive the pad is when struck lightly. The higher the sensitivity, the lighter strike it will take to trigger a loud sample.
- Threshold: Adjusts when the sample is triggered at a specific velocity. A higher threshold level means you must play harder to trigger the sound.
- Velocity Curve: Changes the relation between the velocity and volume of the sample. This is particularly useful when you want more natural dynamics for a pad.
Additional resources
- Roland SPD-SX Download page
- Roland SPD-SX User Manual
- Roland SPD-SX USB Flash Drive Compatibility List
- Roland SPD-SX Turbostart Guide
When you need help, Sweetwater has the answers!
Our knowledge base contains over 28,000 expertly written tech articles that will give you answers and help you get the most out of your gear. Our pro musicians and gear experts update content daily to keep you informed and on your way. Best of all, it’s totally FREE, and it’s just another reason that you get more at Sweetwater.com.


Offer applies only to single-receipt qualifying purchases. Select manufacturers may require that only the manufacturer’s products qualify towards the minimum purchase amount needed to be eligible for promotional financing. Otherwise, an invoice that meets the minimum purchase amount and contains at least one qualifying manufacturer product is eligible for promotional financing. No interest will be charged on promo purchase balance, and equal monthly payments are required on promo purchase until it is paid in full. The payments equal the amount financed divided by the number of months in the promo period, rounded up to the next whole dollar. These payments may be higher than the payments that would be required if this purchase was a non-promo purchase. During the last month(s) of the promo period the required monthly payment may be reduced due to the prior months’ rounding. Regular account terms apply to non-promo purchases. New Accounts as of 07/31/2025: Purchase APR is 34.99%. Penalty APR is 39.99%. Min Interest Charge is $2. Existing cardholders: See your credit card agreement terms. Subject to credit approval.
Offer applies only to single-receipt qualifying purchases. No interest will be charged on the promo balance if you pay it off, in full, within the promo period. If you do not, interest will be charged on the promo balance from the purchase date. The required minimum monthly payments may or may not pay off the promo balance before the end of the promo period, depending on purchase amount, promo length and payment allocation. Regular account terms apply to non-promo purchases and, after promo period ends, to the promo balance. New Accounts as of 07/31/2025: Purchase APR is 34.99%. Penalty APR is 39.99%. Min Interest Charge is $2. Existing cardholders: See your credit card agreement terms. Subject to credit approval.
The estimated required monthly payment shown which excludes taxes and delivery equals the amount financed divided by the number of months in the promo period, rounded up to the next cent. During the last month(s) of the promo period the required monthly payment may be reduced due to this rounding. These payments apply only with the financing offer shown. If you make these payments by the due date each month, you should pay off this amount financed within the promo period, if it is the only balance you are paying off. If you have other balances on your account, this payment will be added to any other minimum monthly payments.
Applies only to select items from this manufacturer. Ask your Sweetwater Sales Engineer for more details.