
Pioneer DJ XDJ-XZ Quickstart Guide

The Pioneer DJ XDJ-XZ is a fantastic all-in-one DJ controller packed with features perfect for any occasion. In this guide, we will show you how to register, set up, and use the XDJ-XZ for the first time. This only scratches the surface, so check out the XDJ-XZ Quickstart Manual and Operating Instruction Manual for more information!
Register the XDJ-XZ
Before getting connected, you must register the XDJ-XZ with Pioneer. Once registered, you will gain access to the necessary firmware and software for the controller to work correctly. Keep your Sweetwater invoice handy, as you’ll need to enter some information during registration!
- Log into your Pioneer DJ account. If you don’t have one yet, create it here.
- Once logged in, click your name at the top right corner of the page, then click the blue Register Product box.
- In the Product Name field, type, then select the XDJ-XZ.
- Enter the Serial Number on the bottom side of the unit, the purchase date, and the place of purchase. Click Register.
Download the Software
Your XDJ-XZ comes with free copies of Serato DJ Pro and rekordbox. No activation is required since it is a native controller for both, so you just need to download and install them. You will also need to download and install its driver software before connecting it to your computer so it can work properly.
PC USERS: If you’re a Windows 10 user, you must download the USB CONNECTION (LINK Export) driver to use the rekordbox Link Export feature.
Update the XDJ-XZ Firmware
Pioneer DJ will release new firmware versions periodically, which often adds new features and addresses any bugs that are currently present.
Check the Firmware Version
Before updating the firmware, you first want to check what version is currently installed. If it matches that of the website, you’re good to go.
- Go to the XDJ-XZ software & firmware updates page and look at the latest firmware version number.
- Power on your XDJ-XZ, then press and hold the MENU (UTILITY) button until the UTILITY screen appears.
- Use the knob to the right of the screen to scroll down until you see the firmware version number.
Update the Firmware
If the firmware is out-of-date, You will want to update it. This ensures everything works properly. You must use a USB thumb drive, and it must be in the FAT32 format. If you’re not sure how to correctly format an external device, check out our guide to learn more.
- Download the latest firmware version from the XDJ-XZ software & firmware updates page.
- Navigate to your Downloads folder, extract the firmware installer, transfer it over to your formatted USB thumb drive, and then safely eject the USB thumb drive.
- Do NOT rename the file, and make sure that it’s placed in the USB thumb drive’s root directory.
- Press and hold the USB 1 and RELOOP/EXIT buttons while powering on the unit until you see Connect USB storage device into to USB1 port.
- Insert your USB thumb drive into the USB1 port on the right side of the controller. The firmware update process will then begin.
- Do not connect anything to the USB2 port!
- Power cycle the XDJ-XZ once you see Firmware update is complete. Turn the power off/on before using, then disconnect the USB thumb drive.
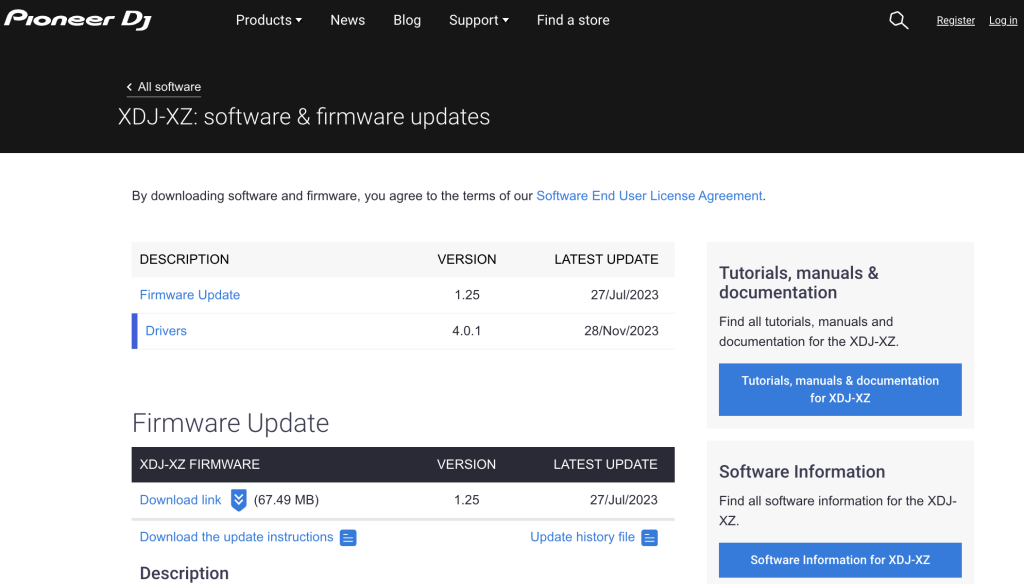
Click the image to download the Pioneer DJ XDJ-XZ firmware
Setup and Connections
Setting up your XDJ-XZ is straightforward. Outside of the standard connections, there are a few things you should know.
- You can connect media players via the LINK CH3 and LINK CH4 using cat5e (Ethernet) cables. This is particularly useful if you want to utilize turntables with DVS.
- You can only utilize decks 1 and 2 if streaming audio from USB thumb drives.
- If you have the rekordbox app, you can connect iPhones and Android devices via the USB 1 or USB 2 ports. This is useful when you don’t have access to a computer but still want to DJ.
- If you need to switch computers (or if another DJ is about to go live and use the same XDJ-XZ), you can use a USB thumb drive to stream the last song while they’re setting up.
Working with the Pioneer DJ XDJ-XZ
The XDJ-XZ has enough features to satisfy any DJ’s needs out there. We’ll cover the basics to get you up and running, so be sure to check out the Operating Instruction Manual to learn more!
- Connect your XDJ-XZ to your computer and launch your Serato or rekordbox.
- Press the LINK button, then press the LOAD 1 and 2 buttons to sync the DJ controller with the software. You should now see Serato or rekordbox beneath each deck on the main display.
- Press BROWSE and use the main encoder knob to select the track you want to load.
- Press the LOAD 1 and 2 buttons to assign the track to the deck.
- To change to decks 3 and 4, double-press the SHIFT button on the associated deck. Deck 1 (left) is assigned to decks 1 and 3. Deck 2 is assigned to decks 2 and 4.
- To assign tracks to decks 3 and 4, select the deck, press BROWSE, and use the main encoder knob to assign the track.
- If a deck is empty, the LOAD 1 or 2 button will not be lit.
- Press the 1 or 2 button (depending on what deck you’re using) to load the track. Once the track is loaded, the LOAD 1 or 2 button will light up.
Switching Over
As mentioned earlier, if you need to switch to another computer or another DJ is using your rig, you can stream music from a USB thumb drive so the song keeps playing while you are switching over.
- Connect a USB thumb drive to one of the USB ports.
- While you have music playing on deck 1, press the USB button associated with the port the thumb drive is connected to located under the LINK button. You will now see all music stored on the USB thumb drive.
- Use the main encoder knob to select your track, then press the LOAD 2 button. The button will begin to flash.
- Press the LOAD 2 button again. This will load the track to the deck.
- Turn off Deck 1, disconnect the USB cable connected to your computer, and swap the computers out. Make sure the software is loaded and ready to go on the other computer!
- Once the new computer is connected, press LINK,then press LOAD 1. Deck 1 is now synced with Serato.
- Press LOAD 2 twice. Deck 2 is now sync’d with Serato and will no longer stream music from the USB thumb drive.
Related Articles
When you need help, Sweetwater has the answers!
Our knowledge base contains over 28,000 expertly written tech articles that will give you answers and help you get the most out of your gear. Our pro musicians and gear experts update content daily to keep you informed and on your way. Best of all, it’s totally FREE, and it’s just another reason that you get more at Sweetwater.com.

