
Melodyne Quickstart Guide
In this guide, we will show you how to use Melodyne for the first time. The basics that will be discussed are applicable to all versions of the software. If you own the Assistant, Editor, or Studio edition, there are more features available, so check out Celemony’s interactive video tutorials for more information. Follow the sections below to get started.
Import audio into Melodyne
Melodyne is pitch correction software that works by receiving recorded audio and analyzing the pitch and tempo. It then separates the notes into blobs, which you can then edit individually as necessary. There are a few ways to import audio; either through your DAW as an effects plug-in or recording/importing the audio using the standalone app.
DAW
You can load the Melodyne plug-in on any audio track within your DAW. If you use an ARA-supported DAW such as Cubase, Studio One, or Logic, it can be used without needing to instantiate it on any tracks. If your DAW supports ARA, visit its user manual to learn how to integrate it with Melodyne.
TIP!
Place Melodyne as the first plug-in on an audio track. If you have effects such as delay or compression in front of it, Melodyne will also record that. Having a clean and dry signal will ensure you get the best results possible.
- Open the Melodyne plug-in and then set the playback marker in your DAW to the start of the audio track that needs correction.
- Click the Transfer button in Melodyne to “record arm” the plug-in and then press play in your DAW to transfer the audio.
- Once completed, press stop. The Transfer will automatically be disabled.
- Melodyne won’t display the waveform in real-time. Once playback has stopped, it will analyze the audio and then it will appear.
What is ARA?
ARA, which stands for Audio Random Access, is a way for a DAW and plug-in to communicate with each other much more closely. This means the integration is more seamless as if the plug-in is already built into your DAW. Check out this Celemony article for more information about how it works and which DAW’s are ARA compatible.
Standalone
When you install the Melodyne plug-in, it will also install the standalone app. The standalone app lets you record audio directly into the software. You can also import any existing audio file. Standalone mode is especially useful if you don’t use a DAW or need to edit an individual track. Before you begin, you first need to update your audio settings.
- Launch the Melodyne app, click File, and then select Preferences.
- Click the top drop down box in the window that appears and select Audio.
- Select your audio device, sample rate, buffer size, and the default inputs and outputs.
- If using an older or slower system or if you’re experiencing a lot of dropouts, check the Ignore buffer underruns box.
- Press the Record button to arm the track, and then press Play to begin recording. Once you’ve completed recording, press Stop.
- To import audio, click File, select Import Audio and choose the audio you wish to edit. You can also drag and drop files into Melodyne from your system’s file browser.
Pitch correction algorithms
All versions of Melodyne have pitch correction algorithms that help you fine-tune your edits even further. Depending on the audio track, you may want to choose one over the other. For example, the Melodic algorithm is geared towards vocals, whereas the Percussive algorithm focuses primarily on instruments like the drums.
- Melodic: Best used for monophonic instruments, meaning instruments that typically only play one note at a time, such as vocals or bass guitar. The notes (blobs) will show up on different pitches.
- Percussive: Preferred for drums and drum loops. While the audio will display on the same pitch, but you can still change it.
- Universal: Used for audio that includes notes, as well as percussive elements. This is particularly useful if you need to edit the pitch or tempo of an entire song.
- Polyphonic (Editor and Studio versions only): This algorithm will detect individual notes in chords from instruments like guitars, pianos, and even choirs. It detects pitch and cannot separate instruments, so if you have a guitar and piano playing the same chord on the same track, you won’t be able to separate them.
Choose the algorithm
By default, Melodyne will automatically choose what it thinks is the best algorithm based on the audio file. You can change the pitch algorithm at any time without needing to re-record the audio. To do this, navigate to the Algorithm menu and select the one you want. If you already know that you’re only using the software for vocal editing, for example, you can change it through the Set Default option of the Algorithm menu.
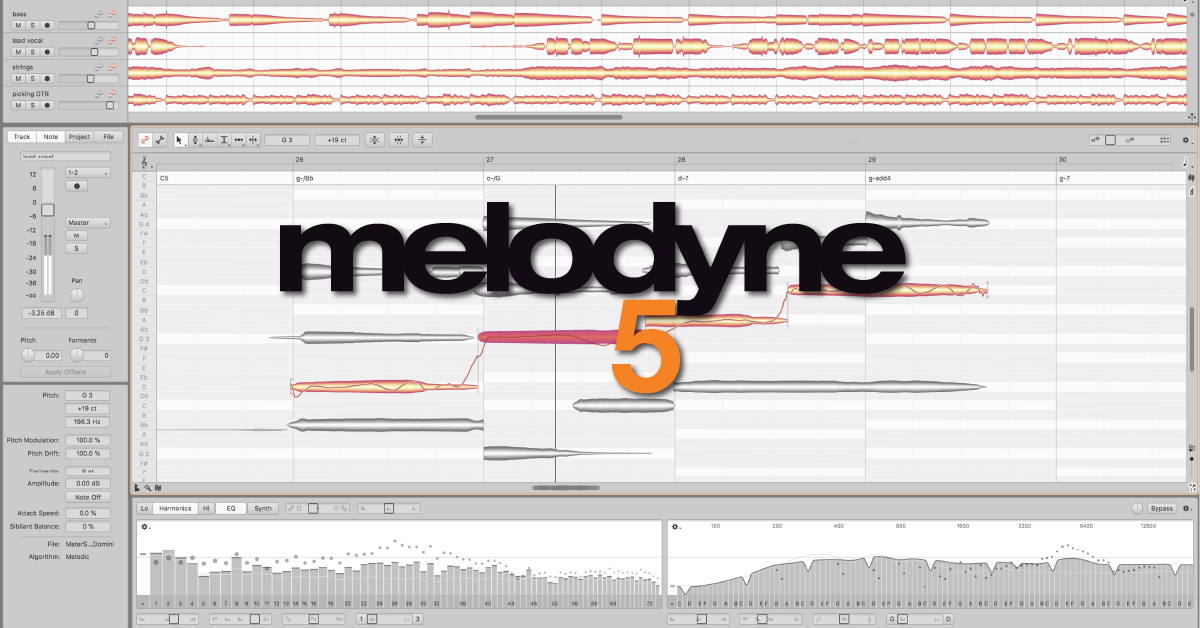
Editing audio
Melodyne’s interface is quite easy to navigate. You’ll primarily use the Main tool (arrow) but there are additional macros available to help further edit audio. All you need to do is click and drag the blob (note) up or down to change pitch. To change the time, drag the blob left or right. To split, hover your mouse over the blob and double-click. When adjusting pitch and time, the blob will snap to the closest pitch or beat. Hold Alt (PC) or Cmd (Mac) and drag the note to override the snap.
- Click the clef icon and select the type of pitch snap; Scale, Chromatic, or None.
- Use the Correct Pitch macro to fine-tune a selection of notes to their note centers quickly. You can also adjust the pitch drift, which flattens out the note.
- Use the Quantize Time macro to quantize the selected blobs.
- Copy and paste blobs to other notes to create harmonies.
- When Melodyne analyzes the audio track, it detects what key it’s in. You can change this by clicking the Scale Editor icon on the bottom left of the window.
Exporting projects
Once you’ve completed your project, you can then export it in a few different formats. .WAV, .AIFF, and Tempo Map. The tempo map is a MIDI file that you can import into your DAW. If you own the Assistant, Editor, or Studio edition, you can also export the notes as a MIDI file.
- Click File and select Export.
- Select the file type, sample rate, bit-depth, and one of the following ranges:
- Entire length: Exports the entire audio file from beginning to end, including the tails.
- Cycle range only: Exports only the audio between the cycle locators.
- Click Export, and select the folder you wish to send the completed audio file to.
When you need help, Sweetwater has the answers!
Our knowledge base contains over 28,000 expertly written tech articles that will give you answers and help you get the most out of your gear. Our pro musicians and gear experts update content daily to keep you informed and on your way. Best of all, it’s totally FREE, and it’s just another reason that you get more at Sweetwater.com.


Offer applies only to single-receipt qualifying purchases. Select manufacturers may require that only the manufacturer’s products qualify towards the minimum purchase amount needed to be eligible for promotional financing. Otherwise, an invoice that meets the minimum purchase amount and contains at least one qualifying manufacturer product is eligible for promotional financing. No interest will be charged on promo purchase balance, and equal monthly payments are required on promo purchase until it is paid in full. The payments equal the amount financed divided by the number of months in the promo period, rounded up to the next whole dollar. These payments may be higher than the payments that would be required if this purchase was a non-promo purchase. During the last month(s) of the promo period the required monthly payment may be reduced due to the prior months’ rounding. Regular account terms apply to non-promo purchases. New Accounts as of 07/31/2025: Purchase APR is 34.99%. Penalty APR is 39.99%. Min Interest Charge is $2. Existing cardholders: See your credit card agreement terms. Subject to credit approval.
Offer applies only to single-receipt qualifying purchases. No interest will be charged on the promo balance if you pay it off, in full, within the promo period. If you do not, interest will be charged on the promo balance from the purchase date. The required minimum monthly payments may or may not pay off the promo balance before the end of the promo period, depending on purchase amount, promo length and payment allocation. Regular account terms apply to non-promo purchases and, after promo period ends, to the promo balance. New Accounts as of 07/31/2025: Purchase APR is 34.99%. Penalty APR is 39.99%. Min Interest Charge is $2. Existing cardholders: See your credit card agreement terms. Subject to credit approval.
The estimated required monthly payment shown which excludes taxes and delivery equals the amount financed divided by the number of months in the promo period, rounded up to the next cent. During the last month(s) of the promo period the required monthly payment may be reduced due to this rounding. These payments apply only with the financing offer shown. If you make these payments by the due date each month, you should pay off this amount financed within the promo period, if it is the only balance you are paying off. If you have other balances on your account, this payment will be added to any other minimum monthly payments.
Applies only to select items from this manufacturer. Ask your Sweetwater Sales Engineer for more details.