
iLoud Prec MTM Monitor Quickstart Guide
In this guide, we will show you how to register, set up, and use the iLoud Precision MTM monitors for the first time. This article only scratches the surface, so be sure to check out the MTM Monitor and X-Monitor User Manuals located in IK Product Manager for more information! Follow the sections below to get started.
Register the Monitors
Before you get set up and connected, you must register your monitors with IK Multimedia. Upon registration, you will gain access to the X-Monitor software, which you will need when calibrating the speakers.
- Log into your IK Multimedia account. If you don’t have an account yet, click the Register button and fill out the necessary information to create a new account.
- Download and install IK Product Manager for your OS.
- Once installed, launch the app, then log in using your IK Multimedia account credentials.
- Once logged in, click Manage My Products, select Register Product, then enter the serial number of your Precision MTM monitors.
- Click Hardware, select Software, and then download your system’s latest version of X-Monitor.

Setup and Calibration
KEEP THE MONITORS VERTICAL: It is recommended to have the Precision MTMs in a vertical position, as it will minimize any desk reflection!
Once your monitors are registered and the X-Monitor software is installed, the next step is setting up and calibrating your monitors. The position of your monitors plays a big role in getting a great sound, so be sure they’re set at the proper listening position.
- Set up your monitors, connect them to your interface, and turn the volume knob up.
- The monitor volume doesn’t matter too much, as the test tone is already at an optimized level.
- Have the tweeters as close to ear level as possible.
- Connect the monitors to the computer when you’re using them with the X-Monitor software.
- We highly recommend you connect them directly to the computer, as USB hubs will result in an unreliable connection.
Calibration
IMPORTANT: For the most accurate result possible, be sure the room you’re calibrating is as quiet as possible.
After correctly setting up your MTM monitors, you’ll need to calibrate the speakers directly on the monitors or by using the X-Monitor software. When you calibrate your monitors, you’ll need to ensure that the tweeters are in listening position and that the mic and monitors are in an equilateral triangle.
Calibrate using your monitors
Calibrating your monitors directly on your monitors is a straightforward process. With the press of a few buttons, you’ll be up and running in no time.
- Place the mic at your primary listening position, then connect the included ARC mic to the ARC MIC IN using the XLR to 3.5mm.
- Press and hold the CAL button on the rear of the monitor. You should now hear a test sweep through the monitor a few times.
- Once the analysis is complete, the LED on the front of the monitor should turn solid green.
Calibrate using X-Monitor
While you can quickly calibrate your MTM monitors directly from them, you can also calibrate them via the X-Monitor software. Connect your monitors, launch X-Monitor, and run the calibration process as outlined in the video below.
Using the X-Monitor Software
The X-Monitor software has excellent features to get the best sound possible. From emulating different voicings to fine-tuning your monitors after calibration, you have total control of your MTM monitors. To give you a better understanding, let’s navigate the software. Also, be sure to check out the X-Monitor User Manual for in-depth information!
Identification and voicing

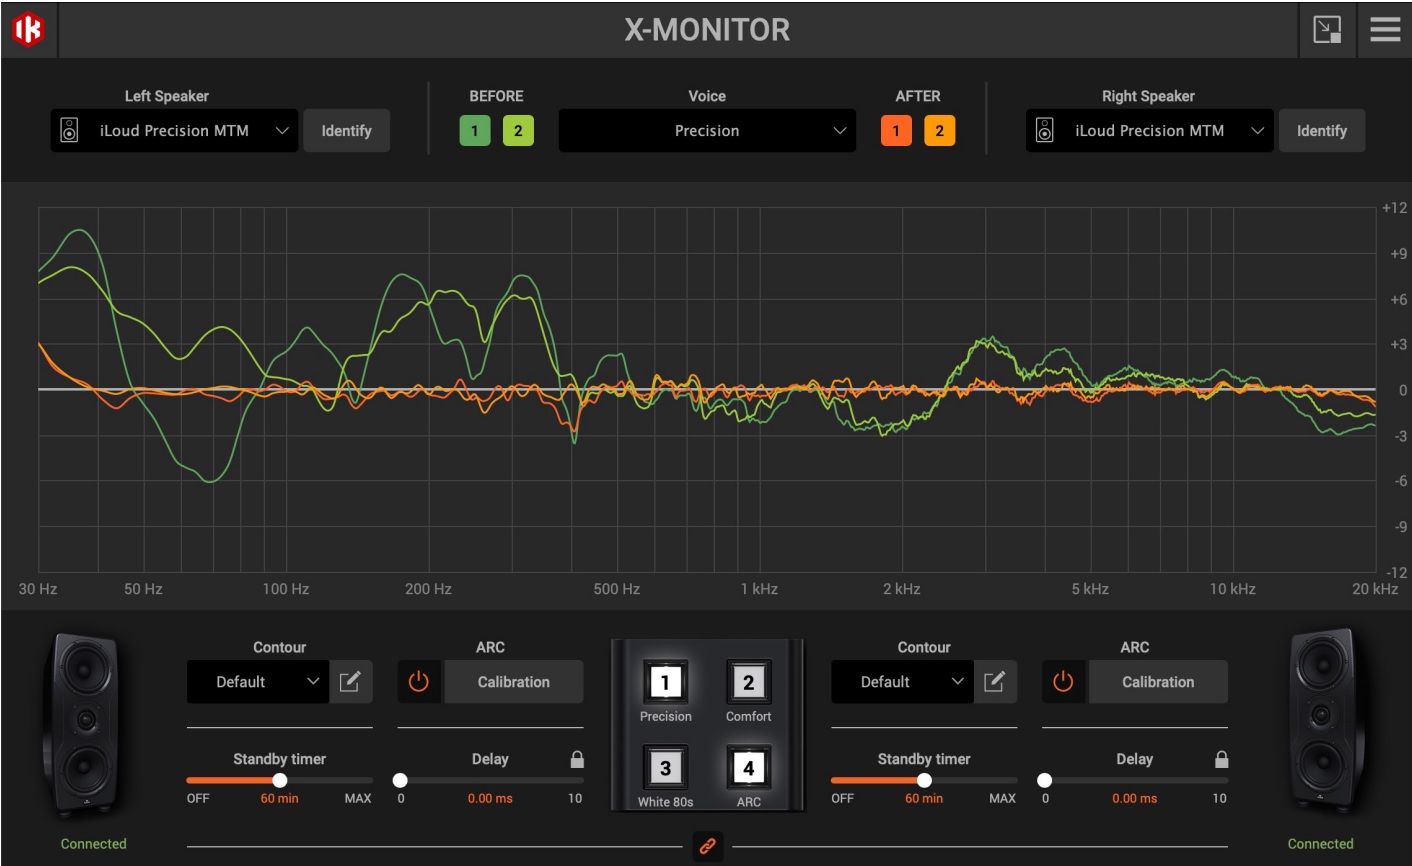
The top section of the software is dedicated to monitor identification and voicing.
- After you connect the monitors via USB and launch the X-Monitor software, you will need to use the dropdown boxes underneath Left Speaker and Right Speaker. After that, click Identify.
- Click the Before and After buttons to hear the output before and after calibration.
- Use the Voice dropdown box to select different ‘voice’ presets. This allows you to hear how your mix translates to various conditions (e.g., mobile devices, high-end speakers).
Frequency response and contour view

NOTE: You can load the frequency curve even before performing the calibration, but you will only be able to view the selected frequency response, which will be indicated by a thick gray line.
This section is self-explanatory. After you’ve calibrated your monitors, you’ll be able to see the frequency before and after correction. When you click one of the Before or After buttons, you’ll be able to isolate and view the frequency response of the specific monitor.
You can also view and edit the contour curves, which is particularly useful when you’re in a room and you need to fine-tune the room correction. Check out IK Multimedia’s video below to learn more about contours and how to use them.
MTM Monitor Firmware Update
IMPORTANT: Do not disconnect or power off the speakers or computer! This will result in a failed update and may cause damage to the speakers.
The X-Monitor software will scan for the monitor’s firmware version whenever the monitors are connected to your computer via USB. If new firmware is available, the software will notify you if the monitor’s firmware is out of date. IK Multimedia has simplified the process, so you don’t have to download and transfer files.
- If you receive a “Firmware Update Needed” window, click Update Firmware.
- Once the firmware update is complete, you should receive a notification that the firmware is up to date.
- If you’ve received an alert stating the firmware update has failed, power cycle the speakers, then try it again. If the issue continues, you must contact IK Multimedia support.
Recovery Mode
NOTE: Only one speaker in DFU mode must be connected to the USB port while in Recovery Mode, which means you’ll need to disconnect all other speakers via USB and perform the procedure one monitor at a time.
On rare occasions, there may be a time when the firmware update fails when the speaker(s) are in DFU mode, which is indicated by a solid blue LED on the monitor’s front panel. If this occurs, the controls in X-Monitor will become inoperable. To solve this issue, you’ll need to enter Recovery Mode.
- Open Settings within X-Monitor, then click Recovery.
- Follow the on-screen instructions to force the firmware update.
- Recovery Mode will erase all user settings and will perform a factory reset.
When you need help, Sweetwater has the answers!
Our knowledge base contains over 28,000 expertly written tech articles that will give you answers and help you get the most out of your gear. Our pro musicians and gear experts update content daily to keep you informed and on your way. Best of all, it’s totally FREE, and it’s just another reason that you get more at Sweetwater.com.

