
EZBass Quickstart Guide

Getting started with EZBass
In this guide, we will show you how to get up and running in Toontrack’s EZBass virtual instrument. That means we’ll go through each section of the software. We’ll also show you how to record MIDI and audio. Follow the sections below to get started.
EZBass audio and MIDI device setup
If you’re using an external audio interface or a MIDI controller, the first thing you’ll want to do is update the EZBass audio and MIDI settings. You only need to update these settings if you’re using EZBass in standalone mode. If using it as a virtual instrument plug-in inside your DAW, continue to Navigate EZBass.
- Click Settings, then select Audio/MIDI Setup…
- Update the following settings as necessary:
- Audio Device: Updates your audio interface settings.
- Output channels: Updates the main outputs. If you have an interface with more than one set of outputs and want to send it to another location (i.e., headphone mixer), check the Multi-out box.
- In Channels: If you plan on recording into the EZBass standalone app, update the inputs you’ll be using.
- MIDI Device: Select the external MIDI controller you’re using.
- MIDI Channel: Updates the main MIDI channel EZBass will trigger. Leaving this to Any will be fine in most situations unless you’re using multiple MIDI devices.
- Once all of the settings are updated, click Apply, then click OK.
Audio hardware not showing up?
If your audio hardware devices aren’t showing up, be sure to visit our guides on resolving audio interface issues and resolving MIDI device issues.

Audio setup window.
Navigate EZBass
There are five tabs that you’ll be working with when using EZBass: Bass, Grooves, Grid Editor, Drums & Keys, and Audio Tracker. With the exception of the Bass tab, all of the windows can be detached by clicking the two squares located at the top right corner of its tab. This speeds up your workflow, so you don’t have to switch back and forth between tabs continually.
Bass
The Bass window is the “homepage” of EZBass. From here, you can adjust the effects of the currently selected bass, update the tuning (Perfect, Bass, or Piano), and if you don’t have an external MIDI controller, you can record MIDI parts by clicking each of the strings.
- To change the bass preset, click the library dropdown at the top right hand of the window, then select the preset using the next dropdown box. Take note of the directory it’s located in: Finger or Pick, as not all articulation options will be the same.
- Each preset comes with built-in effects. You cannot add additional effects to the currently selected preset.
- You can tune the entire bass down by lowering the semitones within the Tuning menu. However, you cannot tune individual strings. This means you can’t, for example, have “Drop D” tuning where only the low E string is tuned down.
Grooves
EZBass comes with hundreds of preset MIDI bass loops. They’re all sorted by genre, style, type, time signature, and resolution (rhythms based on note values). These can all be filtered out, making it easier for you to find the right bassline for your song. You can also search loops and libraries by name.
- When you click Tap2Find… you can tap in a rhythm or record a melody, then click Find Similar Grooves to sort loops that closely match that of yours.
Grid Editor
The Grid Editor is the main window you’ll use when editing MIDI in EZBass. As you can see, there are quite a few functions you’ll be using. This includes articulations (i.e., fingerpicking, ghost notes, slap), adding slide and legatos, quantizing, and changing velocity.
- The articulations available will vary depending on which bass preset you select. If the Pick articulation options aren’t appearing, that means you have a preset which is in the Finger preset directory.
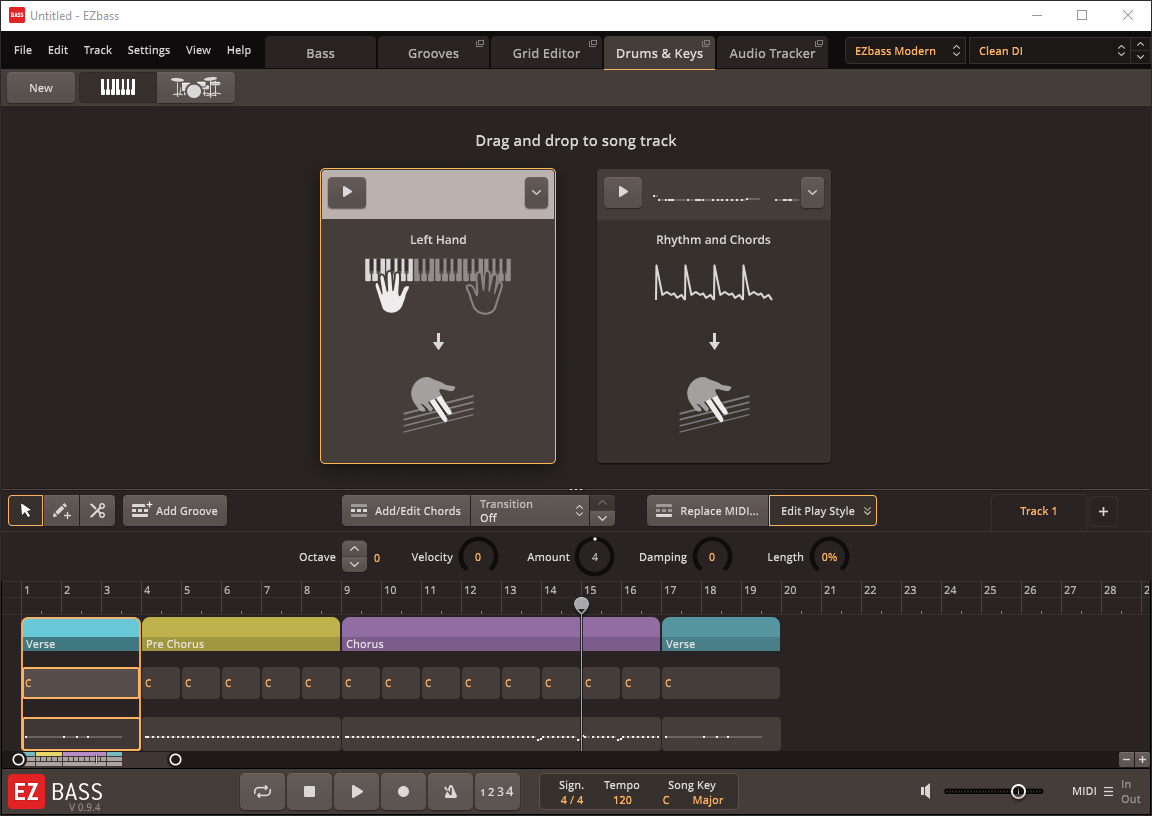
Drums & Keys
A unique feature in EZBass is that you can import a MIDI keyboard or drum file, and it will create a simple bassline based on the option you choose. If you select Drums, it will create a pattern that only follows the root note of the track. When selecting Keys, you can either create a pattern that only follows the root note of each chord (Left Hand) or create one which does that and also follows the rhythm of the track (Rhythm and Chords).
- When using the Left Hand option, the upper limit/cutoff where notes are played is MIDI note 50. This means any notes above it will not trigger.

Drums options in Drums & Keys
Keys options in Drums & Keys
Audio Tracker
Another great feature included in the EZBass app is the Audio Tracker. What this does is it analyzes audio that you either import or record, then converts it to MIDI. It even adds its unique articulations where it thinks it’s necessary. And of course, these can always be tweaked afterward. When importing or recording audio, you’ll be prompted to select Bass, Guitar, or Percussive audio to Bass MIDI. This option will determine how the recorded audio will convert.
- Use the AUDIO/MIDI slider to increase or decrease the volume of the audio file. This helps you hear nuances that were recorded, but not processed to MIDI.
- If you’re importing an audio file, make sure that it’s a single instrument (i.e., guitar track, drum track). While you can import full songs, there will be quite a few additional and random notes that you’ll need to edit out.
Audio Tracker window
Record MIDI and audio in EZBass
Recording audio and MIDI in EZBass is a breeze. When recording MIDI, it will print directly to your Song Track, located at the bottom of the page. When recording audio, however, you’ll need to click Add MIDI to Song Track to apply it to your song.
Record MIDI
To record MIDI, you’ll need to be in either the Bass, Grooves, Grid Editor, or Drums & Keys window. If you’re in the Grid Editor window, the functionality of that window will be temporarily disabled until you’re finished recording. Before recording, we recommend clicking the 1, 2, 3, 4 button to turn on a pre-count. This will give you a one measure count off before the track begins recording.
Performing slides: You can perform a slide by playing two notes at the same time, as long as it’s at most two notes apart. For example, to perform a slide to G, play F, F#, G#, or A at the same time. Once you’re outside of that range, you will then begin playing chords.
- Press the Record button, then press the Play button.
- Begin recording.
- Once complete, press the Play button or Spacebar.
Record audio
When recording or importing audio, you’ll want to be in the Audio Tracker window. After recording, you’ll then need to update a few additional options.
- Click Record Audio… then click the Play button or press the Spacebar.
- If you haven’t already updated your audio interface inputs, do so now by clicking Input Device….
- Begin playing. Once finished, press the Play button or press the Spacebar once more.
- When the Tracker Project Setup window appears, select the conversion most applicable to the incoming audio. For example, if you were recording your guitar, choose Guitar Audio to Bass MIDI.
- Update the rest of the settings, then click OK. If you’re using EZBass as a virtual instrument plug-in, be sure that the tempo in EZBass matches that of the DAW project.
- To add the converted audio to your song track, click Add MIDI to Song Track.
Related content
Learn more about which plug-in format you need for your DAW!
Learn more about file management for music production!
Additional resources
Bass Tab
Grid Editor Tab
Drums & Keys tab
Grooves Tab
Audio Tracker Tab
When you need help, Sweetwater has the answers!
Our knowledge base contains over 28,000 expertly written tech articles that will give you answers and help you get the most out of your gear. Our pro musicians and gear experts update content daily to keep you informed and on your way. Best of all, it’s totally FREE, and it’s just another reason that you get more at Sweetwater.com.


Offer applies only to single-receipt qualifying purchases. Select manufacturers may require that only the manufacturer’s products qualify towards the minimum purchase amount needed to be eligible for promotional financing. Otherwise, an invoice that meets the minimum purchase amount and contains at least one qualifying manufacturer product is eligible for promotional financing. No interest will be charged on promo purchase balance, and equal monthly payments are required on promo purchase until it is paid in full. The payments equal the amount financed divided by the number of months in the promo period, rounded up to the next whole dollar. These payments may be higher than the payments that would be required if this purchase was a non-promo purchase. During the last month(s) of the promo period the required monthly payment may be reduced due to the prior months’ rounding. Regular account terms apply to non-promo purchases. New Accounts as of 07/31/2025: Purchase APR is 34.99%. Penalty APR is 39.99%. Min Interest Charge is $2. Existing cardholders: See your credit card agreement terms. Subject to credit approval.
Offer applies only to single-receipt qualifying purchases. No interest will be charged on the promo balance if you pay it off, in full, within the promo period. If you do not, interest will be charged on the promo balance from the purchase date. The required minimum monthly payments may or may not pay off the promo balance before the end of the promo period, depending on purchase amount, promo length and payment allocation. Regular account terms apply to non-promo purchases and, after promo period ends, to the promo balance. New Accounts as of 07/31/2025: Purchase APR is 34.99%. Penalty APR is 39.99%. Min Interest Charge is $2. Existing cardholders: See your credit card agreement terms. Subject to credit approval.
The estimated required monthly payment shown which excludes taxes and delivery equals the amount financed divided by the number of months in the promo period, rounded up to the next cent. During the last month(s) of the promo period the required monthly payment may be reduced due to this rounding. These payments apply only with the financing offer shown. If you make these payments by the due date each month, you should pay off this amount financed within the promo period, if it is the only balance you are paying off. If you have other balances on your account, this payment will be added to any other minimum monthly payments.
Applies only to select items from this manufacturer. Ask your Sweetwater Sales Engineer for more details.