
Best Practices for Handheld Recorders
Handheld recorders are a great portable solution for field recording, video, podcasting, and even recording band practices in different locations! That’s why, in this guide, we’ll give you advice and provide you with some of the best practices so you can get the most out of your handheld recorder. Follow the sections below to get started.
SD card compatibility
While some have built-in storage, almost all handheld recorders use some sort of SD (secure digital) card. The main reason why SD cards are used in handheld recorders (as well as in cameras, cell phones, etc.) is simply due to their portability. Before using your handheld recorder, though, you’ll need to make sure you buy an SD card that is compatible with your recorder. If an SD cardisn’t included, check the manufacturer’s website for a full list of compatible SD cards.
Formatting the SD card
TIP: SD cards have a sliding security lock switch on the side of them. If you insert your SD card and the recorder shows that it’s unreadable, double-check to make sure that the card is not locked. If locked, simply slide the switch to the opposite position to unlock it.
When you insert a new SD card into a handheld recorder for the first time, it must be formatted. If the SD card isn’t formatted, data will not be written, and you’ll often receive an error stating that the SD card isn’t readable. While you can format the SD card on your computer, it’s recommended to do so on the handheld recorder to ensure that it works properly with your unit. This is particularly important as SDHC cards need to be formatted as FAT32, and SDXC cards as exFAT.
Are you formatting an existing SD card?
As mentioned, formatting an SD card for use with a handheld recorder is possible on a computer. Formatting directly in the handheld recorder is preferred, however. Before formatting an existing SD card, make sure there isn’t any data on it. And if there is datathat you want to keep, be sure to back it up because formatting will erase everything on it.
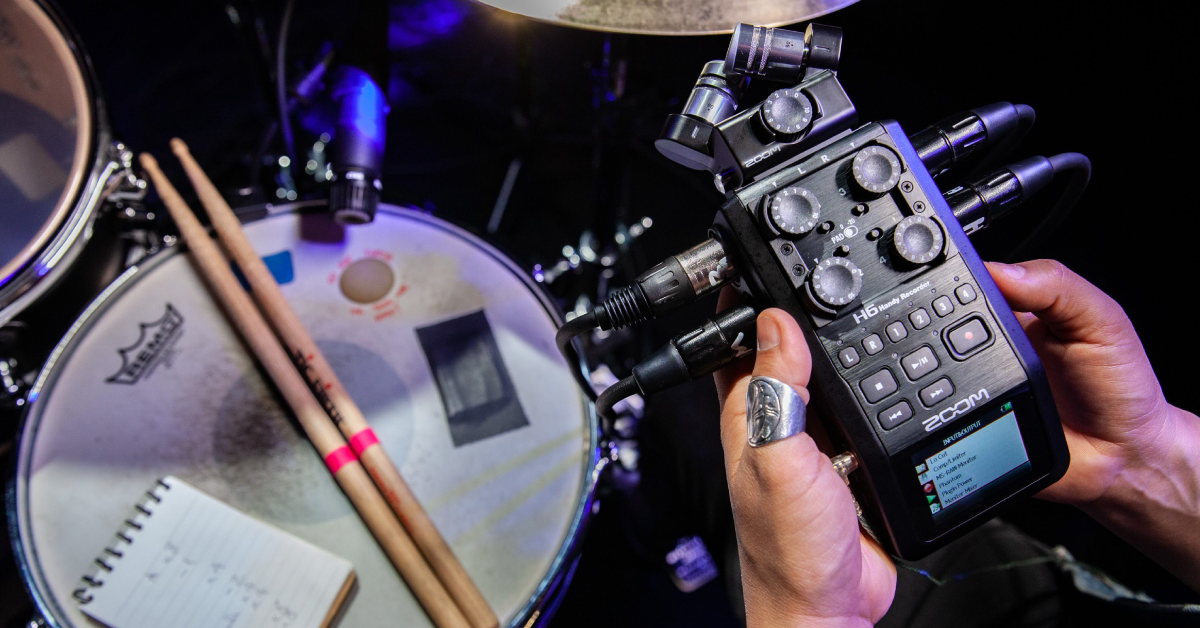
Location and positioning
Where you locate the recorder and how you position it are both essential factors when using it. As a matter of fact, this is the foundation of everything and will make or break the recording.
Nowadays, most handheld devices have noise suppression features, but that will not eliminate noise completely, especially if, for example, you’re outside capturing sound on a windy day. Here are some location and positioning tips when using a handheld recorder.
- Most handheld recorders either come with a windscreen or have an optional accessory pack that includes one. Using the windscreen is crucial because it can help dramatically reduce wind noise, giving you a much clearer sound. And it may make the difference between usable and unusable results.
- Know the environment where you’ll be recording. This makes it much easier during the editing and production process.
- Outdoors: If there’s a specific sound you want to capture, but there’s too much background noise, you may need to consider changing locations to isolate the sound better.
- Concert: If you want to capture the whole band, then you’ll want to be positioned in the center. If not, it’ll affect the stereo field, and you won’t be able to capture the full band.
- Interview or podcast: For the best clarity, try to record in a room with the least amount of reverb as possible.
- Band practice: Similar to live shows, place the recorder in a location where you’ll be able to capture the whole band. And, while it might not be the most convenient, try to have the band perform around the recorder.
- Understand what polar patterns are and how they work. If your handheld recorder has adjustable polar patterns, adjust them as necessary.
- Test, test, test. Make a test recording before it’s time to start the real thing. You may need to do this two, three, or four times and listen back to the recording to make sure you can fix any problems before starting the actual recording session. Move the recorder around and try recording again until you have the best possible sound. Test recordings also ensure that your equipment is working before you start.
Setting the levels
Once you’ve placed the recorder in the spot you want, the next step is to test the level and keep it consistent. This can be a little tricky depending on the environment and the source, but getting a good baseline can turn your final recording from good to extraordinary. You don’t want to get halfway through your recording before you realize that the recording level is too hot and the recording is clipping.
Set it to -12dB
Setting the level at or around -12dB on the meters is considered a good starting point when using portable recorders, especially in the video world. This gives you enough headroom if there’s a sudden spike in the audio, which is especially true for concerts, practices, or Foley (e.g., lightning), as the audio may be unpredictable at times.
It’s much simpler when it comes to interviews or podcasts, though. All you need to do is speak at the volume you and your guest(s) will be talking and make your adjustments as necessary. Just allow an extra few decibels to account for a potential sudden cough, sneeze, or loud spoken outburst.
Wear headphones
If possible, wear headphones while setting the levels and also while recording. The display may show you that the level is at -12dB, but that could be due to various reasons, such as wind or a lapel microphone brushing against a shirt. Wearing headphones will help you determine whether that signal is coming from the source or the environment.
Keep the audio level steady
Even though everything is set to the right level, there may be times when things will be suddenly louder than expected. Adjusting the level on the fly will make it sound more consistent throughout the performance. Think of it like cooking. If you’re making a burger, you wouldn’t put it on the grill, then walk away; you need to keep an eye on it and make sure it doesn’t get overcooked.
Does your handheld recorder have an auto level feature?
If your portable recorder has an auto-level or auto-gain feature (AGC), you may want to turn it off. It lowers the volume as the source becomes louder, but it raises the volume as the source gets softer. While it may be the easy way of keeping the level steady, it can result in some unnatural, over-compressed-sounding recordings.
Working with audio files
Now that everything is set up and the hard parts are taken care of, it’s time to start recording! The two most important things to consider when working with the audio files are the sample rate and bit depth settings and how you manage them afterward.
Recording format
Sample rate and bit depth settings are essential when it comes to audio quality. Low sample rate and bit depth typically equate to lower-quality sound. Increasing it will increase the quality. The downside is that the file size will be exponentially larger, so there’s a delicate balance between finding the best sound while getting the most out of your storage. If you’re recording something longer, like band practice or a concert, you may want to lower the sample rate and bit depth. If you’re recording something shorter, though, like a sound effect, you could increase the settings without necessarily losing a large amount of space.
Audio file management
Managing your audio files is the most important thing to remember when using a portable recorder. The folder structure and titling scheme can sometimes get confusing, especially if you have multiple recordings on the same date. Depending on the manufacturer, the titling scheme could be something similar to year/day/month_take number.wav (20212301_01.wav). Here are a few things that you can do to stay organized.
- If your portable recorder has the ability to create folders, take advantage of that and name each folder for the project you’re working on (e.g., Folder 1 – Podcast, Folder 2 – Band practice).
- Make a note after each take describing what it was (e.g., Take 1 – First guest, Take 2 –Second guest).
- Similar to renaming the folder directly on the handheld recorder, create and name a folder for each project on your computer when transferring the audio files.
Related Articles
When you need help, Sweetwater has the answers!
Our knowledge base contains over 28,000 expertly written tech articles that will give you answers and help you get the most out of your gear. Our pro musicians and gear experts update content daily to keep you informed and on your way. Best of all, it’s totally FREE, and it’s just another reason that you get more at Sweetwater.com.


Offer applies only to single-receipt qualifying purchases. Select manufacturers may require that only the manufacturer’s products qualify towards the minimum purchase amount needed to be eligible for promotional financing. Otherwise, an invoice that meets the minimum purchase amount and contains at least one qualifying manufacturer product is eligible for promotional financing. No interest will be charged on promo purchase balance, and equal monthly payments are required on promo purchase until it is paid in full. The payments equal the amount financed divided by the number of months in the promo period, rounded up to the next whole dollar. These payments may be higher than the payments that would be required if this purchase was a non-promo purchase. During the last month(s) of the promo period the required monthly payment may be reduced due to the prior months’ rounding. Regular account terms apply to non-promo purchases. New Accounts as of 07/31/2025: Purchase APR is 34.99%. Penalty APR is 39.99%. Min Interest Charge is $2. Existing cardholders: See your credit card agreement terms. Subject to credit approval.
Offer applies only to single-receipt qualifying purchases. No interest will be charged on the promo balance if you pay it off, in full, within the promo period. If you do not, interest will be charged on the promo balance from the purchase date. The required minimum monthly payments may or may not pay off the promo balance before the end of the promo period, depending on purchase amount, promo length and payment allocation. Regular account terms apply to non-promo purchases and, after promo period ends, to the promo balance. New Accounts as of 07/31/2025: Purchase APR is 34.99%. Penalty APR is 39.99%. Min Interest Charge is $2. Existing cardholders: See your credit card agreement terms. Subject to credit approval.
The estimated required monthly payment shown which excludes taxes and delivery equals the amount financed divided by the number of months in the promo period, rounded up to the next cent. During the last month(s) of the promo period the required monthly payment may be reduced due to this rounding. These payments apply only with the financing offer shown. If you make these payments by the due date each month, you should pay off this amount financed within the promo period, if it is the only balance you are paying off. If you have other balances on your account, this payment will be added to any other minimum monthly payments.
Applies only to select items from this manufacturer. Ask your Sweetwater Sales Engineer for more details.