
If you have a great interface and some cool virtual instruments, then you have all the tools you need to have a great-sounding keyboard rig. You do still need a platform to host those plug-ins, and if you are heavily invested in VST, then Apple’s Mainstage may not be the right choice.
But that is OK, because PreSonus has got you covered. Let’s fire up Studio One and configure a rig that will let you do everything you need to do!
Controls
Twisting knobs and sliding faders on a MIDI controller, like the Arturia KeyLab, are what makes a virtual instrument really work. The first thing you need to do is set up your controller, so it can give you the hardware controls you need.
Inside the mixer in Studio One are the functions to set this up. Make sure the External Devices button is highlighted on the left side of the mixer window, and your list of external devices will appear (fig. 1). Click on the one you want to modify, and the setup window will open.
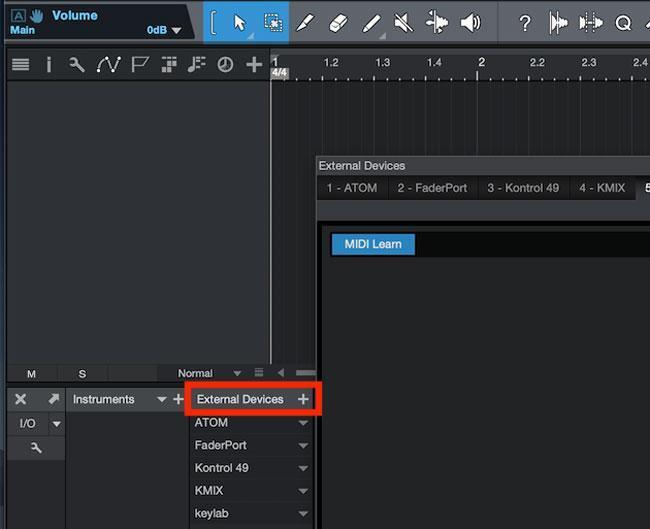
Figure 1: The External Devices window is accessed from the toolbar on the left side of the mixer.
Click on the MIDI Learn button in the upper-left corner of this window and move the controllers you want to use. They will magically appear here. All continuous controller-based controls will appear as a knob, but you can right-click on them and set them up to be a fader or a switch. Once you have the controllers you want to use set up, click the MIDI Learn button again so that it is unlit and close this window. We will come back to it in a few minutes.
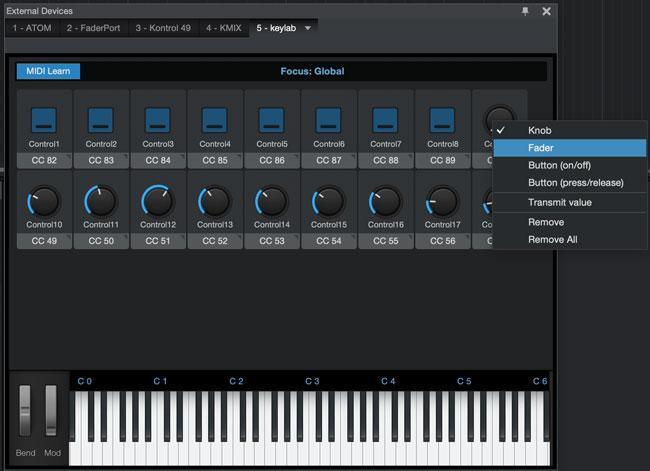
Figure 2: Setting all these controllers up took me about 30 seconds.
Instruments
Studio One has some really cool capabilities for managing virtual instruments that are tucked within their Multi Instrument controls. In the Instruments list in the browser, drag New Multi Instrument into an empty space on the arrange window (fig. 3), and you now have a container that can hold multiple instrument and audio processing plug-ins.
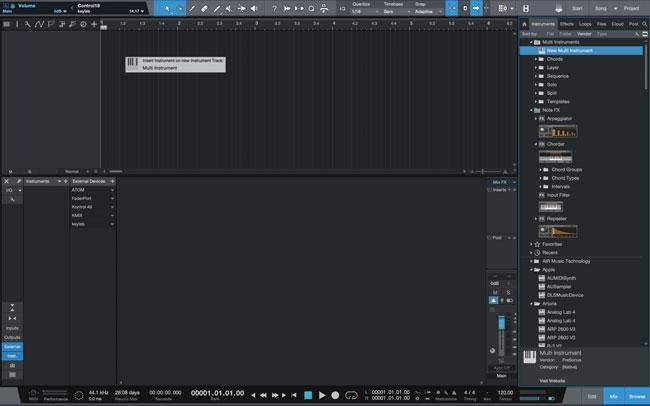
Figure 3: Setting up a Multi Instrument is easy.
It is very simple to drop a couple of VI plugs from the browser into this window. The colored bars just above the keyboard on the screen allow you to set up the key ranges that they play within. I have set up a quick split with Softube’s Monoment Bass for the bass notes and a layer of MODARTT’s Pianoteq 6 and Rob Papen’s Blue for a pad. By highlighting the individual plug-ins in this window, you can set their levels and panning and even add individual effects to them. Repeat this process a couple of times, and you can have several great patches set up for your live show. Then just move the tracks in the arrange window into the order you are going to play them on the gig.
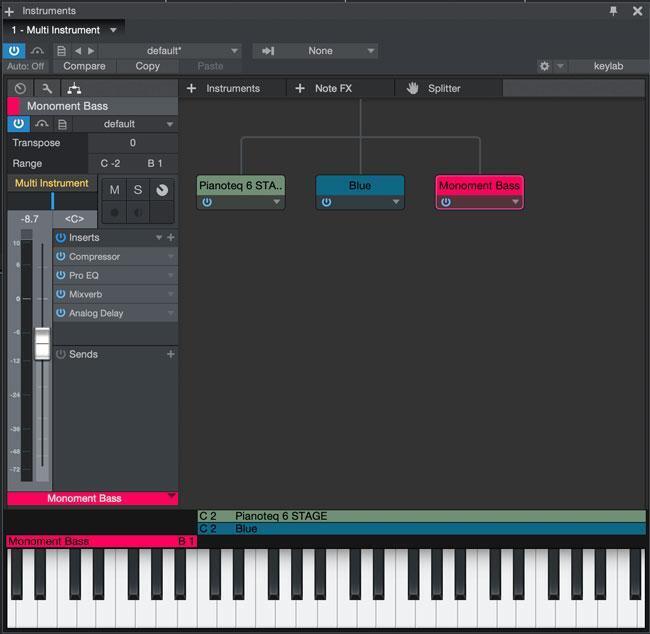
Figure 4: Splits, layers, and effects all live in one window.
Backing tracks
If you are trying to sound just like the record, then you still may need to play some tracks along with your live playing. Managing this is also easy in Studio One. Start by creating an audio track and drag your playback tracks onto this track end to end.
Then you will want to mark the front and back of all these tracks with markers (I like to place the cursor where I want it and hit the Y key on the keyboard). On the markers at the end of your tracks, right-click on them and select Stop at Marker in the context menu. This will make the transport stop at the end of each track, so you don’t have that awkward “Milli Vanilli” moment when it starts the next track before you are ready. You’re welcome!

Figure 5: The track stopping automatically is a big benefit, but you can place them an hour apart on the playlist if you are feeling paranoid!
Control linking
Now comes the piece that ties everything together. We are going to assign Studio One functions to those hardware controls on your keyboard to make the process as smooth as butter.
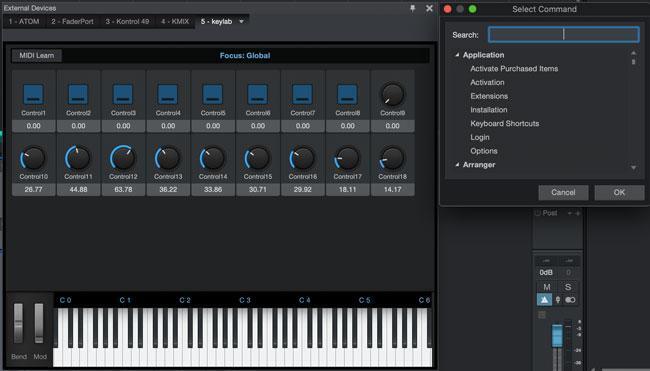
Figure 6: Let’s make these buttons do some magic!
Open up the External Devices panel again and make sure that the MIDI Learn button is not on. Now pick a pair of buttons on your keyboard that you want to use to select your keyboard sounds. I like to use the farthest right ones on my keyboard. Right-click on one of them and click on Assign Command. It will open the keyboard shortcuts window.
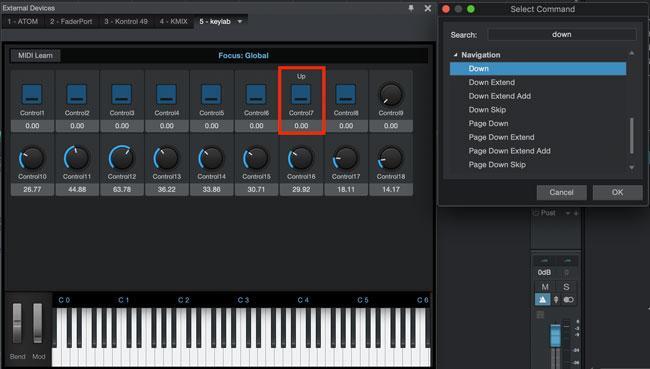
Figure 7: Now we are getting somewhere!
Search for “up” in the shortcuts window and select that command in the Navigation section. You can see Control 7 is assigned as “Up” in figure 7. Repeat the process to link the Down command to the button next to it. You can see Control 8 is assigned as “Down” in figure 8.
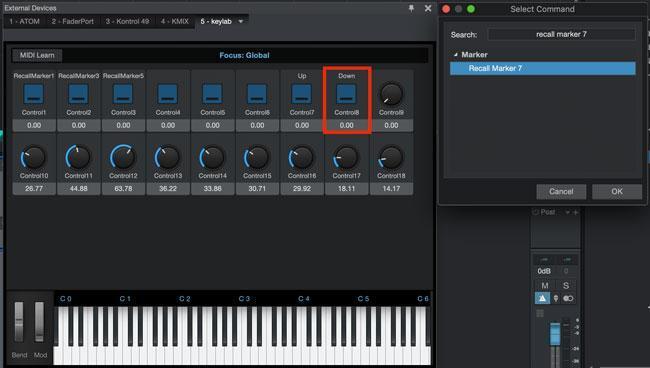
Figure 8: Almost done!
Now pushing these buttons on your controller will move the track selector in the arrange window to different tracks, and as they are selected, your keyboard will play the different sounds you have set up. This will function just like patch changes on a hardware keyboard.
Controlling which backing track you are going to play is a similar process. Right-click on the first hardware button and choose the Assign Command function again. In the shortcuts search bar, type “recall” and select Recall Marker 1 for the first button and repeat the process for each button. But skip the even numbers, so the second button will get mapped to Recall Marker 3 and so on.
Now when you push each of these buttons on your keyboard, it will move the cursor to the beginning of that track. You could map a button on your keyboard to play the track, but I kind of like the extra step of having to reach up and slap the space bar on my computer. It just makes me feel like I am less likely to make an unfortunate mistake.
Time to jam
Once you have this set up, you are ready to take your controller out and gig! You can continue through the process of setting the faders and knobs to control other features for your live setup, but that is a task for another day.
Studio One is filled with features, but it is just as easy to use as it is powerful. This means you can spend more time making music. If you want to add Studio One to your rig or pick the perfect keyboard controller to make your gigging go just a bit smoother, give your Sweetwater Sales Engineer a call at (800) 222-4700.