
Sidechaining is all about interaction between a signal processor and an audio source (usually one that’s different from the audio that’s being processed). Stated that way, I know it sounds kind of dull, but consider some of the reasons why sidechaining is cool:
- Automatic mixing — If you’re recording a singer/songwriter and want the guitar level to dip a bit during vocals, sidechaining can do that.
- Tighter rhythms — Gate a bass so that notes hit exactly when the kick drum hits. Or cause level variations in power chords that track the drums’ dynamics.
- Audio for video — Use sidechaining to reduce the level of a music bed during narration.
- Special effects — Alter a filter’s resonant frequency with the dynamics from snare drum hits, guitar chords, bass notes, and more, and then use the filter to process, well — anything from reverb to hand percussion.
Technically, the audio providing the sidechain signal could be the processor’s input (called internal sidechaining), but we’re going to cover sidechaining from external sources, because that’s where the fun is. Although sidechaining’s main claim to fame is with dynamics processors, there’s more to the story than that, as you’ll find out.
Sidechaining Basics
The amount of compression, gating, expansion, or limiting in a traditional dynamics processor depends on the input signal level — it’s either above or below a threshold, which causes the processor to react in a certain way. However, many hardware and software dynamics processors can separate the audio signal going into the processor from the signal that controls the processor. The latter becomes the sidechain input (fig. 1).

Figure 1: The block diagram on the left shows how the input signal controls a gate’s sidechain input. The diagram on the right diverts the sidechain input to a different, independent control signal, which now controls the gating effect.
Technically speaking, a sidechain connection is always in play with dynamics processing, but it’s transparent because it’s locked to the input signal. A variation on internal sidechaining adds processing (such as a filter) between the input signal and the internal sidechain input. By inserting a filter, only certain frequencies are affected by the dynamics processing. This is how de-essing works — a filter allows only the high frequencies to be compressed.
But let’s move on to how sidechaining can use an external source to control a dynamics processor. Probably the best way to explain why this can be useful is to elaborate on two applications mentioned in the beginning.
Suppose you’re mixing a singer/songwriter playing live with vocal and guitar, and you want the guitar to get quieter when the singer sings. Send the guitar through a compressor, split the vocal into two paths, and send one split to the compressor’s sidechain input. A vocal level above the threshold compresses the guitar to create more space for the vocal, and when the singer isn’t singing, the guitar returns to its uncompressed state.
When doing narration over a video’s music bed, you often want the music’s level to dip somewhat during narration. Insert a compressor in the music track, use the narration as the sidechain signal, and the music bed’s level will dip whenever narration occurs.
How to Access the Sidechain Input
Hardware, like a rackmount compressor noise gate, will include a jack labeled sidechain input or key input. This accepts the output from your audio source (fig. 2).

Figure 2: Behringer’s Composer Pro-XL MDX2600 compressor/gate/limiter has sidechain connections for both input channels.
With software, different programs handle sidechaining differently. For example, with Studio One Professional, a processor’s sidechain input will appear as an available output for a track, bus, send, or FX channel, within a dedicated sidechain category (fig. 3).
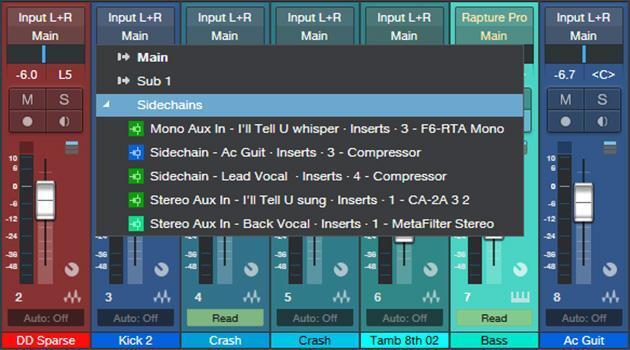
Figure 3: When choosing an output in Studio One, sidechains are shown in their own category, which is separate from the other available outputs.
In a DAW, the most common way to feed a sidechain is to insert a send into the track that will provide the sidechain signal and assign the send output to a processor’s sidechain input. This processor will be in a different track (e.g., the sidechain signal comes from a narration track, and the processor being controlled is in the music bed track). Almost all sends can have either a post-fader setting, where the sidechain signal depends on the channel’s fader setting, or a pre-fader setting, where even if you turn the channel fader down, the signal feeding the sidechain won’t be attenuated.
Some DAWs allow several send or track/bus outputs to feed into a single sidechain input. For example, suppose you’re gating bass with drums. If the drums are recorded on separate tracks, you can insert a send in the kick drum track, snare track, and/or any other drum track that you want to have control the gate, and then balance the levels that are going to that send.
How to Process the Signal Feeding a Sidechain Input
Processing the signal that feeds the sidechain leads to many creative possibilities. For example, if you don’t want a section of the track to feed the sidechain, delete that section. Or to ensure that the track “slams” the sidechain in a particular section — raise the track’s level. You could insert a tremolo in the sidechain signal to vary it rhythmically.
However, most DAWs won’t allow feeding a track into the sidechain input of a processor in the same track, because this creates a feedback loop where the processed output tries to control the processor, which tries to control the output, which tries to control the processor — you get the idea. Nonetheless, this “illegal” setup can be a useful special effect for EDM — for example, use beat-synched delay on the drum sound to trigger compression on the drum track. Fortunately, there’s a way to do this.
- Copy the original track’s audio in a separate track.
- Send the copied track’s output to the sidechain input of the effect in the original audio track.
- Insert the desired effect in the copied track to process the signal feeding the original track’s sidechain.
Sidechain Applications
The most common sidechaining applications involve dynamics processors, but note that other types of processors have sidechain inputs, like filters, dynamic equalizers, and vocoders.
Lock kick drum and bass together
This uses a sidechained gate. For an ultra-tight rhythm section, lock the bass to the kick so that you hear bass only when the kick hits (fig. 4).
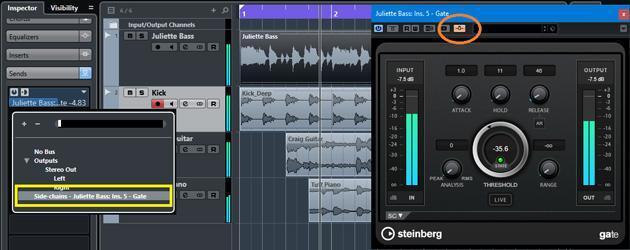
Figure 4: Track setup for locking bass to drums in Steinberg Cubase. The kick send (outlined in yellow) is pre-fader, so its level is independent of the kick’s channel fader, and the send goes to the sidechain-enabled gate that’s inserted in the bass track. The gate module’s “activate sidechain” button is circled in orange.
Set the gate’s threshold so that it opens when the kick exceeds the threshold. The gate’s range control can mute bass completely when the kick doesn’t hit or let through some of the bass part. Release can add a bass decay that lasts longer than the kick, thereby differentiating the two instruments a bit more.
Pumping drums
This popular EDM technique (fig. 5) hit the mainstream with Eric Prydz’s hit from 2004, “Call on Me.” This technique “squashes” the drum sound, typically on beats 2 and 4 of a measure, which gives a pumping, squeezed sound. This usually requires drums on separate tracks so that one drum can provide the control signal, but you can overdub a part specifically to provide the control signal that squashes the drums, rather than be heard as part of the mix.

Figure 5: Setup for conventional compression-based pumping in Ableton Live. The compressor inserts in a mixed drum track, while a send from a separate snare track triggers the compressor. Note the Knee, Lookahead, and Envelope settings (outlined in yellow); adjust these for the best effect.
Insert a compressor into the bus with the mixed drums. We’ll use a separate snare track that hits on 2 and 4 to drive the sidechain. The compressor’s settings are crucial; the key aspect is to use a lot of compression, but with a relatively short release time so that it doesn’t take too long to recover. The settings shown in the screenshot are a good starting point, but adjust to taste. I often find it easier to set up the compressor with a sustained sound like a pad, and then use the “real” track.
Muting via ducking with a gate
Ever notice at airports that when they announce that your flight to Chicago has been delayed for yet another two hours, or there’s a gate change, the background music goes silent? Or when a DJ makes an announcement, the music stops? Those are good examples of ducking, which also has musical purposes — like muting audio rhythmically, if you use a separate control track. With a ducking-capable gate, ducking will mute the input when the sidechain signal exceeds the gate’s threshold.
Duck a music bed with narration, using a compressor
Sometimes you don’t want ducking to gate a signal but just lower the level somewhat — like when narration lowers the level of background music in an audio-for-video mix. The crucial control for this application is the compressor’s threshold, because that determines the amount of gain reduction for the music bed. Attack and release need to be fairly long and optimized to provide the smoothest transition to the music bed while going in and out of narration. You probably don’t want to use any kind of auto-release or program-dependent release time option, because this will coax the compressor into a more traditional type of dynamic range processing. A lower-ratio control setting, and softer knee setting, will provide a smoother ducking effect if needed.
Drum sound enhancement with gating
Here’s yet another use for sidechain-triggered gating. The following example works well for giving snare a more ’80s drum sound, assuming the snare is on its own track.
- Create a track with white or pink noise for the length of the drum part.
- Insert an EQ in the track to shape the noise’s timbre as desired.
- Follow the EQ with a gate.
- Add a send to the snare drum track and assign it to the gate’s sidechain input.
- The noise will now trigger when the snare drum hits. Adjust the gate’s attack and release parameters so that the noise’s dynamics follow the snare drum.
You can also enhance a kick drum with a similar technique, but instead of creating a track with white noise, create a track with a steady sine wave (50Hz–70Hz or so). Insert a gate in this track, and trigger its sidechain input with the kick drum. Set a fairly high threshold, and use the gate’s release control to set the sine wave’s decay time. Now, you too can create sounds that blow the doors off Hondas while stopped at intersections!
You can create even more interesting sounds when you trigger effects on one drum from a different drum. Here’s one of my favorites, if you have snare and kick on separate tracks:
- Create a bus with reverb, set for a long decay time (like 10 seconds).
- In the snare track, insert a send that feeds the reverb bus.
- Insert a gate after the reverb. Set its attack (and hold control, if available) to 20ms, and release to around 250ms.
- Insert a send in the kick drum track and assign it to the gate’s sidechain input.
Now the kick drum will gate the snare’s reverb and produce delightfully twisted rhythmic effects.
It’s Not Just About Dynamics and Being Normal!
Sidechaining is often considered something that’s part of using dynamics processors, but you can do so much more — particularly if you try the technique of copying the audio to create a track that’s customized for feeding the sidechain. Why be normal? This is a wide-open field for experimentation, and a way to help you achieve your own signature sound.