FL Studio is a very powerful tool in the studio. Its features will inspire you in no time. Whether you’re laying down a simple beat or wanting to write a full-blown composition, FL Studio is a great go-to for creating music. While other DAWs have similar functionality, its ease of use is what sets it apart from the rest.
Since its initial release in 1997, when it was known as Fruity Loops, it’s been the go-to recording and music programming software among the hip-hop and electronic music communities. But don’t make the mistake of thinking it is limited to just recording those genres — it’ll record anything you like with ease. In this guide, we’ll take a deep dive to show you some of the key features and how to use them, so you can become an FL Studio master in no time!
Jump to:
Navigate FL Studio
To navigate FL Studio, you’ll be using the toolbar and five main windows. Unlike many of its counterparts, all of FL Studio’s main windows and plug-in windows are “floating,” which means that you can arrange them any way you’d like. This makes it easier to optimize your personal workflow when working on your music.
- Access any of the windows’ options menus by clicking the arrow at the top-left corner.
While it may look a bit daunting at first, it’s much easier once you break it down into parts. Let’s go through each window and show you how each integrates with your project, starting from the top and working our way down.
Pro tip: If you’re using multiple monitors, open any of the windows’ option menus, select “Detached,” then click and drag the window to your secondary monitor.

Toolbar

The Toolbar in FL Studio contains the main transport controls and allows you to change project settings such as the tempo (BPM) and precount (the number of beats that play before recording). If you don’t have a MIDI controller, there’s even a feature that allows you to play and record notes using your computer’s keyboard! Many of the buttons can be re-ordered in any way and are pretty self-explanatory. If you’re not sure what a button does, hover over it with your mouse to view a description in the hint bar.

Pattern/Song
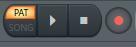
One very important function you’ll often use while working on your project is Pattern/Song. The Pattern/Songpanel is located to the left of the Play button. This determines what will be played back: either the current Pattern or the entire song. You can click between Patternand Song, or you can press L on your keyboard to switch between the two.
Global Snap Panel

You can set the snap (quantization) of everything in your project to the same value in the Global Snap panel, including the Piano Roll window, Event Editor window, and Playlist window. If the snap settings in any of these three windows is set to Main, it will follow the value that is set here in Global Snap. However, you can set the snap independently in other windows if you want. Using the snap functions will come in handy no matter what your workflow is.
Browser
The long, vertical column to the left is the Browser window. This is the home for all your samples, Generators (virtual instruments), and recorded audio clips. There are plenty of other things you can access, too, like mixer and channel presets and even reverb impulse responses.
By default, there are three tabs at the top that contain key sections of the software. These are called “Snapshots.” You can even rename and change the icon and color of any or all of the Snapshots. To make things even easier, you can also search by keywords by clicking the magnifying-glass icon. Searching by keywords can be your friend, particularly if you have a lot of Patterns or need to find a specific sample, effect, or plug-in quickly. Let’s go over what each Snapshot is and how to use them in your project.

All Snapshots
The first Snapshot (audio icon) contains all of the data that’s installed with FL Studio. This includes things such as the factory samples, packs, and audio clips.
Current Project Snapshot
The second Snapshot (page icon)contains everything that’s currently loaded in your project. One particularly useful feature with this Snapshot is that you can view your “undo history” and restore your project to a specific point.
Plug-in Database Snapshot
The last Snapshot (plug icon) is the Plug-in Database. This is where you can quickly access both the native FL Studio effects plug-ins and Generators (virtual instruments)as well as any third-party ones you have installed on your system. Be sure to check out our SweetCare knowledge base article, “How to Use Plug-ins with FL Studio,” to learn more about how to add and load third-party virtual instruments and effects plug-ins into FL Studio!
Learn more in our Knowledge Base article about How to use Plug-ins with FL Studio!
Custom Snapshots
The great thing about FL Studio is that you have the ability to customize and create your own Snapshots. Creating custom Snapshots is one of the easiest and best ways to stay organized, too. For example, if there’s a particular sample folder you always go back to, you can create a Snapshot that takes you directly to that location.
Packs and Samples
FL Studio comes with a countless number of one-shot samples, pads, loops, and vocal tracks. These are sorted into packs, which are located within the Browser window. Every sample is fully editable and can either be loaded as a Sampler trackon the Channel rack (see below) or Timeline by clicking and dragging it to that particular window.
Importing your own custom audio-clips samples into FL Studio is very easy, too. All you need to do is click “Options,” select “File Settings,” then add the location where the sample folder(s) resides. Once you do that, they’ll automatically be loaded into the Browser.
Channel Rack
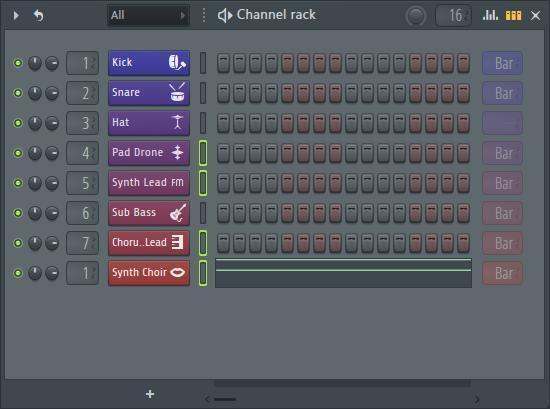
The Channel rack is the meat and potatoes of FL Studio and is the main window you’ll be working with when you’re writing your music. It’s where you’ll create all of your Patterns(which contain all of the note and automation data) via the step sequencer, create filter groups, load samples and plug-ins, and route them to mixer channels.
Each line on the Channel rack is dedicated to one specific Sampler track. You can mute and solo tracks by clicking the green LED button to the far left, adjust the pan and level using the knobs, and also change which mixer channel that track is routed to.
- To add a new Sampler track, click the + sign at the bottom of the window and select a Generator (virtual instrument) or blank Sampler track.
At the top of the Channel rack, you can open the Channel rack options, change the independent loop options for each channel, and select filter groups. You can also change the amount of swing in the Pattern, adjust the Pattern length, and open the Graph Editor (see below). If you want to change the time signature of a Pattern, check it out in our SweetCare article!
Filter Groups
A great feature in the Channel rack is the ability to create filter groups. These allow you to select specific samples and group them together. Filter groups are especially helpful when you have a lot of samples and instruments in your project. Keeping organized will always speed up your workflow. For example, if you only want to view your drum samples and clips, select those (Shift key + left-click to select multiple), go to the Channel rack options, and select “Group selected.” You can then access it from the black “Channel Filter” drop-down box (by default, it displays “All”).
Graph Editor
At the top right of the Channel rack window is the Graph Editor. When you click the Graph Editor button, you can adjust velocity, note, pan, modulation, and pitch settings on a per-step basis. This feature is useful when you’re working on drum tracks or if you need to make changes on the fly and don’t necessarily need to open the Piano Roll.
Step Sequencer

FL Studio has always been based on step sequencing. Each Pattern in your project is broken up into individual steps. By default, there are 16 steps per Pattern, indicated by the green and red buttons (highlighted in the image above). You can add an individual step by clicking one of the blocks. To add multiple, just click and drag across. To remove steps, just right-click them.
You can also change the number of steps in each Pattern by clicking and dragging up and down in the box located directly to the left of the Graph Editor. If you’re not familiar with step sequencing, see the diagram on the right, which converts steps to note values.

Piano Roll
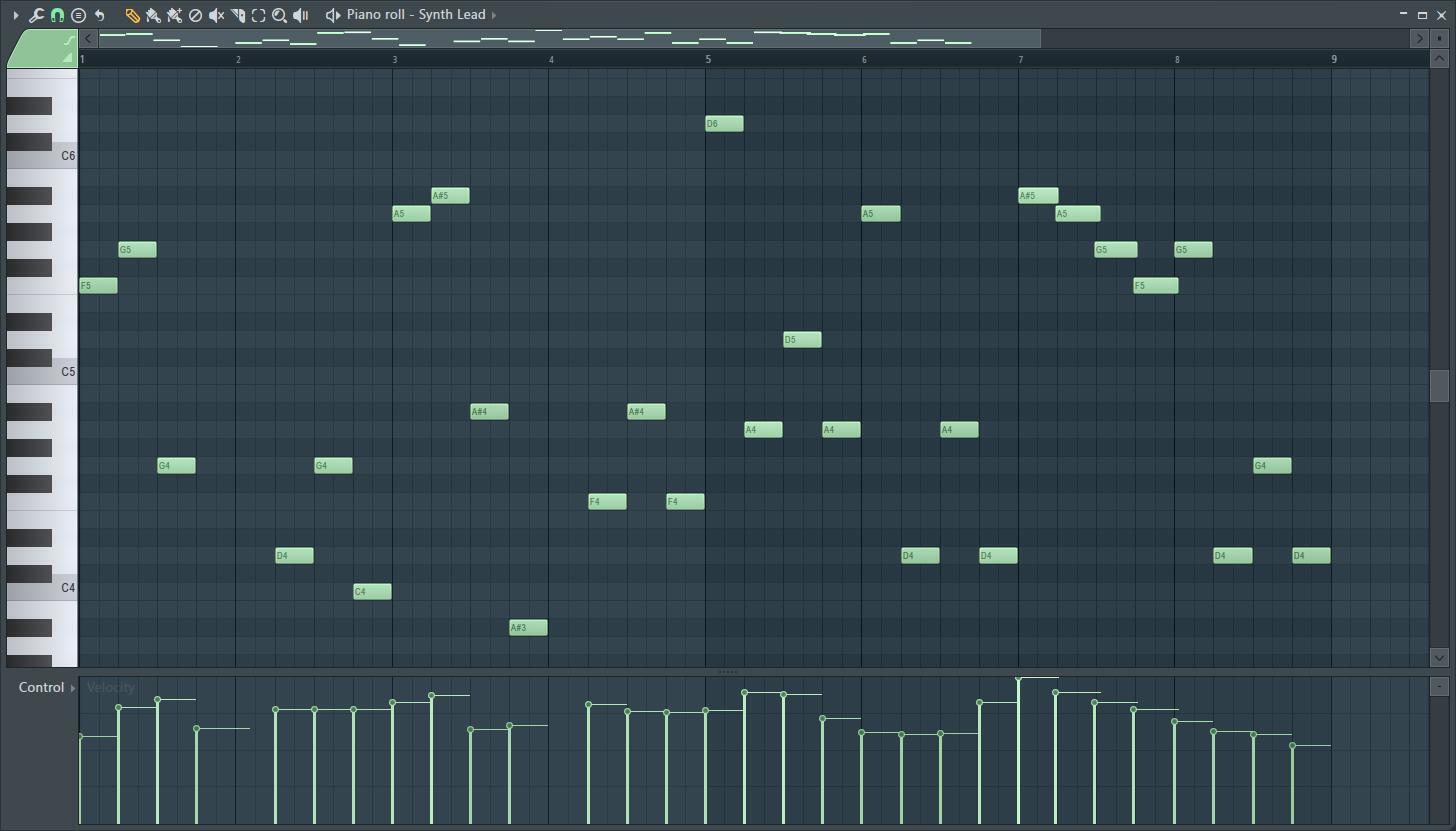
The Piano Roll in FL Studio is where all of the song’s notes, chords, and automation are entered and edited. Think of it like a musical sketchbook for your clips, samples, and virtual instruments. You can open the Piano Roll window a few different ways. By clicking the Piano icon in the Toolbar (see image below), using the F7 key on your keyboard, right-clicking a track in the Channel rack, or double-clicking a Pattern within the Playlist.

While you’ll primarily use the Piano Roll when working and editing melodic material, you’ll also use it to fine-tune the length and pitch of drums, as well. You’ll also need to open the Piano Roll if you want to add additional beats to a Pattern (32nd notes, for example).
There are a lot of really cool features located within the Piano Roll. To get you up and running fast, though, we’ll go over a few of the key functions you’ll be using quite a bit.
Give your drums a unique sound!
When working with your drums in the Piano Roll, place a copy of the note you’re working with above or below it. This changes the pitch of the drum and will give you a bit more depth and a more unique sound. For example, if you want your snare drum to have a lot of punch, create a note in the same position that’s one octave down.
Draw and Paint
The Draw and Paint tools, indicated by the pencil and paintbrush icons, are what you’ll use when entering notes. These tools will also be used in the Playlist window. You might be asking yourself, “If both of them enter notes, why would I use one and not the other?” Well, that all depends on what type of track you’re working with and what type of rhythm you want to create.
When you select “Draw,” you can do the following:
- Single click will enter the note. Holding the left mouse button while dragging it will enter and reposition the note.
- Shift + click will create a copy of the note.
- Ctrl/Cmd + click will disable the snap option to help fine-tune the position of the note.
- Right-click will remove the note.
When you select “Paint,” the following options are available to you:
- Single click will enter a note. Clicking and dragging will “paint,” or enter multiple notes at the length the previous note was set to.
- Shift + click to paint while replacing existing notes (Monophonic paint)
- Right-click to remove the note.
Now that you know how each option works, let’s put it into practice. Say you’re working with a synth and want to enter a repeated rhythm of 8th notes. In this situation, you’ll probably want to use the Paint tool to speed up your workflow a bit. If you’re wanting to create a certain melody or chord with the synth, though, you’re better off using the Draw tool.
Select
The Select tool is pretty self-explanatory, allowing you to select a group of notes. You can then switch to the Pencil or Draw to move them. Alternatively, you can hold Alt, while in one of the tools to select a group of notes, as well. The Select tool will also be used in the Playlist window.
Use the keyboard shortcuts!
Keyboard shortcuts are your best friend while in the Piano Roll window. Rather than clicking back and forth, you can use the following hot keys to switch through the tools.
- B to select the Paint tool.
- P for the Draw tool.
- E for the Select tool.
- Hold the Ctrl/Cmd key and use your mouse wheel to zoom in and out. This makes it much easier when tweaking the length of a note or group of notes.
Playlist
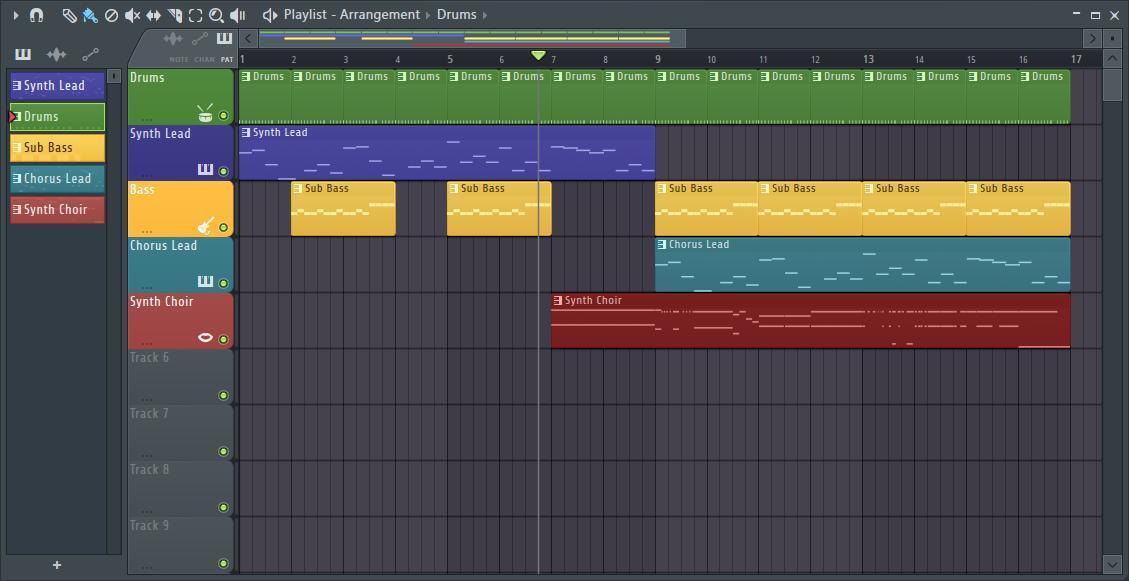
If the Piano Roll is your sketchbook, then the Playlist in FL Studio is your canvas. It’s where every piece of your song will come together. It’s similar to the Piano Roll in terms of options and functionality, but instead of editing and arranging notes on a Pattern, you’ll be editing and arranging entire tracks. The way that the Playlist works is that you select the Pattern you want to add from the Picker panel (far-left column), then use the Draw or Paint tool to add it onto a track.
If you own FL Studio Producer Edition or Signature Edition, you can also record audio within the Playlist. To learn more about how to record audio, check out our FL Studio Quickstart Guide.
Rename and Color
An awesome feature in the Playlist window is that you have the ability to independently color and rename both the Patterns and the tracks. This makes it much easier to distinguish your clips. To rename and color, simply right-click the Pattern or track you want to change, then select “Rename and color.”
So, why would you want to color and rename these independently? It comes down to differentiating Patterns within a track and also to locating the right spot in your song. Let’s use the image below as an example.
The drum track for this song is green. Since the intro, verse, and chorus Patterns have different beats, changing the color of those specific Patterns makes them much easier to spot.

Mixer
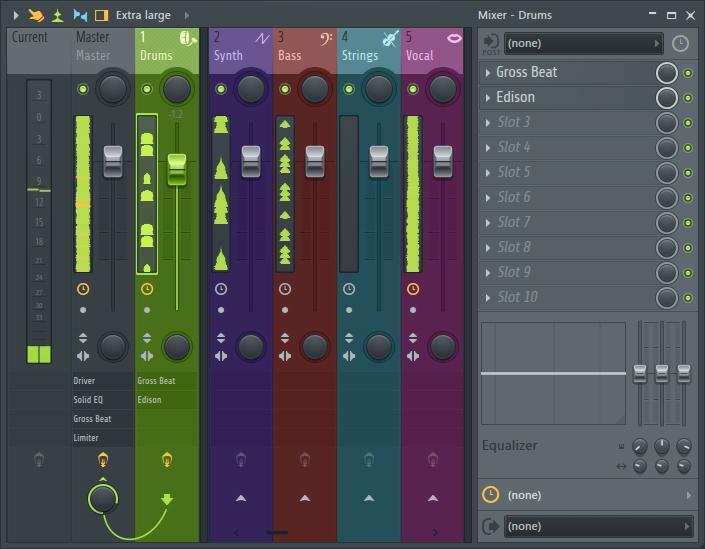
Once you’ve created your Patterns and have arranged the song the way you want, the Mixer window is where everything will come together. The mixer is where you control each of your samples’ level, plug-ins, and routing. In other words, it’s where you’ll create the mix by adjusting the volume and panning and by inserting plug-ins. Let’s take a look at the channel controls starting from the top down.
- Every Sampler and audio track is assigned to the mixer channel you set it to in the Channel rack. Just like the Channel rack and Playlist, you’re able to rename and color the mixer tracks.
At the top of the channel, you have the Mute/Solo button (green LED icon) and Pan knob, which controls how far left or right the signal sounds in your speakers. Below that, you have the channel fader, followed by stereo separation, and swap left and right channels (for stereo tracks). At the very bottom, you can enable or disable your plug-ins by clicking the Lightbulb icon and also change the routing of your audio.
Routing Audio
By default, every Insert (Mixer track)is routed to the Master track, which is located on the very left of the window. At the bottom of the mixer, you’ll notice an up arrow. If it’s green and pointing up, this indicates that the channel is currently selected. If you want to route one Mixer trackto another, just click the up arrow for that track. Routing is particularly useful if you want to add the same plug-in to multiple tracks or load more than 10 effects plug-ins to a particular track (see below).
Load Effects Plug-ins
You can load your effects plug-ins by clicking one of the Slots located at the right side of the Mixer window. Once the plug-in window has opened, you can change the settings and choose plug-in presets by clicking “Presets” on the top of the plug-in window.
Randomize plug-in presets
A unique feature in FL Studio is that you can randomize plug-in settings on the fly — even if it’s a third-party plug-in! What this does is shuffle all of the plug-in parameters on the fly. Randomizing a plug-in preset is really useful because not only does it give you an idea of how the plug-in will sound on the track, but it also gives your Pattern a unique sound.
Loading more than 10 plug-ins
While it may look like only 10 plug-ins can be added onto a track, you can actually create an empty Sampler track on the Channel rack, then route your instrument to that Insertchannel to add even more. For example, if you wanted to add more plug-ins on your synth that is routed to Channel 3, then go to the Channel rack, create an empty Sampler track, set the Sampler track to Channel 8, then route Channel 3 to Channel 8.
Sorting Plug-ins
When you click one of the slots to load a plug-in, you can sort them by “Category,” which will sort your plug-ins into specific categories (i.e., EQs, compressors, delays); “Simple,” which sorts them alphabetically; or “Tree,” which is a collapsible version of Category. This makes it very easy for you to locate a specific effects plug-in without having to search all over the place.
FL Studio Tips and Tricks
Now that you know how to navigate the windows in FL Studio, we’ll go over a few simple tips and tricks that will not only make your life easier but also make your song sound like the next radio hit! For even more handy tips, check out our article “6 Tips for Making Killer Beats in FL Studio.”
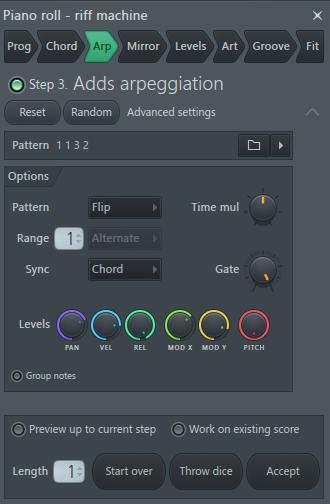
Riff Machine
The Riff Machine changes the Pattern’s progression, chords, rhythm, and groove based on the current notes in your Pattern. You can either use one of the many Riff Machine presets or click “Random.” It’s a great feature if you want to create a unique synth melody while still staying in tempo and in key. To open the Riff Machine, go to the Piano Roll options, go to Tools, then select “Riff Machine.”
Automation

You have the ability to automate pretty much anything in FL Studio. What this does is it automatically changes a parameter in a specific way and in a set amount of time of your choosing. The most common use of automation in the studio is adjusting the volume of a track. You’re not just limited to automating the volume, though. You can also automate the panning, stereo separation, and even any instrument and effects plug-in parameters!
For example, if you wanted to have your drums fade in and out while maintaining the velocity of your Pattern, just right-click the drum track’s fader in the Mixer window and select “Create automation clip.” A clip is then added to the Playlist, where you can then adjust the behavior by clicking and dragging the points in the clip.
How to Automate Tracks in FL Studio 20
Arrangement

Another very important and useful feature you should learn right off the bat is the Arrangement function, which is located at the top of the Playlist window. Think of an arrangement as a blueprint for your song; this includes the layout of your Patterns, audio, and automation clips.
With the Arrangement function, you can clone and edit an existing arrangement, merge multiple arrangements together, and even start with a clean slate without needing to create a new project. While the actual arrangement will change without affecting your Patterns (nondestructive), any changes you make to notes, samples, routing, or Sampler tracks (such as adding or removing them) will still apply (destructive).
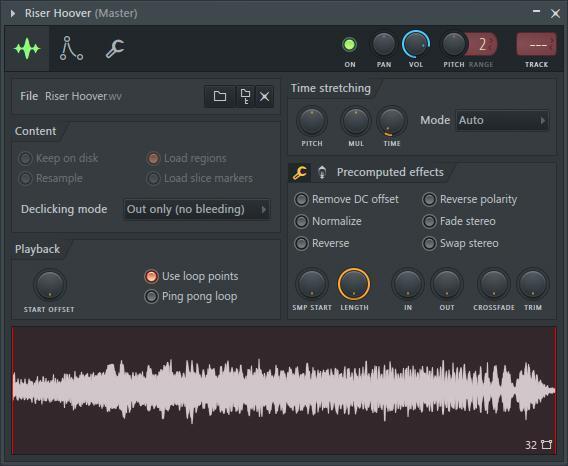
Change Audio Sample Settings
One great feature in FL Studio is the ability to alter the sound of your audio samples directly from the Channel rack. Just click the sample to open the sample settings menu. From here, you can time stretch the waveform and change the length. You can also change envelope and gate settings. Utilizing this feature can turn a simple vocal into a full-blown arpeggiated synth!
Render Patterns as Audio Clips
While you’re in the Playlist window, you can render individual Patterns as audio clips. Just go to your Pattern in the Picker section, then right-click and select “Render as audio clip.” You might be asking why you would want to do this. The answer is quite simple! When rendered as an audio clip, you can access all of the audio-editing functions that aren’t available when working with your MIDI-based tracks.
Export Your Song to SoundCloud
Once you’re ready to export your song, you can export it directly to SoundCloud. Having your songs on SoundCloud is really cool when you want to hear your music or share your music with friends and don’t have access to your studio computer. There are two different ways to do this. You can either upload it only to SoundCloud (File > Export > Upload to cloud),or you can upload it to SoundCloud while bouncing the track to your computer at the same time (File > Export > Audio then click the “Upload to cloud” button).

Wrapping Up
Now that you have the basics down, feel free to get creative and explore some of the other options available! This article barely scratches the surface because there are almost no limits to the things you can do. Be sure to check out more FL Studio content on our Knowledge Base; and if you have any questions, don’t hesitate to contact your Sales Engineer at (800) 222-4700.