
Workflow is one of the most important factors of any producer’s job. Being able to swiftly move through your DAW makes every step of the creative process easier, ensuring that the ideas keep flowing and can be quickly laid down as they are conceived. FL Studio has become one of the most popular DAWs in modern music production, especially in hip-hop and R&B. Most producers are drawn to its easy-to-understand windows and intuitive tools that make creating a breeze. Here are a few tips and tricks that will help speed up your workflow and get the creative juices flowing.
1 – Sidechaining Kick/808 or Kick/Bass
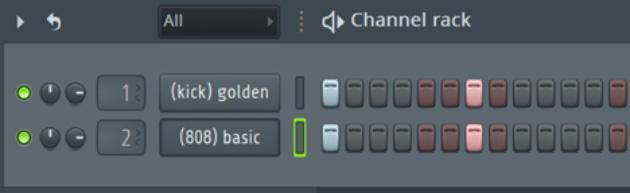
Figure 1
The main idea of this is to get your Kick to punch through the transient of the 808 so that it remains prevalent, although you can get a bit more creative and sidechain hi-hats to other instruments, etc. This will work best when both instruments (the Kick and the 808, for instance) are playing in sync. In fig. 1, you can see I have the Kick on Channel 1 and the 808 on Channel 2.

Figure 2
Next, you will insert the Fruity Peak Controller on the instrument you want to stand out more, in this case the Channel 1–Kick (fig. 2). I use this technique mostly with my kicks and 808s as the transients of the 808s can take away some of the punch from my kicks.

Figure 3
Once the Peak Controller is inserted on Channel 1–Kick, highlight Channel 2–808, which is the channel to be “ducked” when the trigger instrument (Channel 1–Kick) plays. Once Channel 2–808 is highlighted, right-click on the fader of Channel 1– Kick and click “Link to controller” (fig. 3).

Figure 4
The Remote Control Settings window will pop up; select “Peak ctrl – Peak” (fig. 4). This will link Channel 2–808 to the “Peak ctrl” on Channel 1–Kick; hit Accept.
You can turn the knobs to your liking, but I’ve found that these settings work well when I’m trying to make the Kick punch through the 808. These can also work well when triggering a Bass line from the Kick.

Figure 5
The BASE knob controls the lowest value of Channel 1–Kick, so use the BASE knob to set the volume of Channel 1–Kick in the track. For this example, I have it set to 75%.
The VOL (volume) knob is how much you want Channel 2–808 to be ducked (or boosted) when there is a trigger input from Channel 1–Kick. I typically set this between 15% and 25%.
The TENSION knob is how aggressively your trigger instrument (Channel 1–Kick) will compress the peak on Channel 2–808.
The DECAY knob is how long it will continue to duck or compress Channel 2–808. I always set this to 100% as I only want the transient of my Channel 2–808 (or bass) to be ducked so that the kick remains punchy. However, you can use this creatively when applying sidechaining techniques to other instruments as a sort of gating effect.
2 – Saving Mixer Presets

Figure 6
This brings us to the second tip, which is a simple yet timesaving trick. If you right-click the mixing channel, navigate to File, and click “Save mixer track state as,” this will allow you to save that channel’s mixer preset for easier recall (fig. 6). Whether it’s your go-to channel strip for vocals, drums, etc., you will be able to recall it quickly by opening the Mixer Presets from the browser window (fig. 7).

Figure 7
3 – Selecting Multiple Channels

Figure 8
Holding Command (Mac) or Ctrl (PC) and dragging across the mixer channels allows you to select multiple channels at once (fig. 8). From here, you can right-click on an unused channel to sum or bus the chosen channels to it.
By right-clicking the up arrow located at the bottom of the mixer channel, you can either send a copy of the audio files by routing tracks to this channel or create a bus by routing to this channel only (fig. 9). This allows you to add effects and manipulate multiple tracks at once.

Figure 9
4 – Using the Stamp Tool
The stamp tool is very effective for creating advanced chords and progressions (purple button in fig. 10).

Figure 10
Clicking on the purple button brings up a list of chords (fig. 11). Simply choose from the list and click anywhere in the piano roll for the chord to be stamped.

Figure 11
5 – Scale Highlighting
Scale highlighting allows you to highlight the notes of a scale so that you stay in key when writing. Click the orange drop-down arrow (highlighted by the red arrow in fig. 12) and go to Helpers. Simply choose Scale Highlighting, which reveals scales. Choose a scale from the list, and the white notes on the keyboard will fit in that scale.

Figure 12
6 – Sliding Notes

Figure 13
Sliding 808s has become very popular in modern hip-hop music, and it’s very easy to do in FL Studio. A slide note is selected in the top left of the piano roll with the ramp-looking icon (see the red arrow in fig. 13).

Figure 14
Figure 14 shows the C3 note. A slide note can only be placed where a normal note is already present for it to do anything. In fig. 14 I’ve added a slide note on C4. If the slide note is shorter, then it will slide up or down to the note faster. If the slide note is longer, then it will slide to the note more slowly. You can also double-click on any note to make it a slide note (fig. 15).

Figure 15
I hope that these tips help you create better music and have a faster workflow. Always remember that practice makes progress, and the more you use these tools, the better and faster you will get at utilizing their full capabilities.