Using a MIDI controller onstage makes you look professional. Musicians onstage should be surrounded by instruments, not laptops. You don’t want to look like you’re checking your email while you’re performing. As I mentioned in an article detailing how to start using tracks, I once had someone ask me if I was watching YouTube on my computer while onstage. It reminded me that as a musician, I’m used to seeing a laptop among instruments, but for someone in the congregation, that still seems odd. So looking like a musician is one reason to use a MIDI controller to control your computer.
Why Use a MIDI Controller

Using a MIDI controller onstage allows you to move your computer out of the way. It can help avoid the distraction of having a computer dead center on the stage as you’re singing and leading worship. While it’s impossible to limit every distraction, we should do everything within our power to not add to the problem.
Using a MIDI controller with your computer when you play live also allows you to treat your computer like an instrument. Very practically, you can buy a controller that fits into your setup and “play” your computer, just like it’s an instrument. Even if you’re not really playing your computer, you’re also not breaking the flow of what you’re doing when you interact with your computer.
Choose a Controller That Fits Your Context
I consider a MIDI controller essential for performing onstage, but how do you choose the correct controller for you?
Consider your context. What instrument do you play? Is it easy for you to reach up and trigger something with your hands? Or are your feet free to trigger things as you continue to play? For me, as a guitar player, I have much more freedom when I am able to use a MIDI foot controller to trigger tracks, while continuing to play guitar.
For instance, while grid-based controllers are great for production and clip-based performances, they may not be the best choice in a playback environment. Because tracks are linear, most people are using arrangement view so they have a simple, hands-off experience, with the flexibility to repeat any song section. But grid-based controllers are typically designed to be used in session view. While you can make custom mappings on your grid-based controller, you’ll likely end up with a lot of unused features or a controller full of masking tape and labels.
Even if you use session view for playback, you’re firing scenes and not clips, so having the ability to trigger individual clips becomes less important. Again, grid-based controllers are fantastic, but if your primary need is using Ableton Live for playback, you might consider another option.
Whatever you choose, remember to consider your context. Now, let’s discuss a few options for MIDI controllers based on what instrument you’re playing.
Guitar Players

If you’re a guitar player, then a foot controller is probably your best choice. This allows you to keep your hands on your guitar and use your feet to navigate Ableton Live. Since most MIDI foot controllers have more advanced MIDI integration — or at least a MIDI out/through — consider using your MIDI foot controller to automate your pedal changes, or pedal presets, as well. For instance, you can press a button that starts song 2 and pulls up your dialed-in sound for that song at the same time.
You can also use Ableton Live to automate patch changes on your pedals with presets. This allows you to automate your patch changes and focus on leading worship. I recently spoke to a friend of mine who mentioned using Ableton to automate his Line 6 Helix to change patches automatically throughout the song. He was able to step up to the mic and focus on leading worship and playing guitar, without thinking about changing his sounds. Adding in a foot controller allows you to start/stop the song and jump around in your arrangement all with only your feet.
Keyboard Players
Keyboard players might have it easiest when it comes to choosing a controller. For starters, the MIDI controller you’re already using with MainStage might work perfectly. If you’ve got some faders or knobs that are being used, you can connect your controller via USB to your tracks machine and play keys, and control tracks, all from one controller. Want to use your controller with two computers? Consider using an iConnectivity MIDI4+ or mio4.
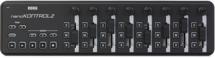
If you’re already using your faders and knobs to control keyboard sounds or using a hardware keyboard that doesn’t give you those options, consider adding a microcontroller to your setup. Adding a controller, like the Korg nanoKontrol or the Akai LPD8, can very affordably expand the flexibility of your existing controller. You can add buttons, faders, and knobs to control Ableton Live very easily.
Similar to what I mentioned for guitar players, you can use Ableton to automate your keys rig, so you can stay focused on the performance and let Ableton change your patches for you (see video below). Using your microcontroller can give you control over your keys sounds and control Ableton Live at the same time.
Drummers
Drummers — keep your hands on the sticks! To me, there’s nothing worse than seeing a drummer doing a cymbal swell between songs — while trying to reach over to their computer to press the space bar to start playback. As a drummer, you should get a drum pad to trigger Ableton.
Using a drum pad will allow you to stay in the same mode you’re in when you’re playing drums and hit a pad to start/stop your songs, or navigate a song live in the moment. The added benefit of using a drum pad is that you can use the pad either to trigger samples from Ableton or to use samples on the drum pad itself. Again, just like the guitarists and the keyboard players, you can even have Ableton pull up your presets automatically so you get the exact right sound, at the exact right time.
One thing I encourage musicians to do when programming their Ableton sets — especially when a drummer is going to trigger tracks — is set things up so they are as hands off as possible. If you’re going from song 1 to 2 automatically, then lay those songs next to each other in arrangement view so you don’t need to stop or reach for anything.
If you want to have freedom and flexibility, set things up so your drummer presses Repeat or Next to jump around within a song. You can even use the IAC driver (or a PC equivalent) to automatically select your next song once your current song is finished. This way, all your drummer needs to do is press play to move on.
The goal, however you achieve it, is to get your Ableton setup and MIDI controller to work together and enable your drummer to be as hands off as possible.
Consider Distance and Flexibility
If you’re looking to move your computer out of the way, or to send MIDI from your computer to different positions onstage, consider using an iConnectivity MIDI4+ or mio4. With an Ethernet cable, you can network multiple devices together easily. If you’re using a PlayAudio12, you can also network that together with a MIDI 4+ and mio4 to create a redundant MIDI setup. You can send your USB and 5-pin MIDI across stage using those devices and an Ethernet cable.
Whatever MIDI controller you choose for your setup, find one that allows you to stay in the moment and stay focused on what matters — leading worship. That’s the goal: to find the equipment and gear that serves you best and makes your job easier. We’re here to help you accomplish both of those goals. Give your Sweetwater Sales Engineer a call at (800) 222-4700.