
Step on almost any church platform today, and you’ll notice something missing: floor wedges and monitors. They’ve slowly disappeared and been replaced by personal monitor systems, wireless packs, and in-ear monitors (IEM). While the benefits of transitioning to in-ear monitors are numerous, the path of transition can be challenging. A few easy-to-follow steps can simplify the transition for you and your team.
- Why the Transition to In-ears Can Be Challenging
- Prepare for Transition
- Communicate the Transition
- Create a Smooth Transition
- In-ear Mix Essentials
Why the Transition to In-ears Can Be Challenging
Typically, transitioning from floor wedges to in-ears means you’re changing from having a trained audio engineer create your mix to you having control over your own mix. However, without proper mix training, your results may be less than optimal. This can lead to disgruntled musicians who dread the mention of any new “improvements” you’re attempting to implement.
You can make the transition easier for your team by using these simple steps.
Prepare for Transition
Start by Listening
Have your team onboard before entering the transition. Start by asking these questions in conversation during downtime.
- How can we better manage platform volume levels?
- How important is your monitor mix to you?
- What makes a great monitor mix for you?
- How can we improve our pitch and timing?
- How can we communicate better during a set?
Listen to their observations. Ask follow-up questions to unearth deeper concerns they don’t know how to voice. Rather than presenting a plan, share that you’ll work on a solution. Get their input and plant the seed that things can improve. This gives you the opportunity to clarify your needs and weigh your options.
Choose Your Gear
IEM hardware options and features have expanded dramatically. There are portable rehearsal-only systems, sound console-specific systems, economical systems, expandable systems, wired systems, wireless systems, and systems for the hearing challenged. There’s a system for every goal.
Another consideration is selecting the right set of in-ears for each user. From universal tip styles to custom-molded units and single-driver to multi-driver options, there’s an IEM for everyone’s specific preferences. Some IEM brands offer driver combinations tuned for specific roles, such as bass, drums, keyboards, vocals, and audio engineering. Having the right fit and correct tuning greatly enhances the IEM experience.
With your specific goals and challenges clarified, it’s time to choose the right gear. This is the easiest step. Simply call your Sweetwater Sales Engineer at (800) 222-4700. We’ll clear out the clutter with practical, experienced advice to help you choose wisely.
Communicate the Transition
Once decisions have been made, it’s time to cast your vision with your team. Paint a mental picture of how things will be better and your plan for helping team members conquer the learning curve. Address their concerns or apprehensions. With clear goals at the fore and your team onboard, you’re ready to move forward.
What’s in It for Me?
As you explain how IEMs will make life better for everyone, including the audio engineer, help your volunteers understand that the individual benefits are worth embracing the change. Here are three key advantages:
1. Get Your Own Mix
Gone are the frustrating, “More of me, please,” days of trying to iron out a perfect monitor mix for a full band sharing a mono channel on a couple of floor wedges. Switching to in-ears allows you to create the mix you need without affecting what the other musicians hear. You can play or sing your best.
2. Protect Your Hearing
With amplifiers blaring, drums slamming, and floor monitors ringing directly into your ears, a church platform can be a terribly noisy place. A good pair of in-ears allows you to ditch the floor wedges and drastically reduce the harsh sonic blast that can destroy your hearing in the long term.
Pro Tip: Two Ears Only – One serious word of caution. Using in-ears in both ears isolates you from the room sound so you can listen at safer volumes. However, an in-ear monitor in only one ear causes ear fatigue and likely damage. The geeky reason is that your ear’s natural protection is based on the quietest ear. When sensing loud volumes, your ears engorge with blood to insulate your super-sensitive tissues and organs from harsh vibration damage. With only one IEM inserted, your quieter ear tells your brain that everything is alright and that the loud side is about half its actual level (about -6dB). You compensate by raising the IEM volume to an unsafe level. Removing one IEM exposes your ear to the harshest decibels being pumped straight into your unprotected ear canal — it’s harder on your hearing than floor wedges. Instead, use both IEMs and incorporate a pair of room mics into the IEM feed. You’ll get a better sense of being in the room and continue to hear all the nuanced details in your music.

3. Get Great Guitar Tone
Your guitarists can use IEMs without switching from their amps to a Helix, Quad Cortex, ToneX, or other multi-effects workstation or amp pedal. The age-old battle of amp volume versus stage volume can be resolved with an attenuator, such as the Tone King Ironman II, or a load box, such as the Universal Audio OX or the Two Notes Torpedo Captor X.
Alternatively, move your amp offstage into a closet or isolate it and crank out your best tube-amp tone. You get great sound, the stage volume is gone, and everyone is happier, including the audio engineer.
Learn more in this article: A Guitarist’s Guide to Using Guitar Amps on a Silent Stage
Create a Smooth Transition
Training your team well overcomes the biggest struggle of using in-ears: lack of knowledge. Simply replacing all the floor monitors with IEMs one day without deliberate, preliminary training and expecting everyone to suddenly get it will set up your team — and yourself — for failure. No one wants that.
One Step at a Time
Perhaps your team is the rare unicorn that quickly and easily handles huge paradigm shifts such as transitioning to IEMs. Most teams need more leadership involved. Determine a reasonable number of learning curves your volunteers can successfully handle at a time. Every learning curve presents unique challenges and opportunities to equip or lose your people.
Rather than overwhelm your volunteers, consider smaller, more manageable steps with practical goals that your team will embrace.
For example, at a large church where I was the worship pastor, we took incremental steps before jumping directly to the full Aviom IEM system that we eventually adopted:
- Everyone began practicing with a click at home, and our drummers used one during services. (Easy transition)
- We adopted a silent stage. Each musician had IEMs and a personal Rolls mixer that allowed them to control two parameters in their ears: the level of their individual sound and the level of an overall team mix (including room mics) managed by the FOH engineer. (This went more smoothly than anticipated. The musicians learned basic IEM use and care. They picked from two band mixes, one for vocals and one for musicians. They had used a similar mix on floor wedges, so it felt familiar, except now they heard themselves more clearly and stopped asking to be turned up.)
- We added the click and guide cues to the team mix and rehearsal tracks.
- We added multitracks. (We only added to their ears a pad that wasn’t being played onstage, so this was easy for the team. This step was more for me and the sound engineers to get used to editing and mixing multitracks.)
- We moved to the full stereo IEM system in which each musician could manage their own personal mix. They learned to create and pan a mix, and we added a brief “set your mix” moment to our soundcheck. This step was easier and faster than expected.
By breaking the overall transition into manageable steps, we successfully bridged the gap over a couple of months. Perhaps this was a little longer than ripping off a bandage or diving into the deep end, but everyone felt equipped to succeed, and we celebrated the positive feedback from the congregation at each point. It was a clear win.
One surprise bonus was that, after switching to the Aviom system, we repurposed the Rolls units to support our portable and youth systems. Double win!
Devote Time to Teach How to Use the Gear
Spend dedicated time teaching your team to use the new gear. Demonstrate dialing in a great personal mix, saving and recalling settings, and going through your new soundcheck procedure.
Before the training session, share manufacturer training videos explaining your specific in-ear gear. Encourage the team to review them beforehand and reference them after the initial training. Consider creating your own videos walking through the gear in the context of how you do things if you have the time and resources.
Pro Tip: Two Uses for Virtual Soundchecks
- Teach the team to mix. Play a loop of captured tracks of your band to give everyone a chance to practice creating in-ear mixes. Use earphone cable splitters to pair more experienced with less experienced team members. They can ask questions and become more comfortable with the new technology.
- During regular soundchecks, once the initial gain levels are set, record the band playing a chorus of a song they know well (without changing their IEM settings). Play it back while everyone dials in their IEM mixes. Within only a few minutes, everyone will have a functional in-ear mix and be ready to focus on making joyful music together.
Debrief Deliberately
As you follow your plan, allow time after each rehearsal and performance to discover your wins and challenges. Let your team share their tricks and techniques. This reminds each person that they’re not going through the transition alone. It encourages them to help one another. It’s a great way to equip your members to serve.
In-ear Mix Essentials
While creating a great in-ear mix can seem intimidating, a great in-ear mix really comes down to applying a few basic principles. I call these in-ear mix essentials.
Build a Firm Foundation
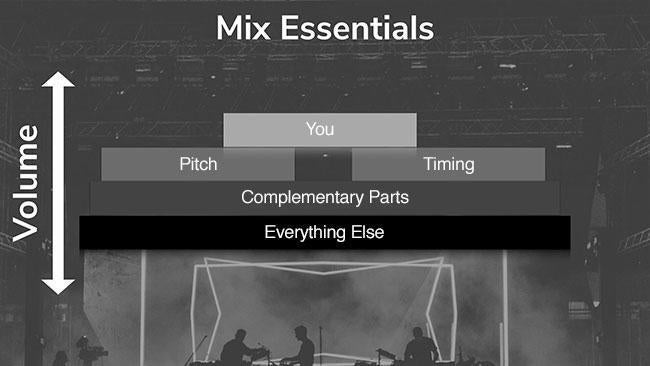
Think of creating an IEM mix as building the layers of a pyramid.
Once your sound engineer has everyone’s gain levels dialed in, you need to start your mix from a blank canvas. Clear everything out of your in-ear mix. (Reserve one saved setting slot on each IEM mixer for a template with everything panned to center, all effects removed, and all levels at zero. Open that, save to a new slot, and begin.) Set the master level to zero (off), and you’re ready to mix.
- Raise your level to 75%. (You won’t hear anything yet.) Then raise the master volume to just a bit quieter than you want — you can bump it up a bit after adding everyone else. This gives you a reference point to add everyone else. If your personal in-ear volume level is too loud, then you’ll sing or play too softly because you’re afraid that you’re too loud. If the volume level of your in-ears is too soft, then you’ll sing or play too loudly to compensate for a perceived lack of volume.
- Next, make sure you have solid pitch and timing references from one or two primary instruments. I suggest they should be at least equal in volume to each other but lower than your volume in your in-ears. For pitch, choose an instrument that will always be in tune (e.g., a keyboard rather than an acoustic guitar). For timing, the click is great if your team uses one. If not, then use a channel with the kick, hi-hat, or snare.
- Add in complementary parts. If you’re a singer, create a good blend of other singers. If you’re a drummer, make sure you’ve got plenty of bass. If you are one of several guitarists onstage, make sure you’ve got plenty of the other guitarists so you can blend parts well. Ensure other parts are less prominent in your mix than yourself and your primary pitch and timing reference instruments.
- Add in everything else that you want or need to hear. It’s a monitor mix, not a studio production. Just because something is on the platform doesn’t mean it needs to be in your mix. I find that adding “extra” parts quickly leads to a muddy mix. Make sure you can hear plenty of the primary vocalist, music director, and cue track so you’re always on the same page.
- Finally, if your IEM has the capability, then pan the elements in your mix and add effects. Read more about that below.
Subtractive Mixing
After getting a grasp on mix essentials, you should teach your team the basics of subtractive mixing. Essentially, there are two ways to get more of something:
- Make that part louder
- Decrease the volume of everything else
If you’ve maxed out your volume, then there is no “more.” Instead, carve away everything that’s too loud:
- Turn each channel down about 30%. Increase the master gain level. (If you’re using an in-ear pack, then increase the volume of your pack after you turn everything else down.)
- Raise your channel’s level until it’s right. If it is still too soft, then repeat step 1.
- Next, slowly start adding other channels back in according to the mix essentials we discussed earlier. Again, if you run out of “more,” then go back to step 1 and repeat the process.
Demonstrate Good Mix Examples
This may be one of the most important steps to help your team transition to IEMs successfully. Teach your team how a good mix sounds and how to create it using the virtual soundcheck trick. Walk through mix essentials and subtractive mixing.
Help people learn by having the audio engineer go from musician to musician with a cable splitter or use an IEM system that allows listening in on each IEM mix. Make helpful adjustments as requested. If you have more than one audio technician, then schedule one to focus on helping people with their IEMs throughout the learning period. (This is a great opportunity to expand your audio team!)
Along with training your team well, you’ve got to make sure you’re set up properly with the correct gear and configurations. Here are a few tips that will help take your mix to the next level.
More Than Volume — Pan, Please!
If possible, use a stereo in-ear setup. The difference between a mono and stereo in-ear mix is like a movie that transitions from black and white to color. Stereo gives far greater opportunity for clarity.
Think of it this way: In a mono mix, you can only turn something up or down or use reverb/delay to push channels back into the overall body of the mix. Panning channels to the right or left in stereo spreads everything out so each channel becomes distinct in your mix.

As a rule of thumb, keep your channel and any low-end content in the center of the mix. (Exception: If your channel is stereo, such as a stereo keyboard or stereo pedalboard, then hard pan to the right and left — it will sound like you’re in the center of the mix but feel fuller.)
Next, instead of hard panning all the stereo instruments (stereo keys, stereo guitar, multitrack pads, etc.), narrow their left and right signals. This keeps a stereo sound but helps them have a more distinct space. Then pan mono instruments so they occupy their own spaces in the stereo field.
Separate instruments with similar frequency signatures. For example, move the acoustic guitar and the hi-hat opposite from one another. Do the same with background vocals, multiple electric guitars, the snare/click, ambient guitars and keyboard pads, the right/left room mics, and other dual-instrument combinations. The contrast helps each remain clear and distinct. If someone is playing a sound similar to yours, then place them further to the left or right. (Keep yourself in the center.)
When possible, pan instruments according to where they are onstage in relation to yourself. For example, the guitarist to your left goes toward your left ear, and the vocalist to your far right gets hard panned to the right.
Use these suggestions to start your mix. Then adjust the panning until it works for you and feels right.
Add an Audience Response Mic
Because quality in-ears keep out ambient and platform sound, switching to in-ears will make it harder to hear the congregation. The mix can feel sterile as a result. Add a room mic — or, better yet, a matched pair of room mics — to help bring everything alive.
For details about the room mics that Sweetwater customers have found helpful, see the “Room Microphones” section in the inSync article “Miking Tips for Easter: A Practical Guide to the Unusual.”
Use Effects As Needed
Singing with in-ears might be the trickiest setup to get used to. Never done it? Stick your fingers in your ears now and talk. It’s not easy!
Singing with in-ears can sound bare and sterile. All the flaws stand out. Adding reverb to vocals smooths things out. Though, be careful not to drown your mix in reverb, or you’ll have a muddy mix.
Finally, to help with vocal dynamics, consider using a compressor. Work with your sound engineer to get the settings just right so that what you hear in your ears matches the dynamics in the front-of-house mix.
Some personal in-ear monitor mixers allow each user to add reverb, EQ, compression, limiting, other effects, or even hearing-impairment profiles to customize their mixes.
Help from Experts Who Care
Having a great in-ear mix is one of the best ways to upgrade your front-of-house sound. You’ll instantly improve blending, pitch, timing, tone, cohesion, and communication. Plus, you’ll end the “more of me in the monitors, please” sound wars and have significantly improved control of the overall room sound.
Invest time to explain the benefits, properly train the team, and set them up for success. You’ll have a great transition. Everyone will have a better opportunity to impact the worship experience.
For expert advice on selecting in-ears and personal monitoring systems, call your personal Sweetwater Sales Engineer at (800) 222-4700. They’ll be glad to help you move your team forward!